

Deploying from a sandbox to production in Salesforce can be tricky. Not only does the Salesforce platform come with its own nuances, but custom objects and configurations add an extra layer of complexity. Whether you’re deploying natively with change sets or with a DevOps platform like Gearset, this post will show you what to look out for and walk you through how to deploy from your sandbox to your production org with ease.
What to watch out for when deploying from a sandbox to production
Teams can come up against a number of different issues when deploying metadata from a Salesforce sandbox to production. Sandboxes are a unique type of org – they’re designed to give ultimate flexibility in testing and are completely isolated from any of your other orgs. There are a number of best practices that apply to all deployments but there are a few additional things to keep in mind to help deploy successfully from a sandbox to production.
Type of sandbox
The type of sandbox you have can affect your deployment process. There are a few different types to choose from and all have their own characteristics and limitations:
- A Developer sandbox is intended for development and testing in an isolated environment. These sandboxes only include a copy of your production org’s metadata and have a limited amount of file and data storage of 200MB.
- A Developer Pro sandbox is similar to the Developer sandbox, but it can handle much larger data sets — with a storage capacity of 1GB.
- A Partial Copy sandbox holds a copy of the metadata from your production org, as well as a limited subset of sample test data.
- A Full Copy sandbox is an environment which provides a complete copy of your production org, including all data and metadata.
Understanding the differences and limitations of each sandbox type can help you make more informed decisions and avoid potential pitfalls during the deployment process. Regardless of the sandbox type, proper planning, version control, and thorough testing are all critical to achieve successful deployments.
San Francisco, CA
Dreamforce
Sandbox management
Because your orgs are constantly changing, it can be tricky to keep your sandbox’s metadata closely synched to production. But if your environments don’t match up, you could introduce unexpected bugs and errors when deploying to production. To avoid this, it’s vital to keep your chosen sandbox as closely synced to your production org as possible by performing regular sandbox refreshes.
A sandbox refresh copies your production org, aligning the metadata (and data, depending on your sandbox) between your environments. This will give you a better idea of how changes will affect your live environment when they’re released and save you headaches when it comes to deployment time. Each sandbox type has a limit on how frequently you can refresh them, ranging from once a day to once every 29 days – but refreshing as often as possible is the best way to keep your environments as closely matched as possible.
Sandbox seeding is the process of populating your sandbox with test data, so you can test your changes before release. But it’s best practice to make sure no personal data from your production org makes it into your sandbox. Masking your data keeps sensitive production data safe while giving your team realistic data to carry out testing. This means they can release to production with the confidence that their features or changes will work.
Dependencies
The reason metadata can be tricky to deploy is because of the web of relationships and connections between components in your org. Forgetting to deploy these dependencies, or only selecting half, can cause huge headaches with failed deployments or complex error messages. These dependencies can be on anything from custom objects, Apex classes, triggers, and Visualforce pages and or even something as simple as a small permission setting. Deploying these components without considering their dependencies can cause deployment failures or your new changes to behave unexpectedly in production.
Apex code coverage
Salesforce has specific requirements for code coverage before any deployment to production, so if your deployment includes any Apex code you need to be cautious about code coverage and test classes. The minimum requirement is to have 75% of your Apex code covered by unit tests to be able to deploy to production environments. As well as this, all triggers need to have at least one line of test coverage.
API management
While API management is not directly tied to the specific process of deploying from sandbox to production in Salesforce, the API may indirectly influence areas of the deployment process. API versions are a key part of deploying successfully and without careful management the newer versions can cause confusion. You could start to see new differences in comparisons or experience a blockage when a validation or deployment fails. This is more of a risk when sandboxes are using a different platform version to your production org.
Difficult metadata types to deploy from a sandbox to production
Some metadata types are notoriously harder to deploy than others. We won’t list every single metadata type but here are some of the most common headache-inducers:
CPQ configuration
Salesforce CPQ deployments are well known for being difficult, with teams even trying to recreate configuration manually in the target org. Unlike other packages, CPQ configuration is stored as data, not metadata. That usually means you need a different tool and workflow to deploy CPQ than you use for metadata. If this sounds familiar, you can take the pain out of stressful CPQ deployments by using Gearset’s Salesforce CPQ deployment solution. Not only can you see all differences and dependencies clearly, but you can also deploy metadata and CPQ together in one deployment, not two.
Layouts
Deploying Page Layouts to Salesforce orgs can be so painful that many teams skip it all together. The biggest problem is that Layouts are large metadata items with lots of component parts, and most deployment tools only support deploying the Layout to Salesforce as a whole – in an ‘all or nothing’ approach. By using Gearset for your deployments, you can easily deploy specific components of Layouts rather than the whole thing – saying goodbye to manual workarounds and overwriting teammates changes.
Flows
Deploying flows in Salesforce can be awkward for a number of reasons but the one we hear time and time again is an issue with versioning. Each time you make changes and save them, you create a new version of your Flow in that org. To confuse things, the version number depends on the target org. If you iterate on a Flow in a dev org and end up deploying v5 to a target that currently has v2, it will be added as v3. Using Gearset helps you easily navigate these issues by helping you compare changes side-by-side, regardless of flow versions.
There are so many types of metadata and they all come with their own challenges. Gearset helps take the pain out of these tricky metadata types, and hundreds more, including Digital experiences (communities), Profiles and permission sets and custom objects and fields.
How to deploy changes from sandbox to production using change sets
Despite change sets being a slow and painful way to deploy, many teams are still using them every day. Let’s walk through how to do a sandbox to production deployment with change sets, and then look at the same deployment using Gearset.
To deploy to your production environment using change sets, the native Salesforce deployment tool, there are a number of steps to follow:
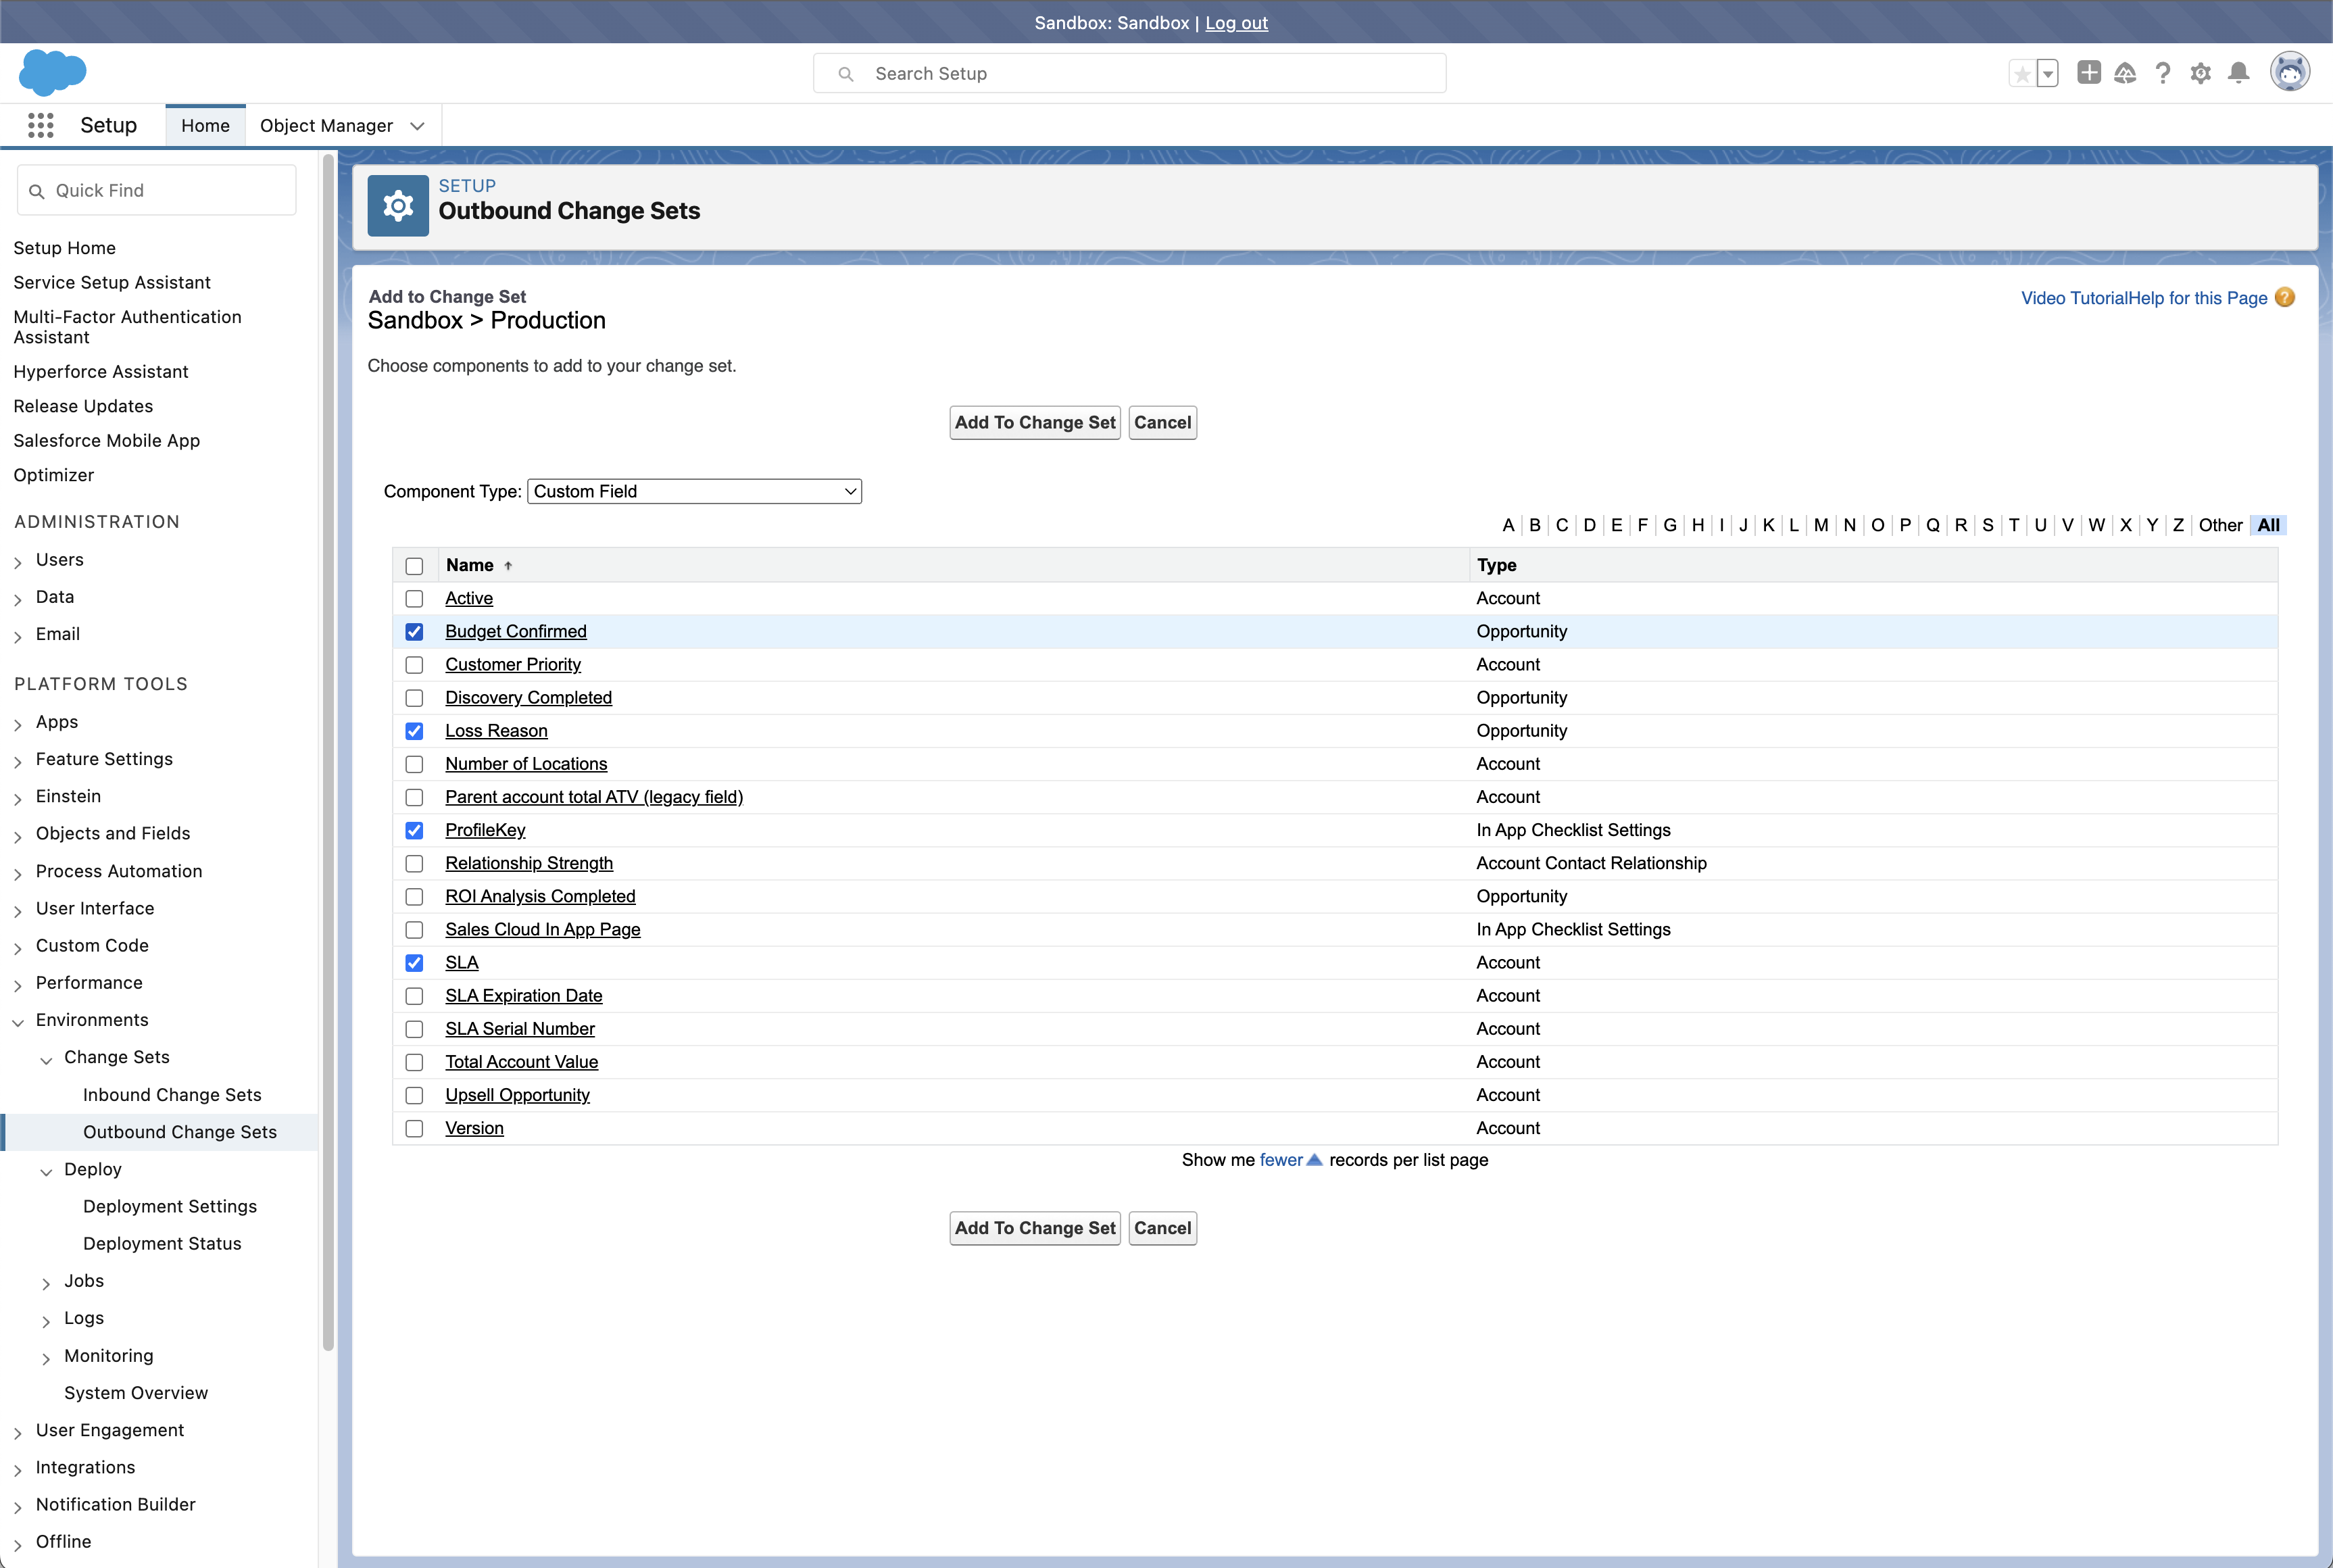
- Log into your sandbox environment.
- Under Environments in the side panel, select Change Sets > Outbound Change Sets > New.
- Give your change set a name and description.
- Under Change Set Components select Add.
- Find and select the items you want to deploy using the check boxes.
- Click Add to Change Set after selecting each metadata type.
- When you’ve included everything you want to deploy, click Upload to select the environment you want to deploy to and then click Upload again.
- You’ll receive an email saying the upload was successful, at which point you’ll need to receive the inbound changes in your target org. Log into your production environment and select Environments > Change Sets > Inbound Change Sets. Your change set will be listed under Change Sets Awaiting Deployment.
- Click Deploy, select a testing option then press Deploy again to start the migration.
- Check your deployment status on the Deployment status page in Deployment settings.
How to deploy changes from sandbox to production using Gearset
NOTE: Gearset’s comparisons have had an upgrade! We’re updating all our blog posts with the new UI images — but in the meantime, you can learn more about what’s changed.
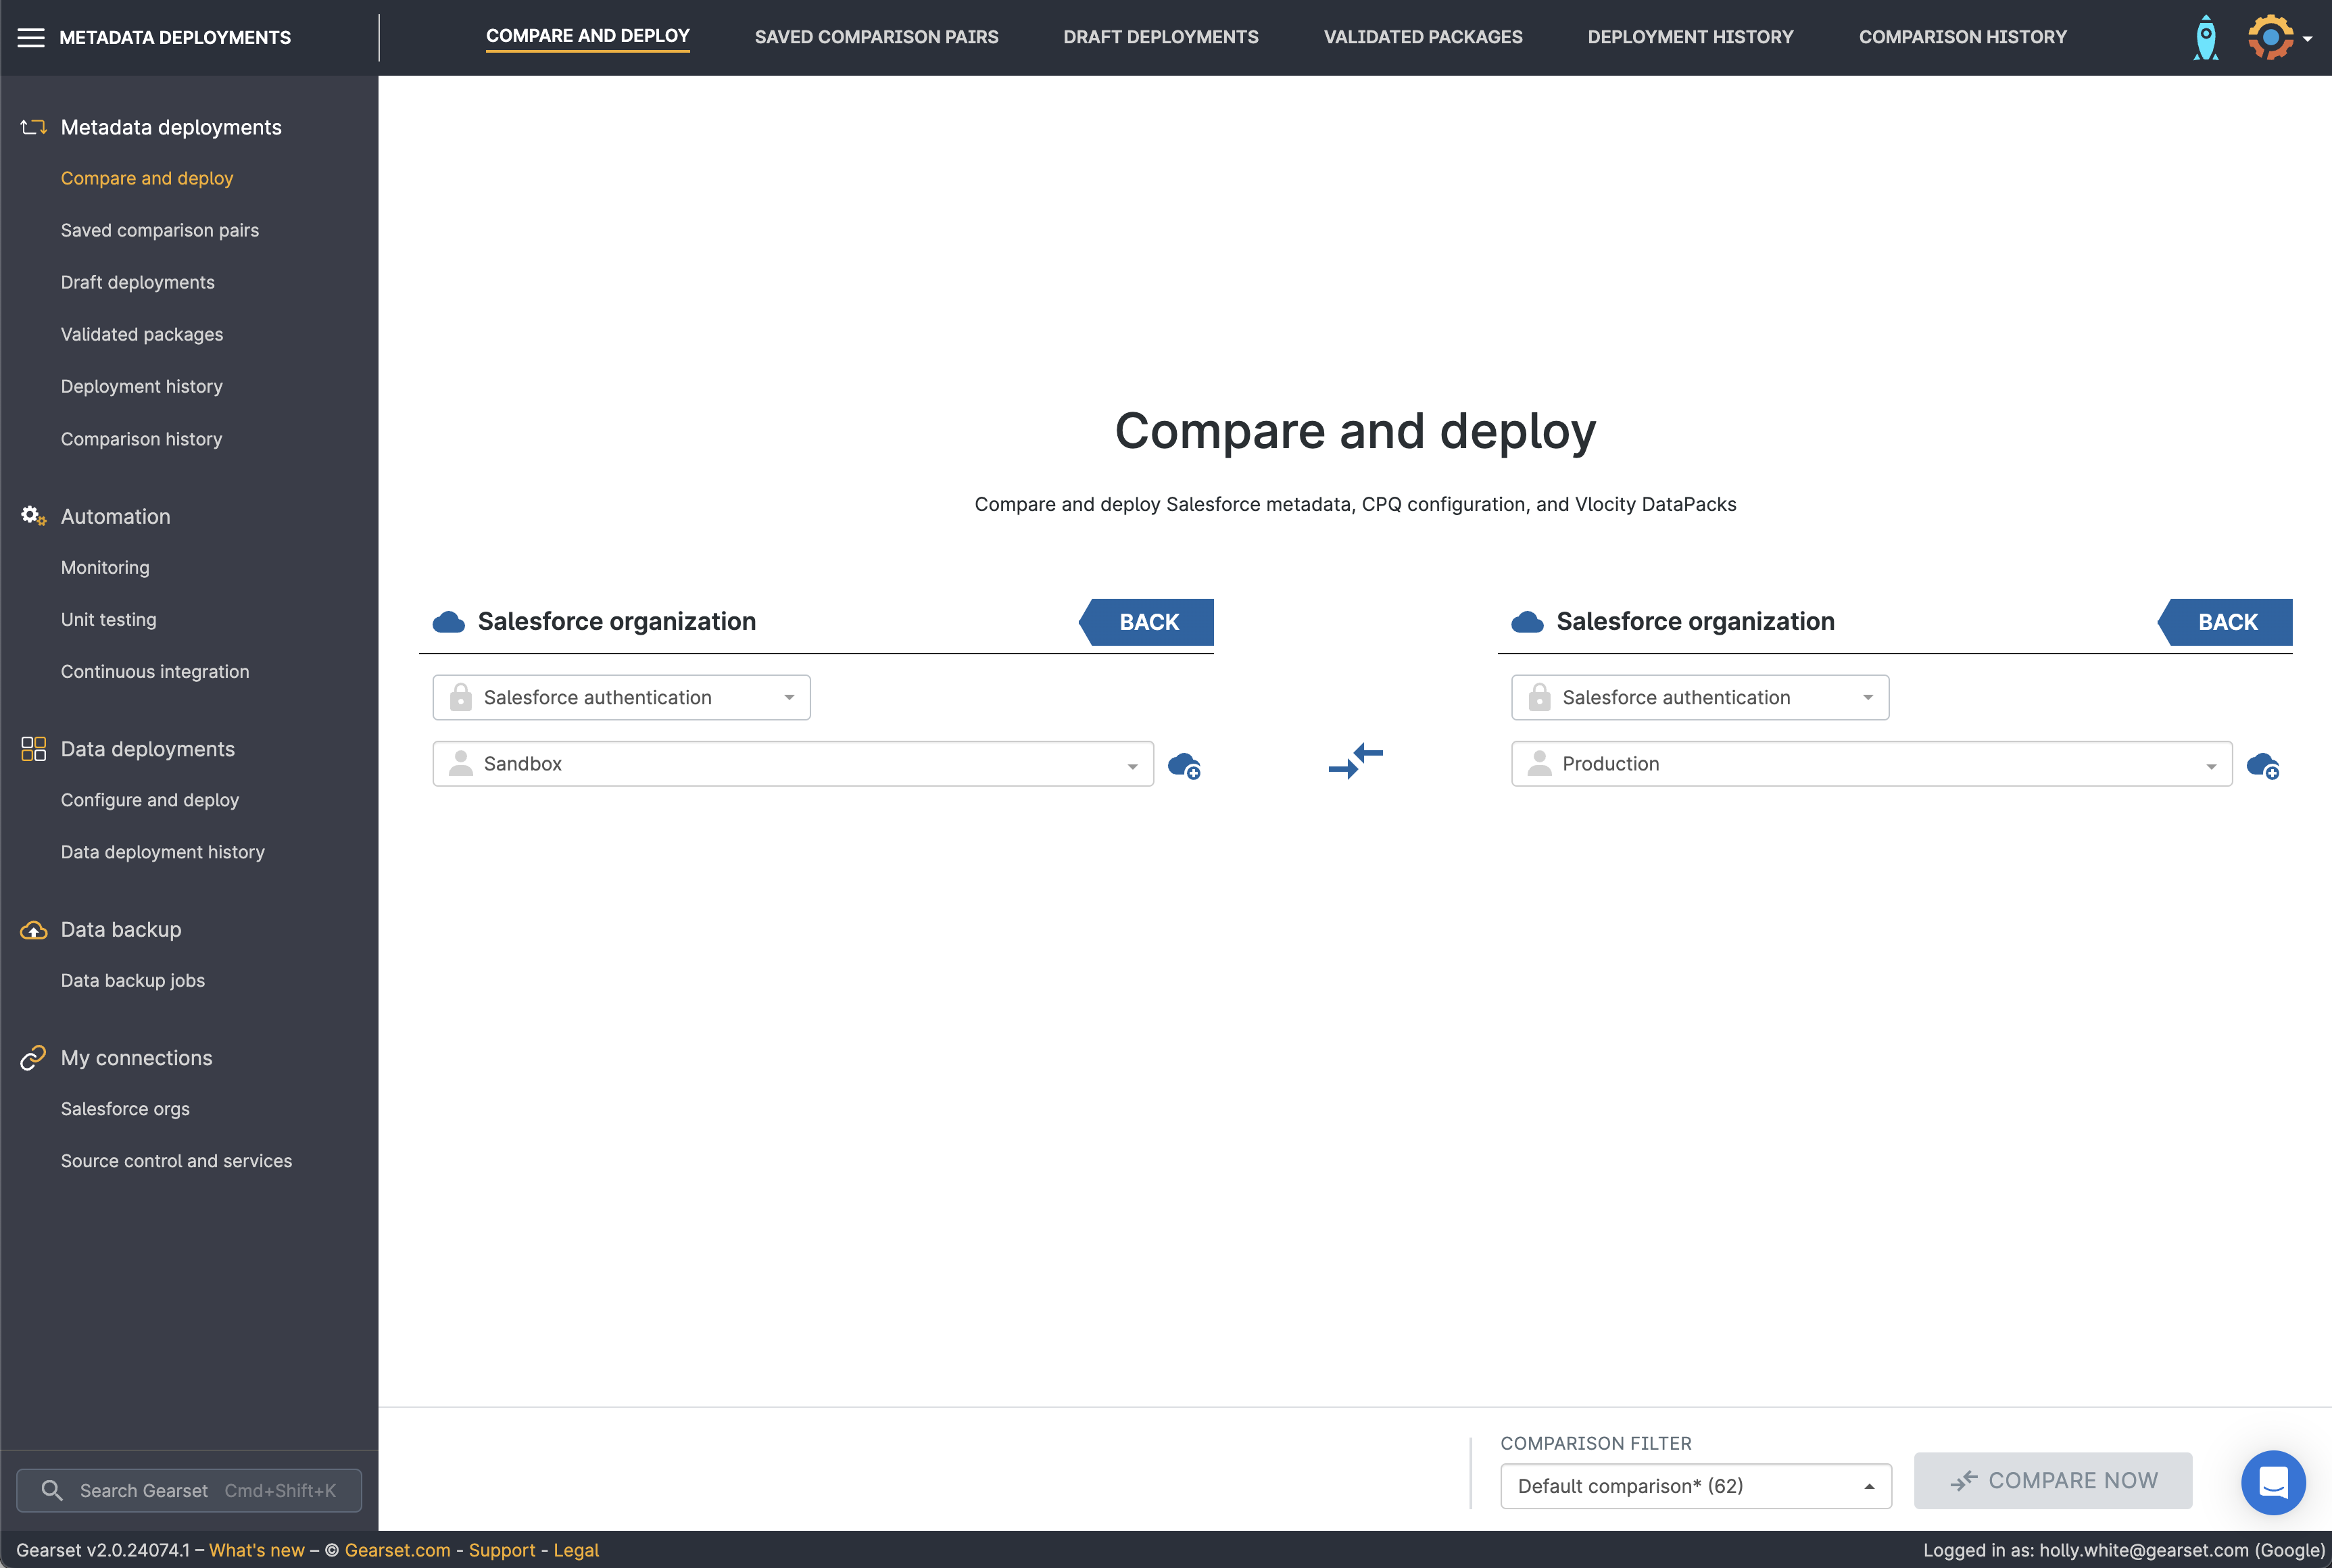
If you’re looking for something more user-friendly where you don’t need to log in and out of your orgs for a single deployment, here’s how Gearset makes it easy to deploy from your sandbox to production environment:
Select your source and target orgs
- From the Compare and deploy page, select your source and target orgs – in this case, your sandbox as your source and your production org as your target.
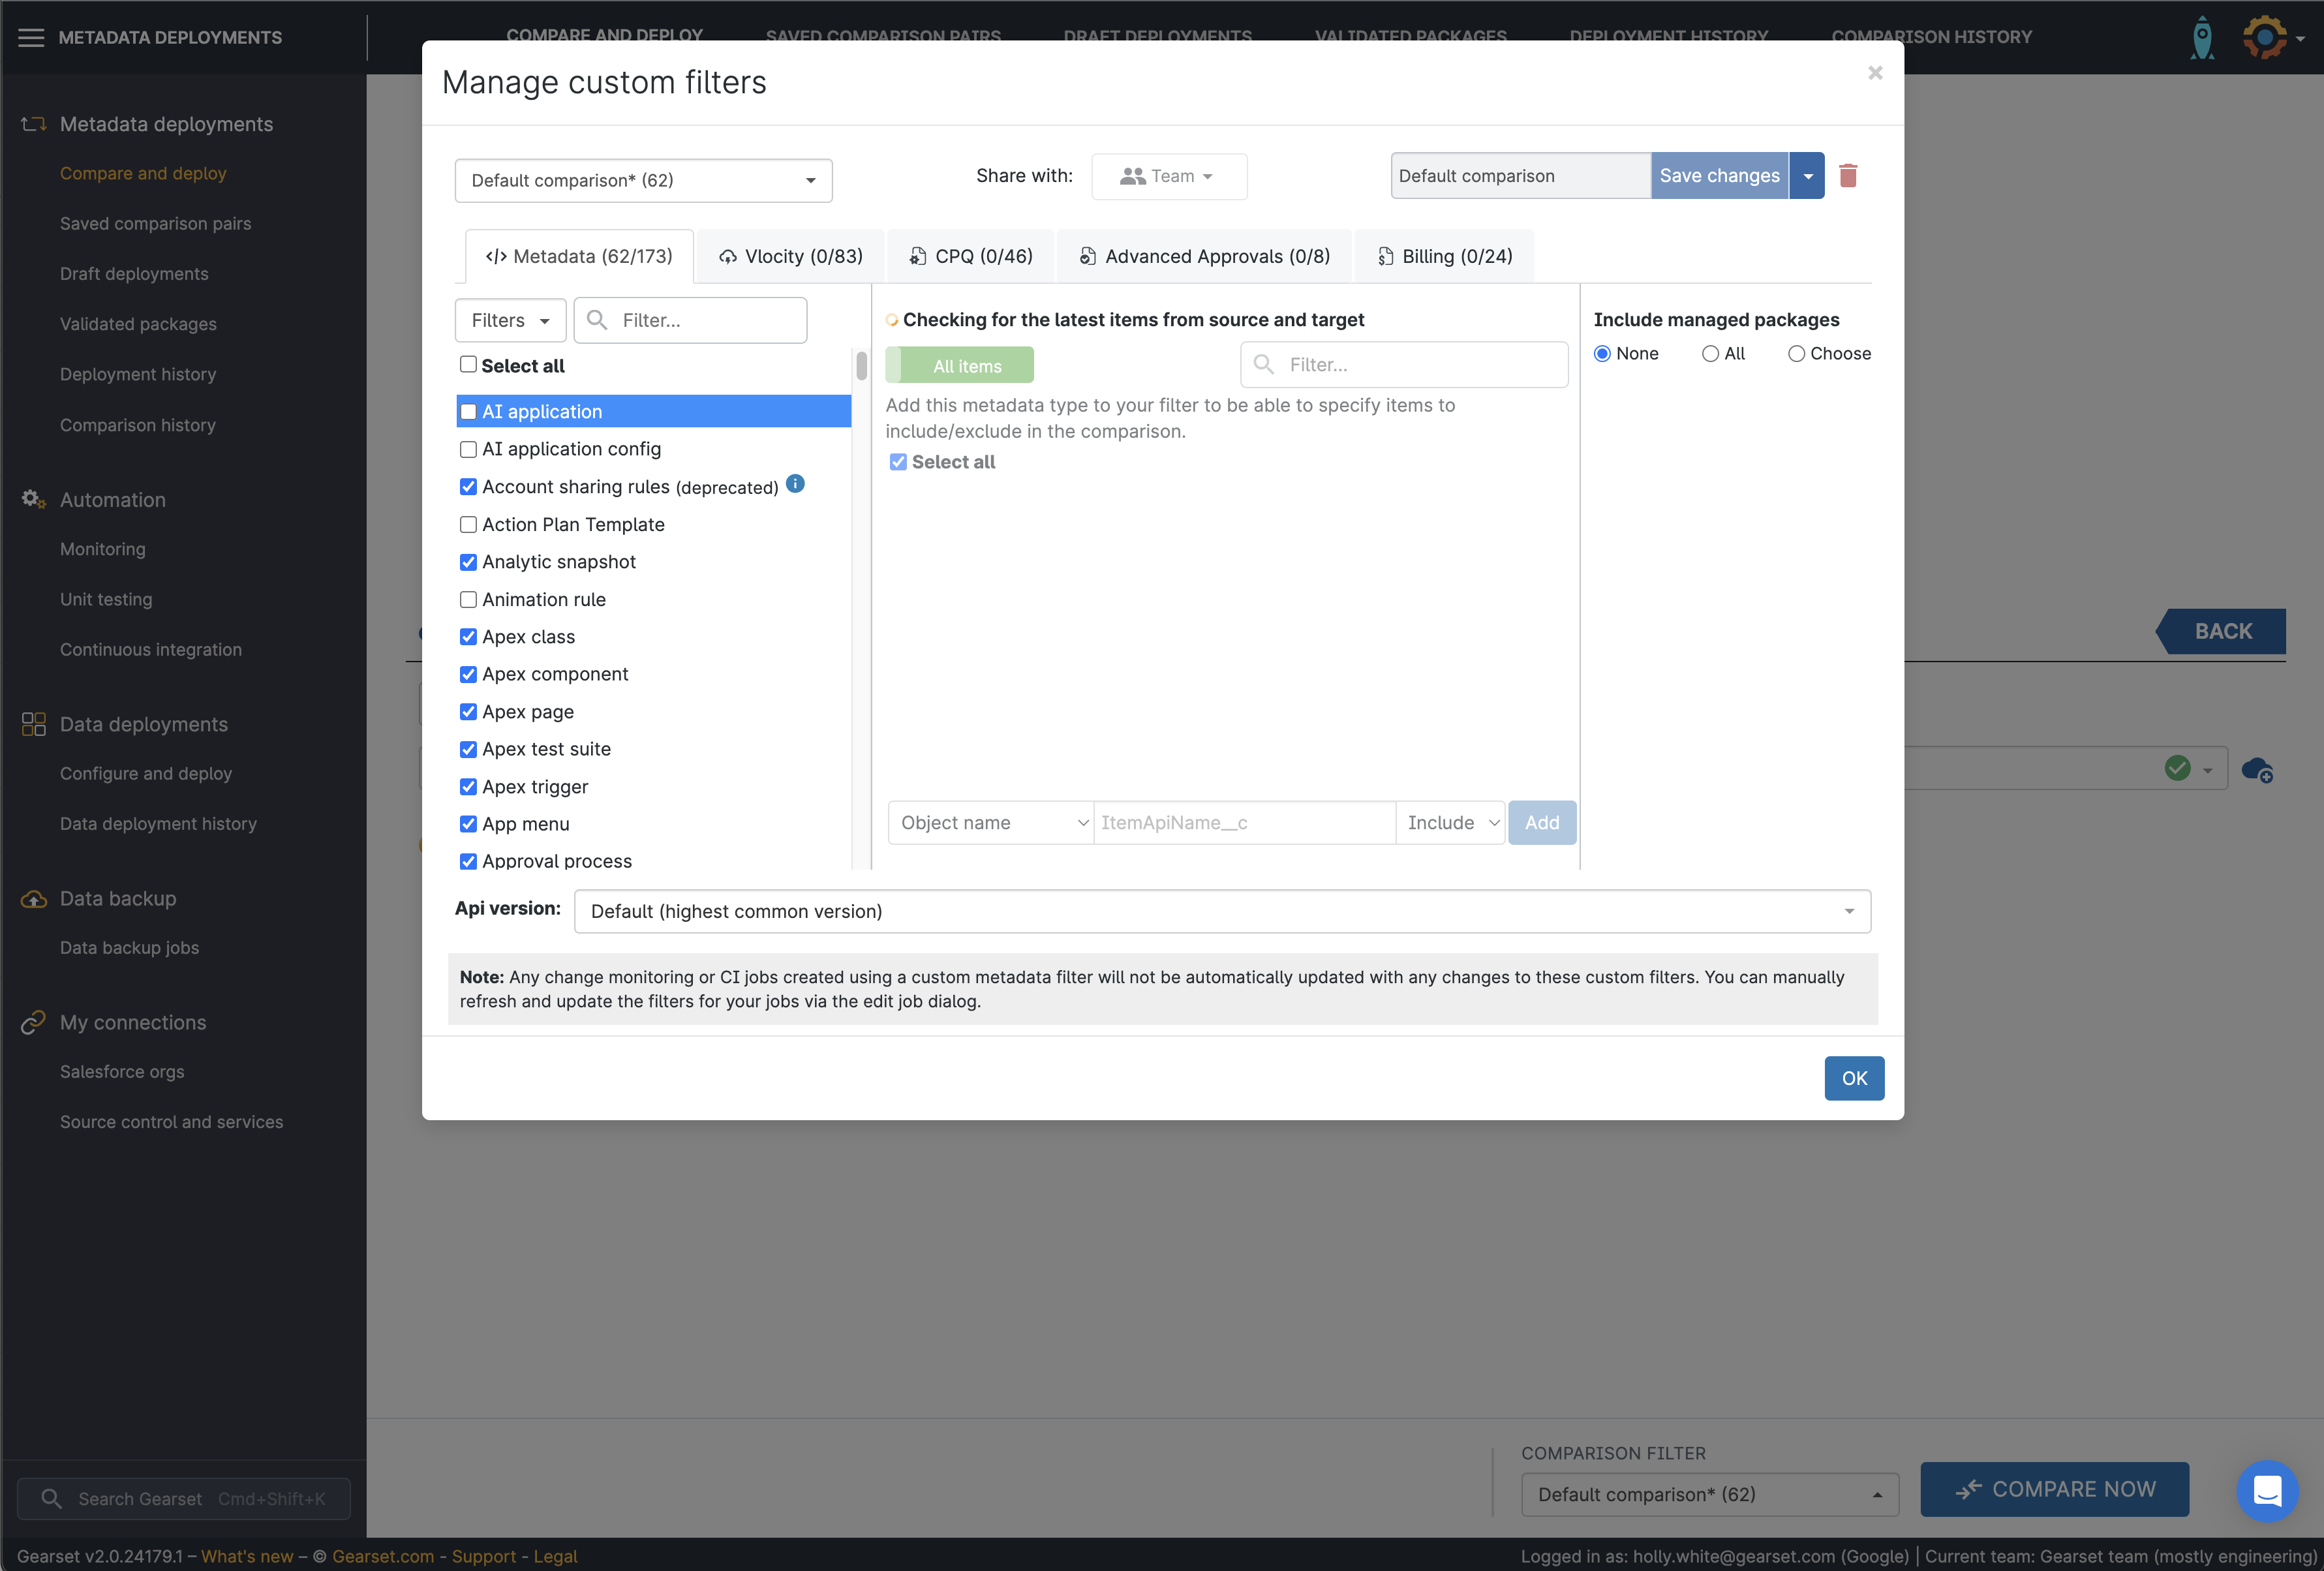
Select a comparison filter
- Select the relevant comparison filter or build your own before pressing Compare now.
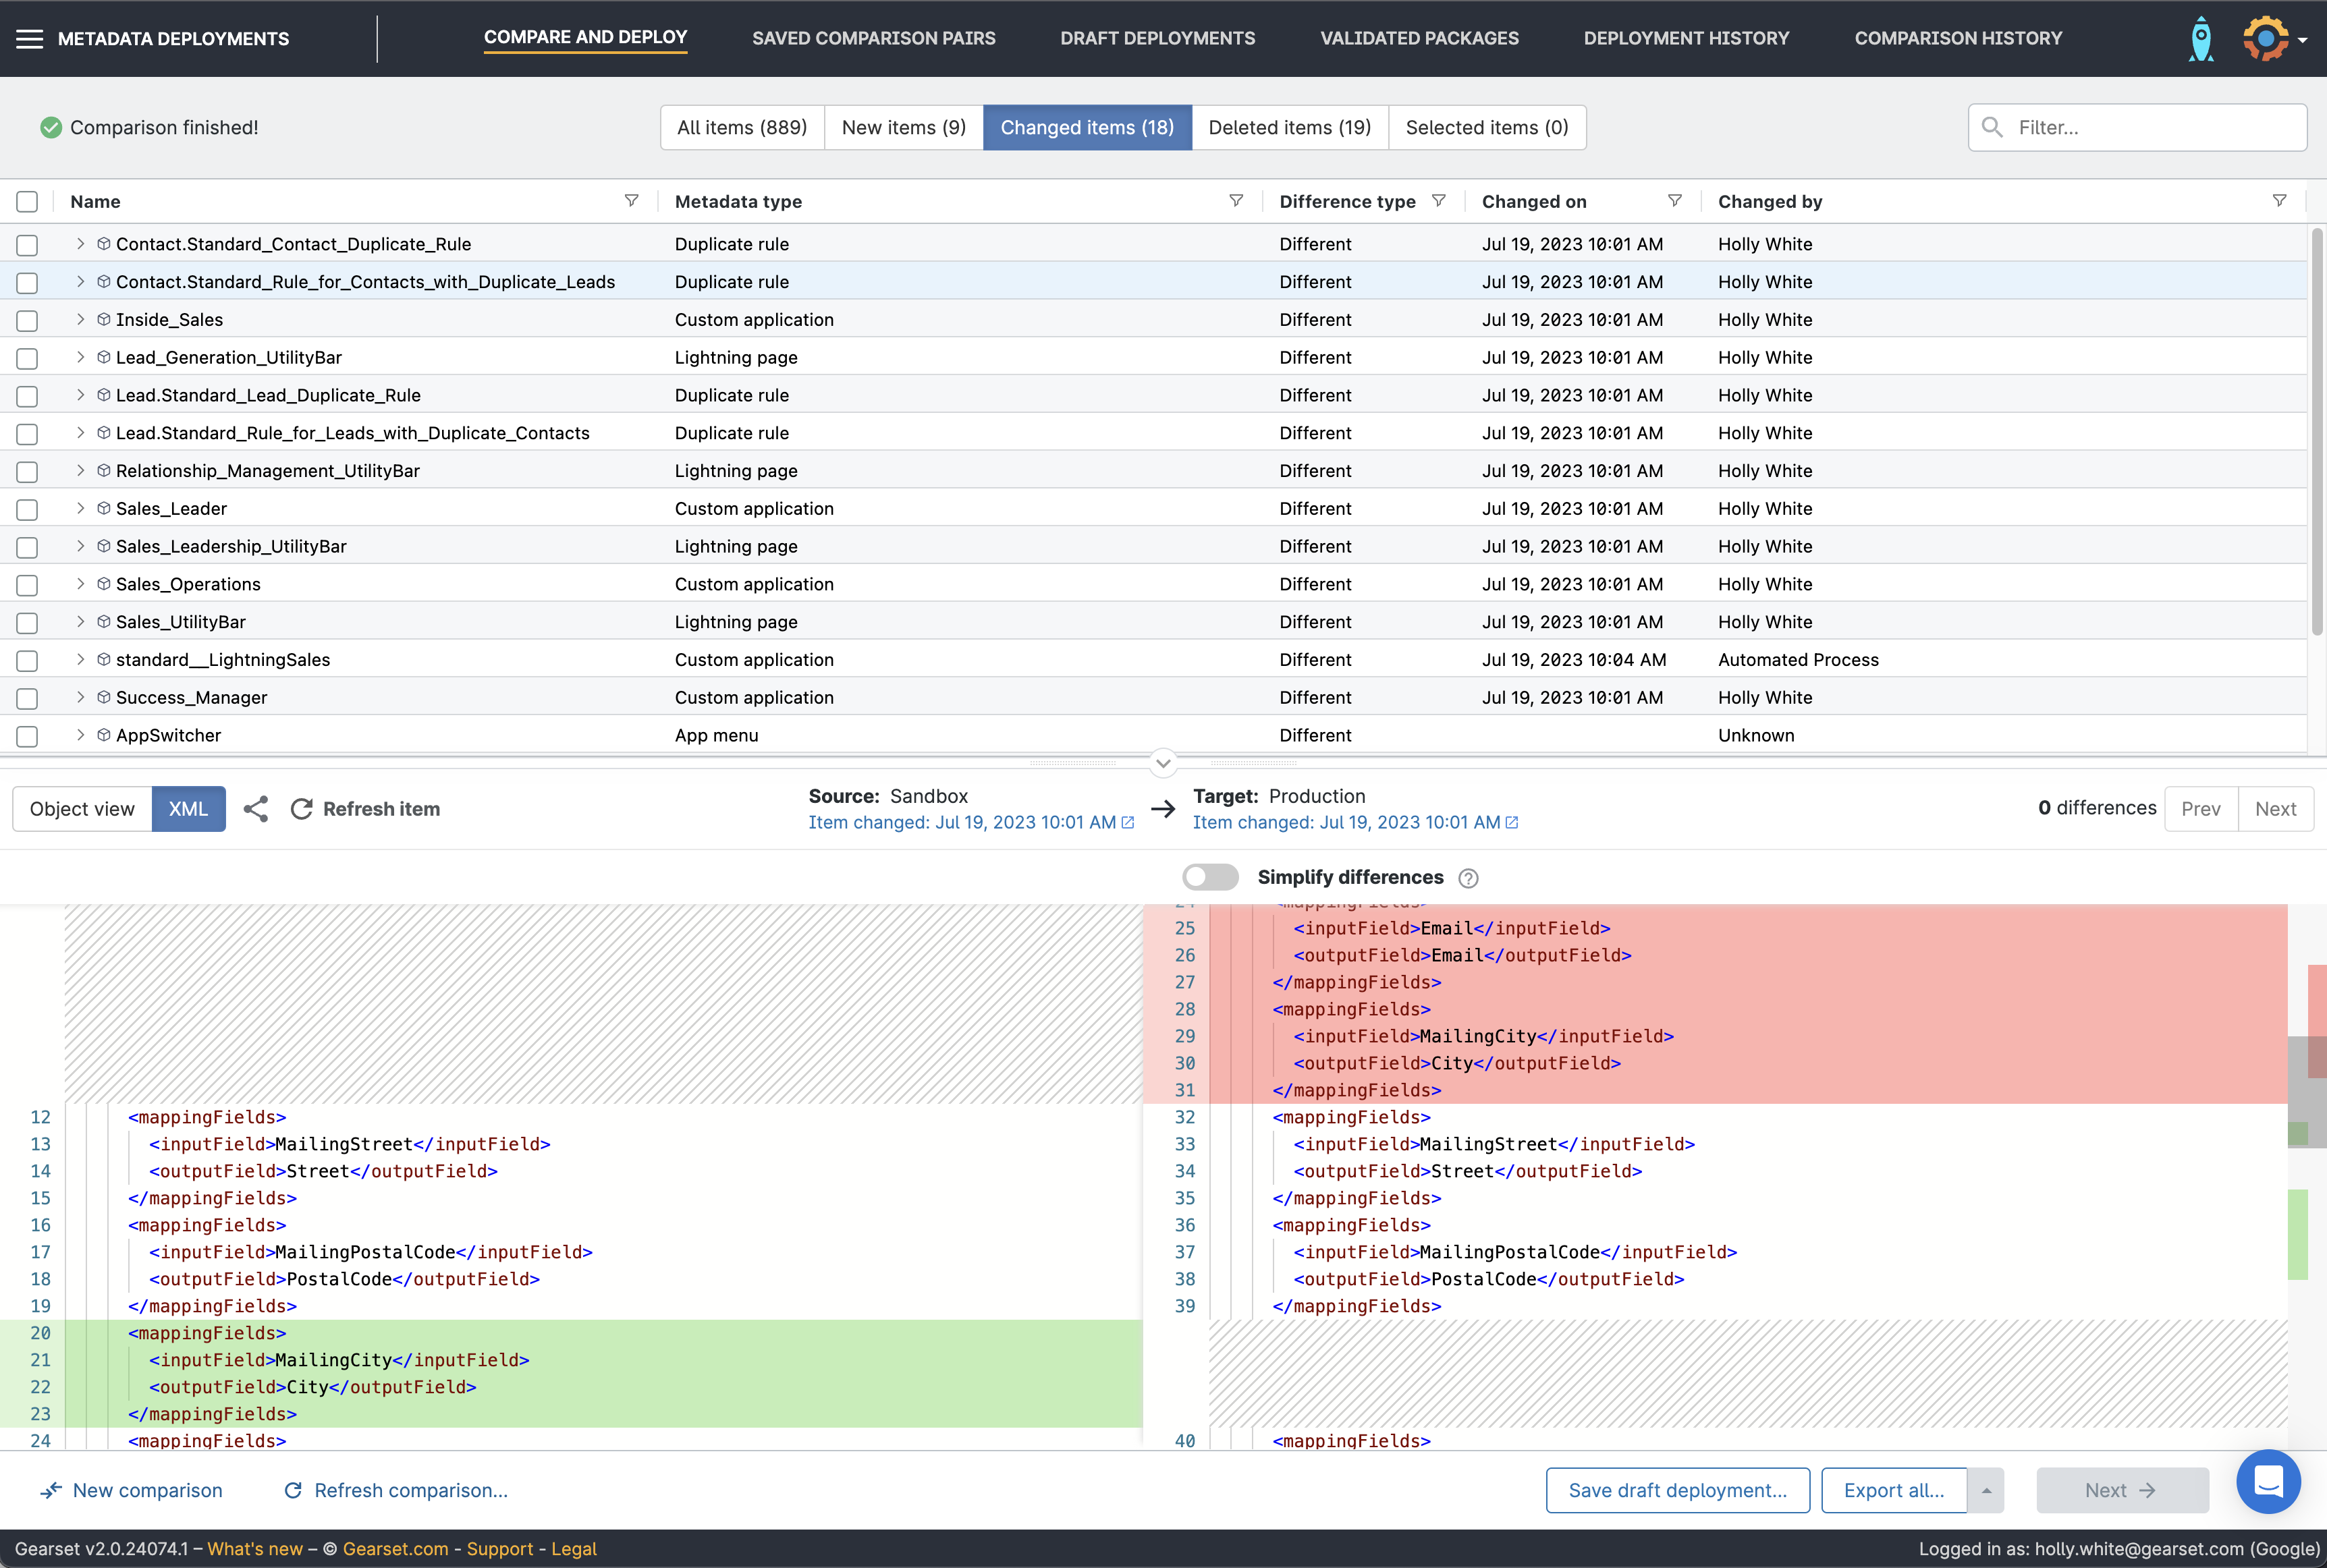
Choose the metadata you’d like to deploy
- On the comparison screen, you’ll see a side-by-side view of all the changes between your orgs. They’re separated into New, Changed or Deleted tabs for easier browsing. Choose the metadata items you want to deploy and click Next to finalise the deployment package.
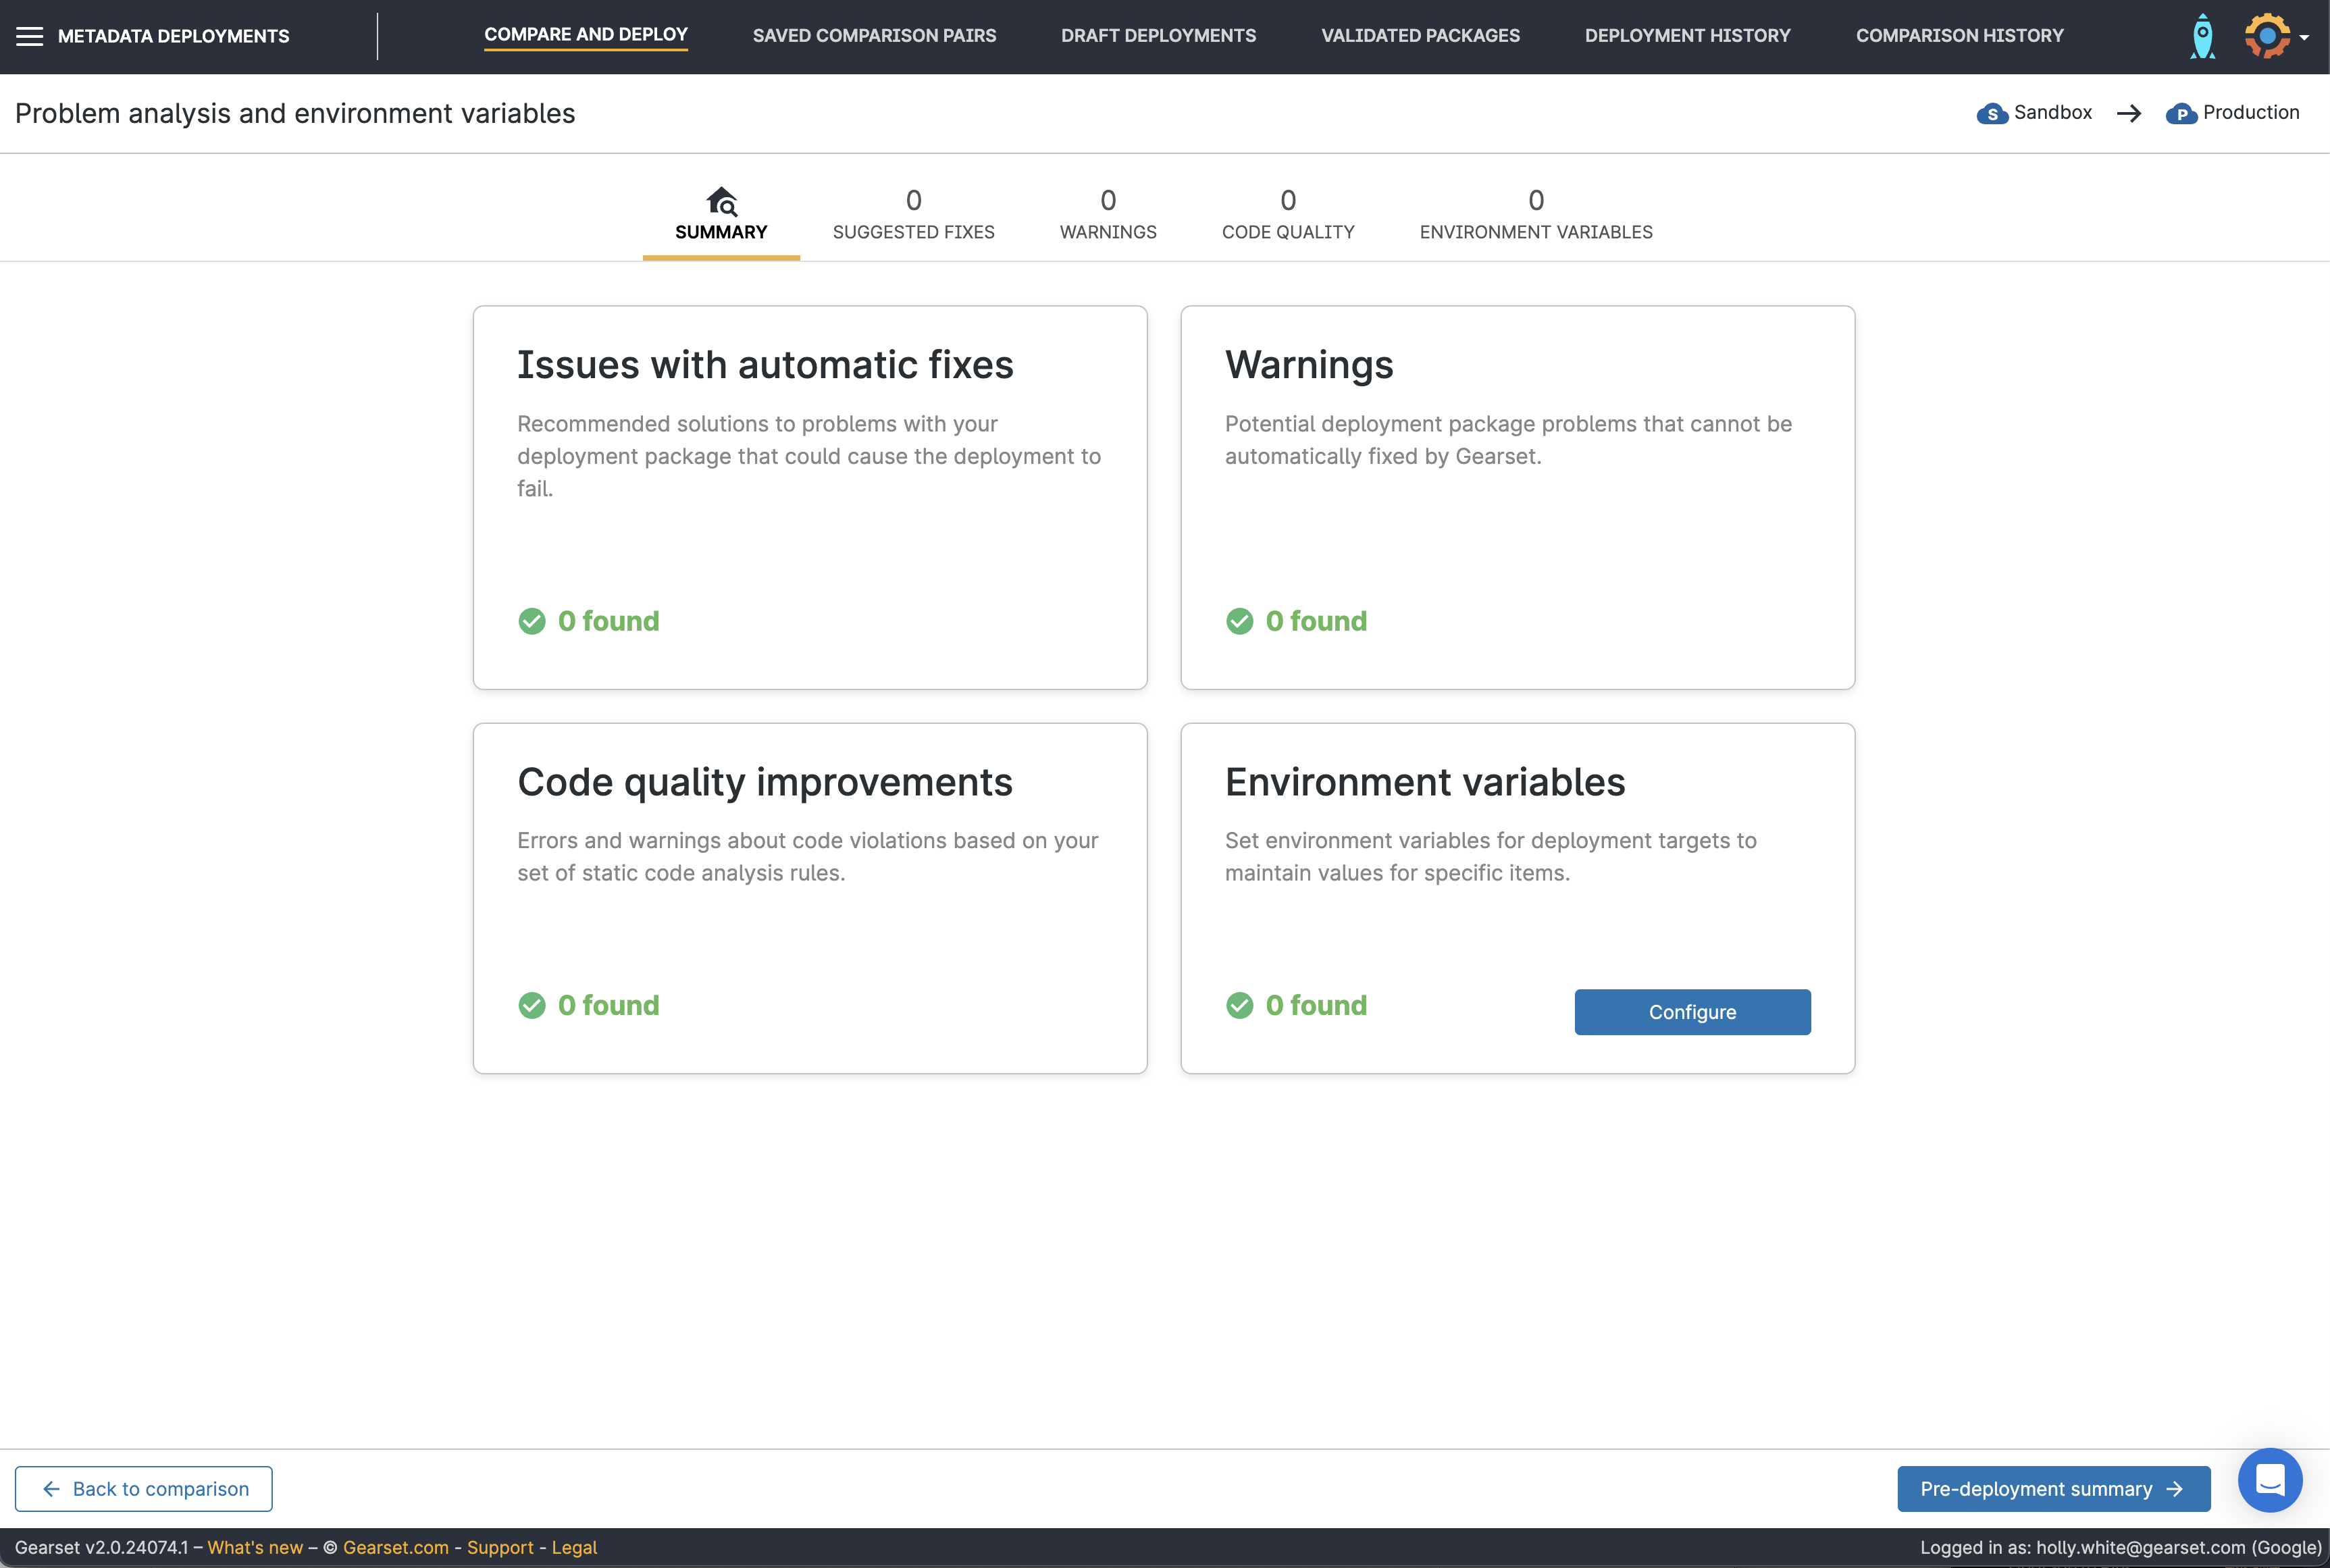
Run the problem analyzers
- Gearset’s problem analyzers will pick up any dependencies that have been missed or flag any other issues that could cause the deployment to fail, as well as suggesting a fix. Gearset will also run static code analysis on your deployment package, to highlight any violations. Once you’re happy, click through to the Pre-deployment summary.
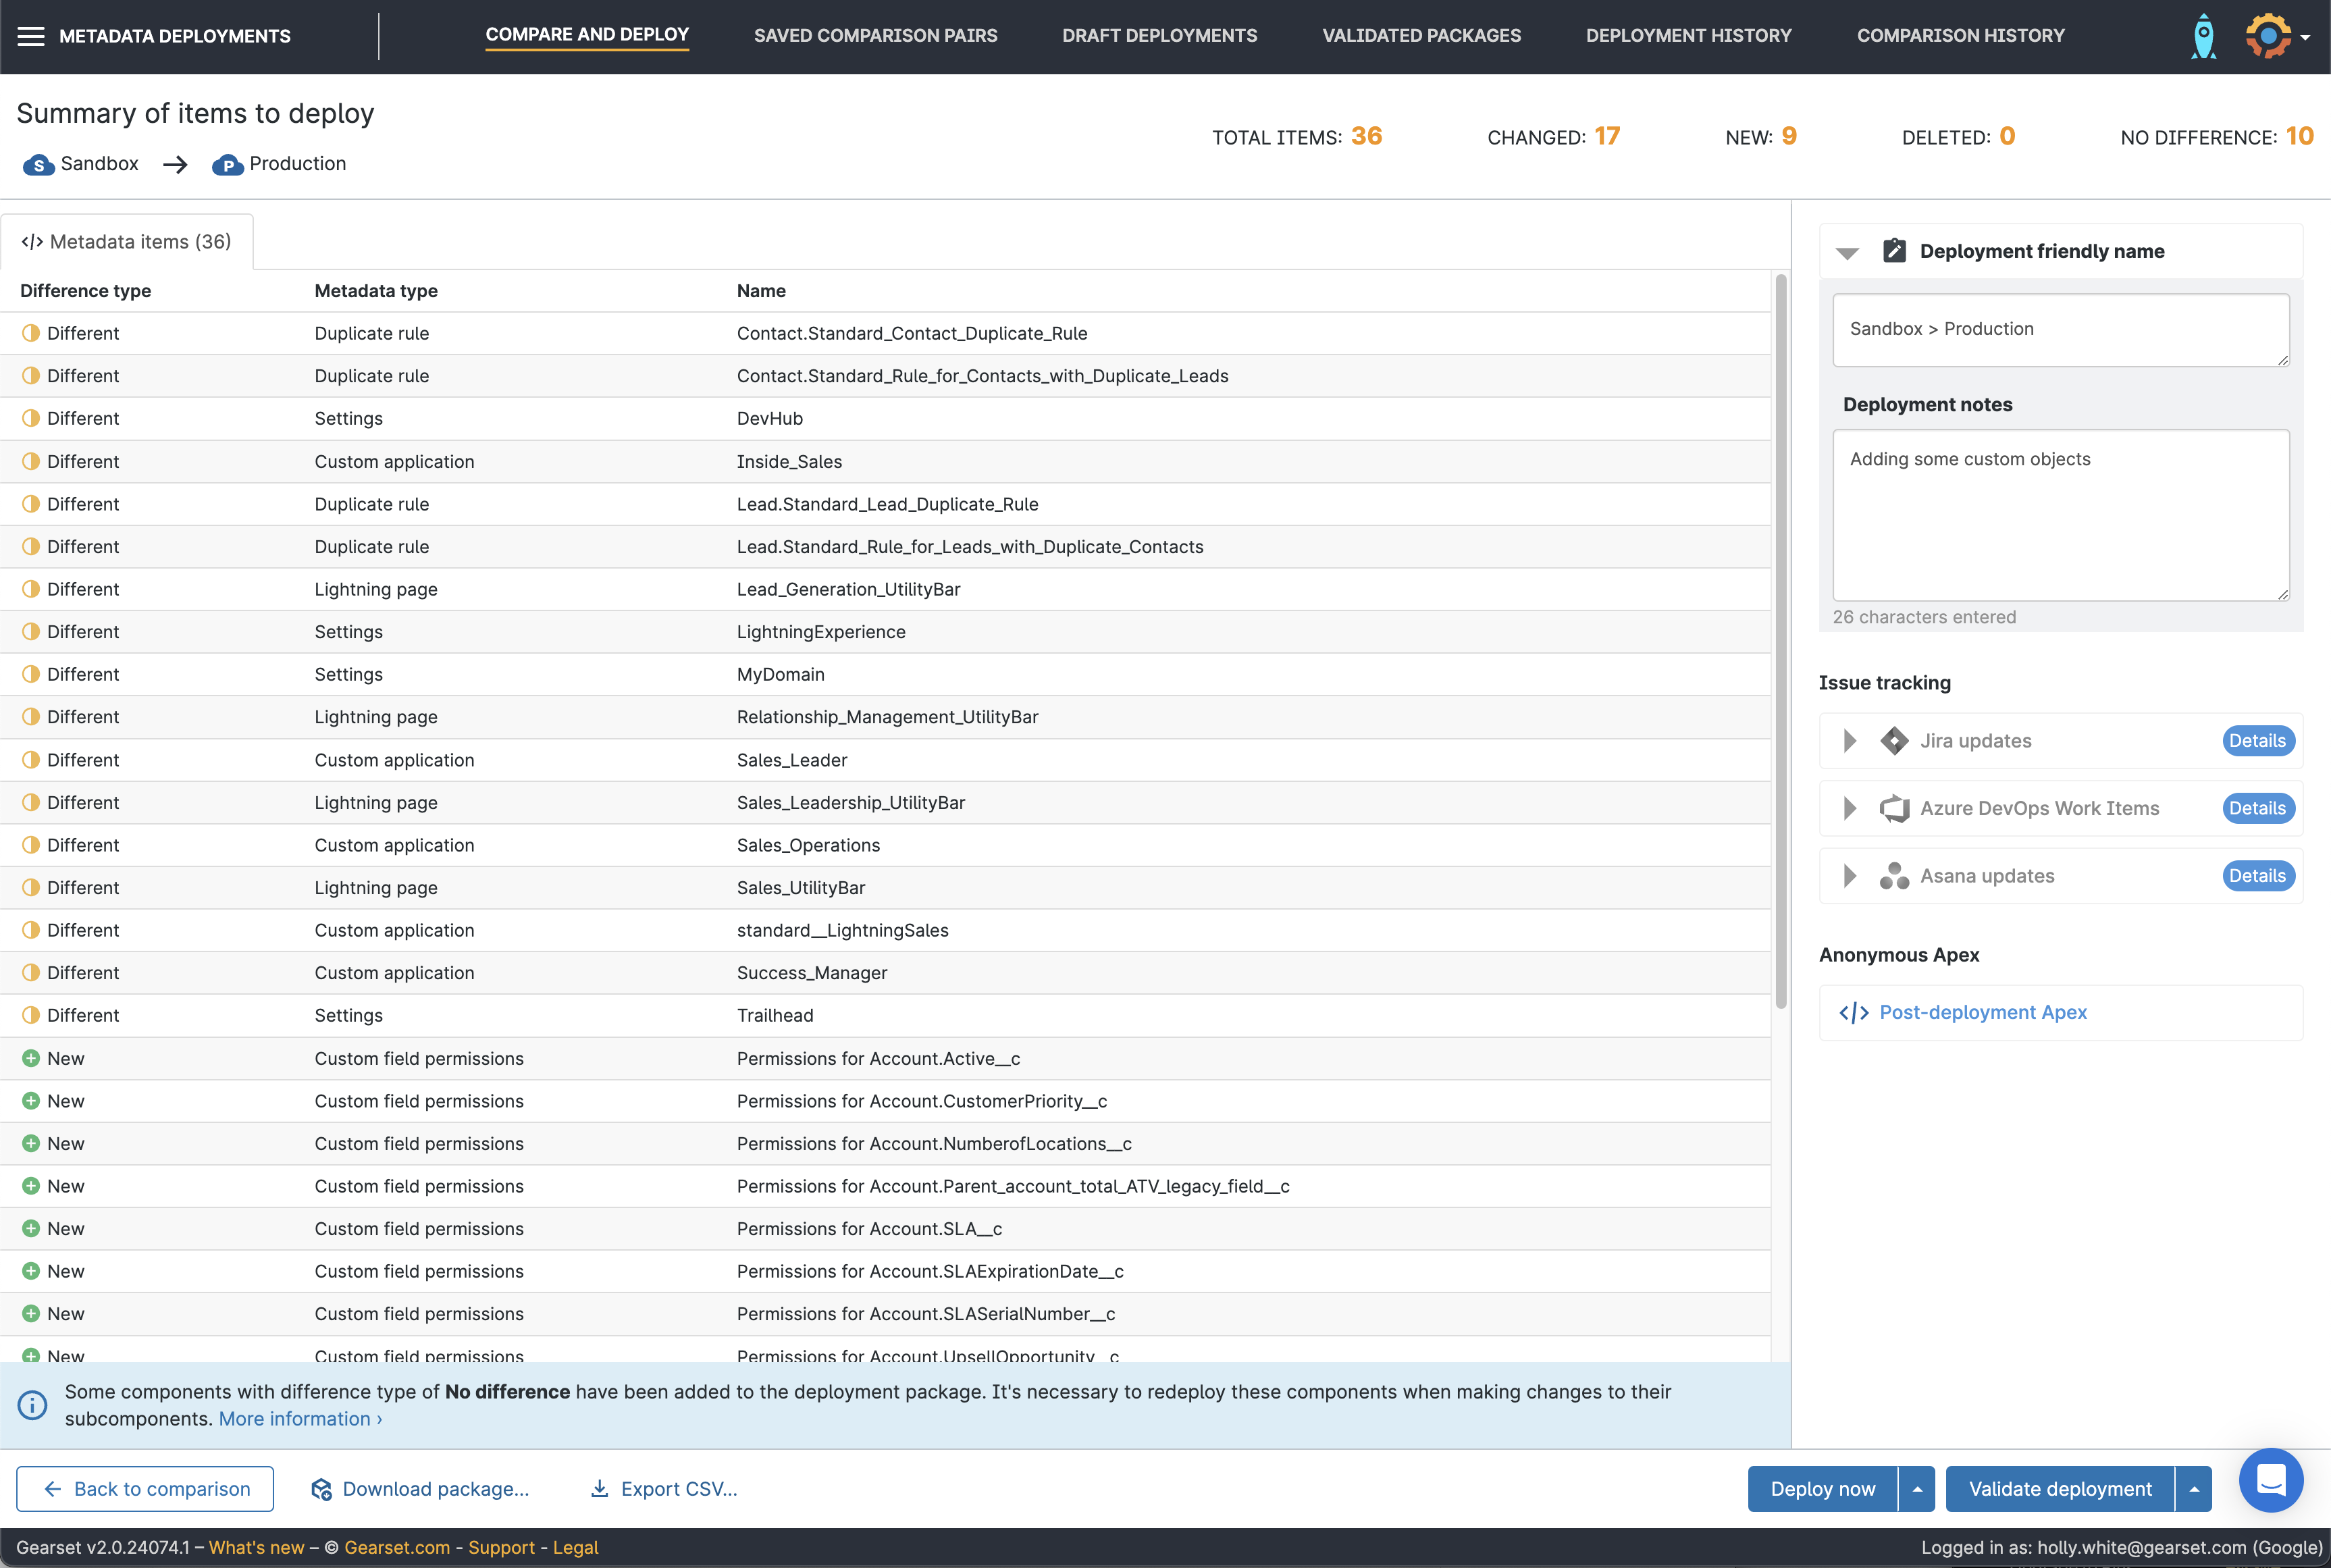
Deploy your changes
- Give your deployment a friendly name and include any notes your team will find useful. You can also add and update any associated tickets from Jira, Azure DevOps Work Items or Asana for easy tracking and visibility. You can then choose to Validate deployment, Deploy now, or schedule the package to deploy at another time.
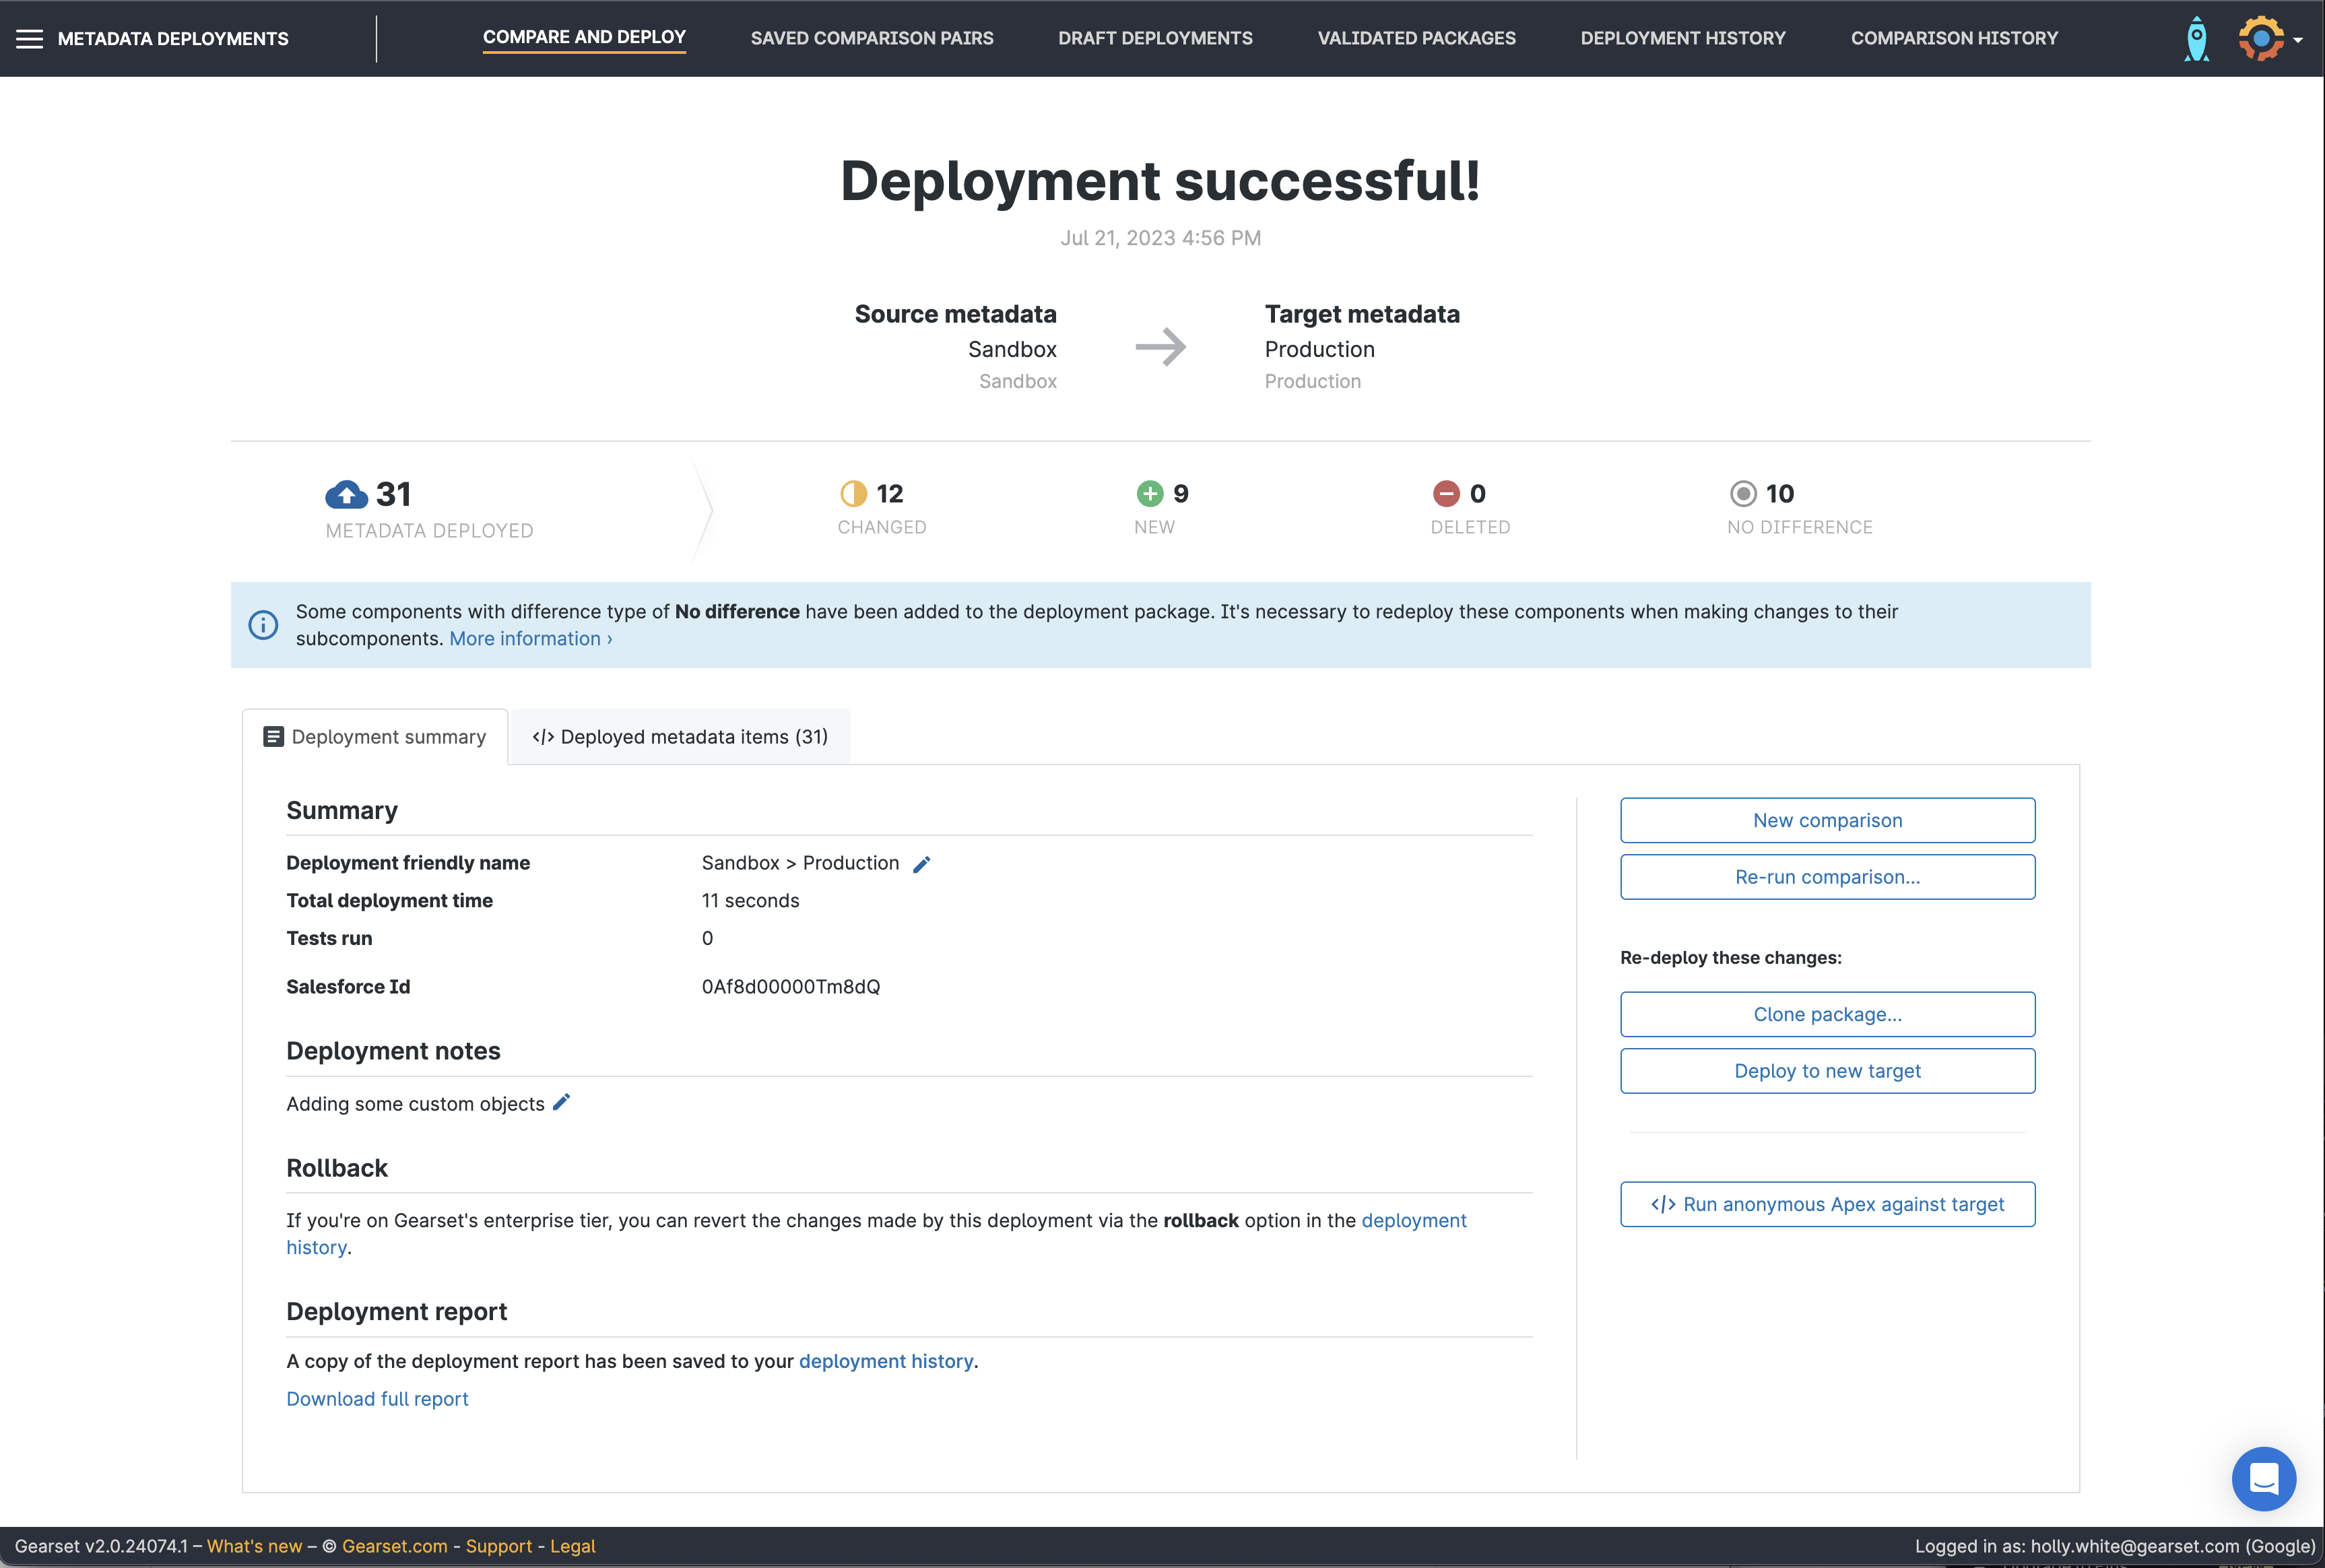
Once the deployment has run, you’ll be given a summary of the deployment and can download a full PDF report at any time from the Deployment history page.
Deploying from a sandbox to production with change sets can be tricky at the best of times but especially if you’re migrating fiddly metadata types. Plus, if you run into errors, there’s no easy fix and you have to head back to your sandbox to rebuild and try again.
Thankfully, Gearset’s intuitive UI and problem analysers help you build and debug deployments in just a few clicks.
Supercharge your sandbox to production deployments
Whether you’re deploying from a sandbox to production, back promoting or rolling back a deployment, Gearset can help! If you want further help speeding up your Salesforce deployements, catch up on this 30-minute webinar with DevOps Advocate Rob Cowell — he covers the 7 key deployment principles, including good preparation, using sandboxes, keeping orgs in sync, and improving visibility, that can help your team deploy faster and more reliably than ever.
Let Gearset take the pain out of all your Salesforce deployments – sign up for your 30-day free trial today.
