
Most businesses want automated processes and workflows in their Salesforce orgs, and Flows are the trusted tool Salesforce teams use to make that happen.
Executing business logic is rarely simple, so Flows can be pretty complicated to build and difficult to deploy if you haven’t got the right tools. Using change sets, it’s easy to lose track of versions, dependencies and more. Working with the XML code behind Flows in developer tools can be equally confusing — especially for non-developers who are used to the Salesforce platform’s visual, drag-and-drop interface.
Ready to go with the flow? In this guide, we’ll look at how to deploy Flows quickly and easily with Gearset, so you don’t have to dig through XML or struggle with failed change sets.
What are Flows in Salesforce?
Flows are a powerful tool for adding automated business processes to your Salesforce environment. They enable admins and low-code developers to create business logic — what once required Apex code can now be built declaratively with a Flow. There are different types of Flow: Screen Flows involve direct interactions by end users on a Lightning page, while Schedule-Triggered Flows, Autolaunched Flows, Record-Triggered Flows, and Platform Event-Triggered Flows all run behind the scenes.
Flows are currently part of the toolset on Lightning Flow, the process automation feature on Salesforce that contains Flow Builder, Process Builder and Workflow Rules. You can build simple automation in Process Builder, but Salesforce has been investing heavily in Flows for years. In fact, Process Builder and Workflow Rules are being retired — existing Processes will continue to be supported but you can’t create new automation. So lots of teams are migrating from Process Builder to Flows.
San Francisco, CA
Dreamforce
What Flow metadata types are there?
There are a handful of Flow-specific metadata types you may end up working with for Salesforce Flow deployments.
- Flow. This metadata represents the Flow itself.
- FlowCategory. Flows can be grouped together, and FlowCategory is the metadata type that represents those groupings.
- FlowDefinition. Flow Definitions define the active version of a Flow, but since Salesforce made significant changes to Flows in its Winter ‘19 release it now no longer recommends using Flow Definitions.
- FlowTest. If you’ve created any tests for your Flows, those are defined with FlowTest metadata.
- FlowSettings. This metadata captures a whole range of possible settings, e.g. whether users can pause Flows.
- FlowAccessess. This is a field on your Profiles or Permission Sets metadata that controls which Flows users have access to.
The Metadata API plays a crucial role in managing these metadata types. It allows you to move Flows and their settings between Salesforce environments — such as from a sandbox to production — using scripts or tools like Gearset instead of making changes manually in Salesforce using change sets.
How to deploy Flows using change sets
Building a Flow is complicated, but deploying them is also challenging, especially with change sets. If you’re using change sets to deploy your Flows, there’s a few things to check first.
Flow pre-deployment checklist
Test the Flow: You should always test your Flow in the sandbox, running through any possible scenarios and error handling. It’s worth also testing edge cases, like if a user cancels a Flow or it times out. You want to be absolutely sure your Flow works as expected in the sandbox before you deploy it to production.
Check dependencies: Missing dependencies are a common cause of deployment failure. Check any related components — custom objects, fields, permissions, page layouts — have been added to the change set. Otherwise you’ll hit errors when you try to deploy.
Verify flow element references: Check your Flow element references — including any picklist choices, sub-flows, record variables, email alerts, Apex actions, or calls to Apex classes — are pointing to the right components. This is important because your Flow will rely on those components being present and configured correctly in production.
Make sure the right version is active: Make sure the right version of the Flow is active and ready to deploy. You only want one version active at a time to avoid confusion and reduce the risk of mistakes.
Check your Metadata API settings: Make sure the Metadata API is functioning, you have the right deployment permissions, and all components of your Flow are properly configured and available in the target org.```
Check flow references: Flow references determine how the Flow is called or used — whether it’s triggered by Process Builder, embedded in a Screen Flow, called from Apex code, or launched through a custom button. These need to be checked to ensure they point to the correct version of the Flow or deployment environment.
Using change sets to deploy Flows can lead to a lack of visibility, overwritten changes and failed deployments as you need to manually add Flow dependencies, remember to activate Flows in your target org, and keep track of versions (and their limits!).
Deploy a Flow using change sets
Here’s a step-by-step guide for deploying a Flow using change sets in Salesforce:
- Ensure your Flow is active in the source org.
- Create a change set by going to Setup in the source org, search for Outbound Change Sets, and click New. Give your change set a descriptive name (e.g., “Flow Deployment") and an optional description. Click Save.
- In the change set detail page, click Add under the “Change Set Components" section. In the Component Type dropdown, select Flow Definition. Find and select the Flow you want to deploy. Click Add to Change Set.
- After adding the Flow, Salesforce will automatically include some dependencies. Review the list and manually add any other related components (e.g., Custom Objects, Custom Fields, Permission Sets, or Apex Classes) the Flow interacts with to avoid deployment errors.
- Once all the components are added, click Upload. Select the target Salesforce org where you want to deploy the Flow and confirm. Switch to the target Salesforce org and navigate to Inbound Change Sets in Setup. Wait for the uploaded change set to appear.
- Open the change set in the target org, and click Validate to test the deployment without making any changes.
- If validation succeeds, click Deploy. If validation fails, you’ll need to resolve any errors (such as missing components or permission issues) in the source org, update the change set, and re-upload it.
An active Flow in an outbound change set is automatically deployed to its destination as inactive, so don’t forget you’ll need to manually activate the Flow once you’ve completed the deployment.
How to understand Flow XML
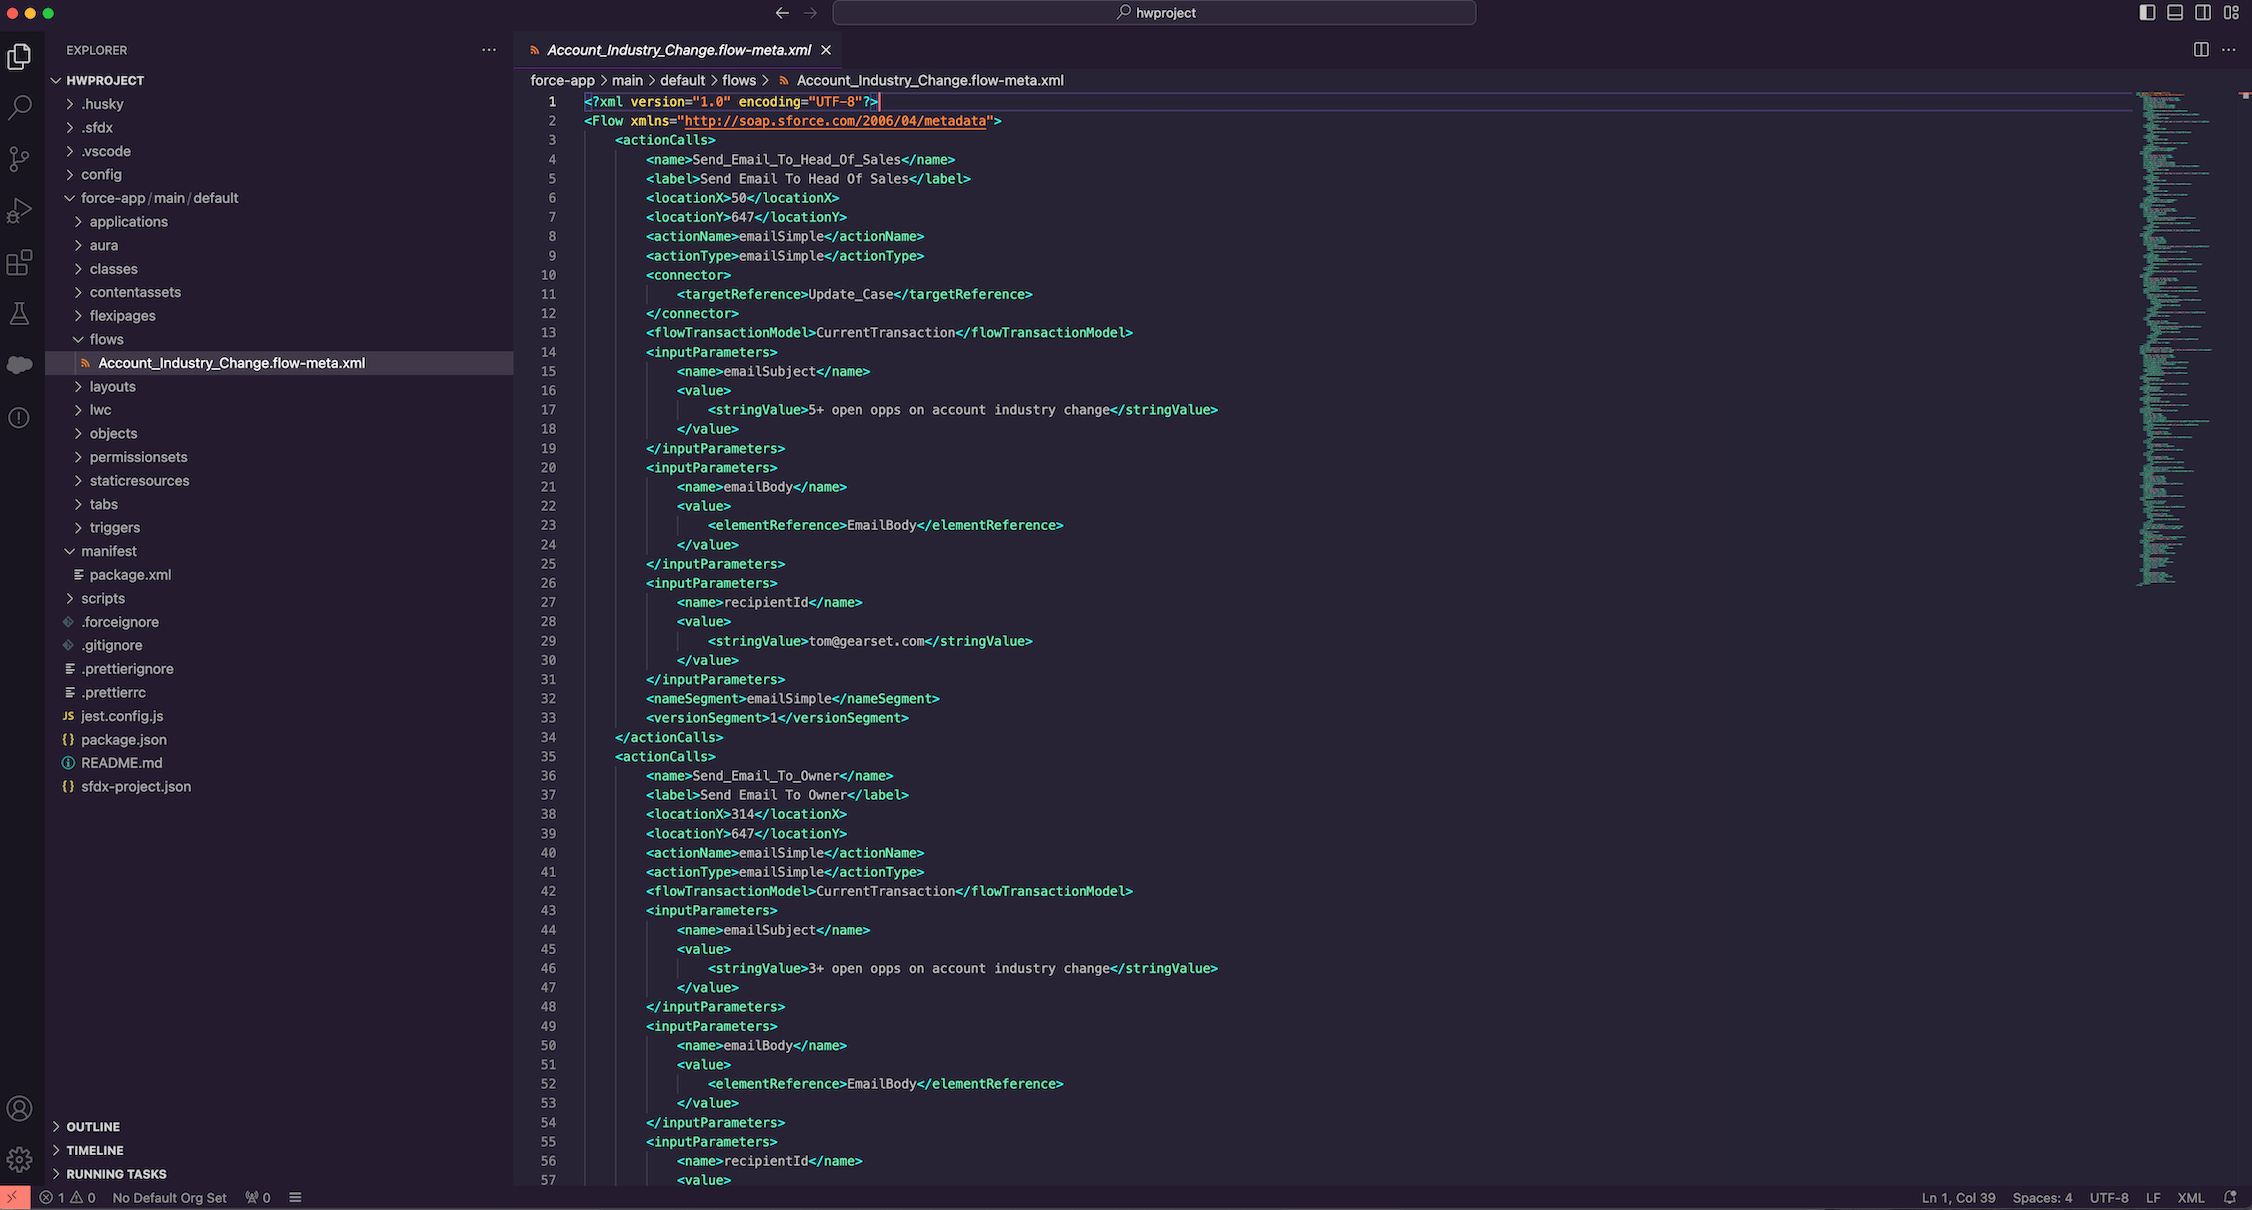
For teams using developer tools such as SFDX CLI or code editors like VSCode to deploy flows, things don’t get much easier. Flow XML isn’t designed to be easily readable. It contains technical metadata like location coordinates, uses nested structures for complex logic, and references custom objects and dependencies with alphanumeric identifiers instead of clear labels — which can make it difficult to understand without visual tools.
So when it comes to understanding the changes you’re deploying, it can be difficult to know what’s included in your Flow. What version is it? What were its most recent changes? Does it include this specific element? This creates a huge amount of difficulty when it comes to deploying Flows, especially when you work in a large team where multiple admins may be working on a Flow at the same time. It’ll leave you wondering whether deploying your most recent changes carries the risk of deleting someone else’s work, and likely relying on manual testing to make sure you haven’t overwritten or missed something.
Unfortunately, without a specialist solution, your best bet is either to blindly deploy your changes and hope you can unpick them in production, or to comb through the XML line by line to spot differences between your Flows in your development and production environments.
Best practices for Flow deployment
Deploying Flows to production is a process that requires careful planning and execution. Here are some best practices to follow:
Keep track of your Flow versions
Salesforce creates a new version of your Flow each time you make and save changes, which can quickly lead to hitting the 50-version limit per Flow. You’ll need to delete older versions or you’ll see the error message maximum flow versions reached in Flow Builder when you try to save a new Flow.
Since Salesforce removed version numbers from Flow API names in the Winter ‘19 release to simplify source control, deploying a Flow creates a new version in the target org that may not match the source version. For example, deploying v5 to an org with v2 adds it as v3, causing versions to fall out of sync. The Salesforce Metadata API v44 also only fetches the latest version of a Flow — whether it’s active or still in draft. To deploy the latest active version, you’ll need to use the semi-retired Flow Definitions to control which version is deployed.
Gearset makes it easy to manage Flow versions. You can preview changes, track dependencies, and deploy specific versions without worrying about Flow Definitions. Gearset’s Flow Navigator lets you switch between versions on the source side, so you’re always deploying the right one.
Avoid overwriting Flows with version control
Adopting broader version control practices using tools like Git is also important for managing your Flow versions by giving you a clear, auditable history of changes and the option to rollback if you hit issues after deploying. You’ll also want to avoid multiple admins or developers editing the same Flow at the same time. Using version control tools to manage branches and merge updates safely can help avoid any conflicts.
With version control, developers can make changes to the same flow on their own branches and then merge. Gearset’s Flow Navigator makes this even easier with a visual interface that highlights new, changed, and deleted elements within your Flows. This means you can see and incorporate teammates’ changes, reducing the likelihood of overwriting work.
Catch any Flow dependencies
Missing dependencies are a classic cause of deployment failure, and Flows are a common culprit because they often reference other metadata types. There are the custom objects and fields your Flow interacts with, any list views and workflow alerts your Flow uses, and your Flow may even be a trigger to kick off other Flows.
If you’re using Gearset, you can see all of the dependencies for any piece of metadata, including Flows. If you miss any, one of Gearset’s 100+ problem analyzers will catch the missing dependencies and allow you to add them to your deployment package.
Controlled deployments and proactive monitoring
Deploy Flows through staging environments to minimize risk and allow time to address issues before they impact production. Monitoring your Flows once they have been deployed is important to quickly identify misconfigurations, broken dependencies, or failed executions.
Flow errors can be a real pain point if you haven’t got a handle on monitoring. The volume of Flow error alerts can quickly become overwhelming, especially in complex orgs with lots of active Flows, as even minor issues can trigger repeated notifications.
Keeping on top of Flow errors is much easier when you have Gearset’s Flow error monitoring. The Flow Error Monitoring dashboard gives you a single view of Flow errors in one place. Errors are aggregated into the subject line, and grouped by the Flow they occurred on, so any bugs are easier to spot and fix.
Log, test, and iterate regularly
Log deployment details, including any issues and resolutions, to create a repeatable and reliable Flow deployment process. Regularly test and iterate on Flows to ensure they meet user expectations and adapt to changing requirements. Continuous testing helps catch and resolve issues early, improving the overall quality of your deployments.
Gearset’s full deployment history provides a clear audit trail of changes to all your metadata, including Flows. You’ll be able to see what was deployed and when, as well as any version updates and configuration changes. This visibility makes troubleshooting simple and supports collaboration as you can review past deployments, learn from issues, and refine your Flow deployment process for future releases.
Activate Flows automatically
By default, Flows deploy as inactive, which can be annoying if you forget to activate them in production after your deployment. If you’re using Gearset, you’ll have the option to deploy your Flow as active from Gearset itself, so there’s no need to log in to the org and do it manually.
By following these best practices, you can increase your chances of successful Flow deployments and add complex business logic to your environments easily.
How to deploy Flows using Gearset
All admins are faced with the challenges of versioning and dependencies when it comes to deploying Flows to a production org. For many Salesforce teams, releasing updates to Flows means you run the risk of overwriting work, unpicking a failed deployment, or trying to sync two wildly different environments.
As Flow deployments are a common cause of pain in every admin’s life, Gearset has a custom Flows solution to help you deploy successfully every time and happily collaborate with your team.
Let’s look at how to deploy Flows with Gearset. You can sign up for a free trial of Gearset and follow along.
Step 1: Configure your comparison to include the right metadata
Select the source and target environments for your deployment — whether you’re deploying to an org or committing to source control, the workflow is the same. Then click Compare Now.
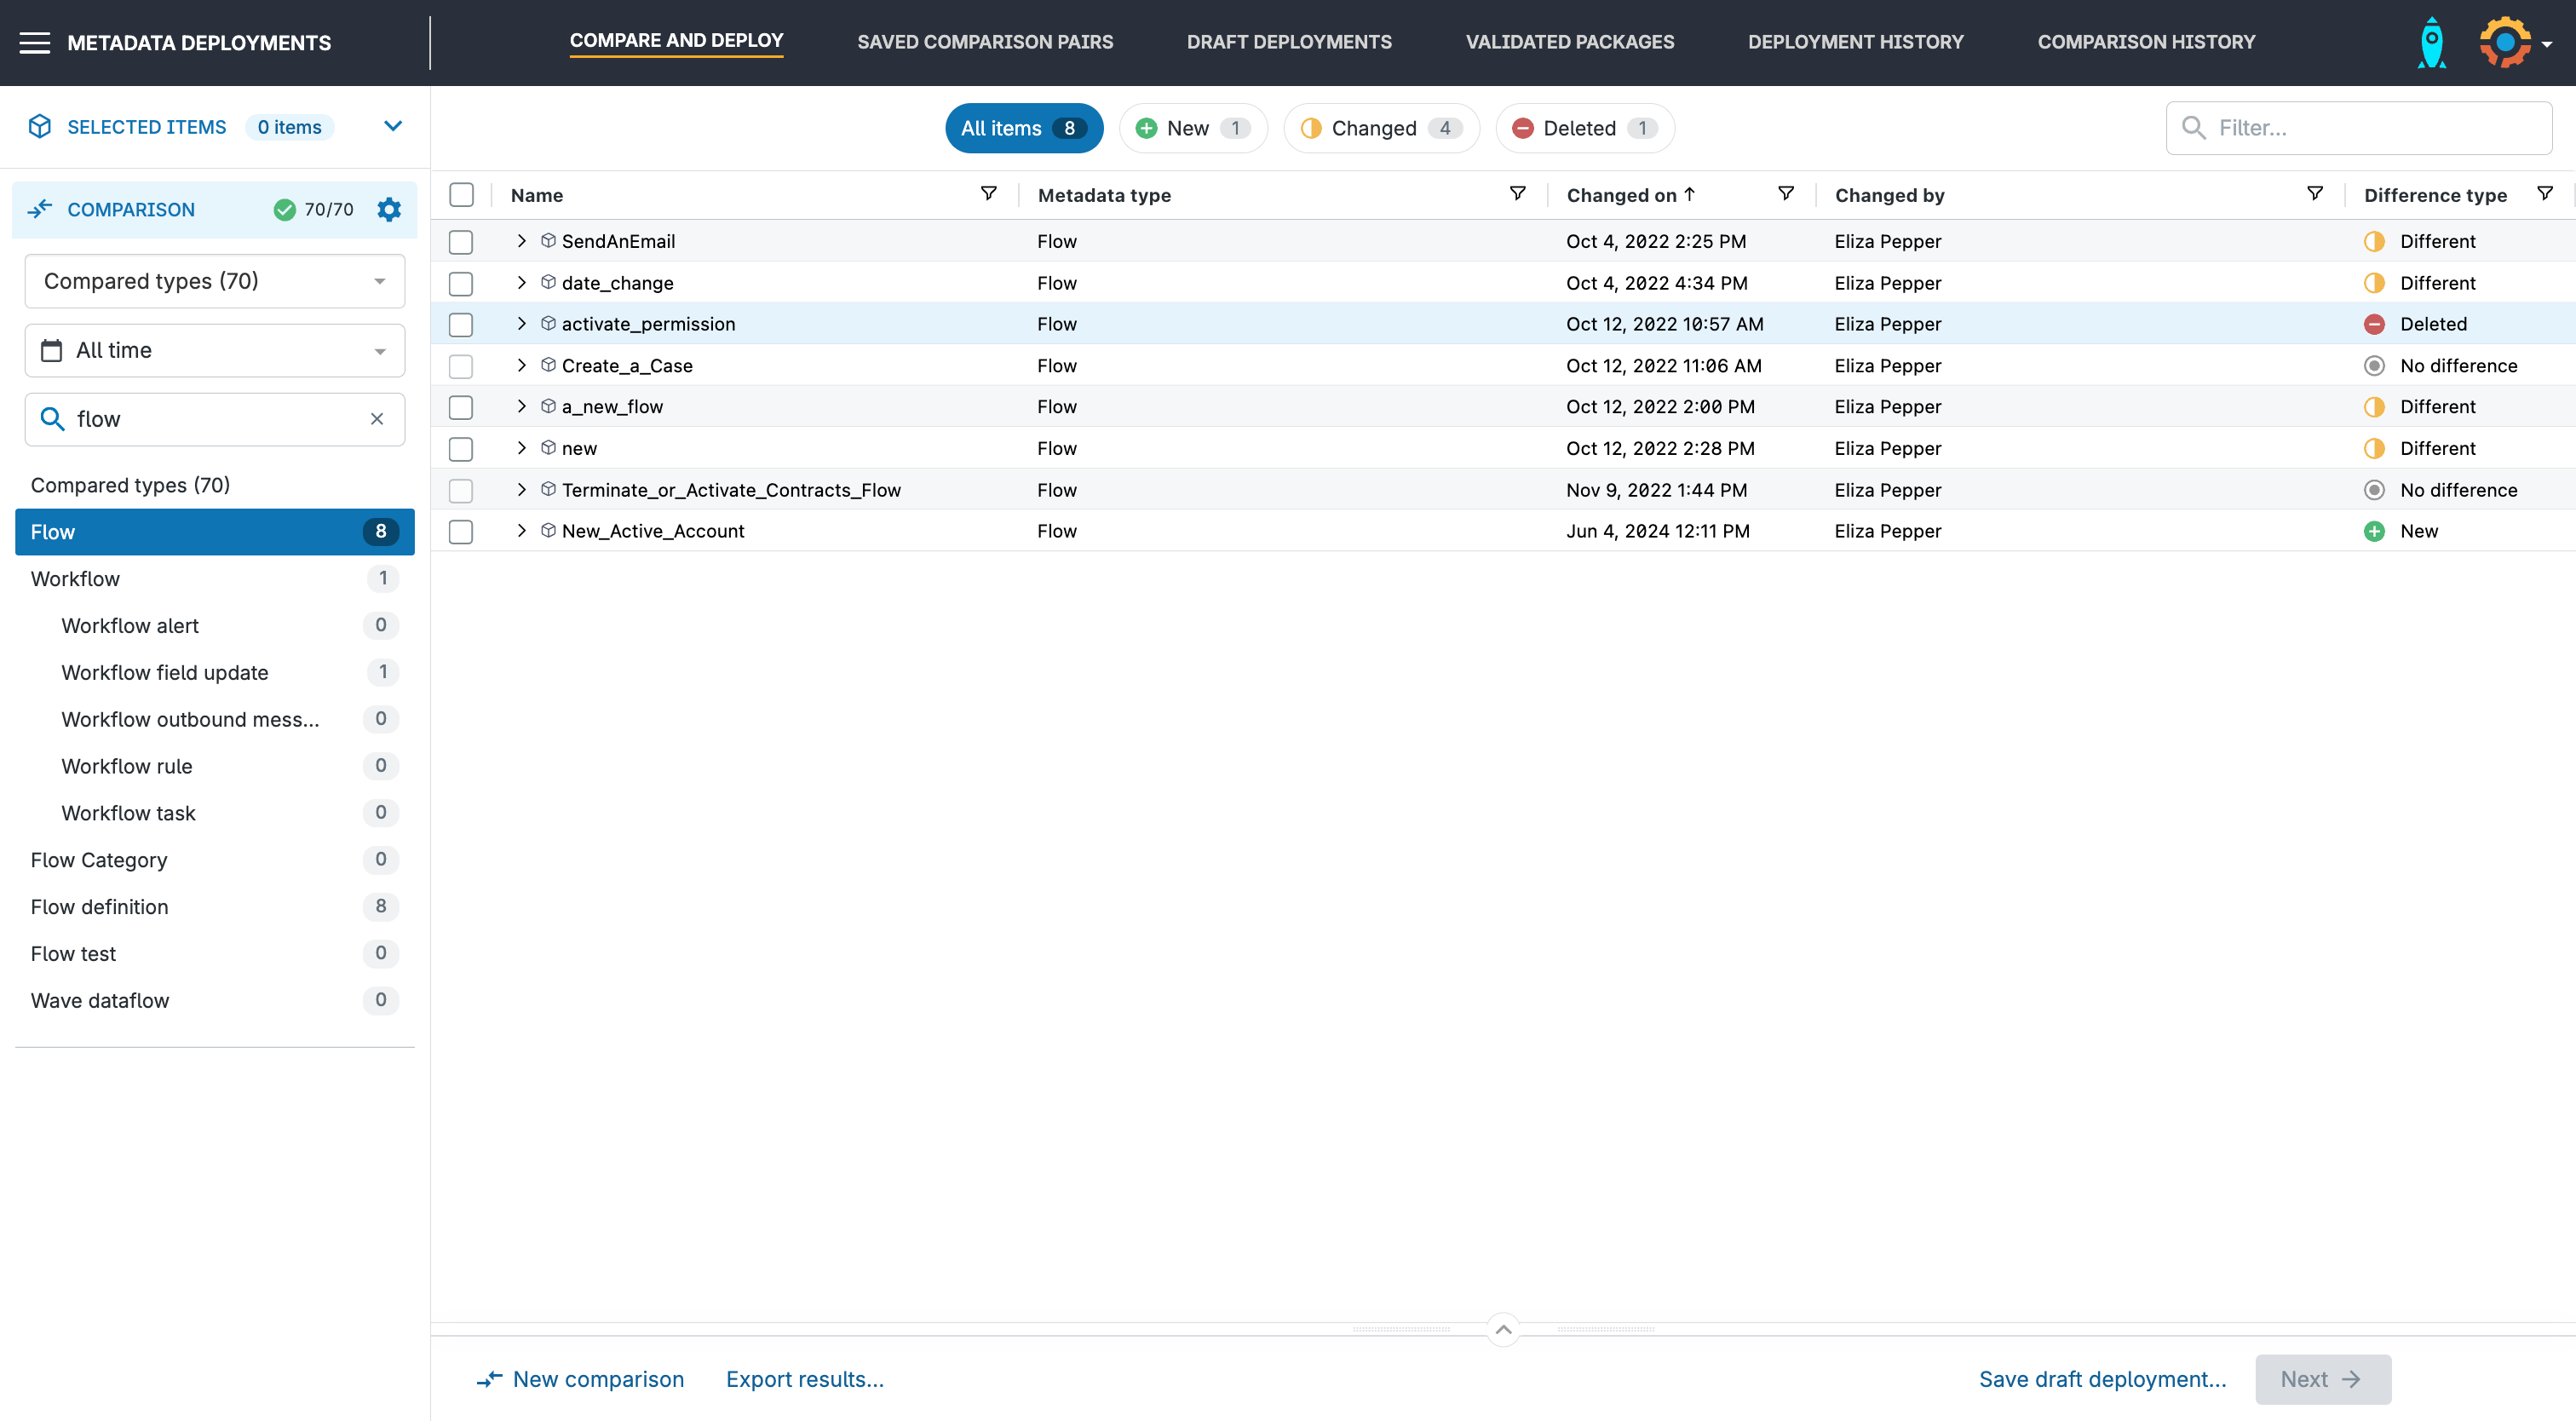
In the left hand toolbar, use the dropdown menu to select your comparison filter. Our default comparison filter includes every metadata type you need for Flow deployments: Flow and FlowCategory, alongside Custom Object for any dependencies. You can also select any managed packages that your Flow depends on, too. You can check that the correct metadata types are included in your comparison by searching for them.
Step 2: Check the Flow version with Flow Navigator
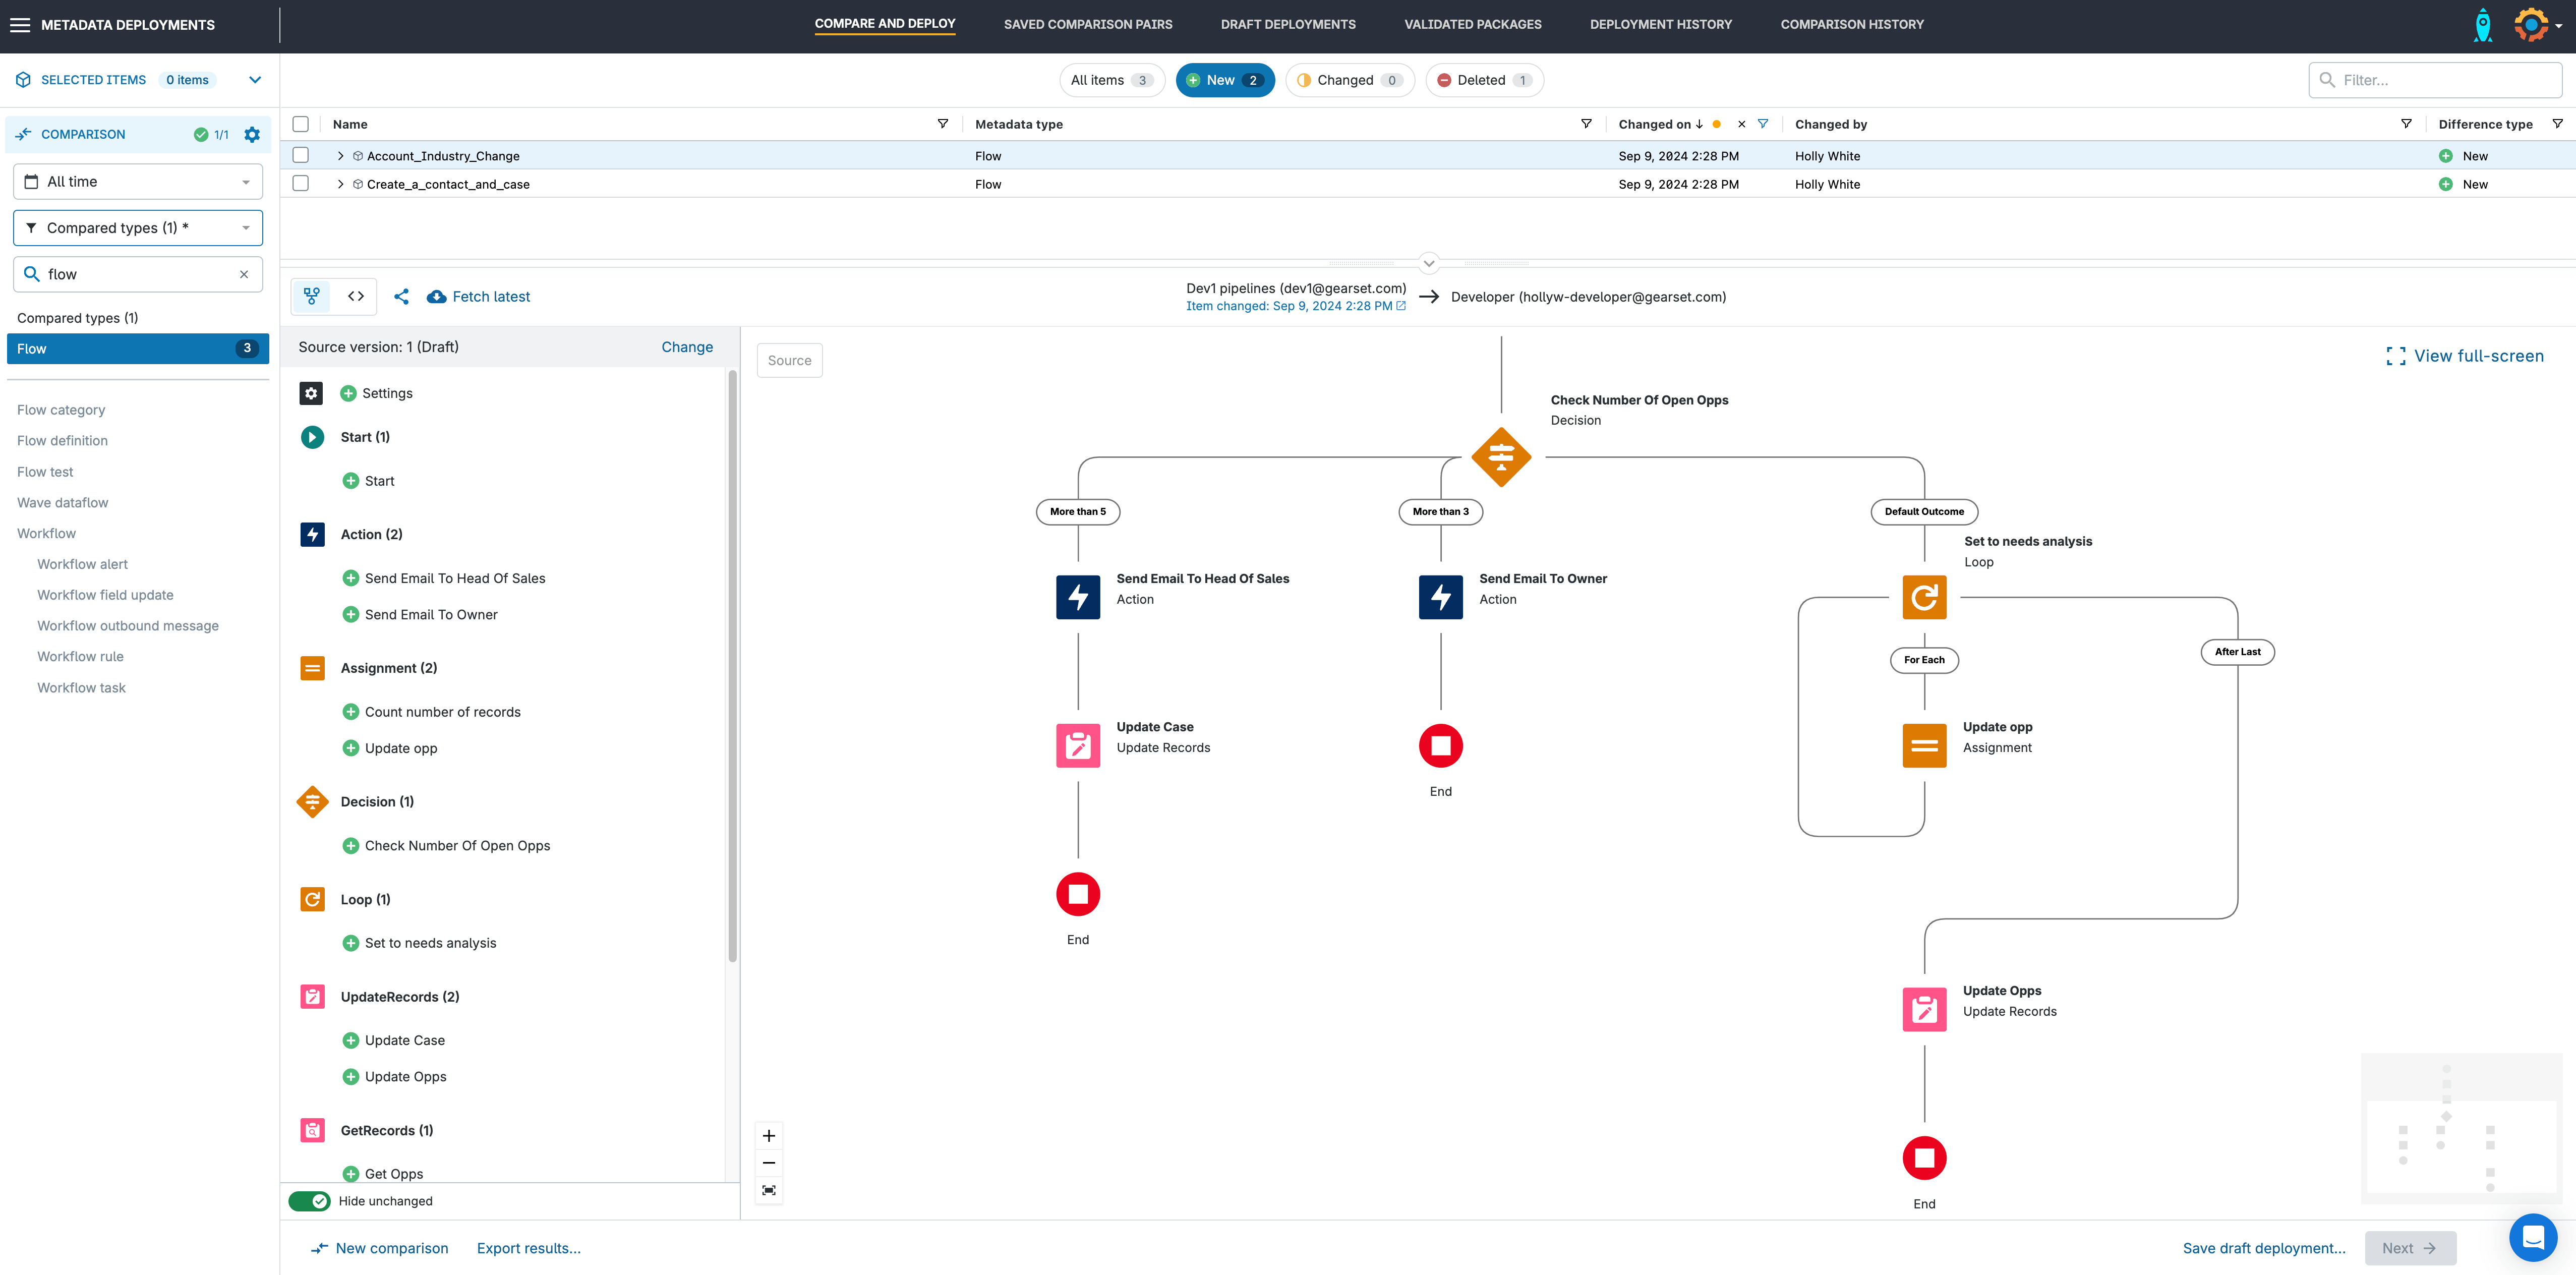
Once you’ve compared the metadata in your source and target, Gearset’s Flow Navigator will display which items are new, changed, or deleted, and exactly what’s different for each item. You can see which version of the Flow has been retrieved from the source. This helps you to identify whether you’re looking at your draft changes in the latest version, rather than the active version that you intended to deploy. You can even change the version if you need.
Step 3: Identify differences between your source and target org
As Flow XML can be difficult to understand, Gearset’s Flow Navigator renders the Flow as it looks in Flow Builder, with visible flow element references and any changes highlighted. The interactive diagram and element sidebar then give you a high-level overview showing what’s changed in your Flow, and where those changes are.
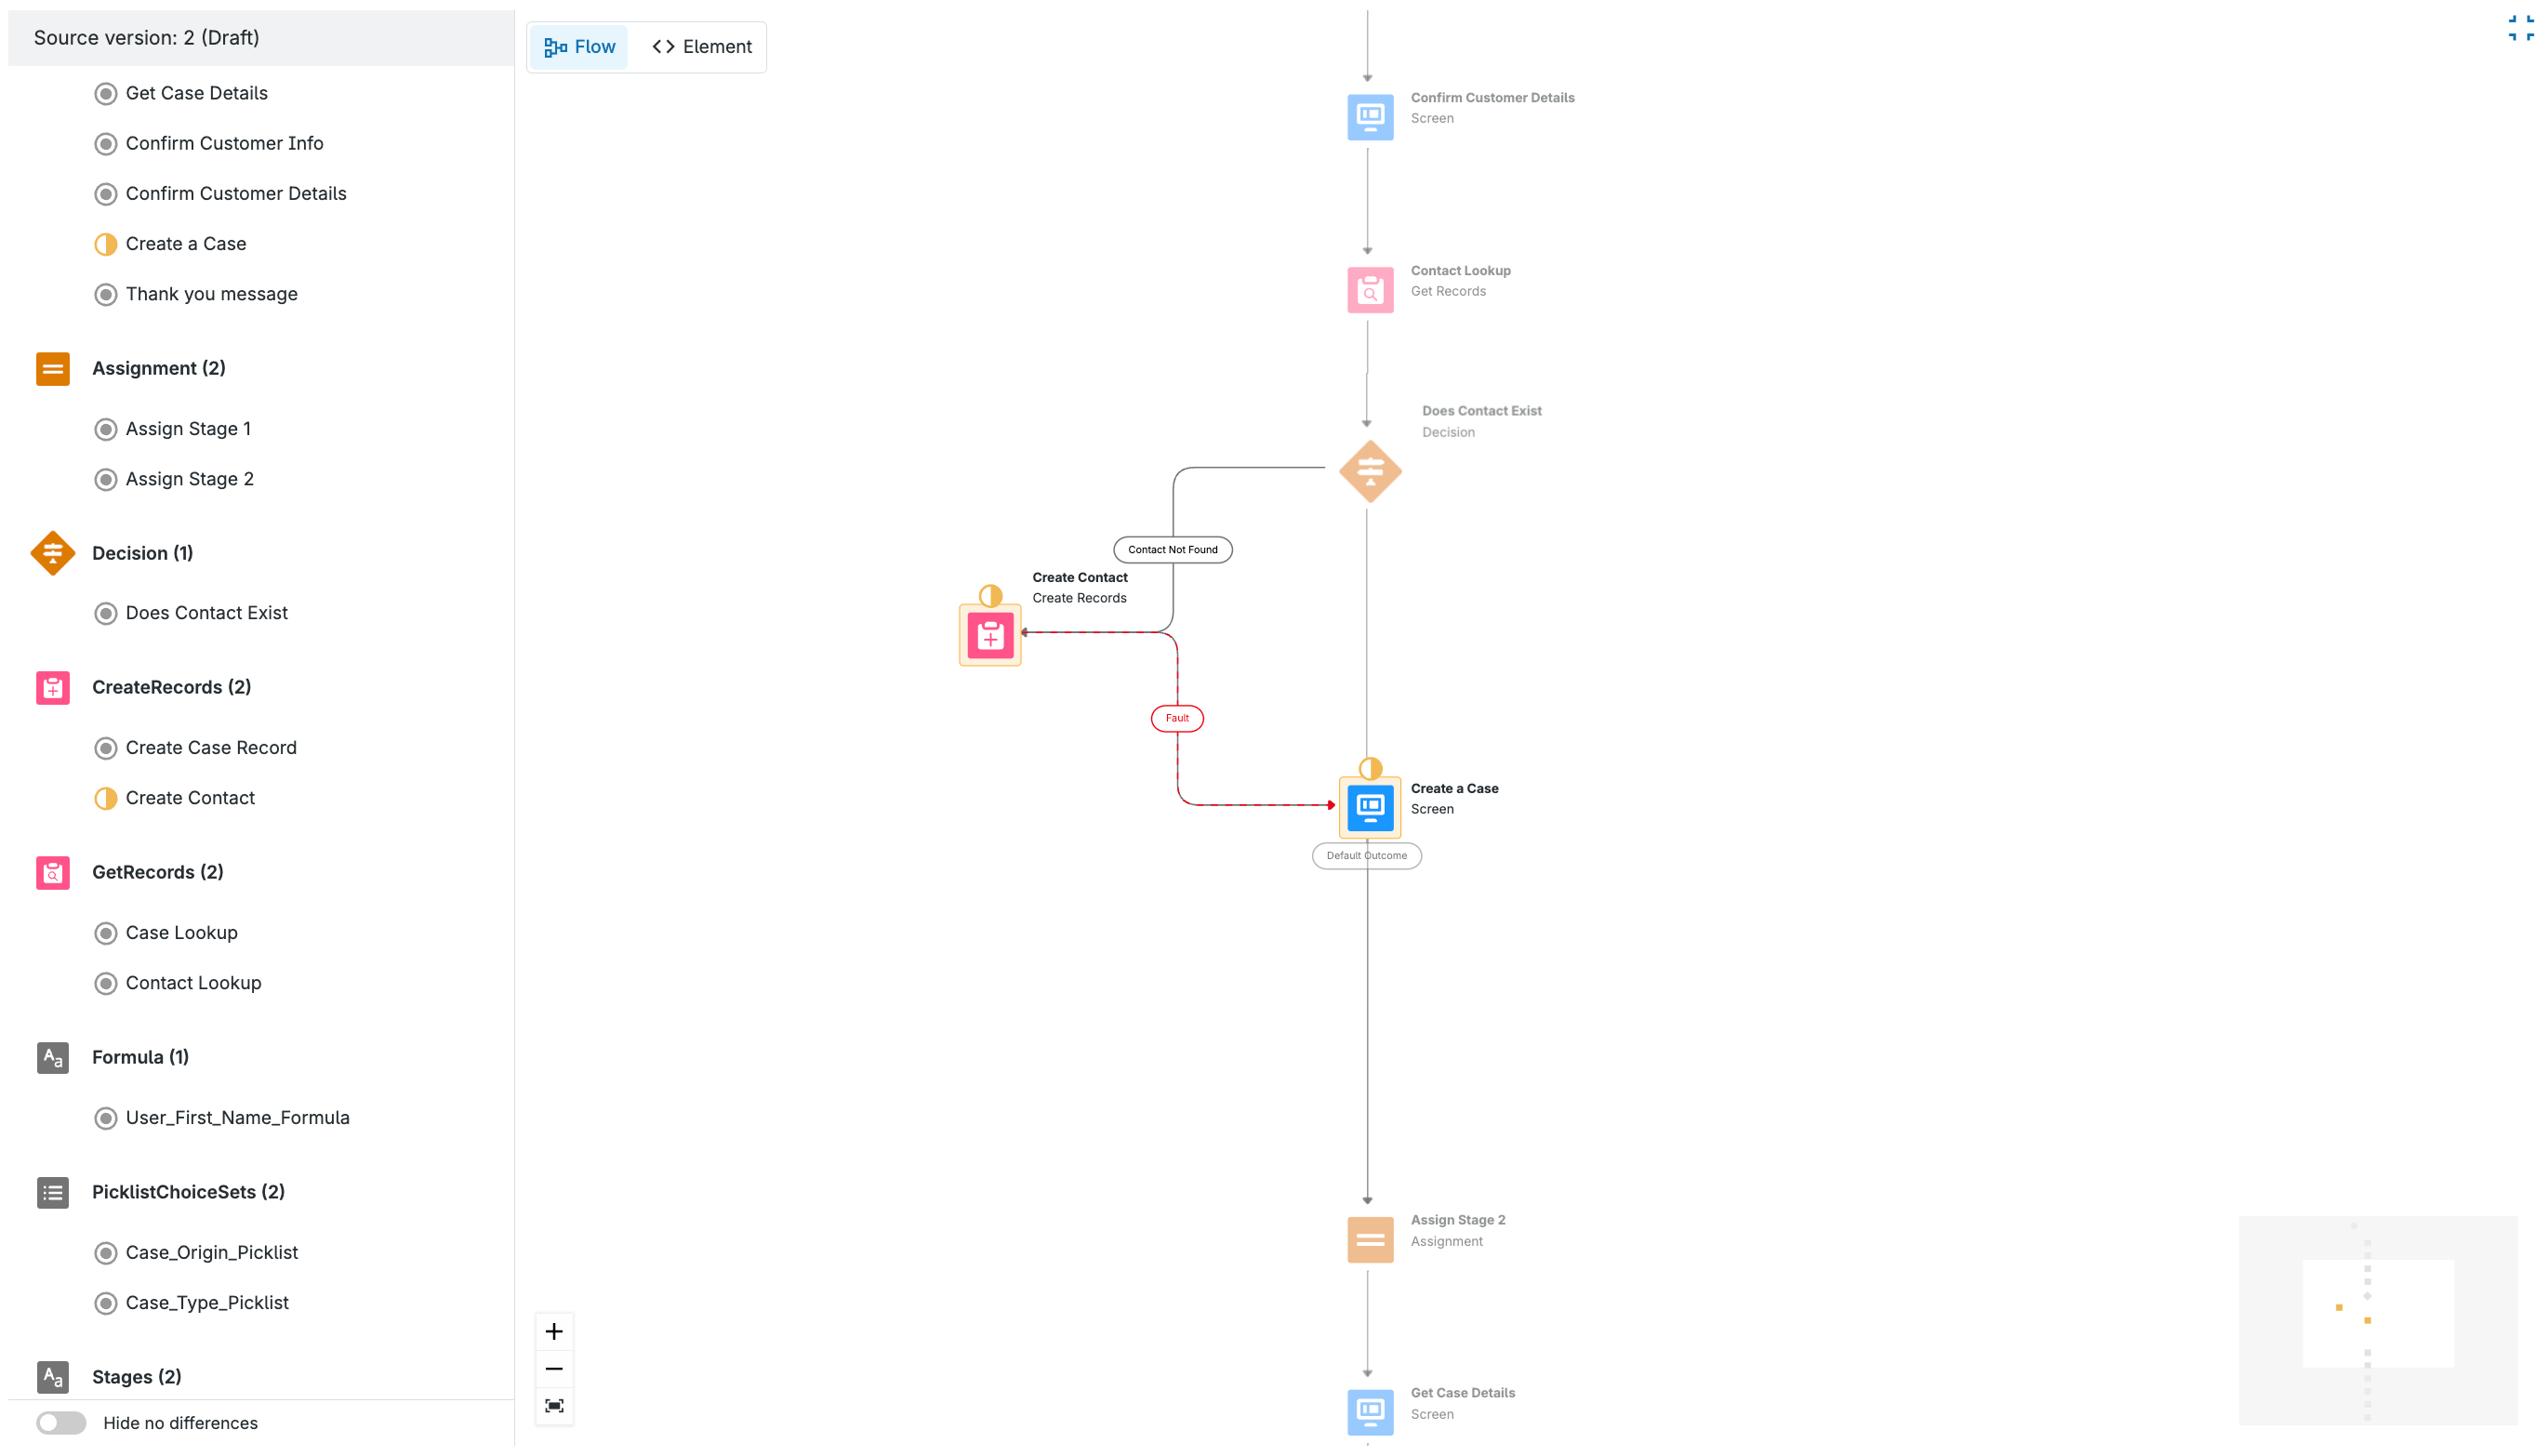
You can drill down into each element and resource to see exactly how they’ve changed. Our element visualizers show the changes in an easy-to-read format, so you don’t need to figure out what all of the XML means.
Step 4: Build your deployment
By clicking on the dropdown for any item, you’ll see all of its dependencies.
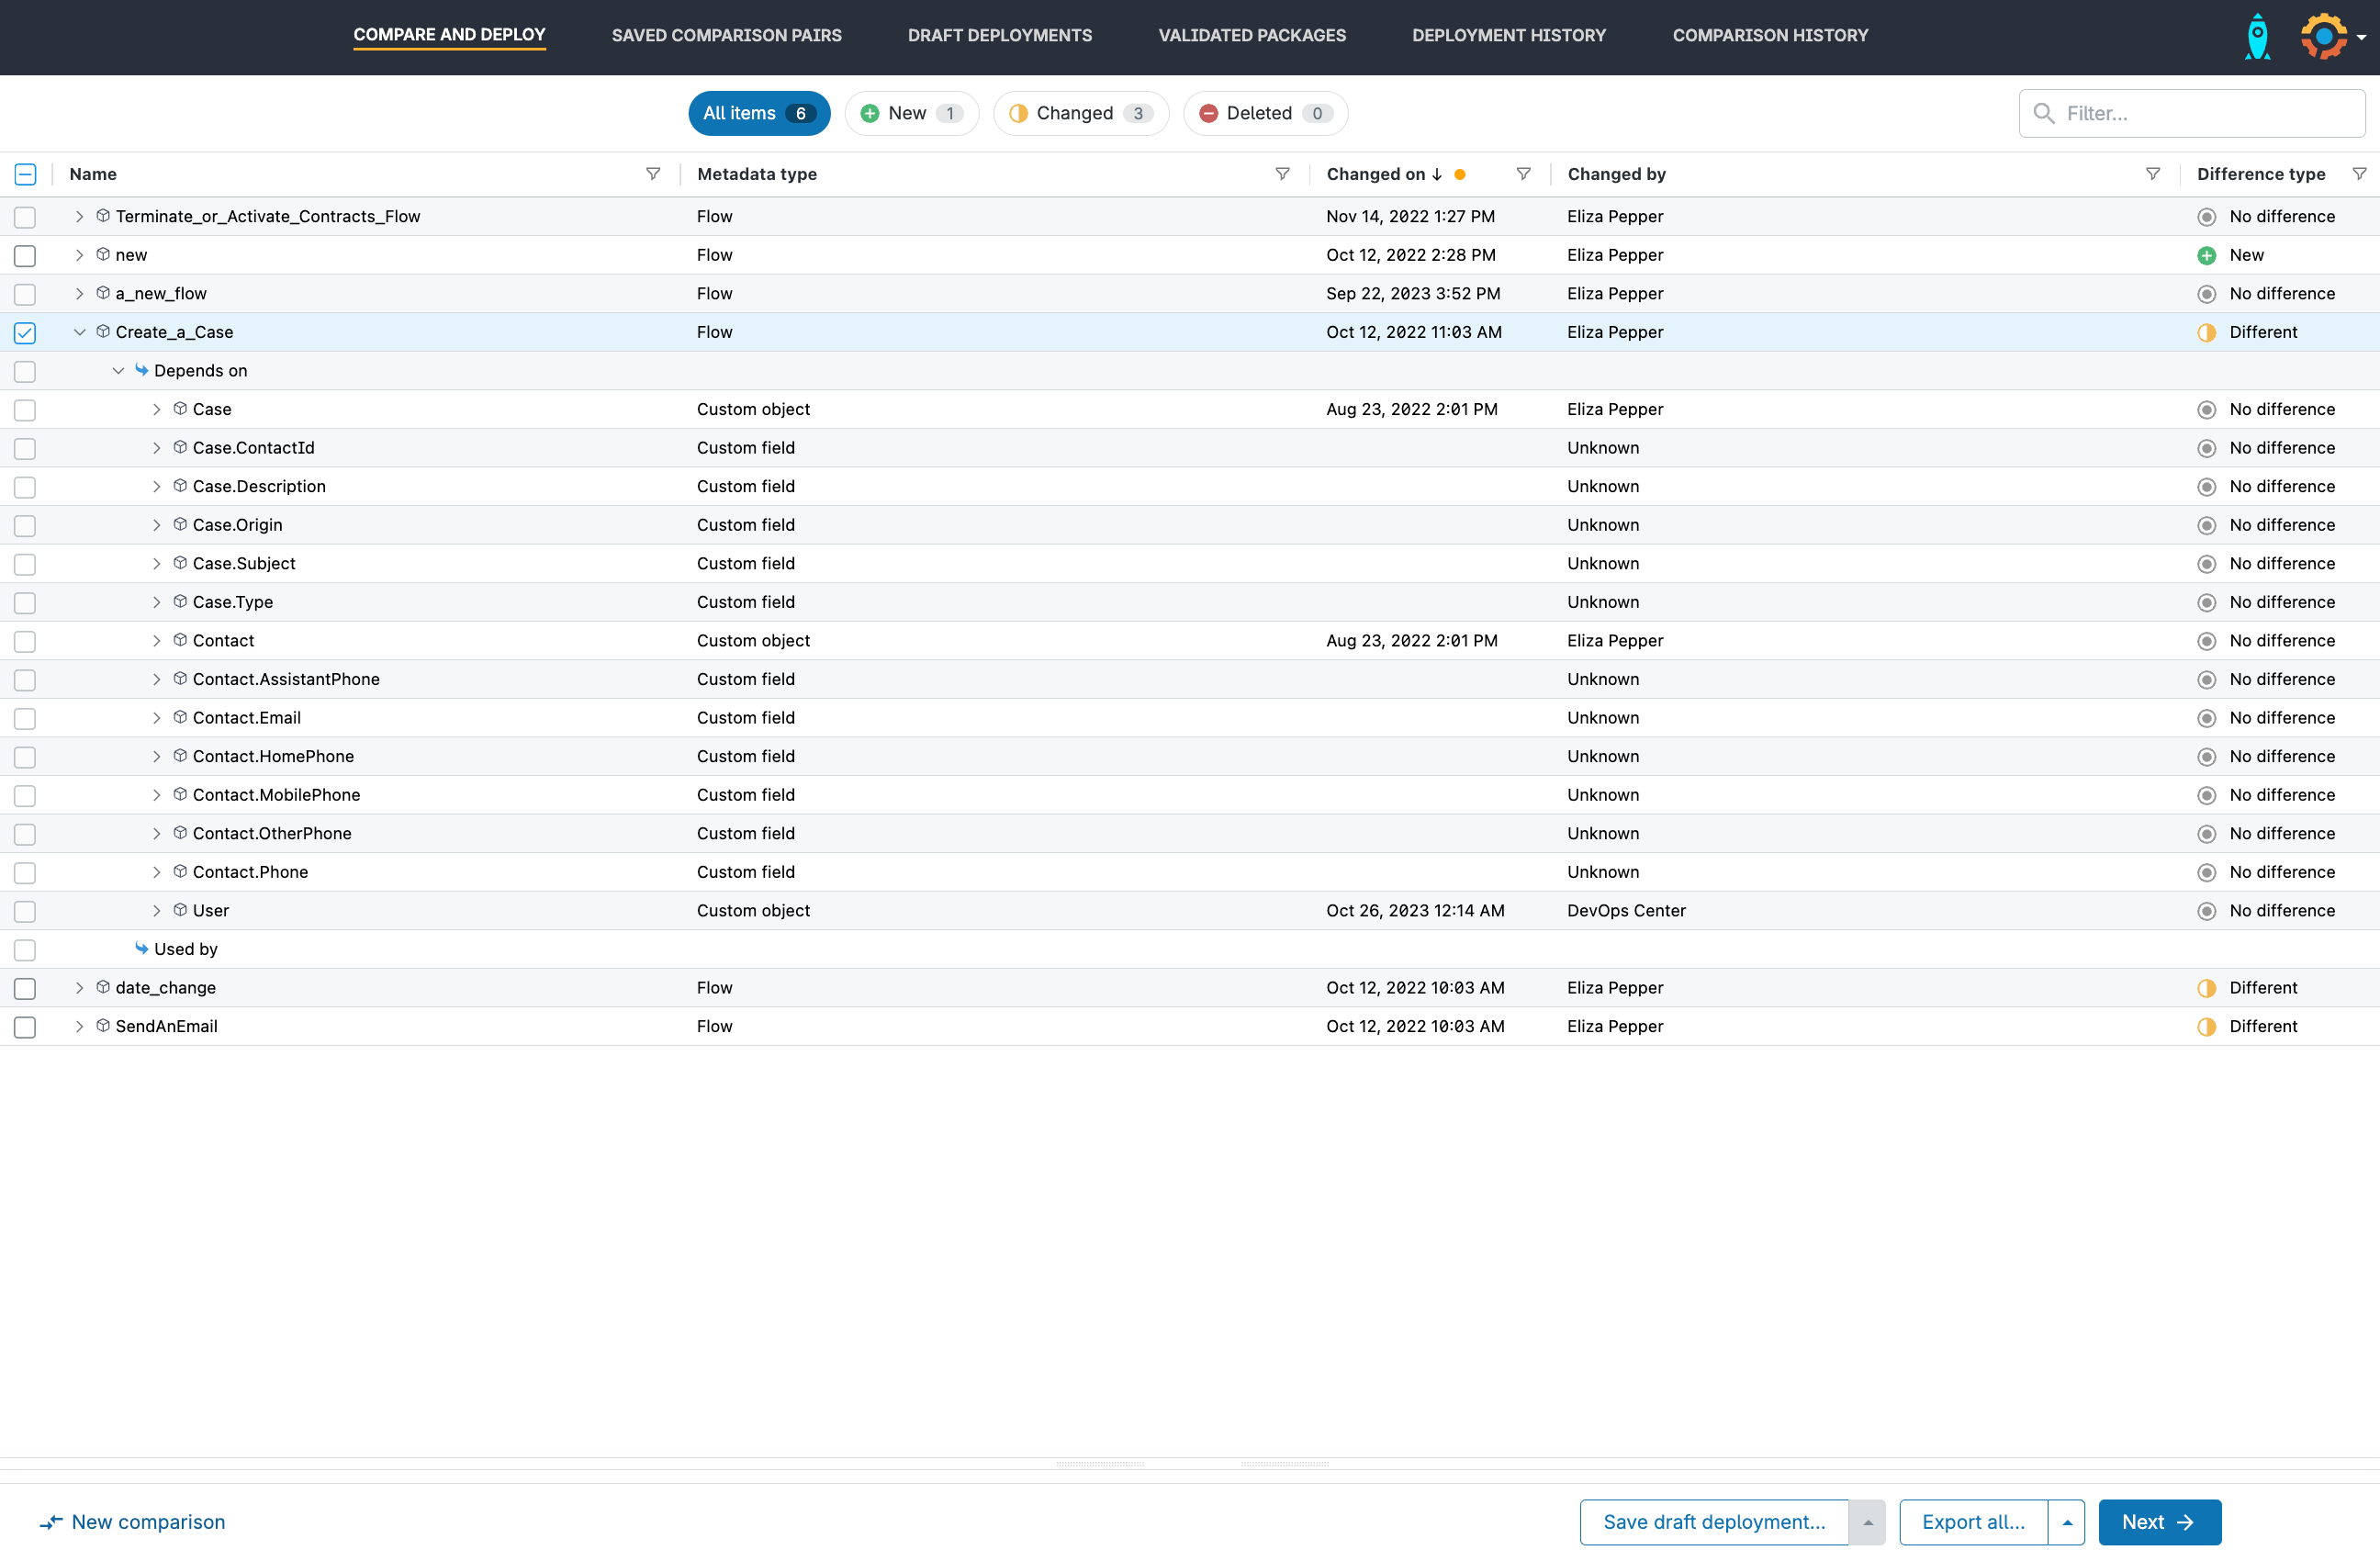
If your source and target are significantly out of sync, you may need to deploy any custom objects and fields your Flow depends on first — avoiding a bunch of validation errors.
Select the metadata items you want to deploy and click Next.
Step 5: Deploy to your target environment
Gearset’s problem analysis will flag any issues with your deployment, including any Flow-specific errors. Once you’ve accepted any suggestions to make the deployment more likely to succeed, click Pre-deployment summary.
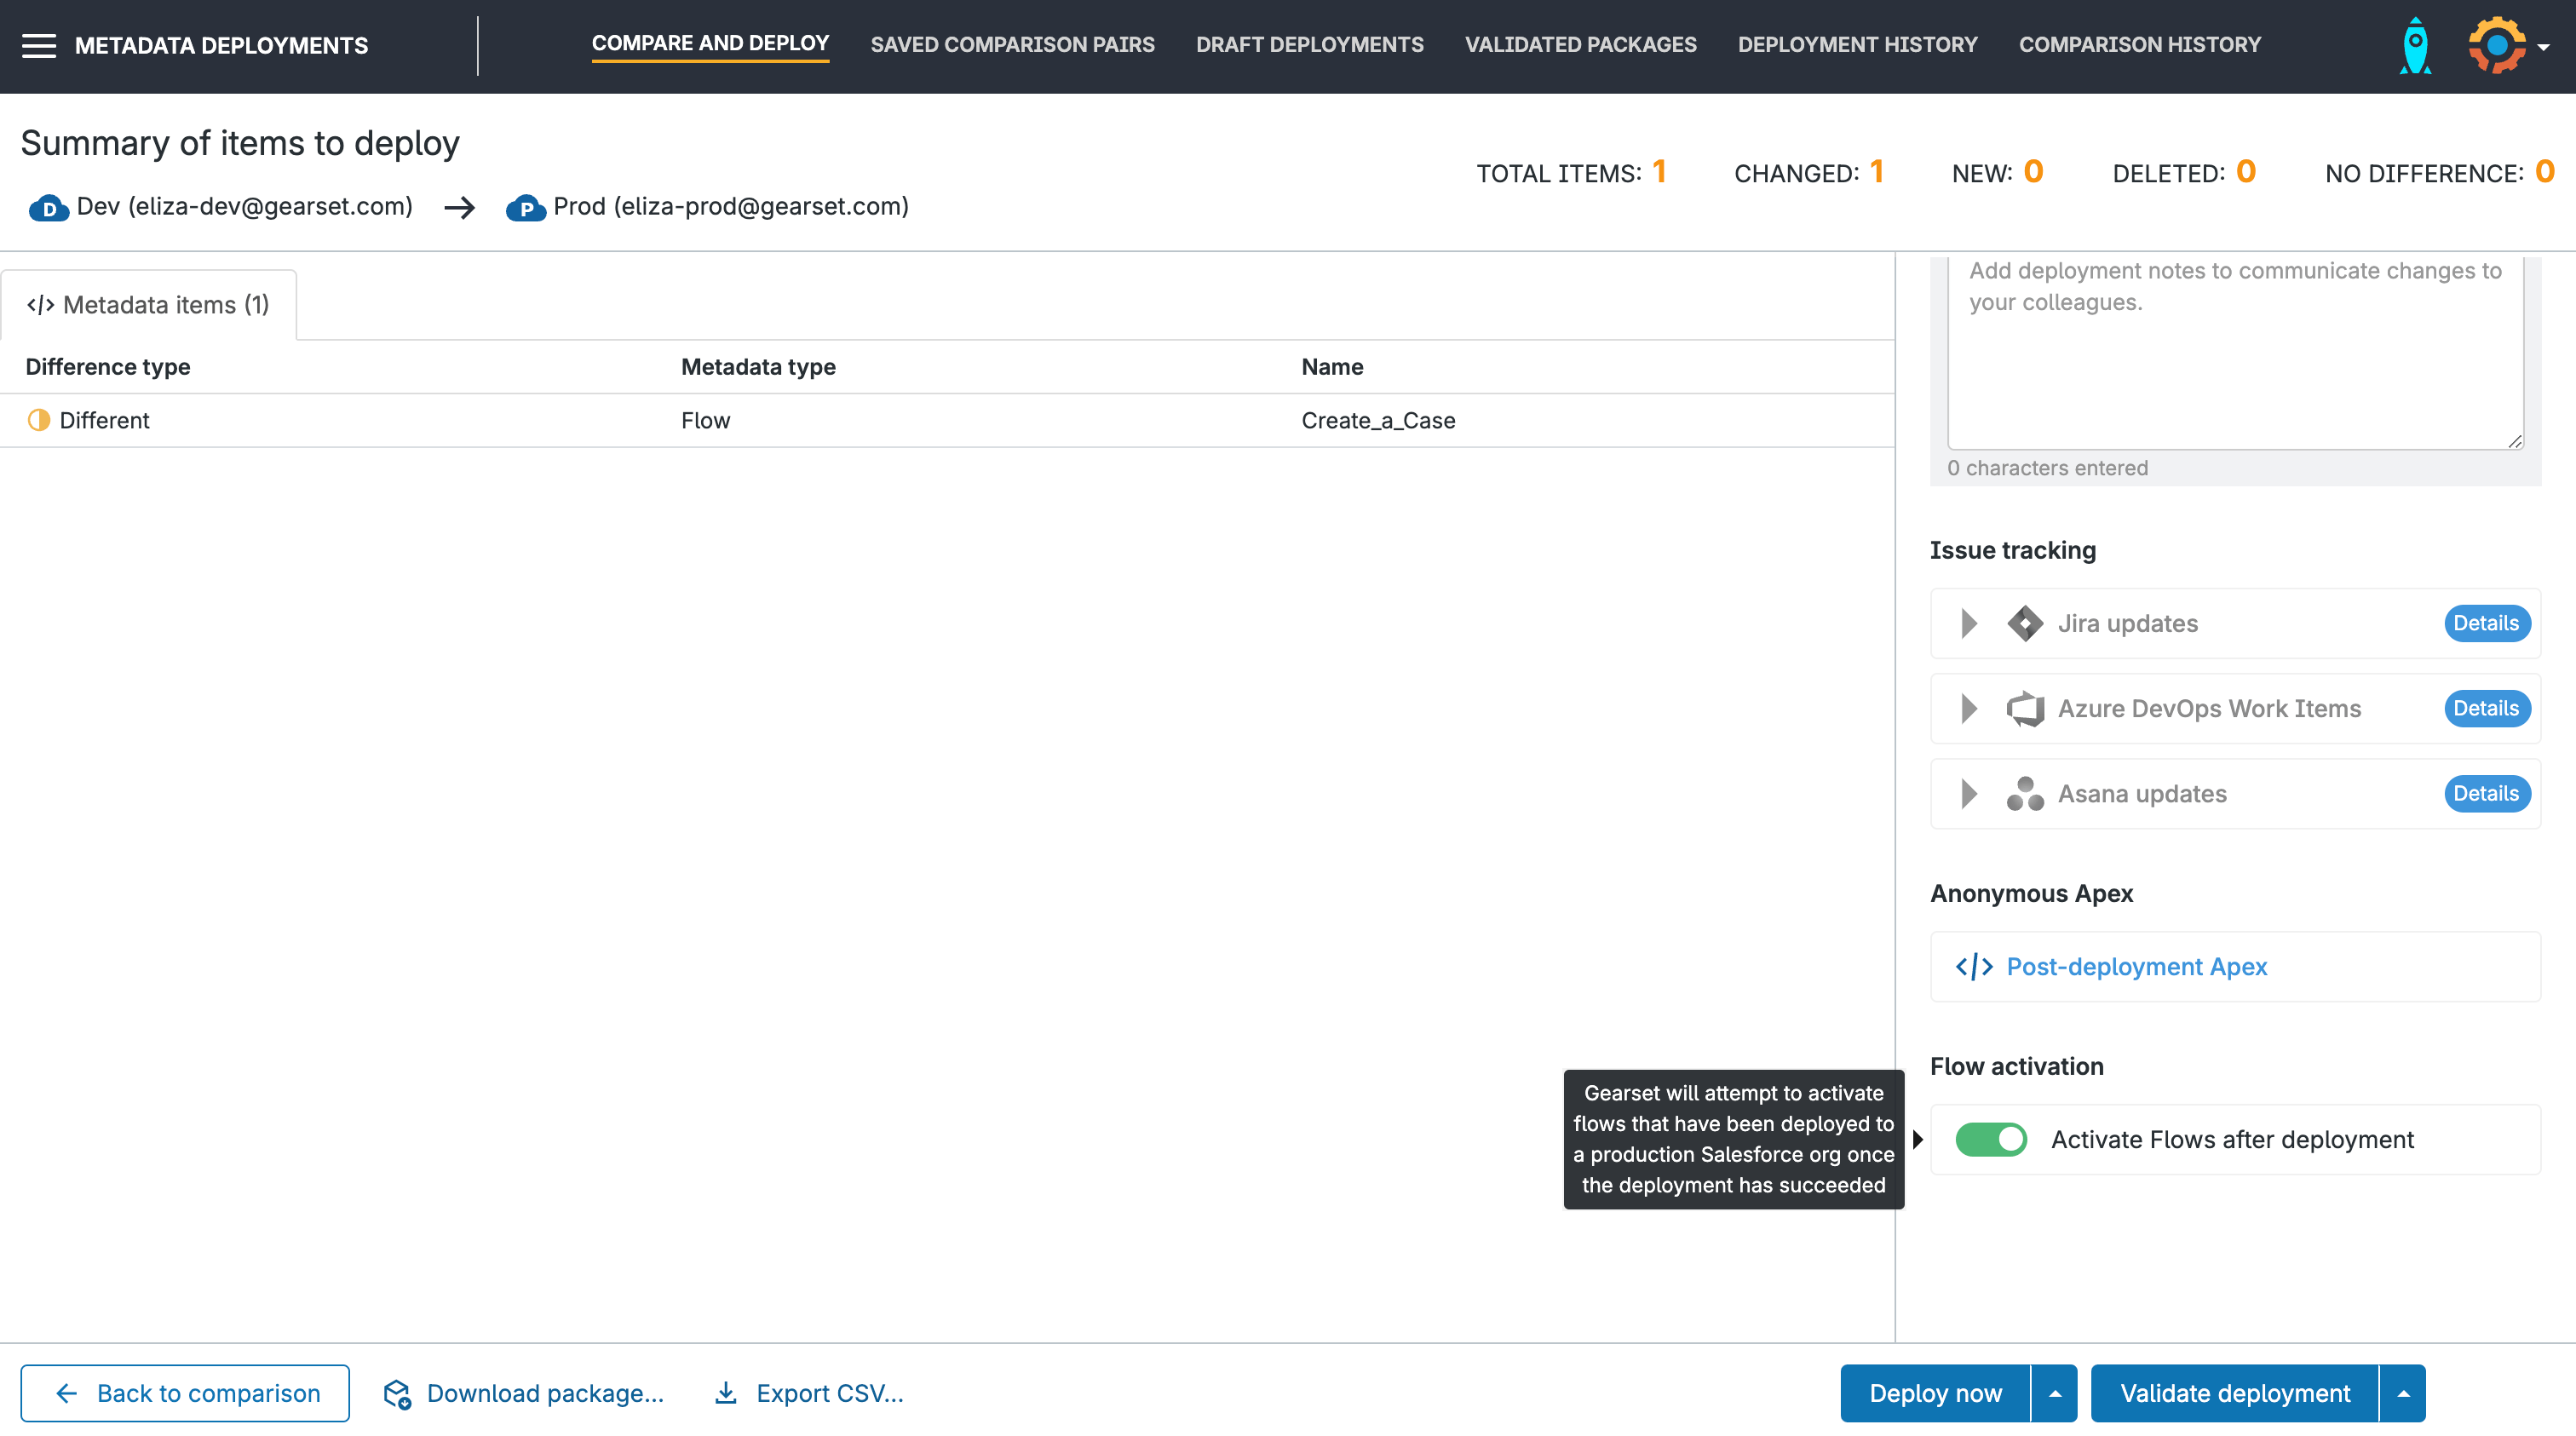
Step 6: Deploy a Flow as active
Gearset’s pre-deployment summary includes an Activate Flows after deployment toggle — so there’s no need to activate Flows in your production org manually.
Step 7: Validate and deploy!
The pre-deployment summary also gives you the chance to check over the package, give it a friendly name, and leave any notes for your teammates.
Clicking Validate deployment lets you see if the deployment will succeed, before hitting Deploy now. You can also schedule the deployment for a release window. Once the deployment has finished you can download a report of the from your Deployment history, where you can also redeploy to another org or roll back.
Step 8: Keep on top of any Flow errors
Once you’ve deployed your Flows, you can keep an eye on them with Flow error monitoring. You can monitor errors over time, spot trends, and ensure your automations stay healthy as your org evolves. It’s a lightweight, proactive safety net for your Flows, built to keep your Salesforce experience smooth.
Help! How do I delete a Flow?
Deleting old Flow versions is critical to org health. If an old version references a custom field, you won’t be able to delete that custom field. You might think you’ve removed all references to the custom field, when in fact there are still some lingering around.
Trying to delete a Flow is yet another source of potential frustration, and there are two problems to overcome. Firstly, you can’t delete an active Flow. The second problem is more of a conundrum: in order to delete a Flow, Salesforce needs you to specify every version of the Flow, but from v44 of the Metadata API onwards you can’t retrieve and deploy specific versions.
Depending on the API version you use, you’re likely to hit one or both of these errors:
Insufficient access rights on cross-reference idYou cannot delete this Flow version because it is active. Deactivate it, and try again.
Thankfully, Gearset’s problem analyzers resolve all of this for you. They disable the Flow, retrieve and deploy all the versions of the Flow, and deploy the destructive change successfully.
Get your deployments flowing!
Keep delivering the Flows that power your business’s automation, without getting blocked on deployments. Using Gearset’s metadata deployment solution you’re guaranteed to see more of your deployments work first time.
If you want to see our Flow navigation or monitoring in action, book a demo with one of our Salesforce DevOps experts. Or, try it for yourself with a free 30-day trial.
