

Salesforce CPQ deployments are well known for being slow, difficult and error-prone. Many teams wrestle with templates, spreadsheets and scripts. Some even recreate configuration manually in the target org. But Gearset’s CPQ solution offers a fundamentally different approach that makes the pain of CPQ a thing of the past.
In this post we’ll lay out Gearset’s approach to CPQ. You might also want to download our free whitepaper that gives more detail on how our solution addresses all the challenges of CPQ.
What is CPQ and why is it important to Salesforce teams?
CPQ has been around since the early 2010s but has skyrocketed in popularity over the past few years.
Sales reps no longer have to rely on complex pricing spreadsheets or risk sending incorrect quotes to customers — once products and prices have been configured, CPQ can generate quotes in just a few clicks. Introducing CPQ helps teams streamline their sales process by delivering quotes quickly, accurately and with consistency.
For businesses looking to increase their Salesforce ROI, migrating to CPQ has a real impact — Salesforce found that CPQ has helped teams reduce the number of quotes with pricing errors by 38% while making quote generation 10x faster!
But as CPQ adoption continues to increase, teams are grappling with the difficulties of trying to deploy CPQ config successfully.
San Francisco, CA
Dreamforce
What makes CPQ deployments so tricky?
CPQ started out as a managed package developed by SteelBrick but later became part of the Salesforce Revenue Cloud after SteelBrick was acquired by Salesforce in 2015. Due to its history as a managed package, CPQ has a complex configuration and dependency model that makes it difficult to deploy.
In fact, CPQ config can be so painful to deploy that lots of Salesforce teams avoid it completely, choosing to recreate changes directly in production instead. Even when migration solutions are used, the workflow usually involves at least two deployments: one for CPQ configuration and another for related metadata. Some of the headaches that Salesforce teams encounter while deploying CPQ in this way include:
- A split or incomplete audit trail, because metadata and CPQ config are deployed separately.
- Lots of time sunk troubleshooting deployment errors, slowing down other pieces of development work.
- Needing CPQ-specialised knowledge and skills, which hampers collaboration and creates a bottleneck.
- Delays for end users because the release process is error-prone and slow.
- Difficulty integrating a CPQ deployment process into an existing DevOps workflow.
- You can make these pains a thing of the past with Gearset’s metadata and CPQ deployment process.
A new approach to CPQ deployments
Gearset is known for providing an easy-to-use and effective Salesforce DevOps solution. Our ‘compare and deploy’ workflow makes metadata deployments intuitive, and our powerful problem analyzers find and fix issues that would cause your deployment to fail. Now we’ve built the same for CPQ, so CPQ deployments are just as intuitive as metadata deployments with Gearset — whether you’re using source control or not.
Just as Gearset lets you view XML differences for standard metadata, we’re now rendering CPQ differences in the same way, bringing unparalleled transparency and understanding to how CPQ configuration differs between orgs or Git branches. Critically, Gearset will automatically manage deploying new CPQ records at deployment time, removing the need to manually maintain relationships.
Being able to view, compare and handle CPQ and metadata simultaneously in Gearset’s intuitive UI is a game changer for Salesforce teams.
Here are just a few ways that deploying metadata and CPQ config together with Gearset can help you and your team.
Everyone can deploy CPQ
Migrating CPQ config across environments shouldn’t require specialists; be confident deploying CPQ with Gearset regardless of your experience or role.
Incorporating CPQ config as part of the metadata deployment flow that thousands of Gearset users are already familiar with makes CPQ accessible to everyone. The more members of your team that are able to deploy CPQ config, the quicker you’re able to release updates to end users.
Automatic change monitoring
Gearset’s change monitoring automatically checks for differences to your org’s CPQ config and metadata every day, and notifies you of any changes found.
Your monitoring job will detect any changes made directly in the org, to catch any potentially unwanted updates to your CPQ config, and alert you to differences from the previous day. Keep your orgs in sync easily by deploying these changes to your other environments in just a few clicks.
Gearset keeps a complete audit history of all new, changed and deleted CPQ config, which can be downloaded and shared for easy reporting.
Save time and effort
Using two different workflows — one for deploying metadata changes and another for CPQ config changes — is time-consuming, inefficient and stressful. Not only does it make the process much more complex than it needs to be, if something goes wrong you then have two separate deployments to unpick.
With Gearset’s Salesforce CPQ deployment solution you can cut your workload in half with a single, comprehensive metadata and CPQ deployment.
Comprehensive auditing
When CPQ migration is spread across multiple deployments — and often different solutions — it can create an auditing nightmare. With a split papertrail, it can be time consuming or even impossible to get a full breakdown of what was deployed, by who and when.
Deploying metadata and CPQ config together with Gearset means that all deployments can be audited in a single place. This includes a full history of every deployment carried out in the app. Gone are the days of manually tracking what has been changed — simply download a full deployment report from Gearset for stress-free auditing on demand.
Roll back changes
Even with the best planning, sometimes deployments need to be undone. Gearset’s rollback functionality helps you easily revert new, changed and deleted metadata items, as well as changed CPQ config items.
Gearset automatically takes a snapshot of your target org before a deployment which is then used as the source of the rollback comparison. With the snapshot as the source and your org as the target, you can use the same compare and deploy flow to rollback deployments.
CPQ source control
With Gearset you can easily compare the CPQ configuration between two orgs, or between an org and a Git branch, seeing the exact differences between your source and target environments. You can then deploy any changes you want to, just like you would any other metadata.
How to use Gearset for CPQ
Watch our webinar to find how Gearset can help you to deploy CPQ config without Crying, Procrastinating or Quitting or follow along with these steps:
Run the external ID setup wizard
Before deploying CPQ configuration, you need to run Gearset’s external ID setup wizard on both your source and target orgs. You only need to go through this process once, unless new objects are added.
Adding the external ID is a simple, automated process, which prevents duplicate records from being created. It also enables rollbacks of changed CPQ items. The external ID doesn’t interfere with any existing external ID fields you may already have.
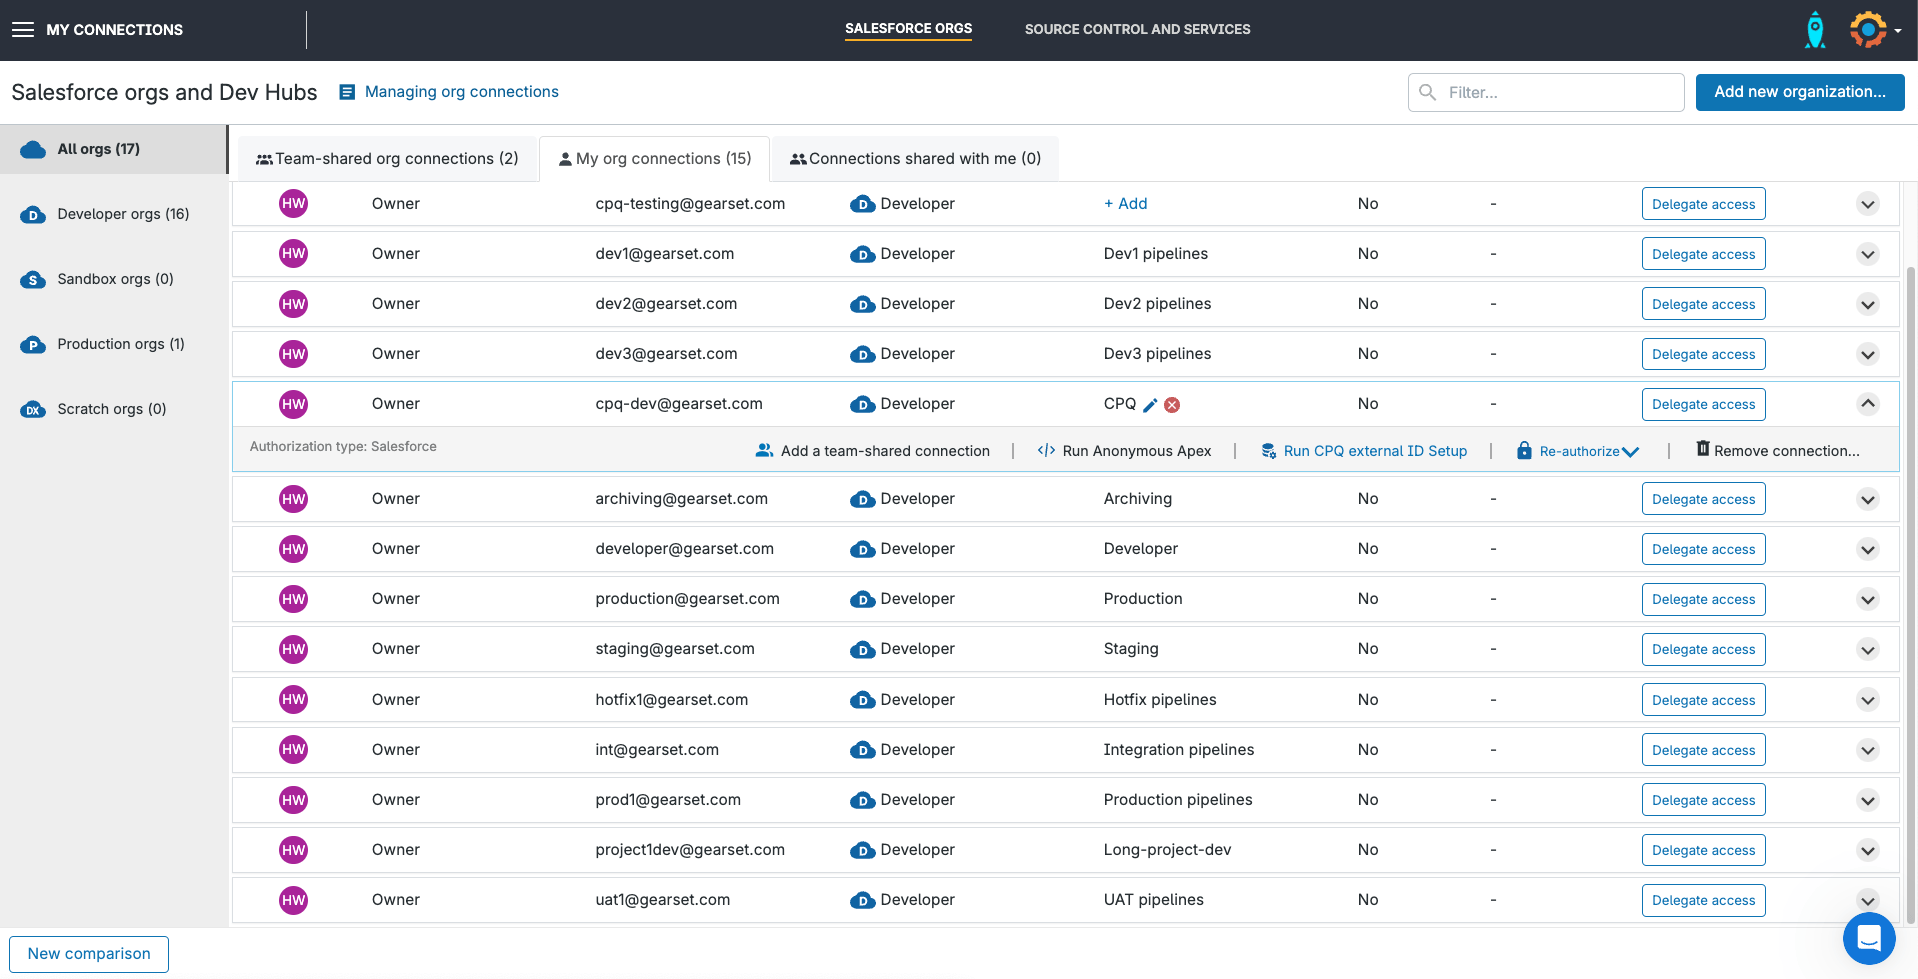
You can enter the setup wizard from the list of your connected Salesforce orgs. Or, when you first try to compare an org that has CPQ enabled, Gearset will detect this automatically and prompt you to begin the setup process. Just click Run setup to begin.
You should disable any validation rules or triggers before starting, because they may cause the external ID creation process to fail. Then click Create Gearset external IDs.

Gearset automatically runs the external ID setup in three steps:
Step 1: Gearset checks the org to make sure Gearset’s external ID field can be added.
Step 2: A metadata deployment adds the external ID field to your CPQ and related objects.
Step 3: Gearset will then populate those external ID fields that were added in step 2. Gearset will derive its external ID value from the existing Salesforce record ID.
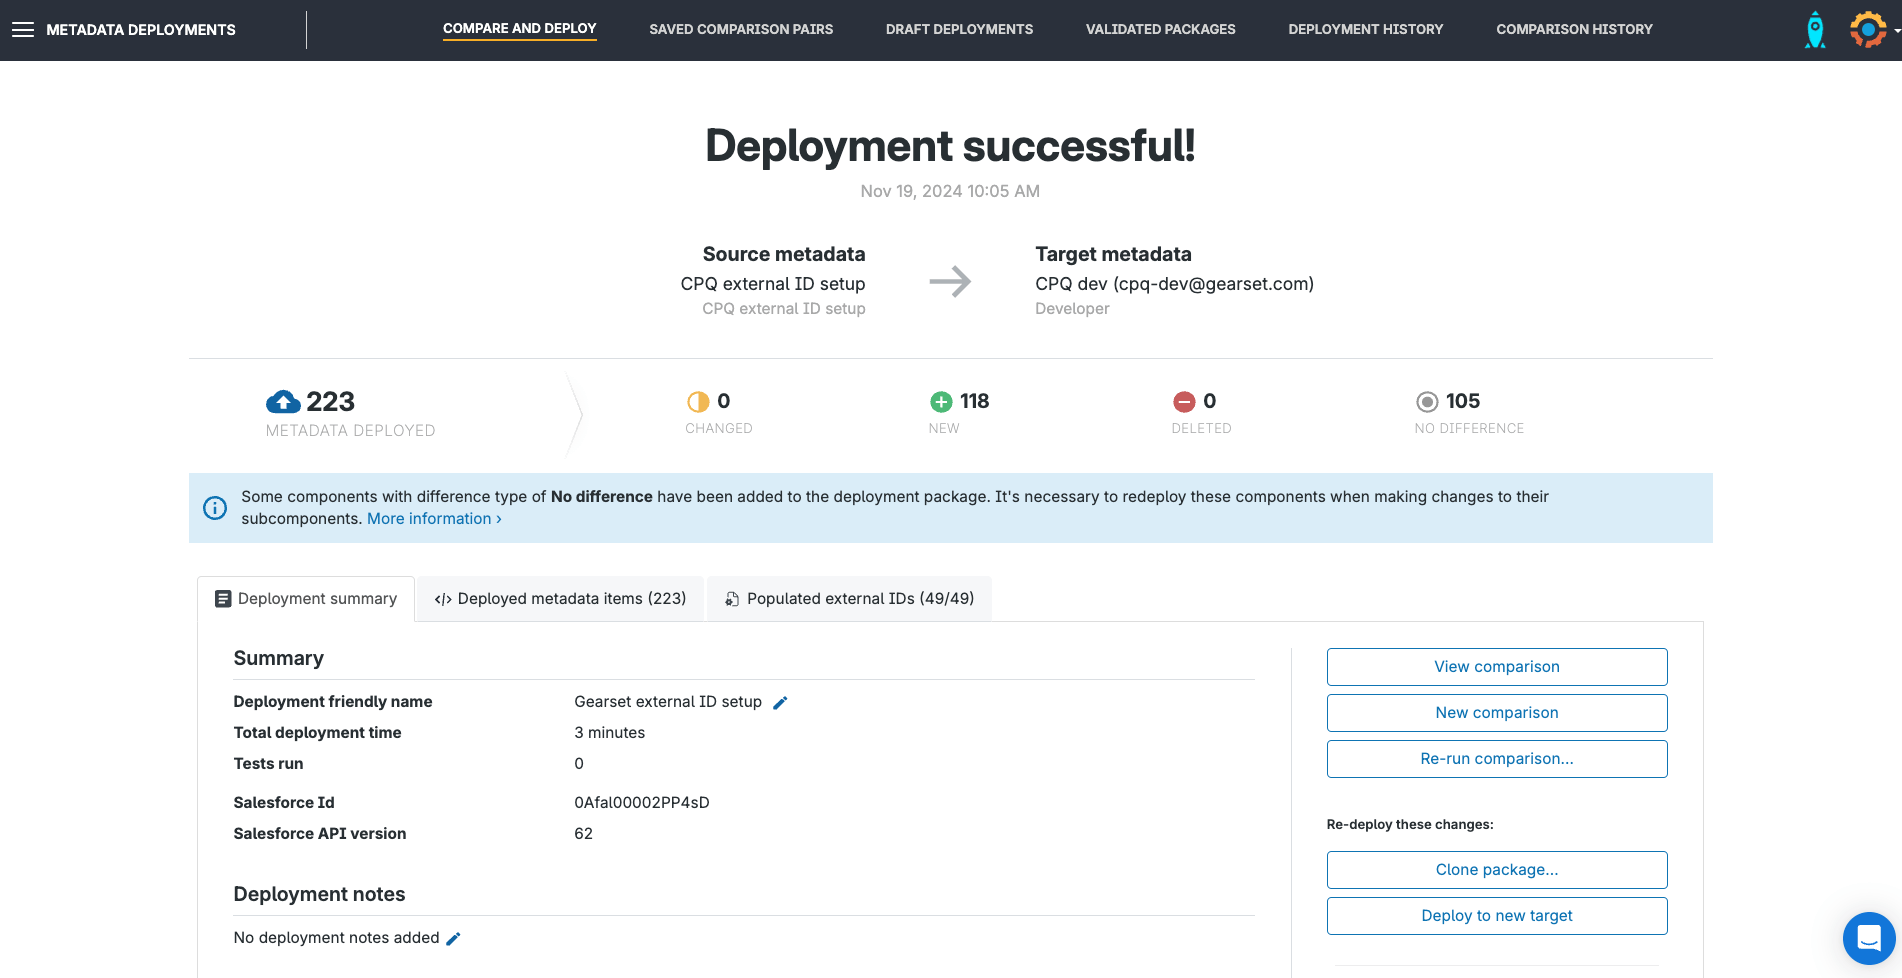
The deployment success page will confirm that the external ID setup wizard has run successfully.
Configure your CPQ comparison
Once the external ID setup has been run on the source and target org, you’re ready to begin comparing and deploying your CPQ configuration!
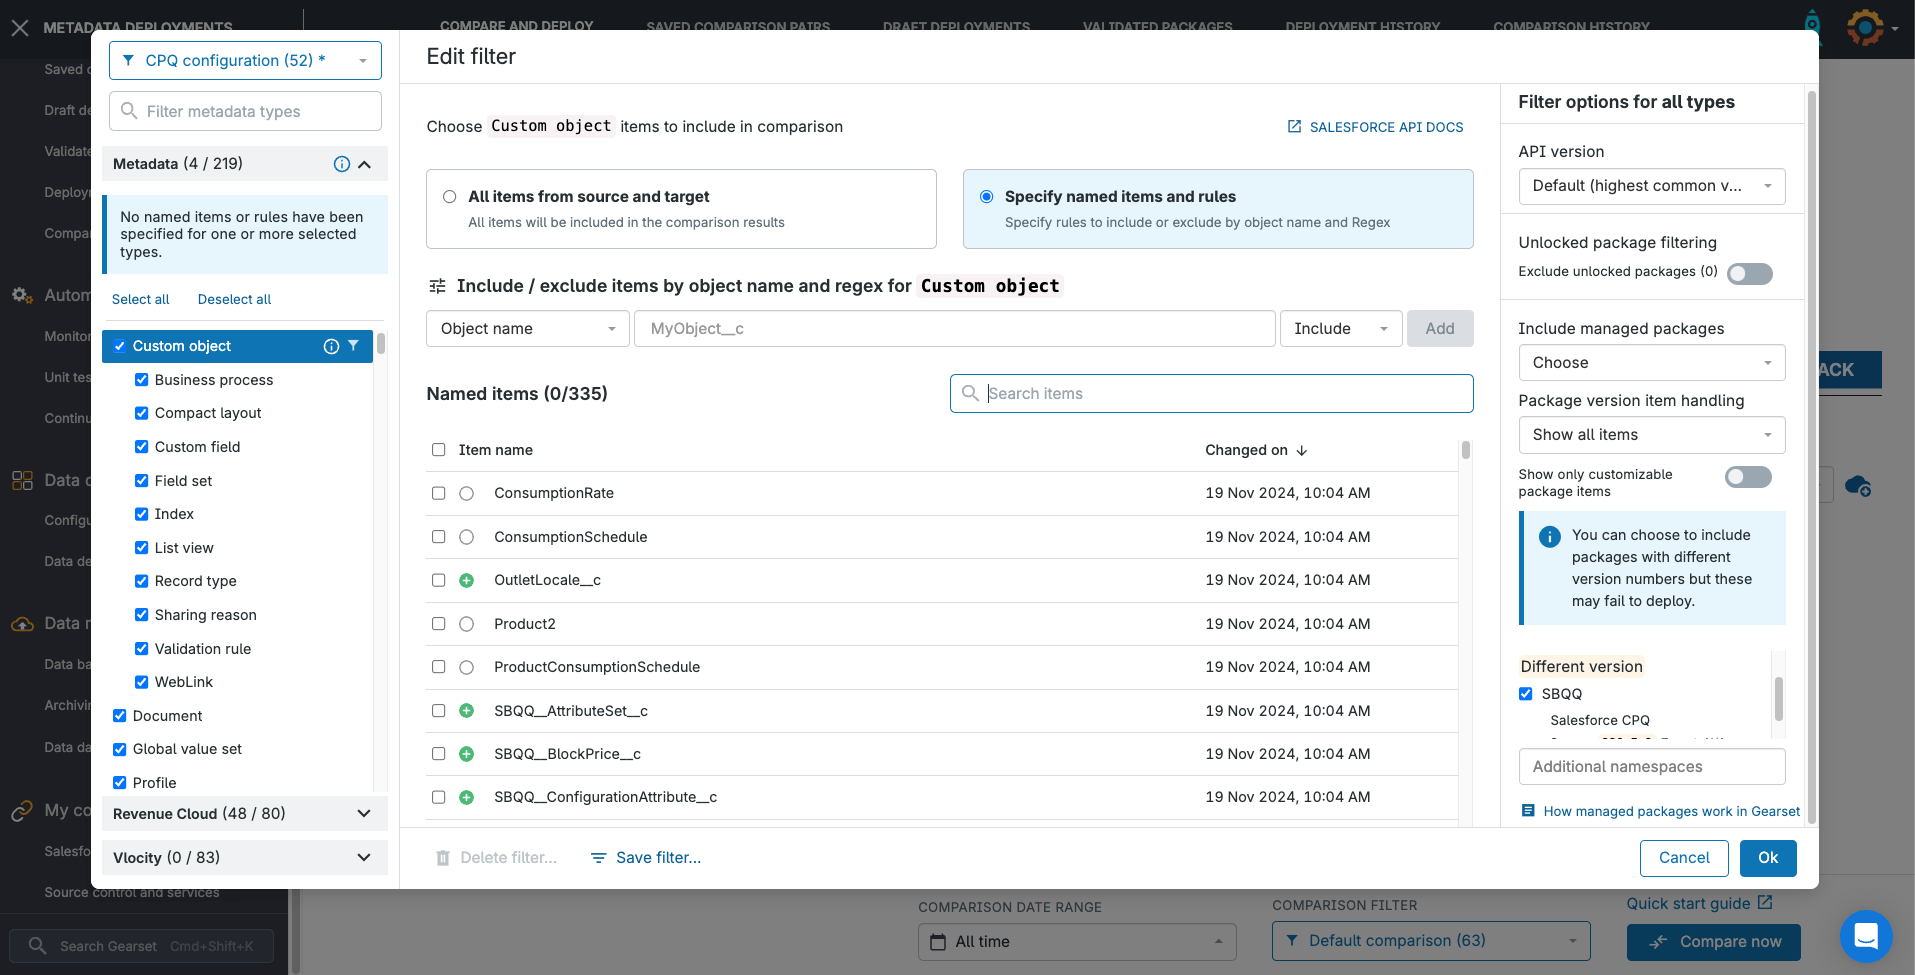
The first step is to choose the CPQ objects and related metadata that you want to compare and deploy. While you can add metadata types to your comparison results on demand, for CPQ deployments it’s a good idea to set up some filters on the comparison from the start. You can do this via the metadata filter, which you’ll find from the Compare and deploy page as a dropdown, or on the next page after you press Compare Now.
You can use the Standard CPQ filter, or configure your own by selecting specific metadata types and CPQ objects to compare and deploy. At minimum, you’ll need to include the following:
- The
SBQQ managed package, which you select from the Include managed packages section - The CPQ objects that you want to compare and deploy — these are listed on the CPQ tab
- From the Metadata tab, any releated Salesforce metadata that your CPQ configuration may depend on — most likely including
Custom object,Global value set,ProfilesandGlobal picklist
Hit Compare now. Gearset will pull in the metadata and CPQ configuration to compare from your orgs. You can add other metadata items to your filter on the next page.
Build your CPQ deployment package
CPQ configuration is displayed in the comparison results grid, just like Salesforce metadata. You can select and deploy both metadata and CPQ configuration as part of the same deployment package.
CPQ items are indicated in the metadata type column using the CPQ prefix, e.g. CPQ product, CPQ template, CPQ product options, etc. Expanding a CPQ item in the comparison results will show you any dependencies for that item, which you’ll want to include in your deployment.
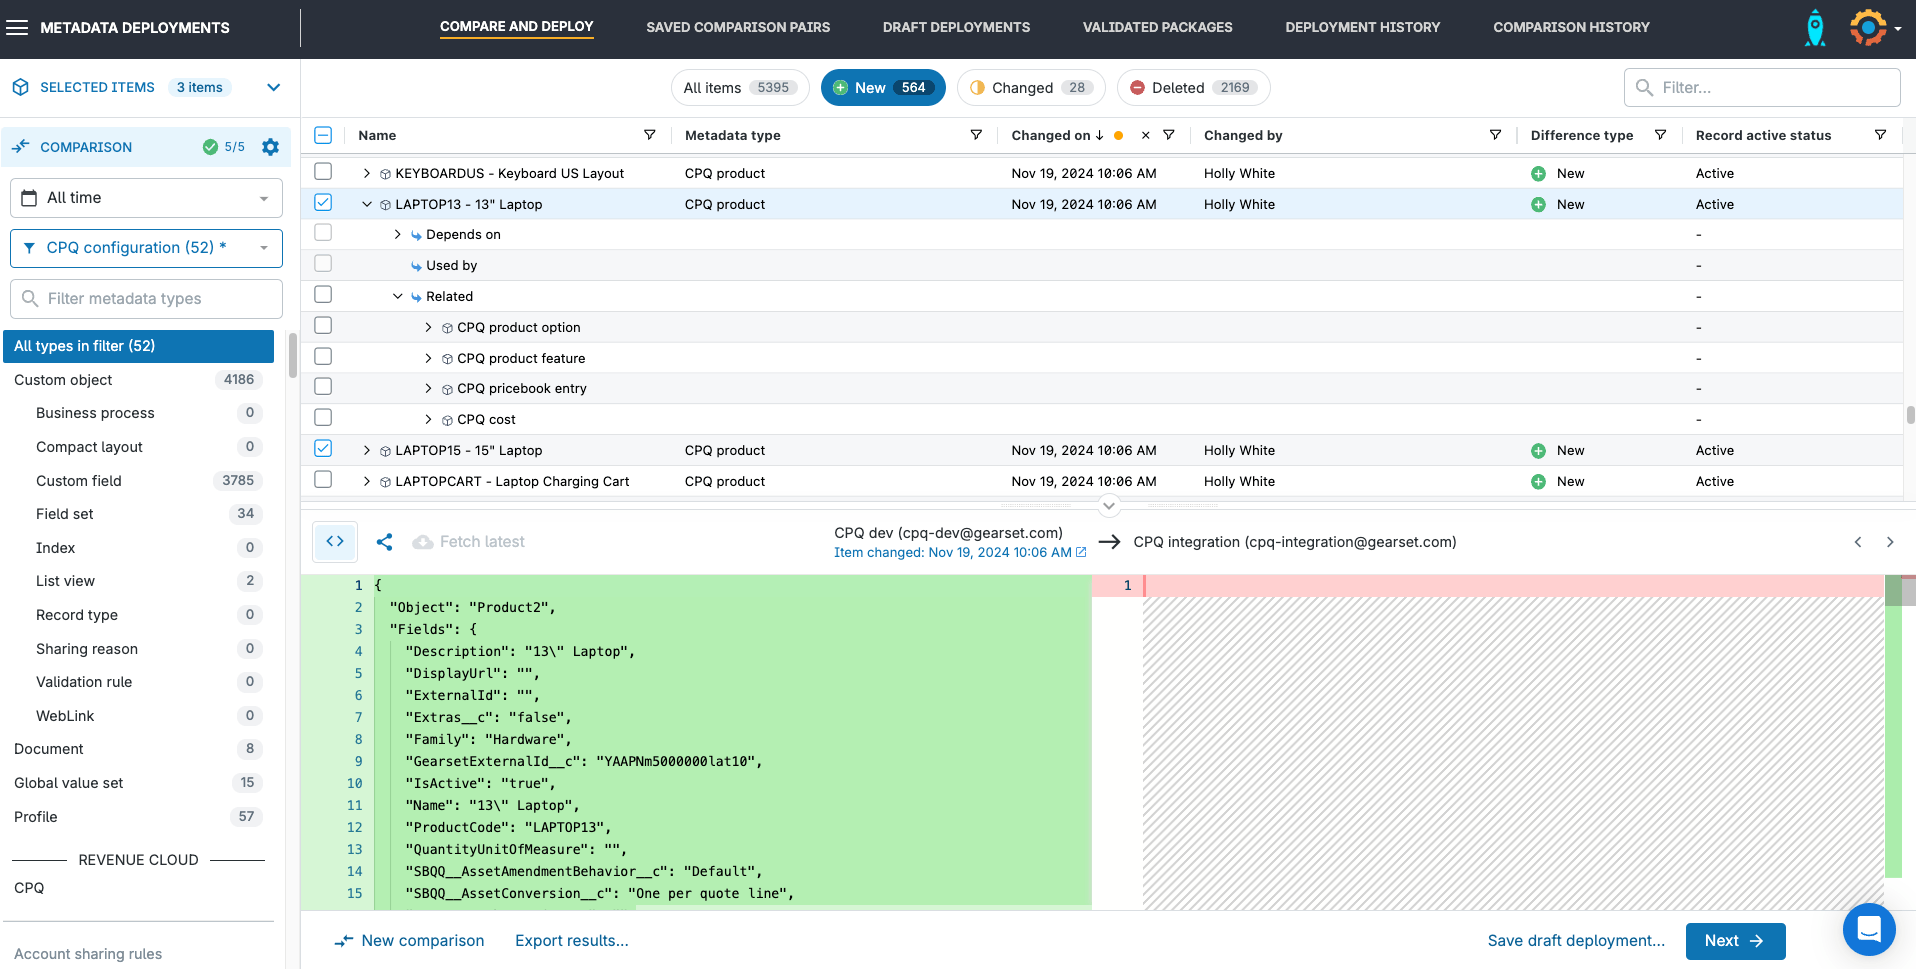
Gearset will automatically handle the population of the record ID for any new item you deploy, as part of the final deployment process.
Deploy CPQ more successfully
As with any deployment, Gearset will detect common issues that may cause your deployment to fail, such as missing dependencies.
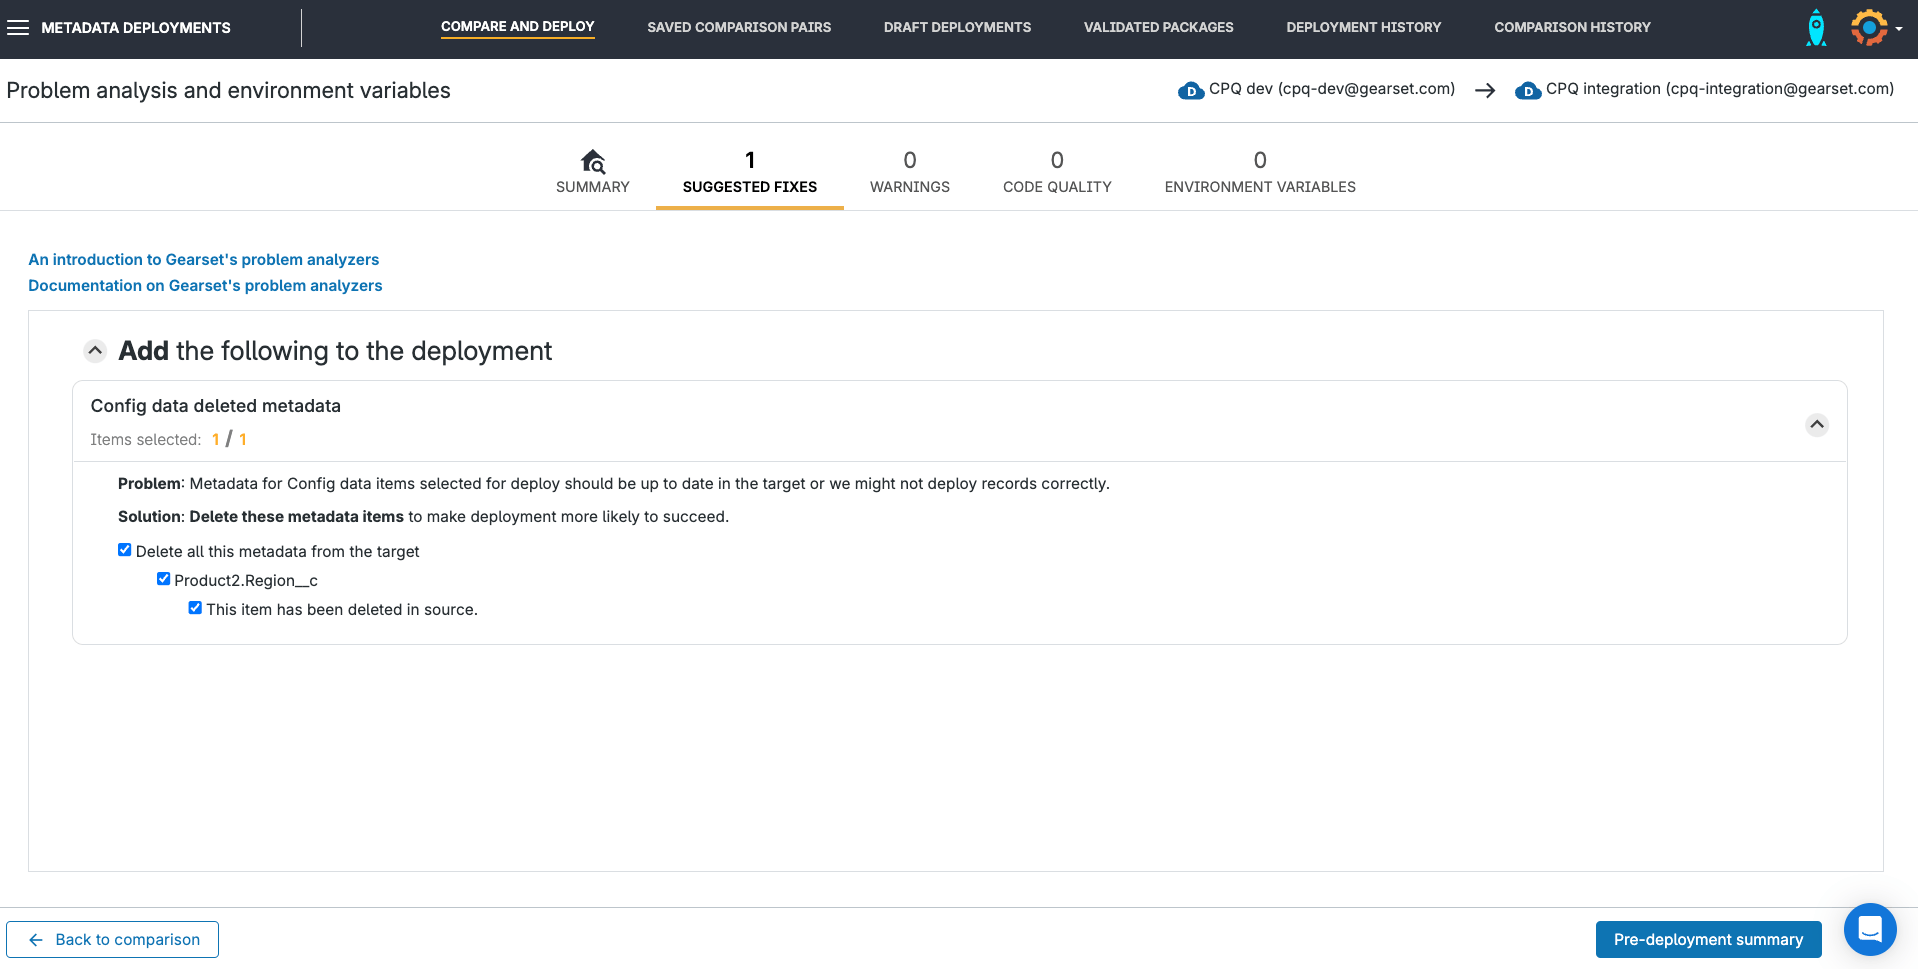
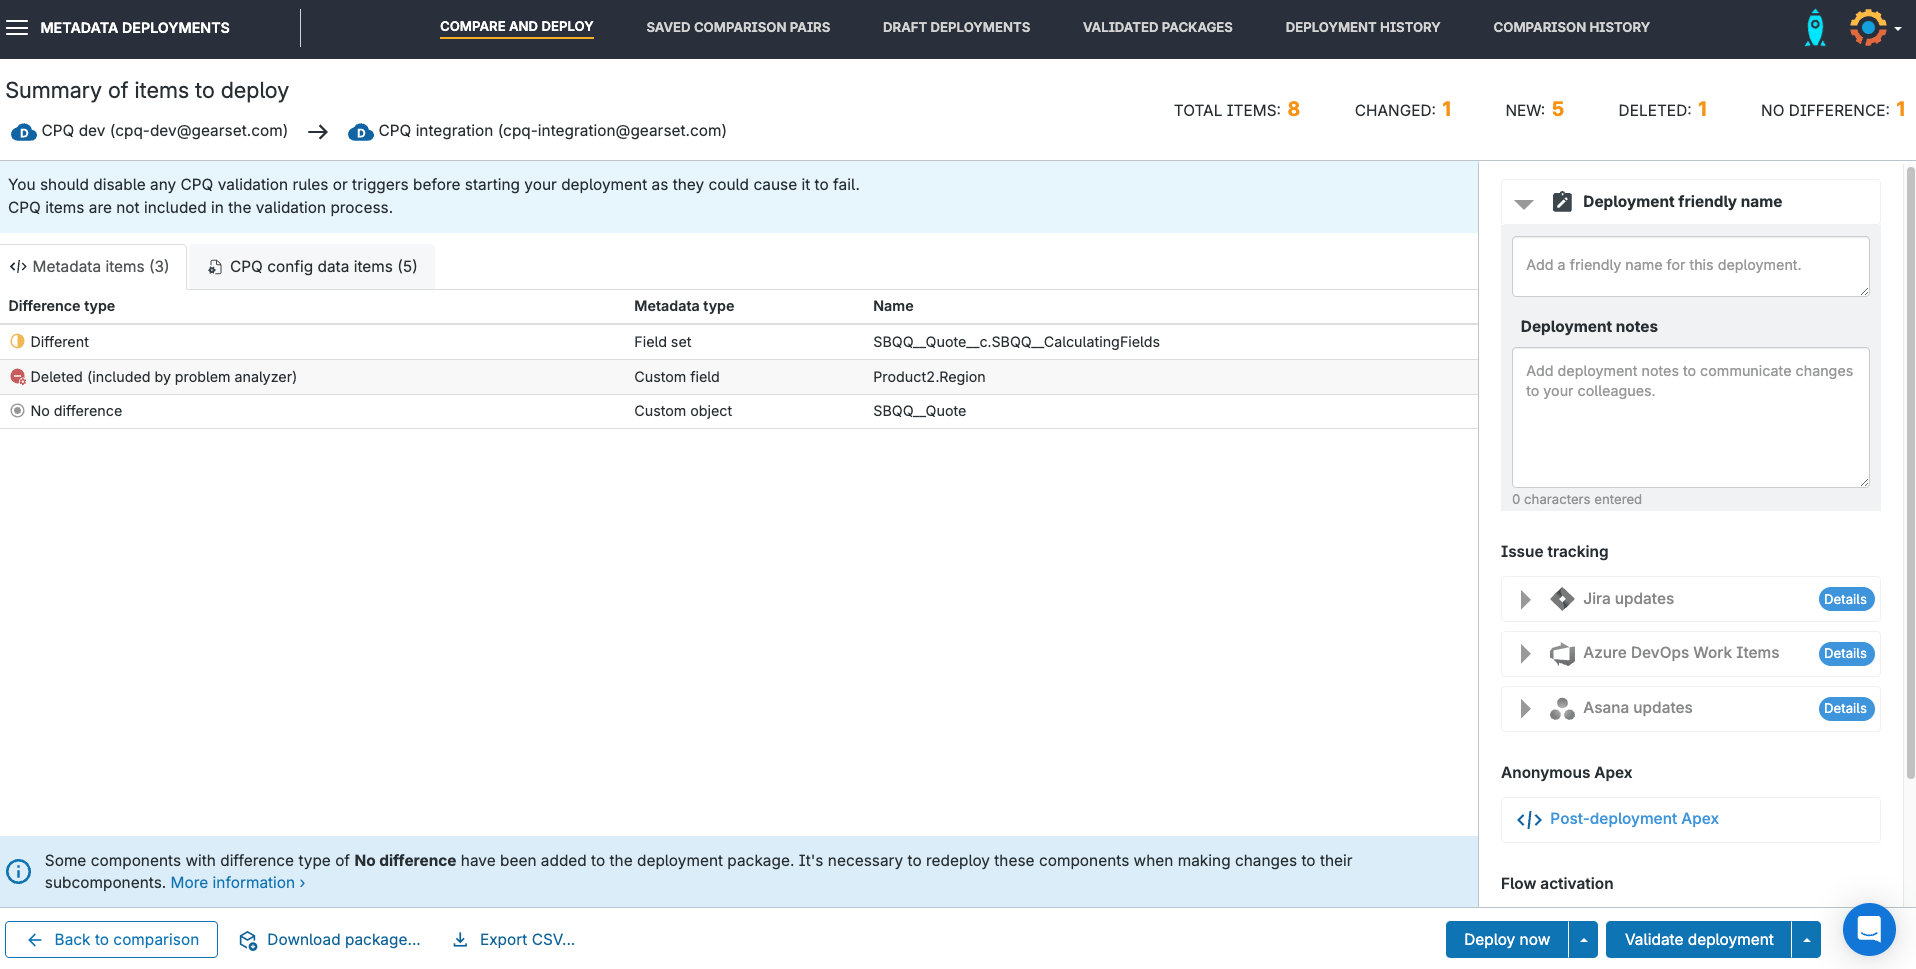
The pre-deployment summary shows you the full list of CPQ and any metadata items being deployed, including any that have been added by Gearset’s problem analyzers. You can add a name and deployment notes for the deployment — these will appear in your metadata deployment history.
When you’re happy that the deployment package looks right, hit Deploy now.
Gearset will deploy any metadata included in the deployment package first. Should this metadata deployment fail, Gearset will stop the deployment and roll back any metadata changes. This makes sure your Salesforce org is left in its original state, and no CPQ deployment will be attempted. Once the metadata has been deployed successfully, and any tests on the deployment have passed, your CPQ configuration will be deployed.
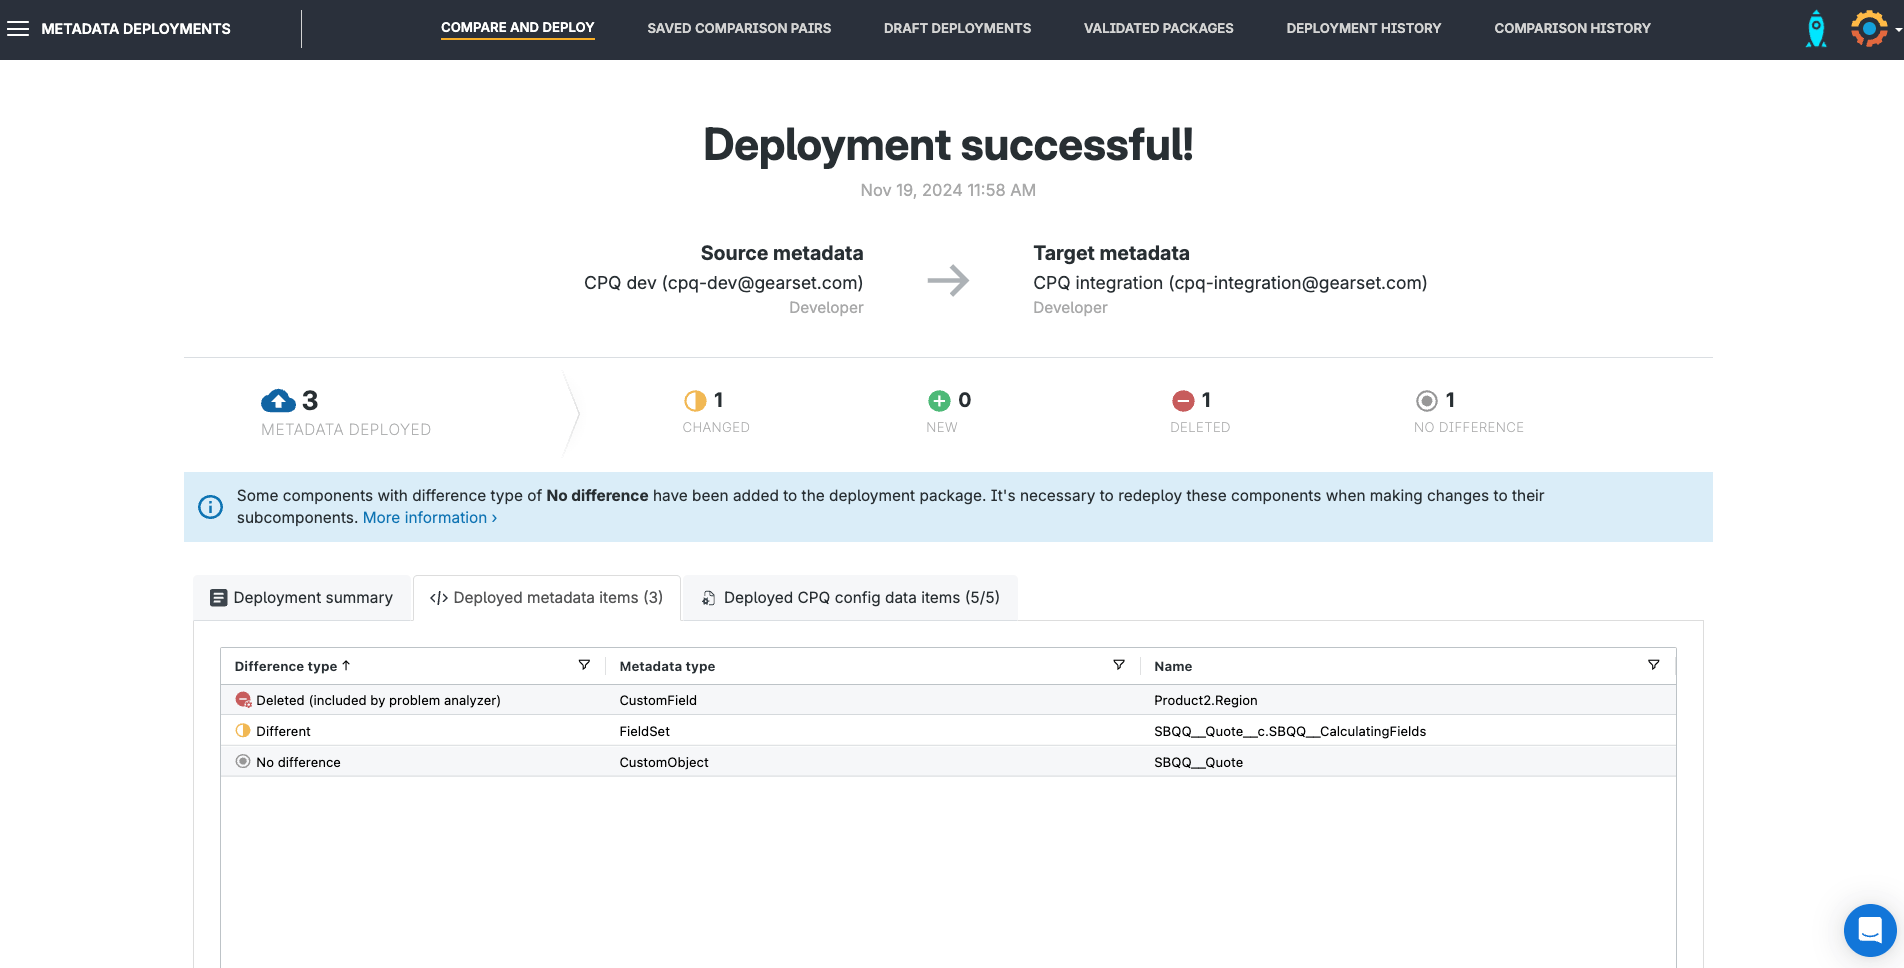
On the Deployment success page you’ll see the summary of items deployed, with a direct link to each record in the target org. The deployment will also be added to your history.
Try Gearset for CPQ
This new workflow for CPQ deployments is a real departure from more traditional approaches, dramatically reducing the time and effort wasted on releasing your latest changes. Gearset’s free 30-day trial includes full access to CPQ deployments, so you can try it for yourself. It’s always great to hear how you’re getting on — so reach out via the live chat if you want to talk to us about your CPQ deployments.
Our free whitepaper, Salesforce CPQ deployments: How to cut the complexity from CPQ release management, is also a great resource to download and share with your team.
