

Salesforce change sets are the native tool for moving metadata from a sandbox to a production org. At first, it seems like a pretty good solution. But when you hit a failed deployment at 11pm because a dependency was missed or you forgot a component and had to rebuild the entire package from scratch, it feels like something else entirely.
For small teams pushing a handful of changes each sprint, change sets do the job just fine. They’re free, built into every org, and need nothing more than an authorized deployment connection to start working. But as teams grow, release cadence increases, and org complexity builds, the manual dependency work that change sets require grows faster than the headcount available to do it — and failed deploys become routine rather than the exception.
This article covers how change sets work, where they tend to break down, and what Salesforce teams do when they’ve outgrown them.
How change sets move metadata between orgs
Change sets package metadata in a source org and deploy it to a target org through a deployment connection. They use the Metadata API so you don’t need to work with XML files or run command-line tools. Instead, you select components through the Salesforce UI, upload the package, and deploy it in the target environment.
Change sets work between orgs that share the same production instance. This means you can deploy from a sandbox to production, or from one sandbox to another sandbox — as long as both sandboxes were created from the same production org. You can’t use change sets to migrate metadata between unrelated orgs, such as two separate production environments or orgs belonging to different companies.
Not being able to move metadata between unrelated orgs creates a boundary around your org which severely limits flexibility. Many teams need to move configurations between unrelated orgs — during a merger, for example, or when setting up a new business unit with its own production environment — and change sets simply can’t help. You’ll need the Metadata API directly or a deployment platform that supports org-to-org comparison regardless of lineage.
For most teams, the typical development process runs from a developer sandbox through a staging or UAT sandbox and into production. Change sets support this linear flow, but each step requires its own deployment connection and its own change set. You can’t create a single package that deploys across multiple environments in sequence — each step requires building and validating separately every time.
Setting up deployment connections
Before you can upload an outbound change set, you need to set up a deployment connection between the source and target orgs. This is a two-part process that requires you to complete some steps in each org.
In the target org (the one you’re deploying to), navigate to Setup → Deployment Settings. You’ll see a list of related orgs — your production instance and any sandboxes created from it. Select the source org you want to receive changes from and enable Allow Inbound Changes.
The source org doesn’t require additional configuration to send outbound change sets, but the connection is one-directional by default. If you want to send change sets back in the other direction — from production to a sandbox, for example — you’ll need to configure that separately in the other org’s Deployment Settings.
This step is often missed when creating new sandboxes. A common point of friction is when an admin finishes building in a new sandbox, tries to upload their first change set, and discovers the deployment connection wasn’t authorized. Checking Deployment Settings in your target org before you start building saves time later.
Permissions default to System Administrators, but you can grant deployment access to other profiles through the Upload Outbound Change Sets and Create and Upload Change Sets permissions. This lets release managers coordinate deployments without requiring full admin rights.
How to build an outbound change set
With your deployment connection in place, you’re now ready to build your change set. Building an outbound change is done in three steps, and this is where teams start to feel some initial pains:
Selecting components
To create a change set, navigate to Setup → Outbound Change Sets in your source org and click New. Give the change set a descriptive name — something you’ll recognize weeks later when it’s sitting in a list of similar packages. “Q4 Release” is too vague. “Account Territory Fields Oct 2024” tells you exactly what’s inside.
The next step is adding components. Click Add and you’ll see a list of metadata types: custom objects, fields, Apex classes, flows, page layouts, and so on. Select the type, then choose the specific components you want to include. Adding the components is entirely manual.
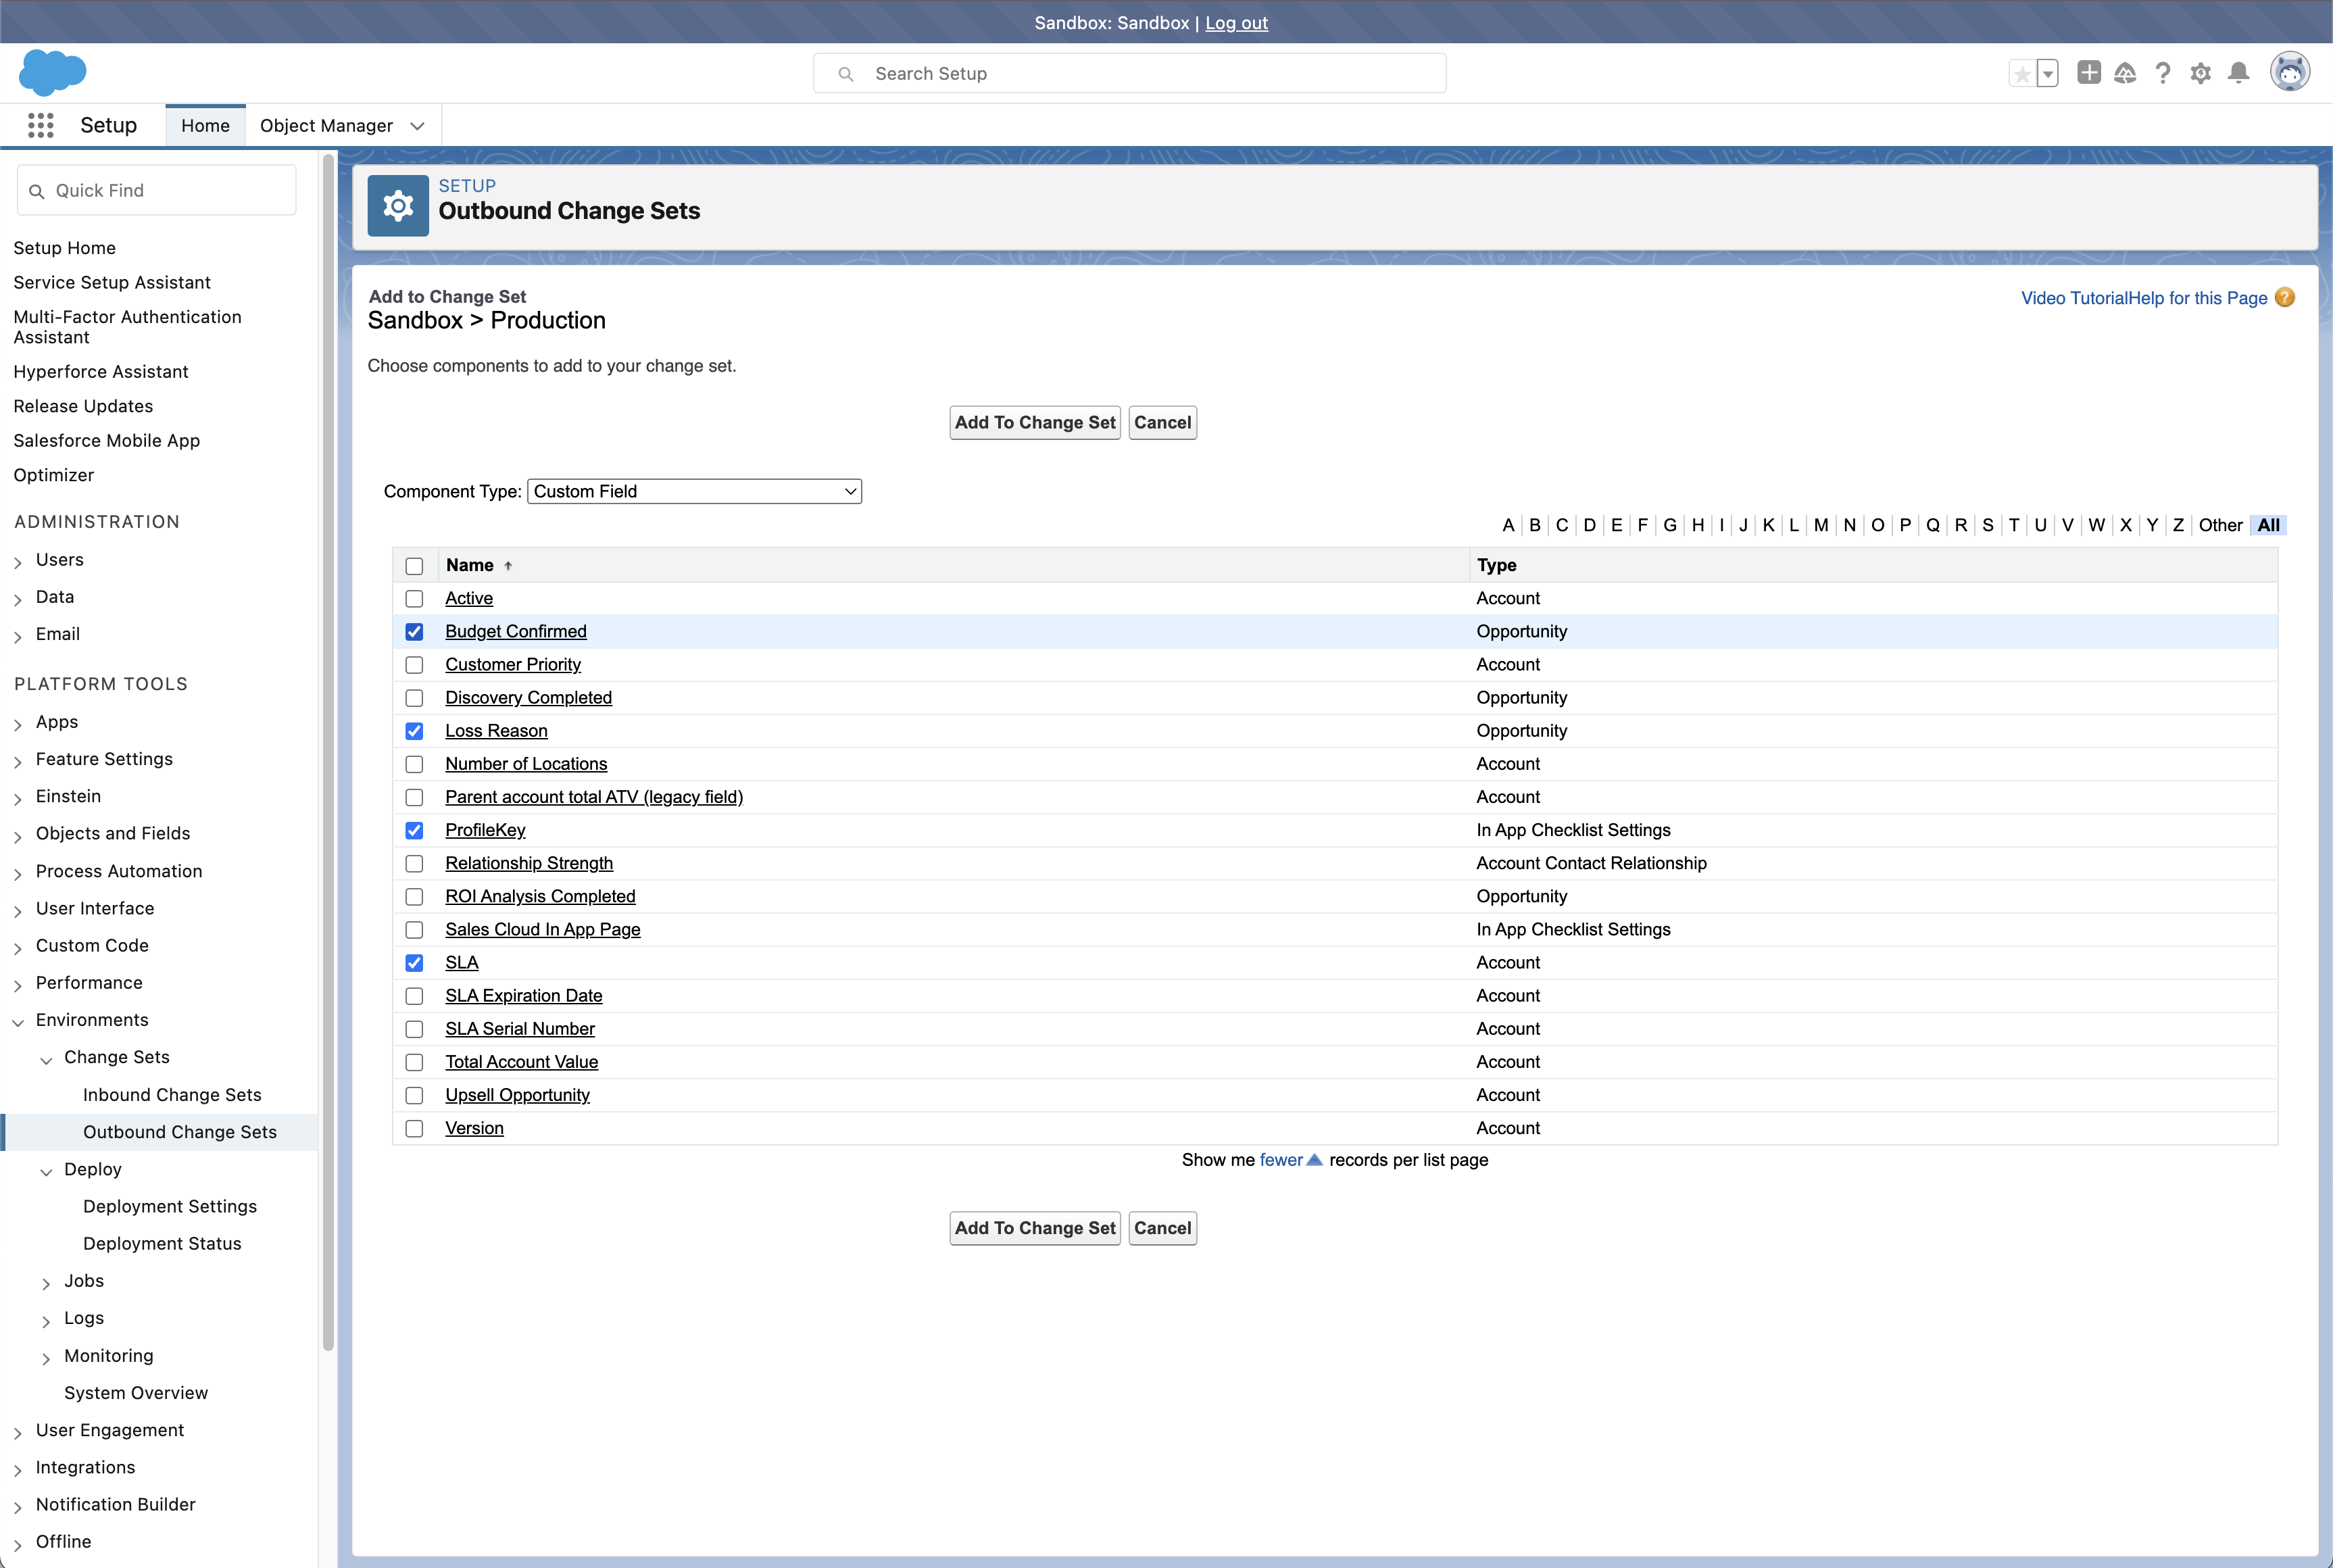
Change sets don’t detect what you’ve modified, so you have to know what changed and add each component individually. If your work spans multiple objects, flows, and classes, you’re building the package from memory — or from notes you hopefully kept. Miss something and you won’t find out until the deployment fails in the target org. What’s worse, the deployment might succeed but leave the feature broken because a referenced field or class wasn’t included.
Using View/Add Dependencies
After adding your primary components, use the View/Add Dependencies button. This scans the org for metadata that your selected components reference — for example, if you added a page layout, it might identify custom fields that the layout displays.
The dependency tool catches direct relationships reasonably well. But it struggles with indirect dependencies such as the chains of references that characterize complex configurations. A flow might reference a record type, which depends on a picklist value, which uses a global value set. The dependency tool will only surface the first link and miss the rest altogether.
The tool also doesn’t distinguish between dependencies that already exist in the target org and those that are genuinely new. Selecting everything it suggests can bloat your change set with hundreds of components. In some cases, it will overwrite production configurations with older sandbox versions.
Treat View/Add Dependencies as a starting point rather than a safety net. You’ll still need to review the list, remove components that already exist in production, and verify that what remains actually needs to be deployed. Although the tool helps you find dependencies, it won’t tell you which ones matter.
Uploading to the target org
Once you’ve added all your components, click Upload. The change set is transmitted to the target org, where it appears in the Inbound Change Sets list.
Once uploaded, a change set can’t be edited. You can’t add missing components, remove something you included by mistake, or adjust anything about the package. It’s locked.
If your deployment fails because of a missing dependency, or if you realize you forgot something, you have one option: clone the change set in the source org, make your changes to the clone, and upload again. This creates a new inbound change set in the target. The original remains unchanged and can’t be deleted from the inbound queue until it’s deployed or the target org manually removes it.
Teams that deploy frequently end up with cluttered change set lists: “Spring Release v1”, “Spring Release v2”, “Spring Release FINAL”, “Spring Release FINAL2”. There’s no built-in cleanup mechanism, and no way to trace which version actually made it to production unless you maintain external records.
This is the difference between change sets and version-control-based workflows, where you can push incremental changes without rebuilding the entire package. With change sets, every adjustment requires a complete manual rebuild, reupload, and revalidation cycle.
Setting up change set permissions
Before you even get to uploading your change set, it’s worth making sure the right people have the right access in both the source and target org — because permissions errors are one of the more frustrating things to troubleshoot mid-deployment.
To create and upload outbound change sets, users need the Create and Upload Change Sets permission. To deploy inbound change sets in the target org, they need the Deploy Change Sets permission. Both are included in the System Administrator profile by default, but can be added to custom profiles or permission sets.
Most teams restrict deployment access to one or two admins or release managers. That’s less about permissions and more about control — making sure someone accountable reviews every change before it reaches production.
If you hit an “insufficient privileges” error, check both permissions explicitly. The error won’t tell you which one is missing.
The difference between validating and deploying
Confusing validation and deployment is one of the most common causes of a failed production deployment — and it’s easy to do, because the two options look almost identical in the UI.
What validation catches — and misses
Before deploying, you have the option to validate the change set. Validation runs through the deployment process without committing any changes, checking for metadata conflicts, missing dependencies, and (for production deployments) running Apex tests.
Validation catches errors that would cause the deployment to fail, but it’s not foolproof. It won’t detect logical errors, such as a flow that deploys successfully but breaks a business process because of a hardcoded ID that doesn’t exist in production. It also won’t catch issues caused by changes made to the target org between validation and deployment. Someone might modify a field or delete a custom object after you validated but before you deployed, creating a conflict.
Still, validation is worth the time. A failed deployment can lock the org’s metadata for extended periods, blocking other admin work. Validating first lets you catch problems without that disruption.
Apex test requirements for production orgs
Deploying Apex code to production triggers test requirements that don’t apply to sandbox-to-sandbox deployments. Salesforce requires that 75% of your org’s total Apex code be covered by unit tests, and all tests must pass.
This is a cumulative threshold across the entire org, not just the code you’re deploying. You might deploy a new class with 100% coverage, but if existing code in production has poor coverage, your deployment fails. New, well-tested code gets blocked by legacy technical debt.
The Run Specified Tests option lets you specify only the test classes relevant to your deployment, bypassing unrelated test failures. But you need to identify those classes manually — change sets don’t help you determine which tests cover which components.
After a successful validation, Quick Deploy lets you deploy within 10 days without re-running tests. This is the primary reason to validate before production deployments — you can run tests during a low-traffic window, then execute Quick Deploy during your scheduled maintenance window without waiting for tests to complete again.
How change sets handle profiles and permissions
Profile deployments are where change sets cause the most unexpected damage. Any incoming profile metadata replaces what already exists in the target org. So, if a permission is enabled in production but not included in the sandbox version you’re deploying, that permission gets disabled.
This creates a pattern of “silent failures” — deployments that succeed technically but leave users unable to access features they could access before. The change set completes without errors, but support tickets start arriving minutes later when people discover they can’t view reports they’ve accessed for months or edit records they own.
The problem compounds with page layout assignments. A profile in a change set only carries layout assignments for record types that are also included in that change set. If you include a profile and a record type but not the page layout assigned to that record type, the deployment removes the layout assignment entirely. Users see a default layout instead of the one they’re supposed to see, with fields missing or in the wrong order.
Many teams avoid deploying profiles through change sets altogether. They deploy the functional changes — objects, fields, flows, code — and then manually update profile permissions in production. It’s an extra step, but it’s more predictable than the blanket overwrite that profile deployments can cause. The alternative is maintaining perfectly synchronized profiles across every sandbox, which almost never happens in practice.
Change sets can’t move every type of metadata
Change sets can’t move every type of Salesforce metadata because some component types aren’t supported by the Metadata API. Others are supported by the API but not surfaced in the change set interface.
Common components that require manual recreation include standard picklist values (custom picklist values deploy fine, but changes to standard fields like Opportunity Stage don’t), organization-wide email addresses, certain territory management configurations, and some Experience Cloud components like navigation menu translations.
Salesforce maintains documentation on supported metadata types that’s worth bookmarking before you build your next change set. The list of unsupported types also grows with each release — new features often ship before deployment support catches up. Flow orchestrations, for example, took months to become deployable through change sets after their initial release.
What happens when a deployment goes wrong?
Change sets don’t have a rollback capability. Once a deployment completes, the changes are committed to the target org — and there’s no undo.
If a deployment causes problems in production — a broken flow, a misconfigured validation rule, user access issues — you have limited options. You can manually reverse the changes in production if you know exactly what changed and how to undo it. Or you can create a new change set in a sandbox that restores the previous configuration and deploy that to production.
Both approaches require you to know what the previous state was. Change sets don’t maintain snapshots of what existed before the deployment. If you don’t have external documentation or a sandbox that still reflects the pre-deployment state, reconstructing what to restore becomes guesswork.
This is why validation matters. It’s your last chance to catch metadata errors before they’re committed. But validation doesn’t catch logical errors or business process problems that only surface when real users interact with the changes. A flow might pass validation but fail when a user encounters a specific record state you didn’t test against.
For those scenarios, you need a rollback capability that change sets don’t provide. The alternative is building every change set with a matching “rollback” change set prepared in advance, which doubles the deployment work and still requires you to anticipate what might go wrong.
Moving beyond change sets
Many Salesforce teams reach a point where the cost of working around change set limitations exceeds the cost of adopting a purpose-built deployment platform. When that moment comes, teams typically look for tools that handle the deployment challenges that change sets can’t.
These tools offer direct org-to-org comparison so you see exactly what’s different, automated dependency detection with specific warnings about what will break, selective profile deployments that don’t overwrite everything, and native rollback capability so you can recover if something goes wrong.
The result is higher deployment success rates, deployment times measured in minutes instead of hours, and the confidence to release more frequently because you can recover quickly if something goes wrong.
Gearset: make changes with confidence — not workarounds
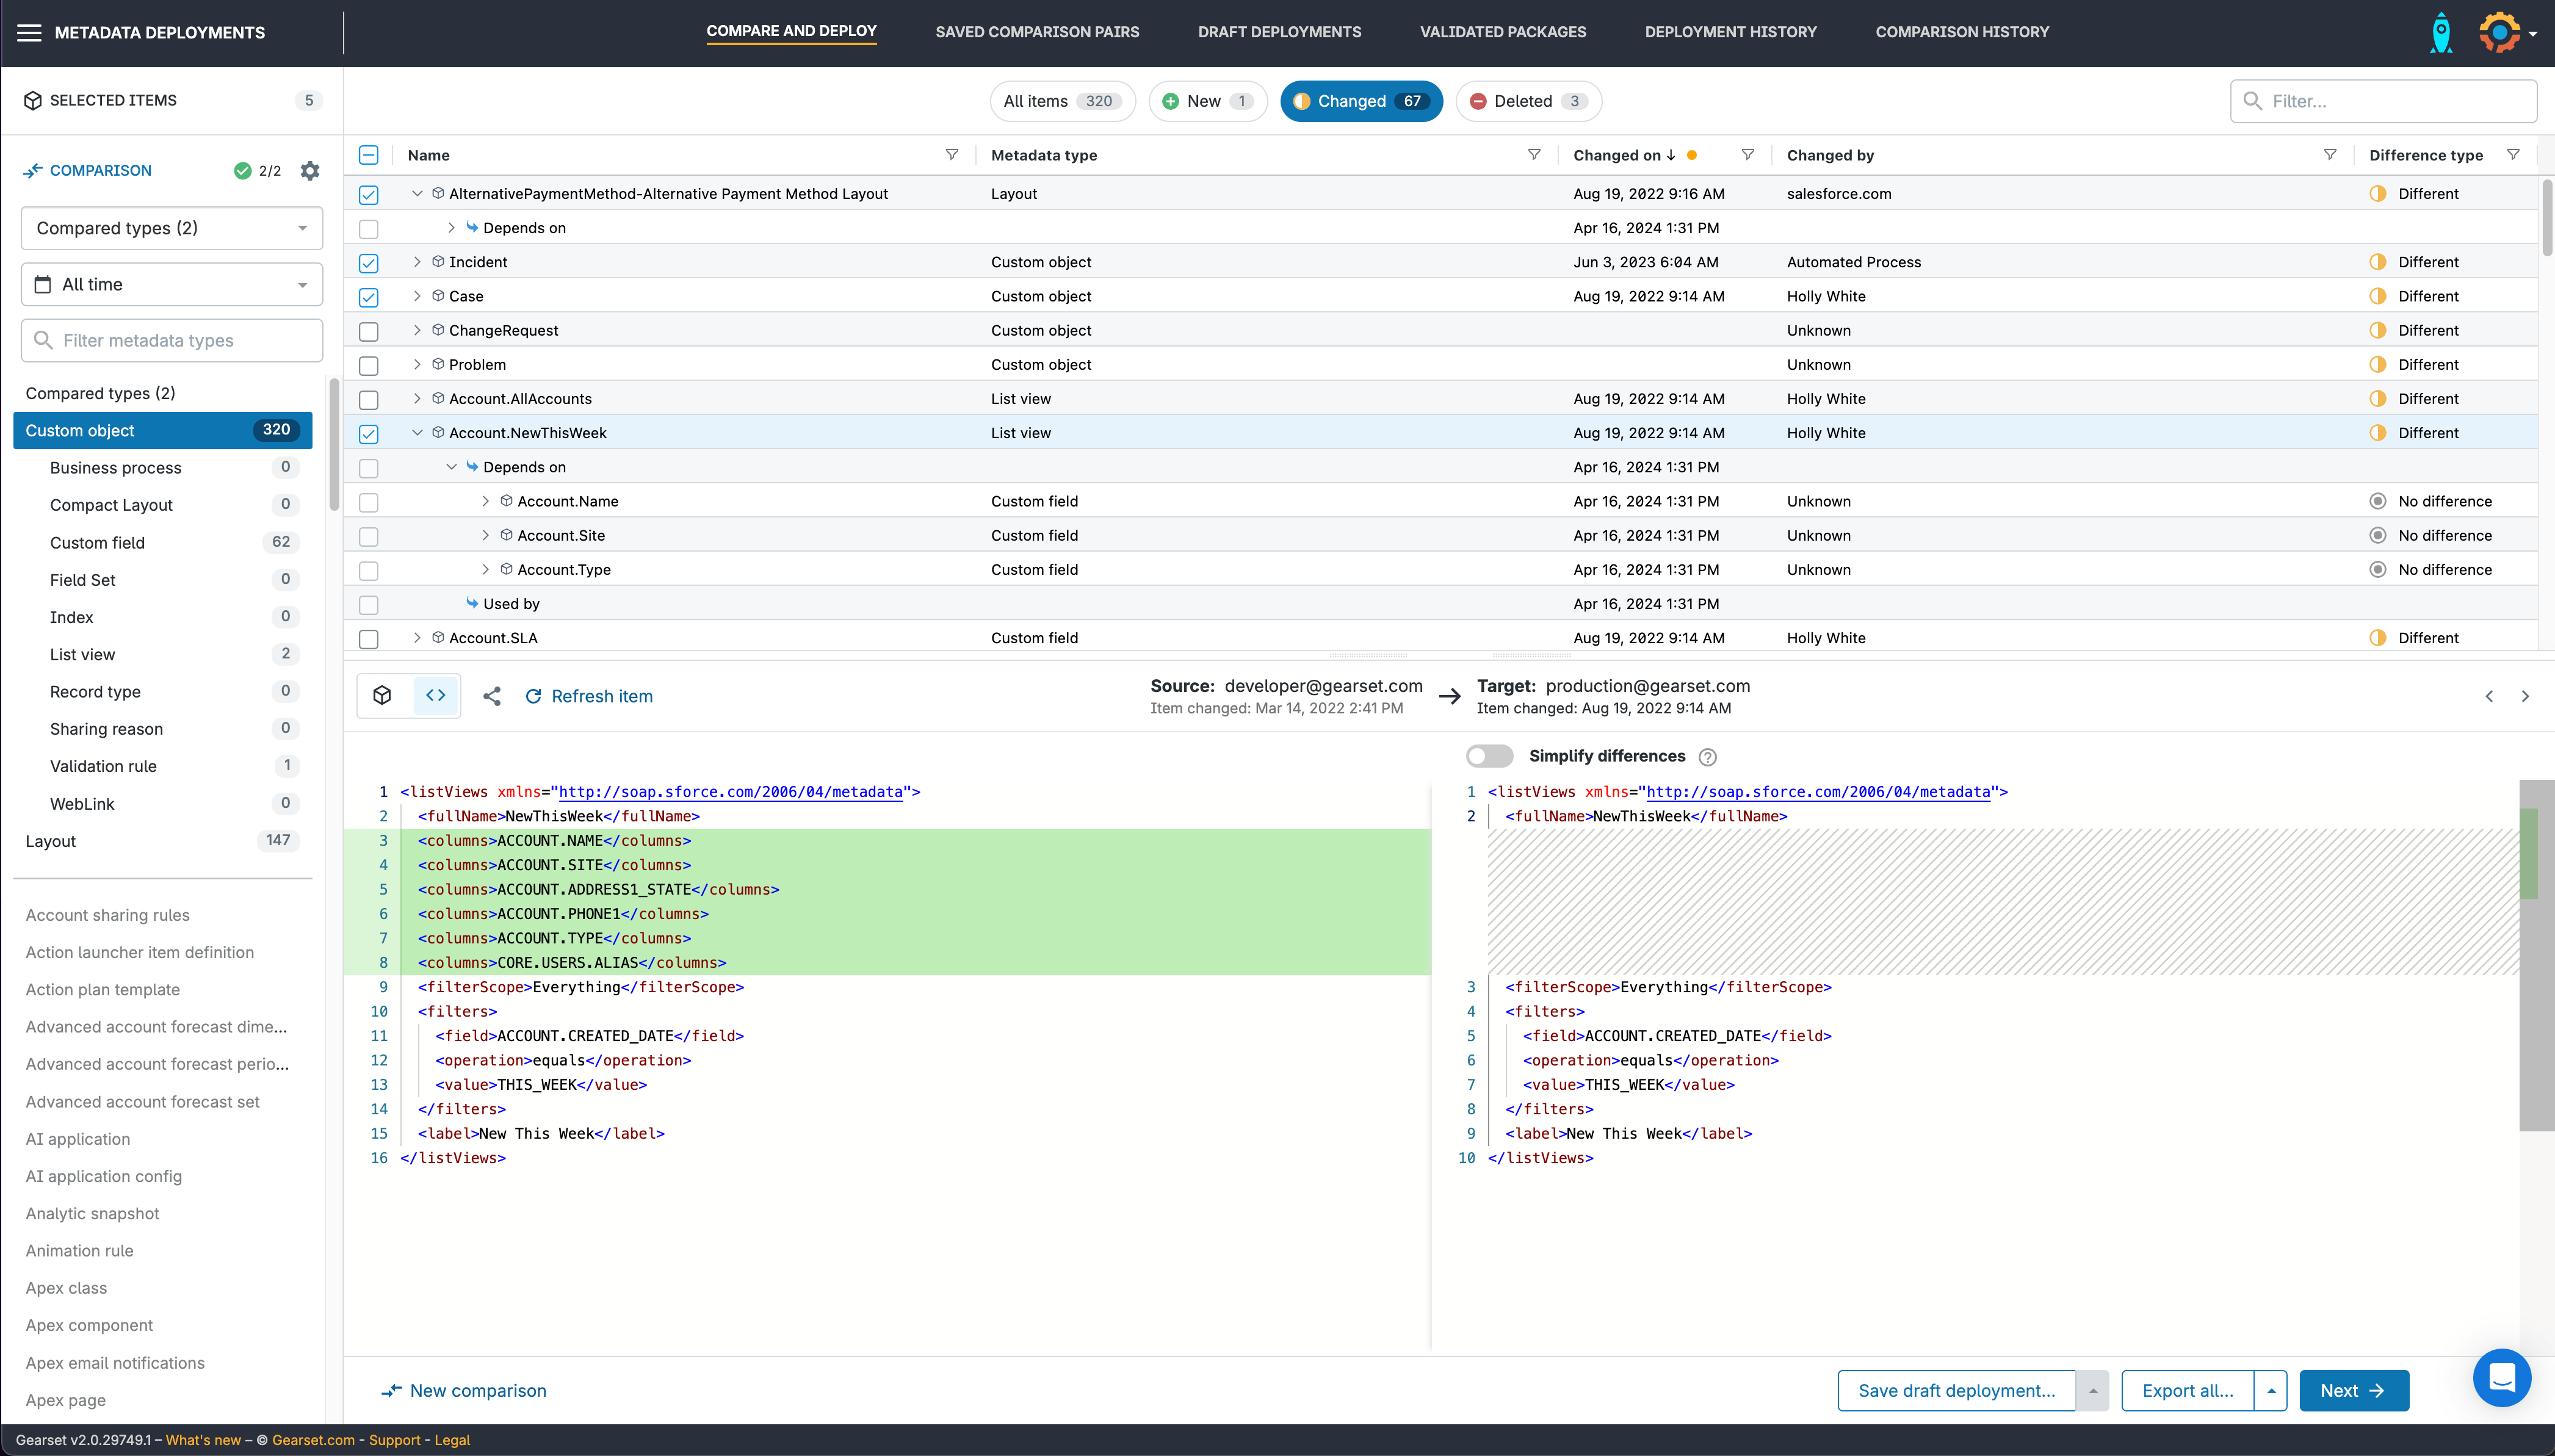
Gearset approaches deployment differently. Instead of building packages from memory, you start by comparing your source and target orgs directly — seeing exactly what metadata exists in each, what’s different, and what’s changed. Filters let you narrow that comparison to the specific components you care about, so you’re not wading through hundreds of irrelevant differences to find the ten changes you actually want to deploy. The result is a clear, accurate picture of your org state before a single component moves.
Precision deployments mean you choose exactly what to include — nothing more, nothing less. Dependencies are surfaced automatically, with specific warnings about what will break if you proceed without them, so you’re never deploying blind. Profile deployments are handled selectively: rather than overwriting everything the profile contains, you deploy only the permissions that actually changed.
Merge conflicts are an inevitable part of working across multiple sandboxes and teams. Gearset surfaces conflicts clearly and gives you the tools to resolve them before they reach production — so you’re not discovering a conflict mid-deployment, under pressure, when the stakes are highest.
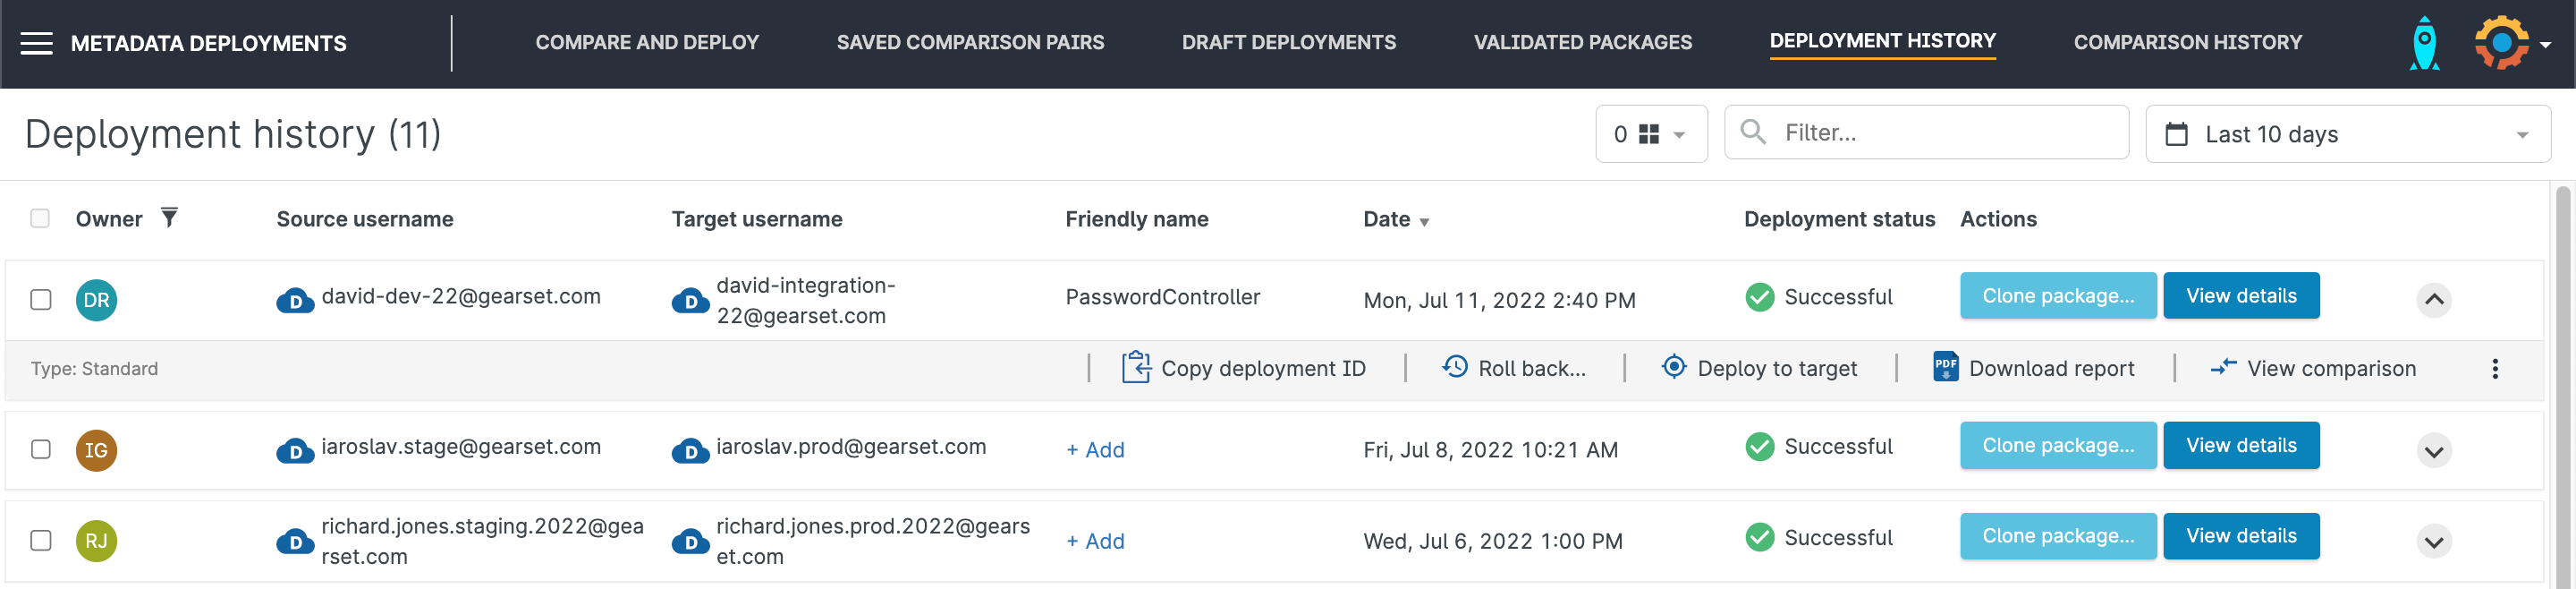
And every deployment can be rolled back. Gearset maintains a snapshot of the target org’s state before any changes are committed. If something breaks after release — a flow behaves unexpectedly, a validation rule fires incorrectly, user access drops — you don’t have to reconstruct the previous state from memory or documentation. You click a button, the deployment reverses, and your org is back to where it was. The entire process takes seconds.
Ready to leave change sets behind?
If change sets are no longer working for your team and you’re ready to move on, start a free 30-day trial with Gearset and see the difference in your own orgs. Or book a demo if you’d like a guided walkthrough with our DevOps team.
