
Having a backup solution, and clearly defined backup policy, for your Salesforce environments is vital. But even with a backup process in place, you still need to think about your restore process well before any data incident.
If you find yourself needing to restore business-critical data to your Salesforce orgs, the chances are you’ll be working under pressure to repair your org quickly. Preparing a plan of action for restoring your org will save you from having to invent a restore process in the middle of a crisis, which could result in more lost data.
In this article we’ll be running through what’s involved in building a robust recovery plan, and see how that restoration process works very differently if you’ve backed up using Data Export vs a dedicated backup and recovery solution like Gearset.
If you want to see Gearset’s backup solution in action, you can book a demo with our experts.
What backup options are there for SaaS tools?
Every company uses a whole suite of SaaS tools to keep the business going. And these tools are all constantly accumulating crucial data, whether it’s a collaboration tool like Slack, project management tool like Asana, or a CRM platform, like Salesforce.
Backing up this data is crucial for business operations and choosing the right option can be confusing when there are multiple platforms available, with complicated pricing models. Most SaaS providers have built-in backup capabilities but these are often limited and may not meet all your compliance requirements. Third-party providers are a better option, offering automation to streamline and customize your backups, as well as both high-frequency and daily backup options.
Companies may also explore on-premises backups or more custom-built data backup solutions, but these can absorb a lot of time and money, not to mention the need for constant maintenance. And what happens in the event of something going wrong, such as a power outage, data deletion, or data corruption?
Standardizing Salesforce delivery in Manufacturing: Lessons from a release team
Why backups alone aren’t enough to safeguard your orgs
The State of Salesforce DevOps 2025 report found that 47% of respondents had experienced data or metadata loss in 2024. While that might seem high, it’s important to remember that data incidents can be caused in a variety of ways. The most common include:
- Salesforce outages
- Human error
- Malicious deletions
- Misapplied Salesforce integrations
Thankfully, 77% of teams also back up their data or metadata at least once a month showing that the majority of Salesforce teams recognize the importance of backups.
When the pressure’s on, clunky restore processes or partial coverage just add risk. Only having backups isn’t enough — you need a clear recovery process that your team can follow, should an incident arise. Without a recovery process, you go into data restoration blind, putting your data integrity at risk. Amid the pressure and stress of a Salesforce incident, it’s vital to have a clear plan of how you should proceed rather than scrambling to work it out in the moment. Being prepared for a restoration helps you recover Salesforce data quicker and more successfully.
What to look for in a recovery-ready approach: off-platform accessibility during outages, full data and metadata coverage, intuitive restore workflows, custom retention policies with audit trails, and predictable pricing you can actually forecast.
What’s involved in a robust Salesforce data backup recovery plan?
In the same way that data incidents can arise in many ways, the impact of those incidents will be unique too — no two data incidents are identical. Because of that, it’s impossible to have a detailed plan which covers how to restore in any scenario. Instead, there are three key steps that lay the foundation for confidently restoring in any situation.
1. Identify and assess the damage
Probably the worst thing to do after any data loss is to rush in and start restoring data straight away. If you haven’t yet understood the cause and scope of the data loss, restoring data to your org might make matters worse by obscuring what data has been lost and causing confusion. So first make sure that the cause of data loss has been identified, contained, and eliminated.
Then you’re ready to assess the extent and nature of the damage. You need to be sure that you know exactly what has been lost or corrupted: which datasets, and which items of metadata. You should assess your backups too. Verify that the latest backups were successful and that the data you plan to restore is sound. If you have backups from several points in time, which backup (or backups) do you need to use?
Once you know exactly what has been lost, you’re ready to plan the best way to restore for the specific data incident you’ve experienced. Having one person or team responsible for your backups will mean that your restore can be put into action at the earliest opportunity, improving your overall data recovery speed.
2. Restore metadata (where applicable)
Metadata restoration is an often overlooked but key part of a recovery plan. This includes restoring custom objects, custom fields, Apex classes, triggers, and other critical metadata types.
Not every data incident will involve issues with your org’s metadata. However, if your metadata has been impacted, it’s best to start by restoring this from your backup first, before restoring any data.
If the metadata in your org is altered or corrupted and you try to restore Salesforce data anyway, you’ll likely hit an error or could even cause further issues. Having the correct metadata in place is vital for a successful data restoration.
If a large amount of metadata needs restoring, restoring the metadata in a series of smaller deployments is more likely to be successful.
3. Restore data
The final step is to restore the data you’ve lost or that has been corrupted. As we’ve mentioned, no two data incidents are exactly the same. So it’s important to choose tools with flexible restoration options that can accommodate the incidents you may encounter.
As with metadata restoration, for large-scale data loss (where you need to restore more than 100,000 records) it’s best to restore your data in sections. Restoring manageable portions of data at a time will make it easier to spot and resolve any problems that may need troubleshooting as you go. Trying to restore too much in one go will often result in lots of error messages which can be time consuming and stressful to unpick.
How you restore data, and how quickly, will depend on the tools you’ve used. Let’s see what that process looks like with native tools on Salesforce, and how that compares with Gearset.
Should archiving be included in my data protection plan?
Retrieving your data from an archive is different from restoring it using a backup solution. When you retrieve your data, you’re calling on older, unused data which has been stored, whereas a data or metadata restoration is recovering your current active data after a system failure or data loss situation.
Archiving your outdated data is important for teams wanting to build robust compliance processes. Together, backup and archiving keep your orgs fast, compliant, and always recoverable — and they fit naturally into your DevOps lifecycle.
But archiving isn’t just about storage savings — it’s also about preparing your org for AI. Agentforce agents rely on clean, current data. Archiving removes stale, legacy records that slow performance and block innovation. It also allows you to securely store data that’s needed for compliance regulations.
How to recover with Salesforce Data Export & Data Loader
Salesforce Data Export can be used to manually or automatically download a .CSV file of all of the data in your Salesforce org on a maximum basis of once a week. Data Export shouldn’t be confused with Salesforce’s Data Recovery Service, which isn’t a backup tool and takes 6-8 weeks to provide a .CSV of your salvageable data. Data Loader is a free client application that can be used for bulk import and export of data to Salesforce orgs. It can be used for insertions, updates and deletions.
Although Salesforce has encouraged the use of third-party backup solutions, Data Export and Data Loader can be combined for a native Salesforce backup process. Let’s see how these native tools can help in the wake of a data loss incident, and where they fall short during a typical recovery process.
1. Identify and assess the damage
You’ll need to start by using Data Export to export backup data from your org in its current state. You can then compare the latest .CSV to an export taken before the data incident, to manually identify the data that has been lost or corrupted.
2. Restore metadata
Data Export and Data Loader can’t restore or deploy metadata. You will have to rebuild and/or redeploy any impacted metadata configuration from a lower environment before you can begin your data restoration.
3. Restore data
When you’re ready to restore, you’ll need to create a separate restoration file for each impacted object. Data Loader can then be used to upload these files to your org. You’ll need to select whether you’d like to Insert, Update or Delete files in the upload. If you’re updating records, you’ll need to identify a field for Data Loader to use for record matching.
The columns in the .CSV file then need to be mapped to the fields on the object you’re uploading to. You can create a new map or use (and edit) existing maps. At this point, you’re ready to go ahead with the upload and Data Loader will provide you with success and error files showing which records were successfully uploaded and which weren’t.
For larger restorations, Salesforce advises you to start by working through core objects in the following order:
- Users
- Accounts
- Campaigns
- Contacts
- Opportunities
- Cases
- Pricebooks
- Products
- Leads
- Contracts
The problem with this approach is the huge number of complicated relationships between your records. So after you’ve restored data to all of your objects, you’ll then need to restore all of these data relationships manually — an additional step that takes a lot of time and effort.
As we’ve seen with Cincinnati Works — who had a near miss using Data Export — a more robust solution is necessary for full data restoration, as native tools just don’t deliver. Their experience, detailed in their customer story, highlights the limitations of relying solely on Data Export and underscores the value of a comprehensive backup and recovery solution like Gearset.
Can I perform a metadata backup with Data Export or Data Loader?
No, you can’t. These tools are data export services and although they vary in functionality, neither can backup your metadata. To back up your Salesforce metadata, including custom objects, flows, and layouts, you’ll need to use a third-party solution like Gearset.
How to restore data with Gearset backup
Gearset’s Salesforce backup and restore solution can help with every step of your backup and restoration process for Salesforce.
Once you realize there has been a data or metadata loss situation, Gearset will help you through the following steps to restore your orgs to any point in time. Gearset captures data and metadata in the same job, so restore plans are complete and less error-prone.
1. Identify and assess the damage
Having the tools in place to quickly identify data loss sets you up for a more successful restoration, because the cause of the incident can be spotted and resolved quicker. Relying on end users to report issues with data can make the restoration process much harder, because changes will have been made to your data since the incident that need preserving.
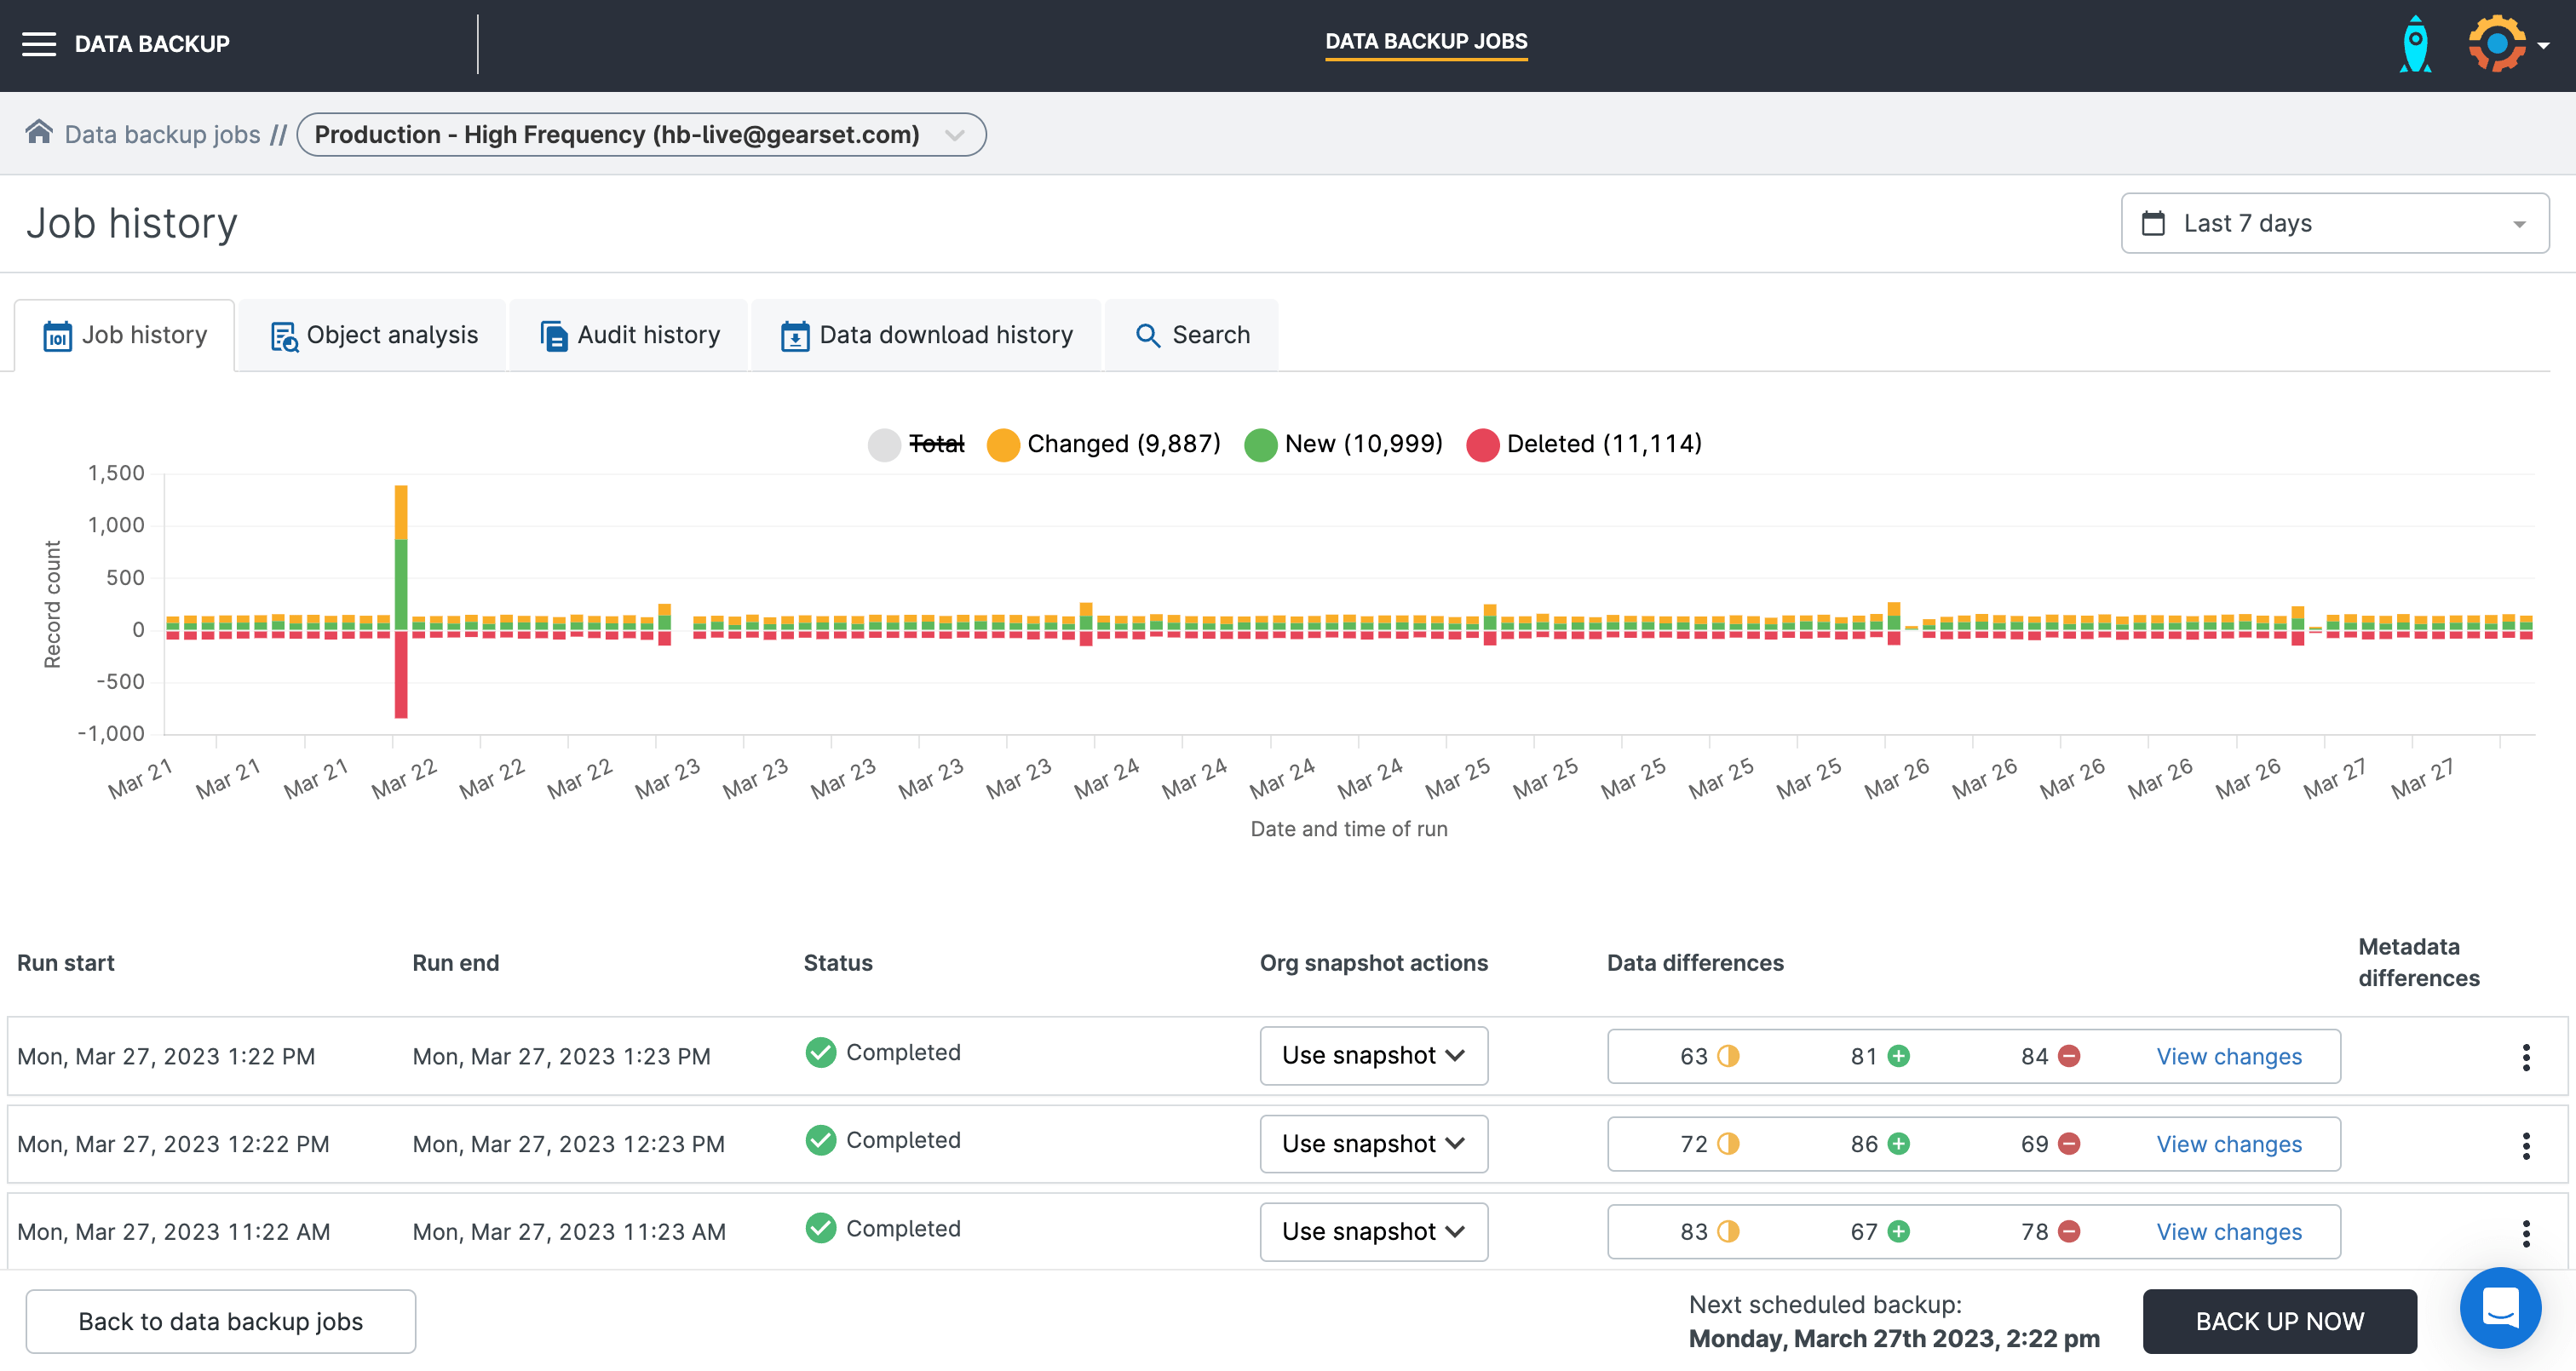
See changes in your data at a glance, with visual overviews of your daily data backup jobs that run automatically in Gearset.
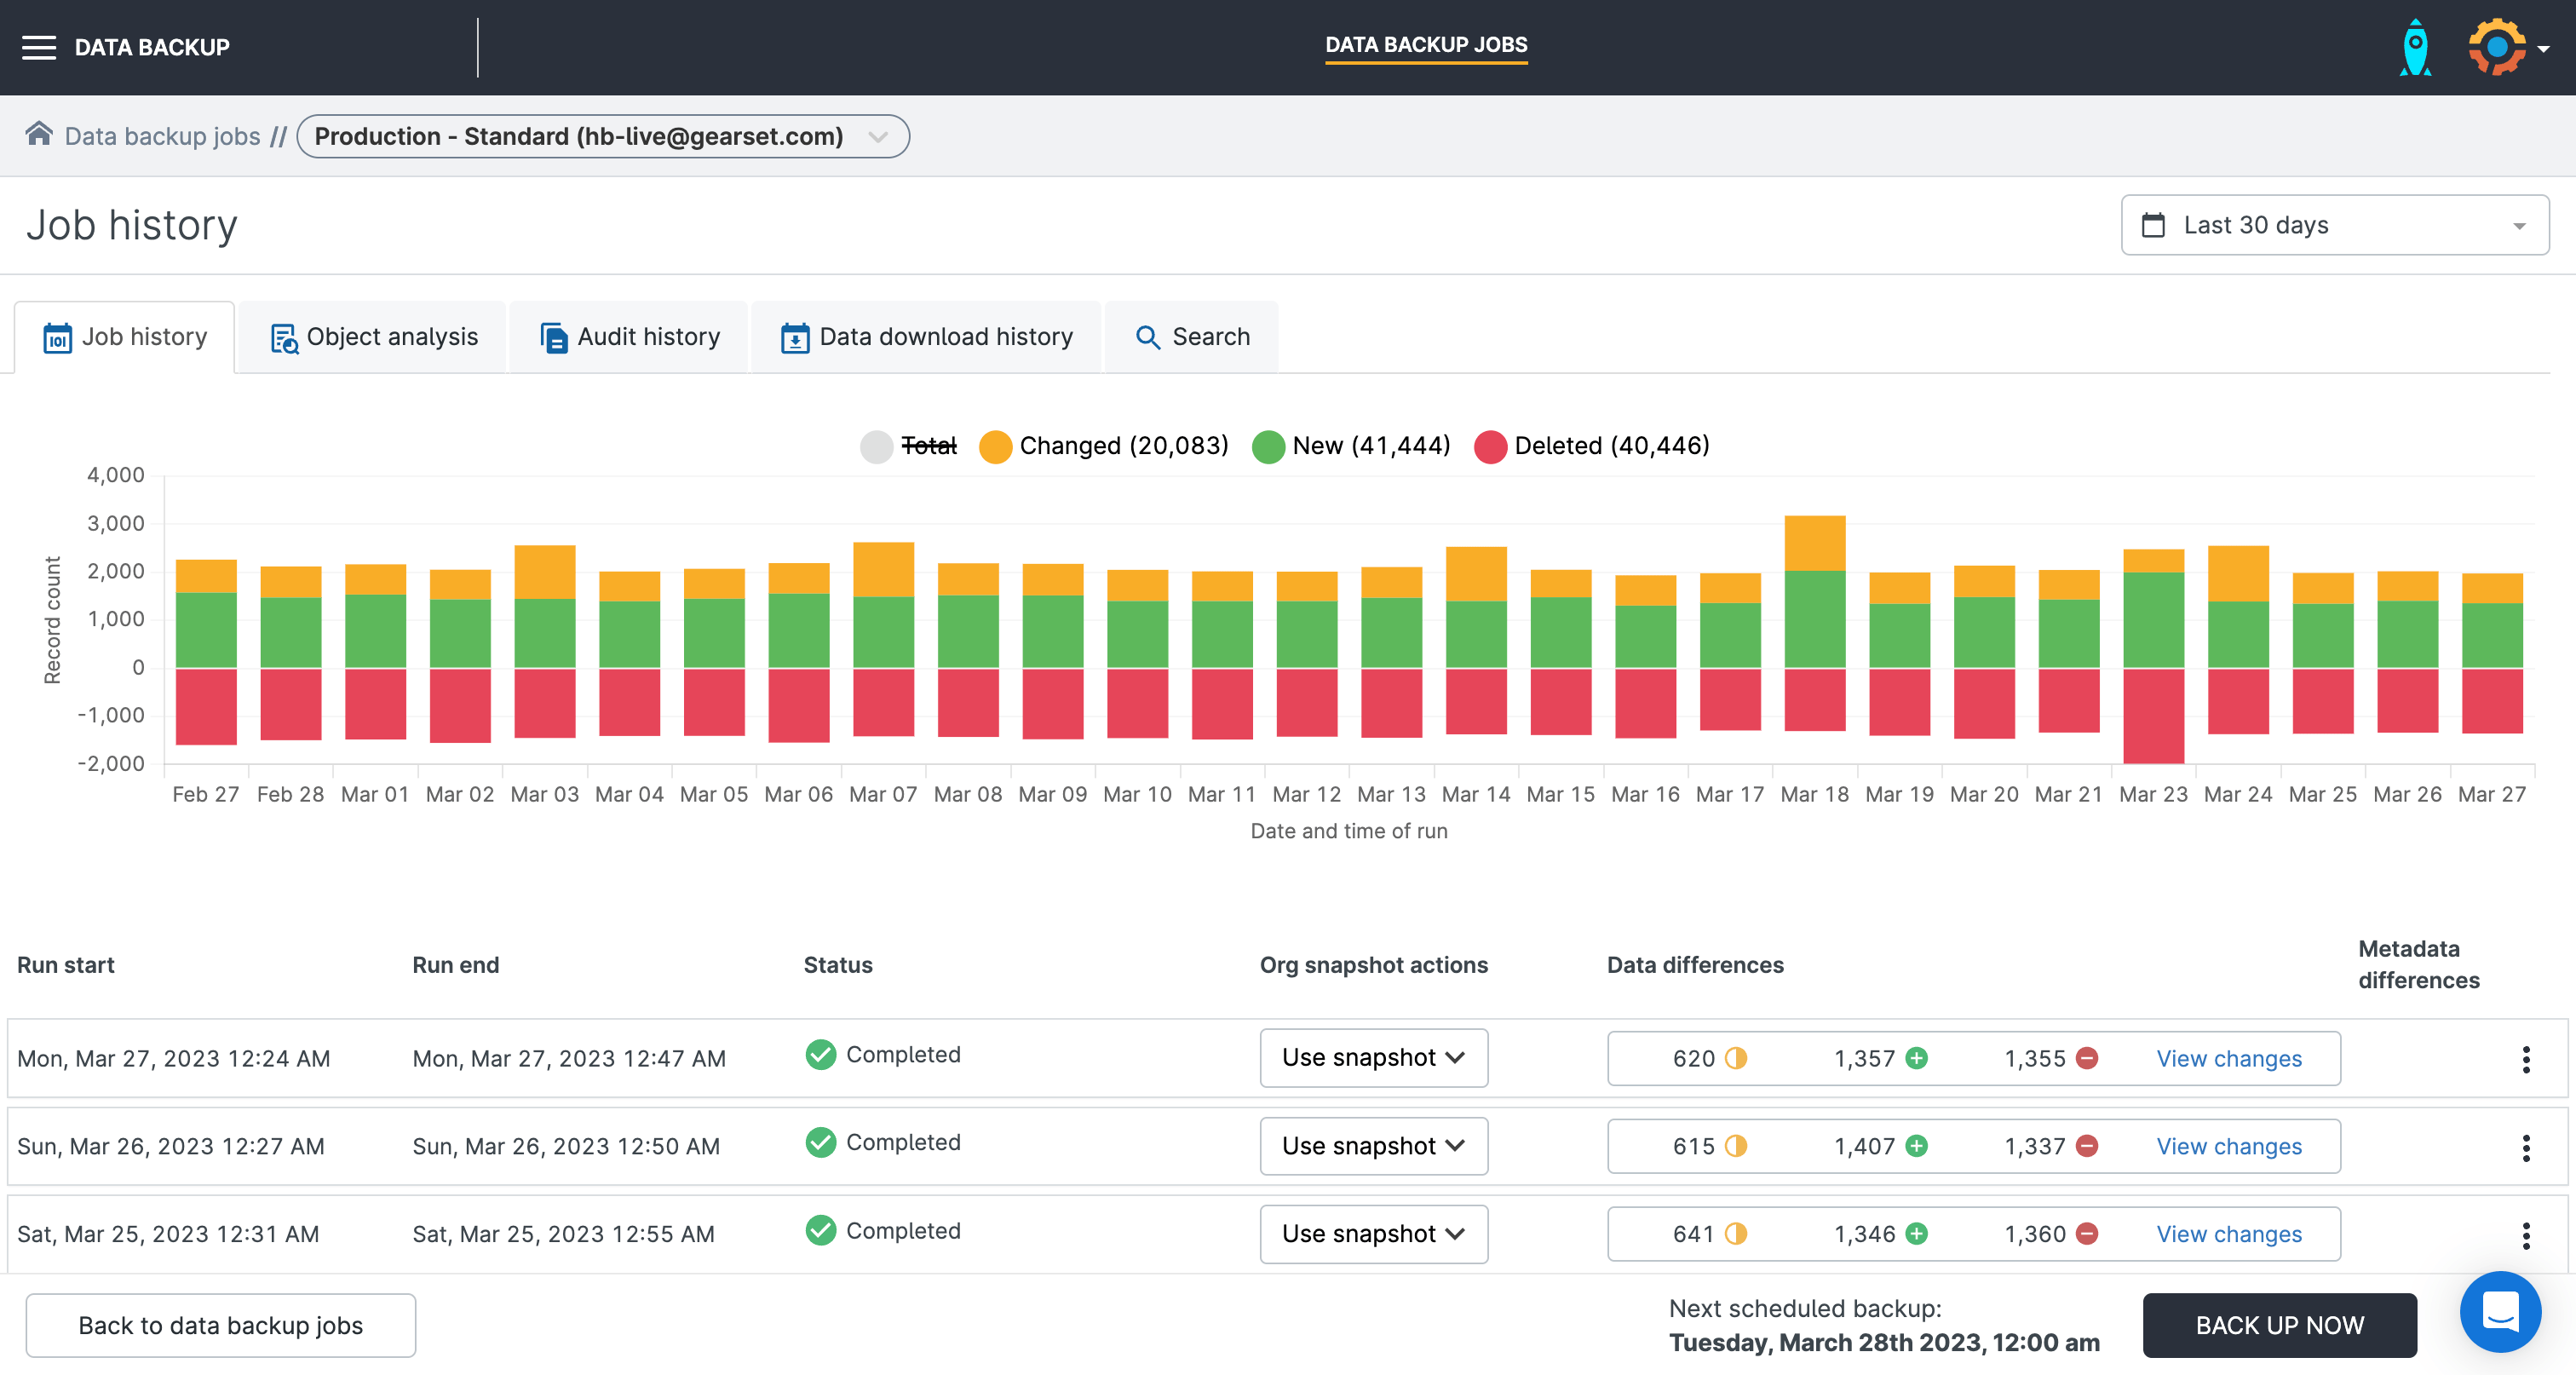
You don’t have to manually monitor your backup job to check for data incidents. Gearset will send you daily summaries of your backup run, so you can spot irregularities early. You can even set up entirely customizable smart alerts that will send you notifications when the number of changes to your data surpasses your specified threshold.
High-frequency backup jobs run hourly backups for up to 10 objects, so you always have an up-to-date backup of your objects that change regularly, e.g. Account. This also means you can identify incidents impacting your most business-critical objects even earlier and ensure you have the most current version of the data to restore from.
2. Restore the metadata
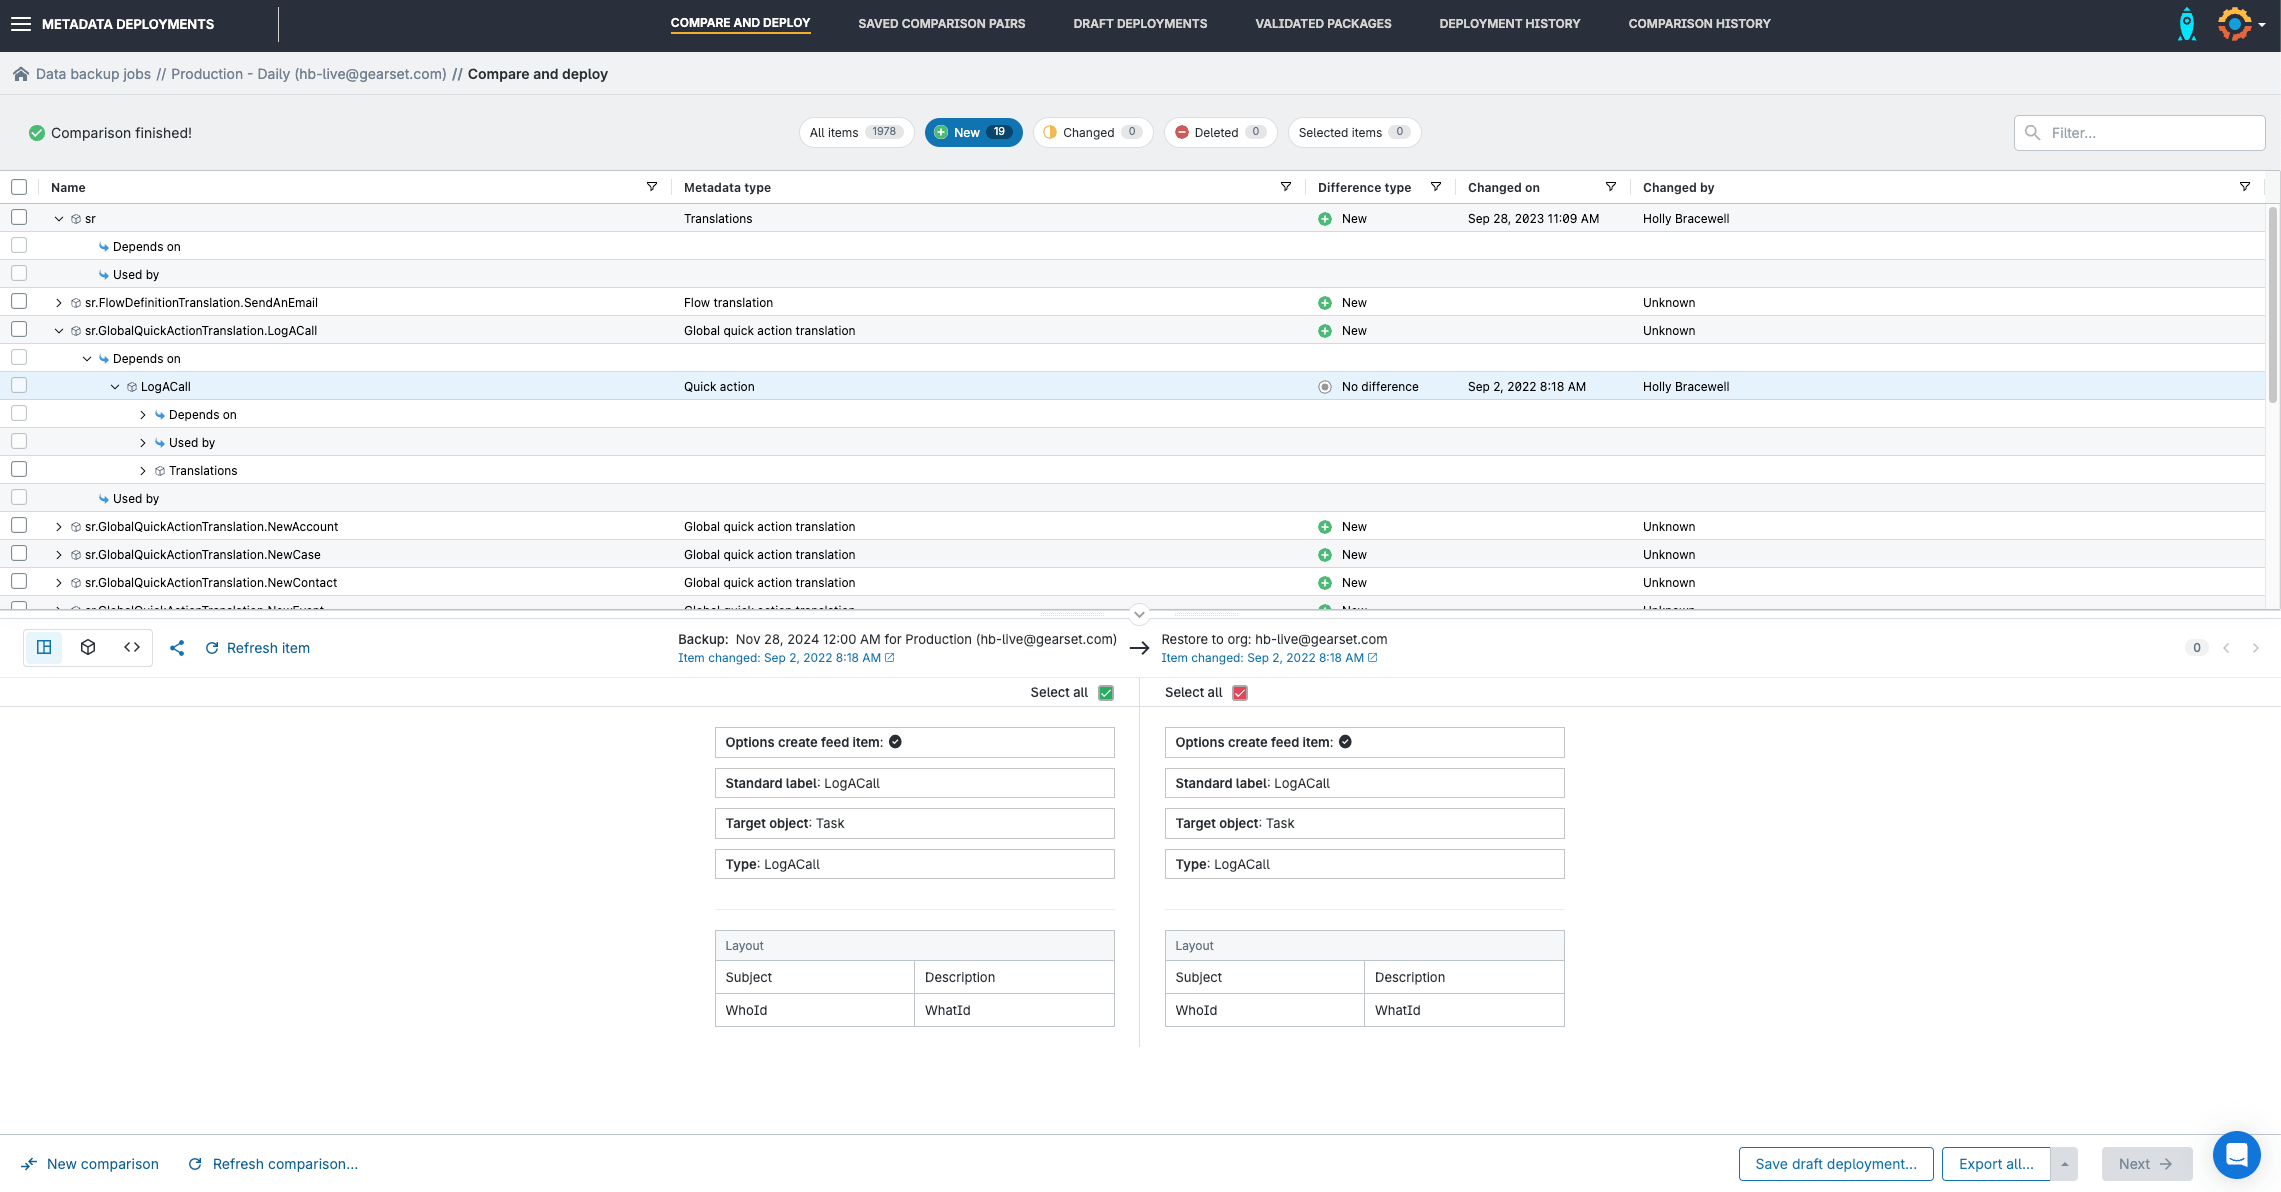
Gearset backup doesn’t just capture your data — Gearset also automatically takes a snapshot of your org’s metadata during the job run too.
If you need to restore metadata as part of your recovery process, simply select Restore snapshot metadata. The metadata restore works the same way as a metadata deployment in Gearset; the app will load a side-by-side comparison of the metadata snapshot from your backup job and your org in its current state. Simply click to select the items you want to restore and Gearset will build the deployment package to restore the chosen metadata.
This is where it really helps if your backup solution is part of your DevOps tool, because you’ll be using the same familiar processes and tooling to restore your orgs that you use every day for Salesforce deployments.
3. Restore the data
As we’ve seen, no two data incidents are exactly the same. So it’s useful to work with tooling that has flexible restoration options to accommodate the variety of incidents you may encounter.
Gearset has four different restoration flows to choose from. We’ll walk through each, so you can identify the most appropriate for your use case.
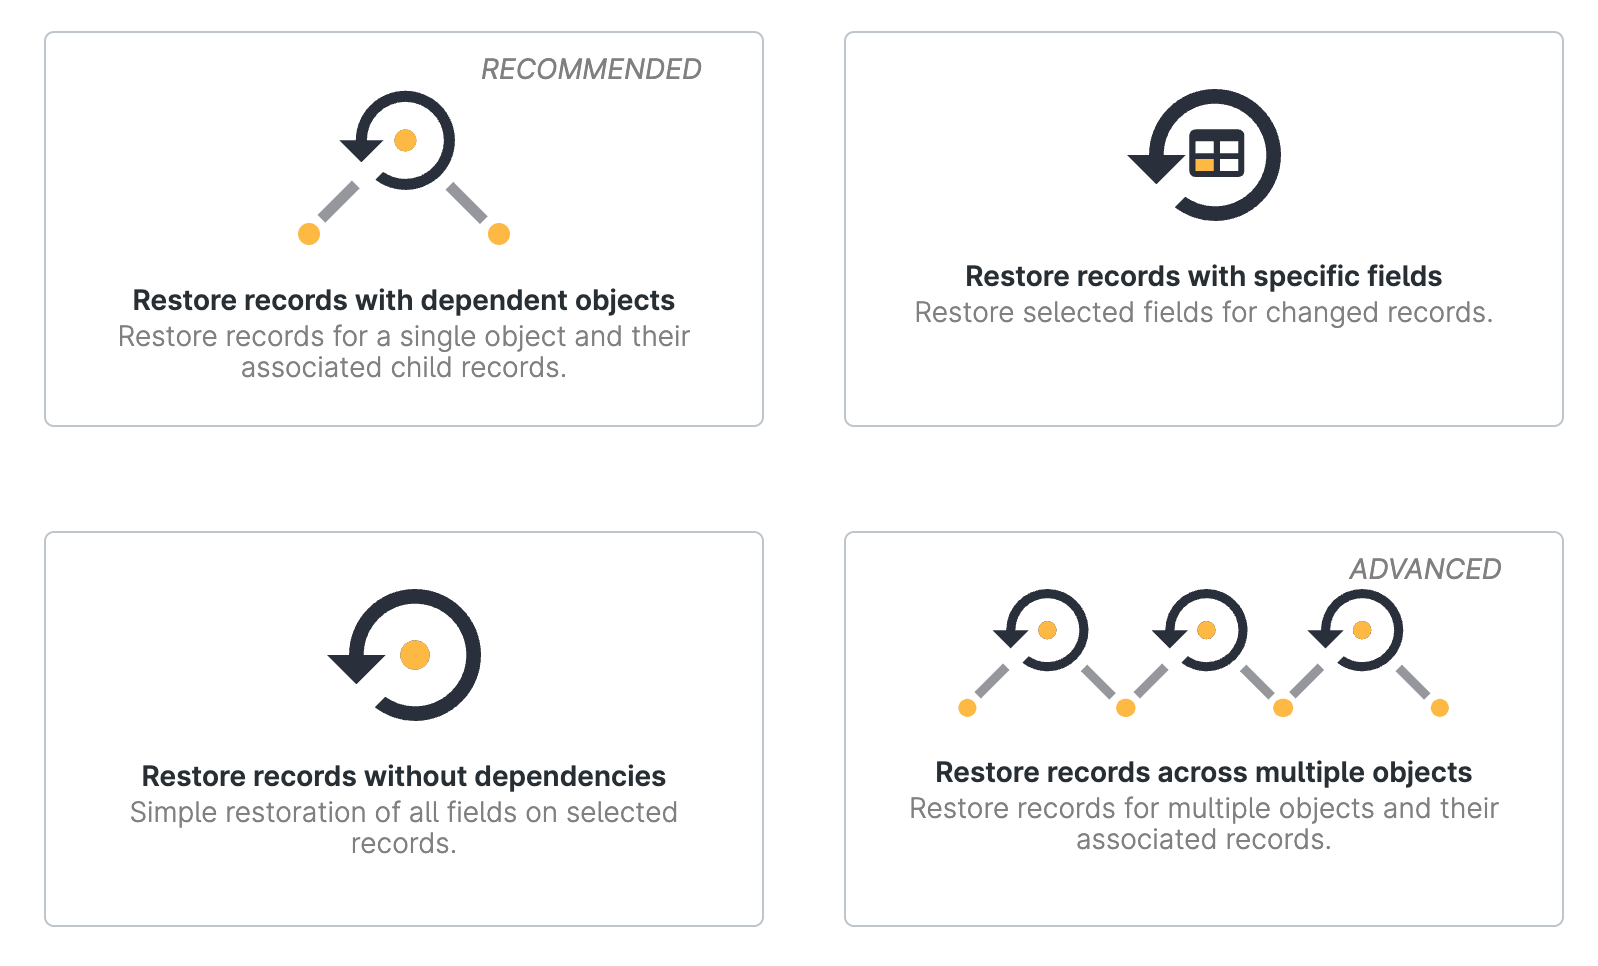
Restore records with dependent objects
Your Salesforce records exist in a complex web of relationships, so a single deleted record can have a cascading effect on other objects. This recovery flow allows you to restore records for a single object as well as any associated child records too. This workflow is the one that we recommend most often as it guides the user through the most common use case we see.
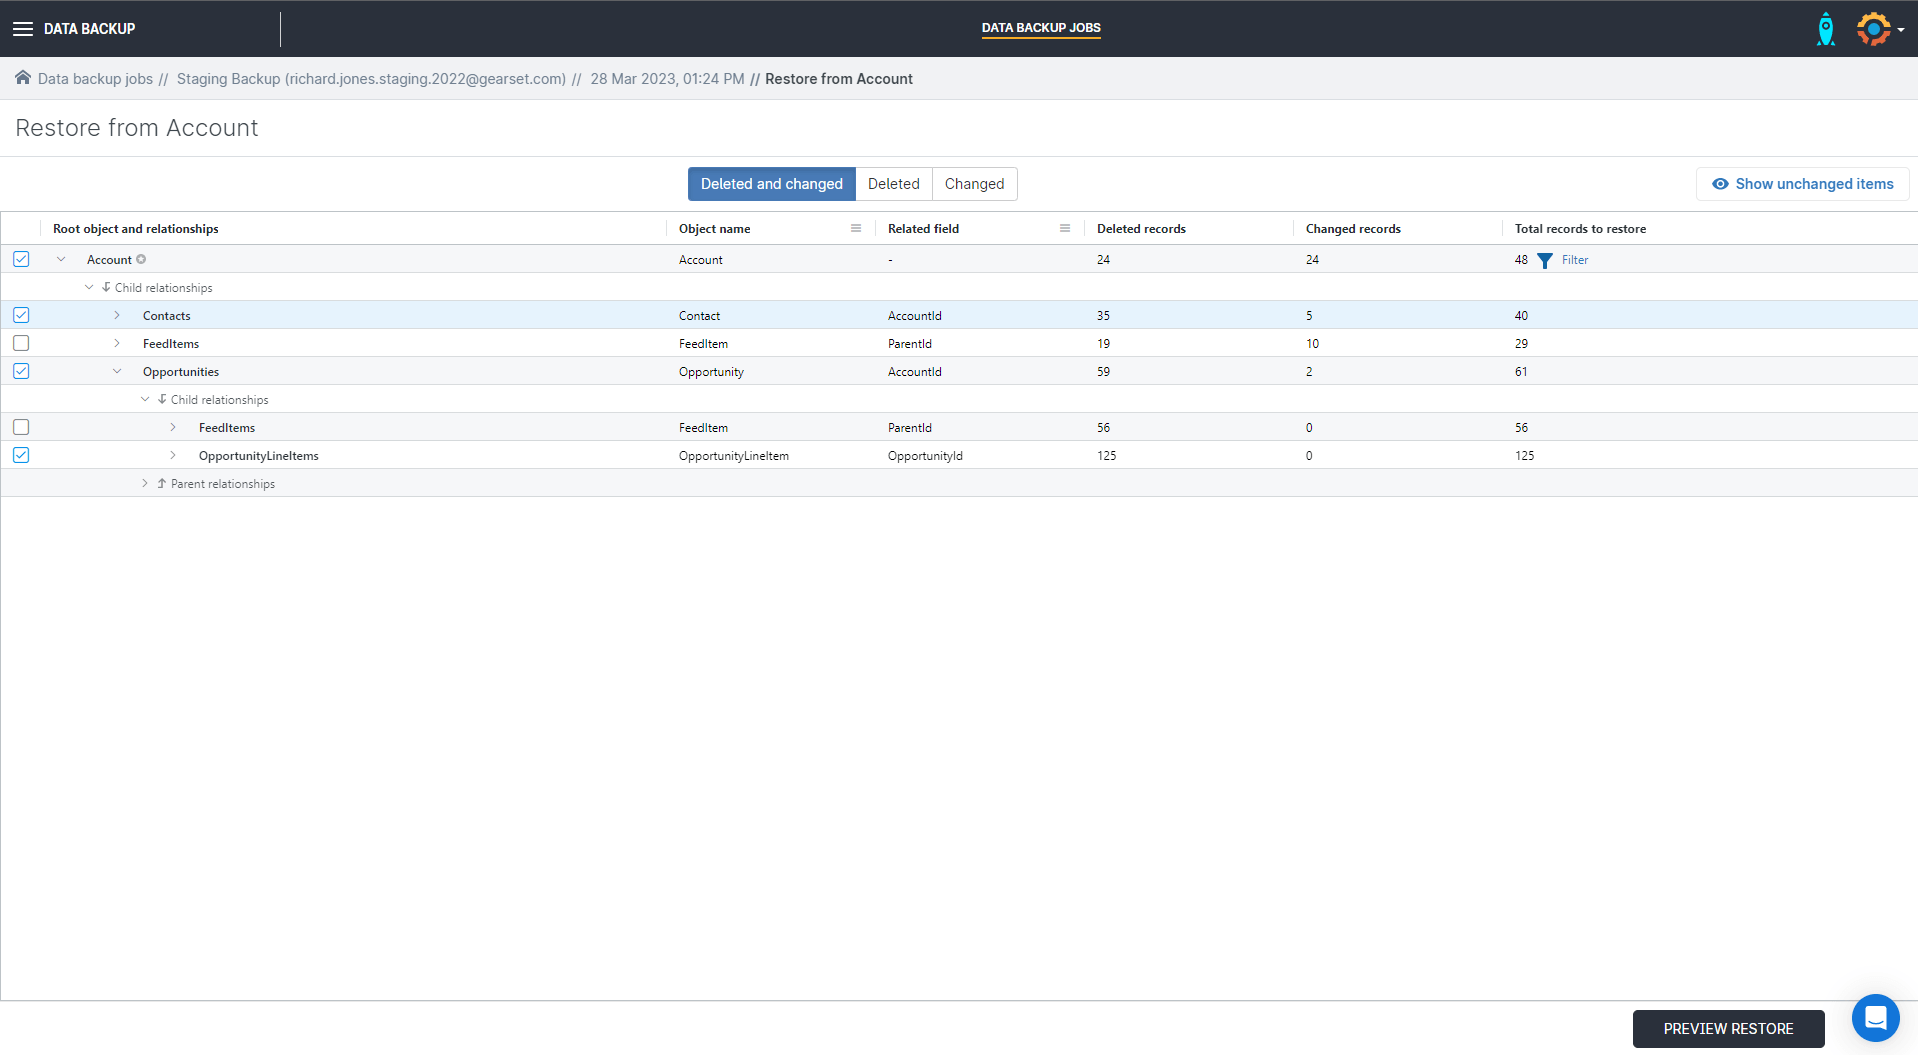
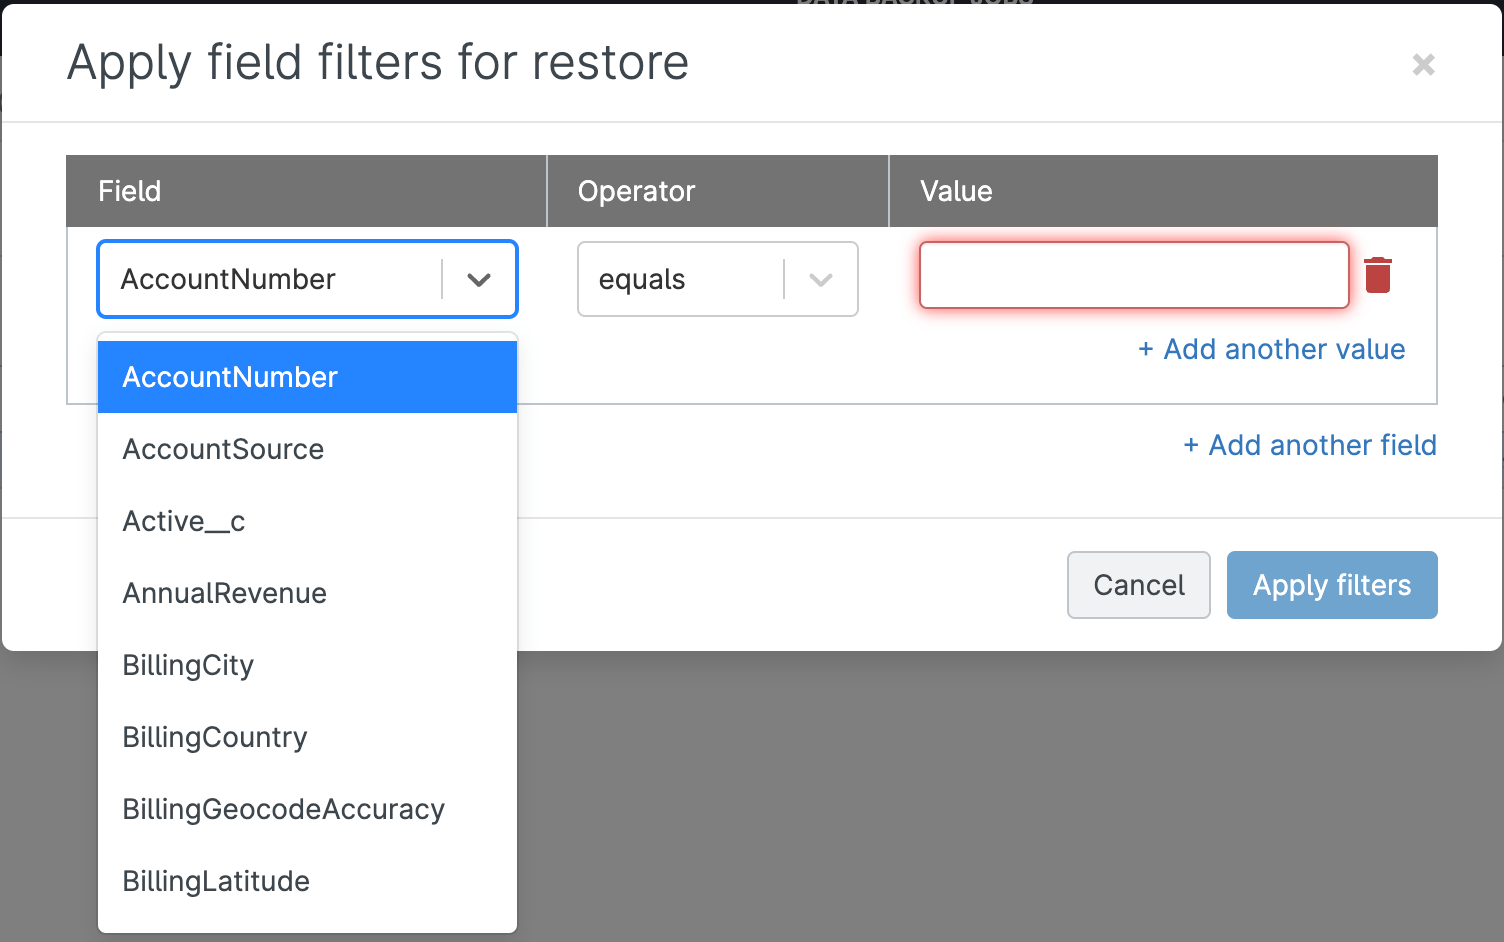
When you select this restore flow, you can restore the entire selected object or set up filtering to identify a specific record or subset of records to restore. Gearset will automatically identify and include associated child records.
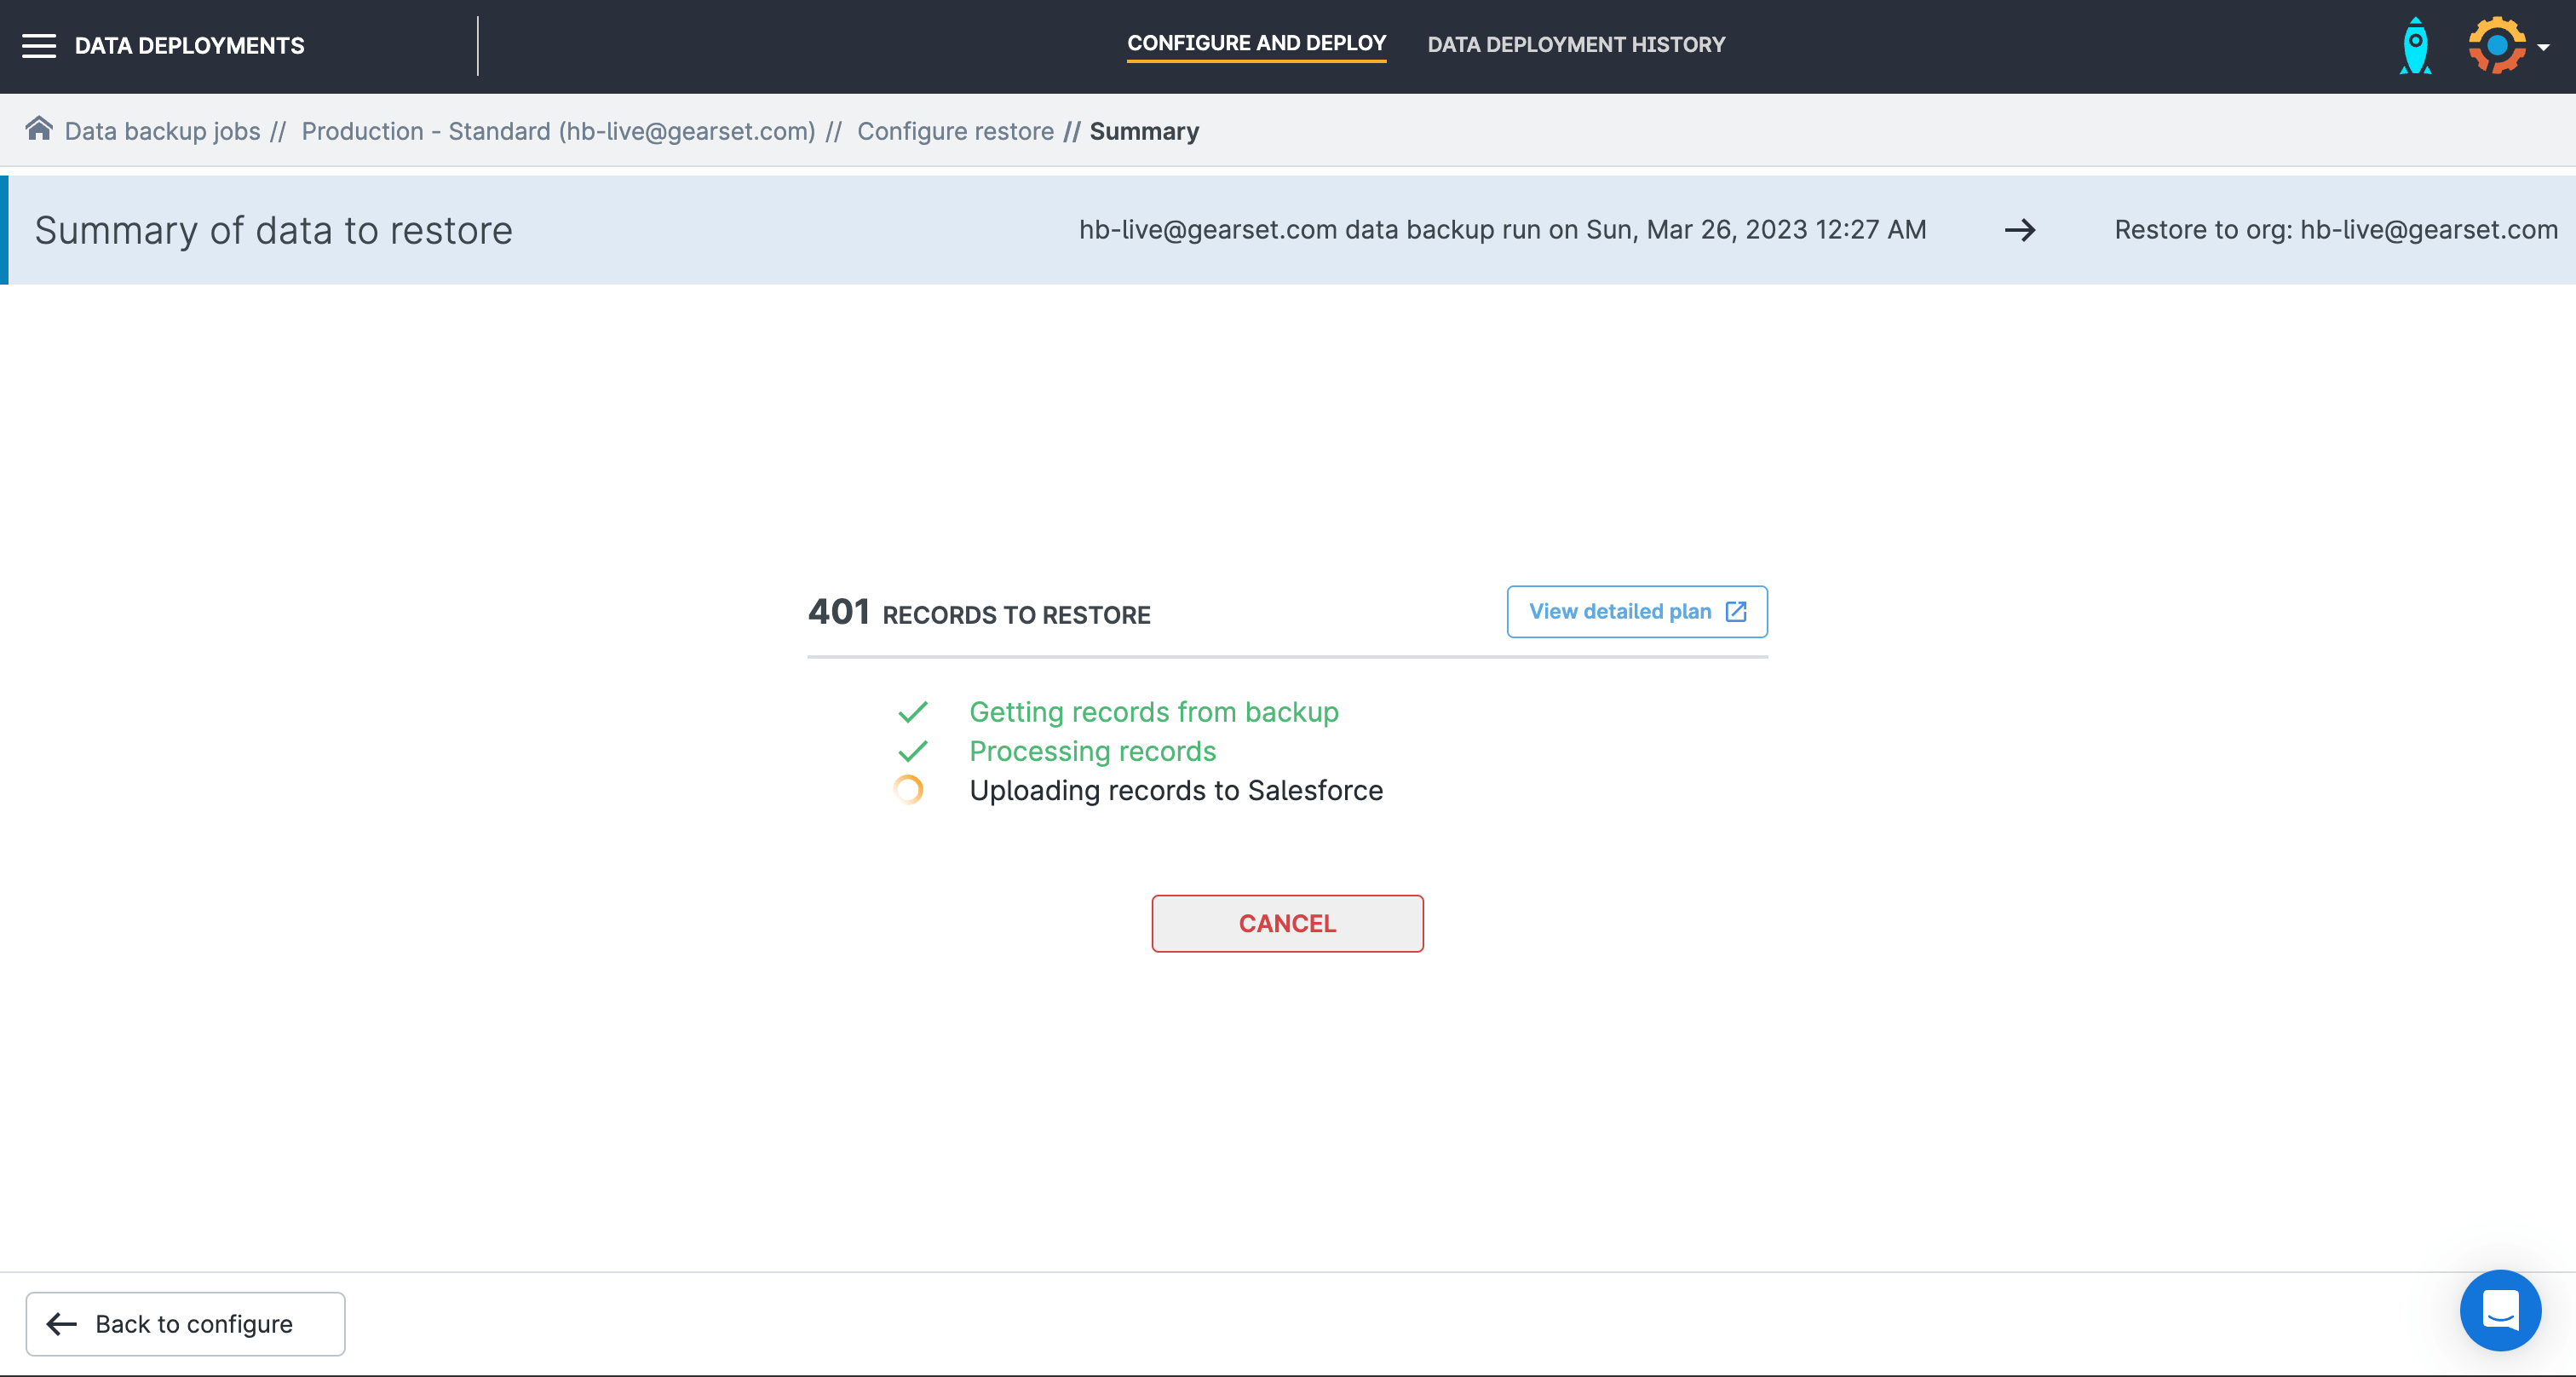
Gearset will create a restoration plan for the records and relationships included in your selection, and you can view the specific records set to be restored for each object.
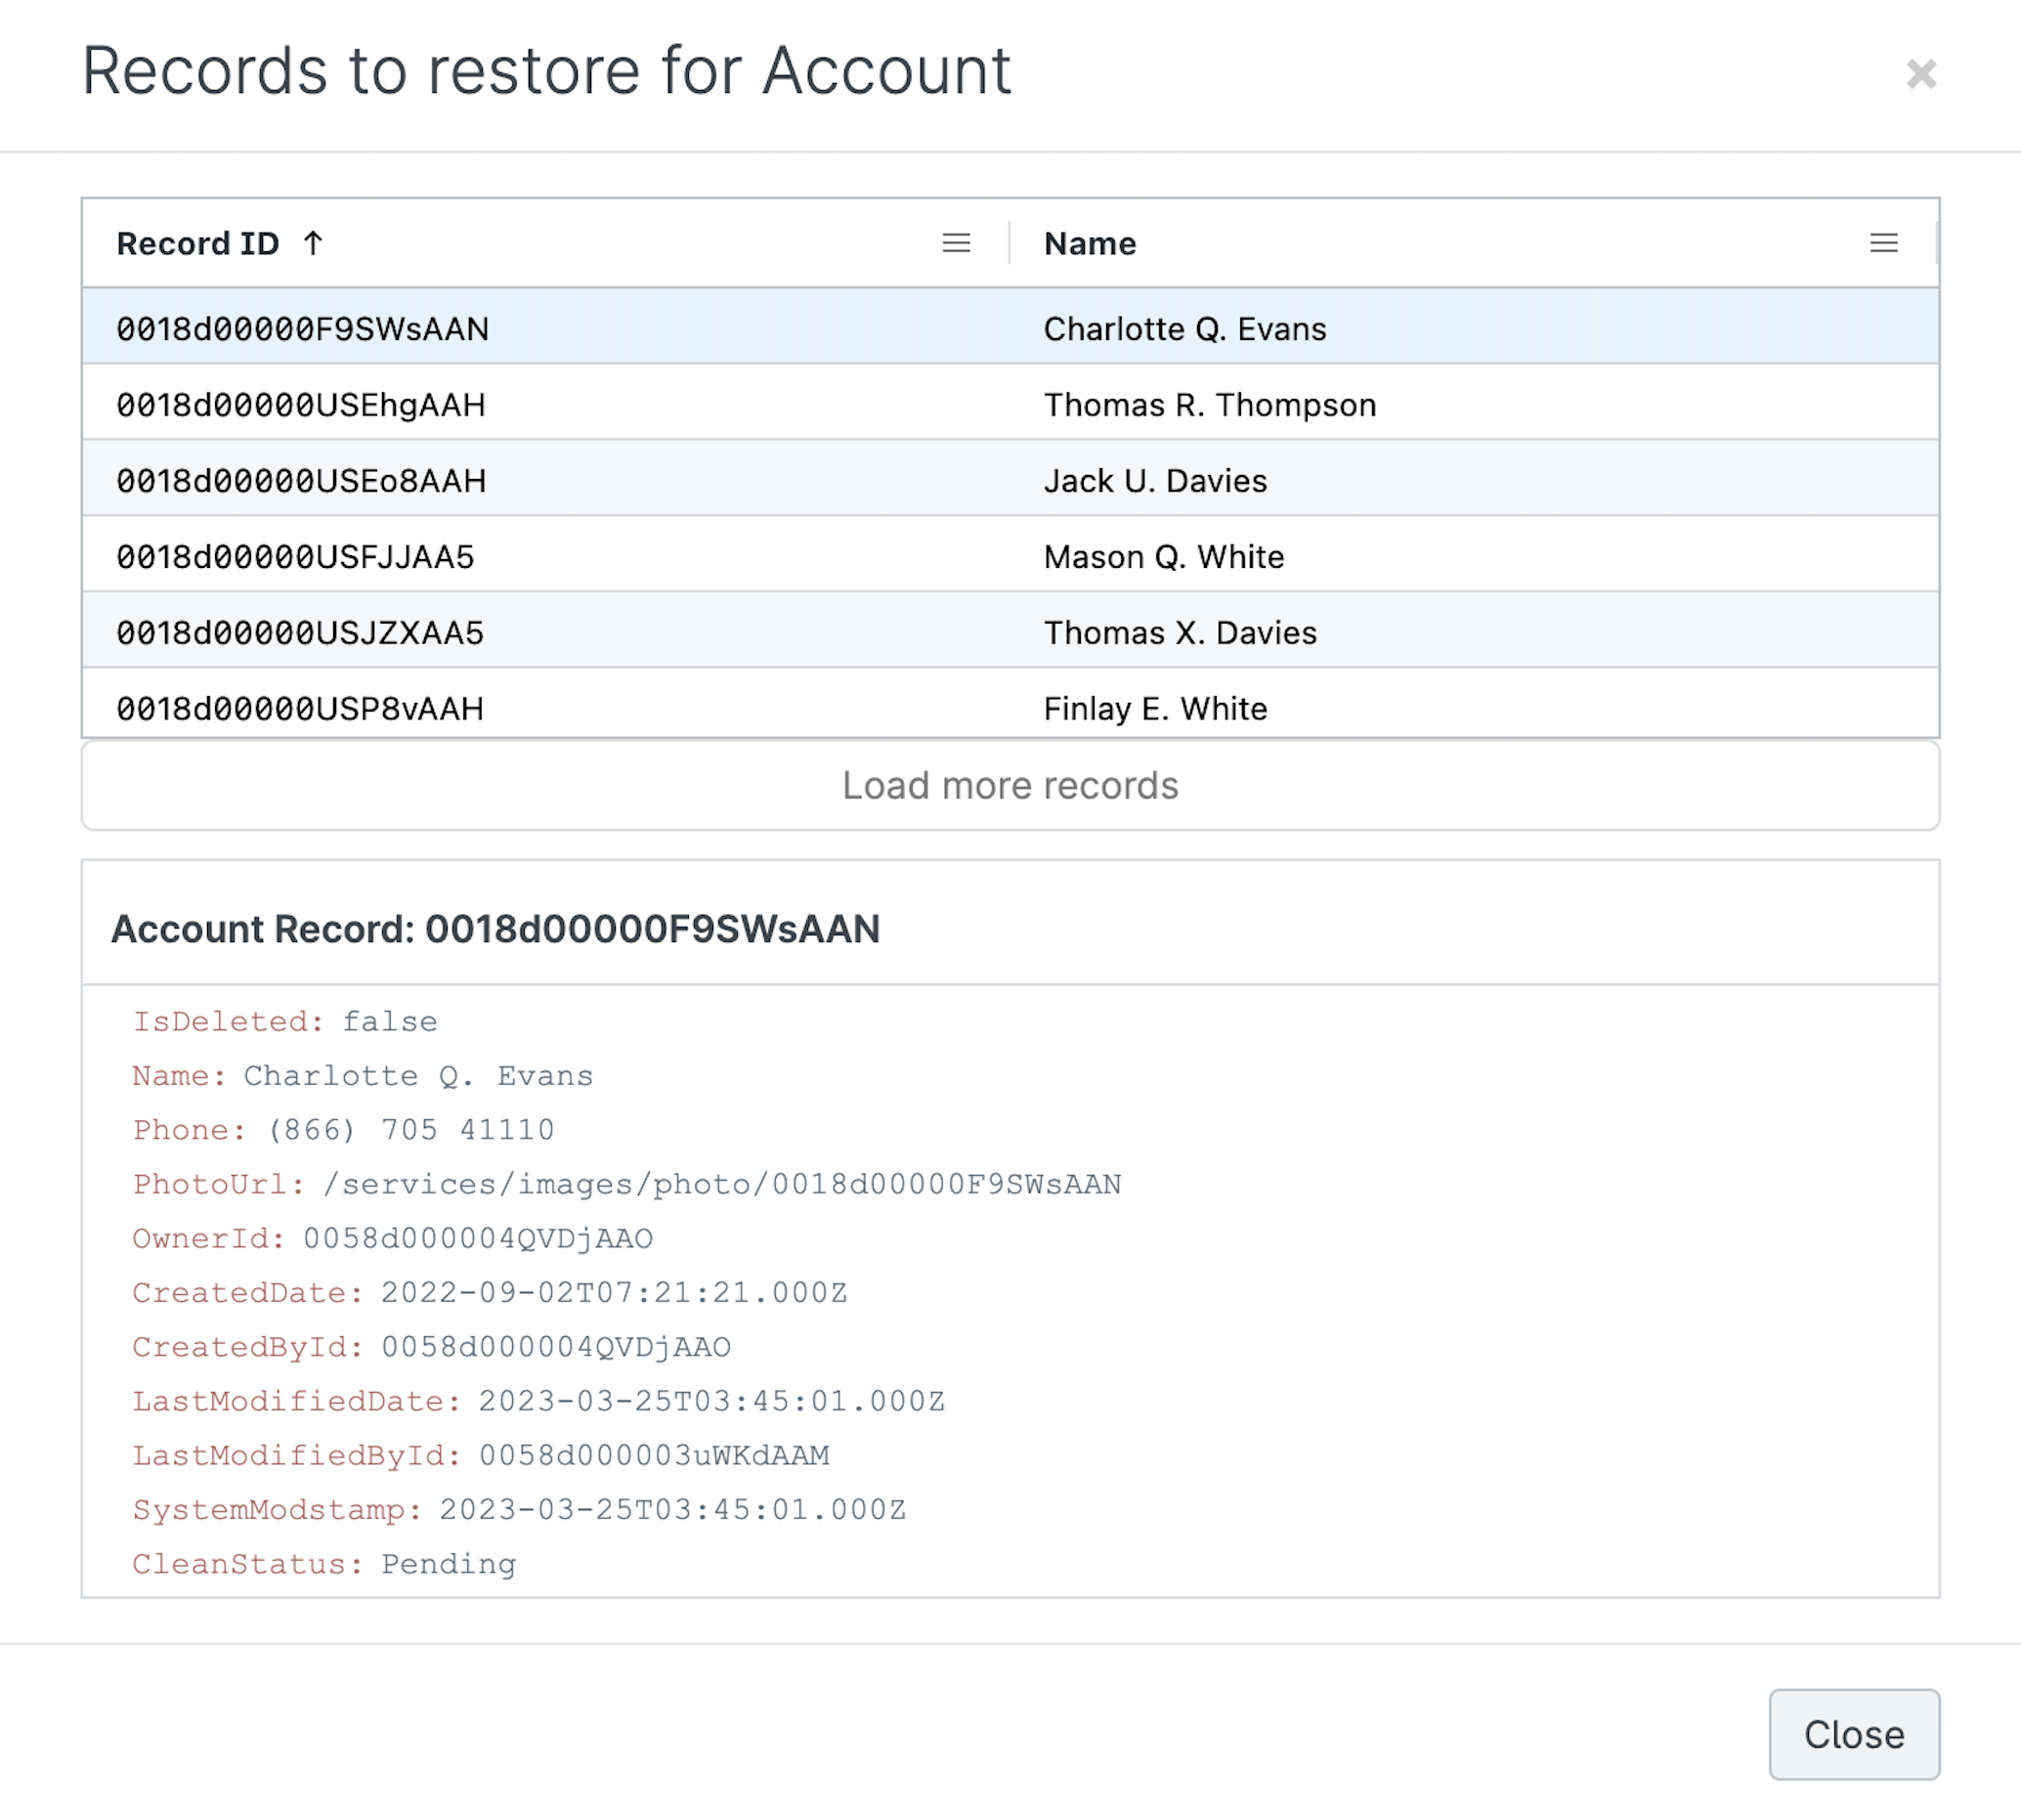
Press Deploy Data and Gearset will start recovering and deploying your data.
Restore records with specific fields
In some cases, you may need to restore specific fields but not the whole record. For example, if a Salesforce integration backfires and mass updates customer phone numbers incorrectly, you’d want to restore the phone number field in your records while leaving the other fields untouched.
Choosing this restore option will show you a field value comparison for changed records, so you can select which to recover.
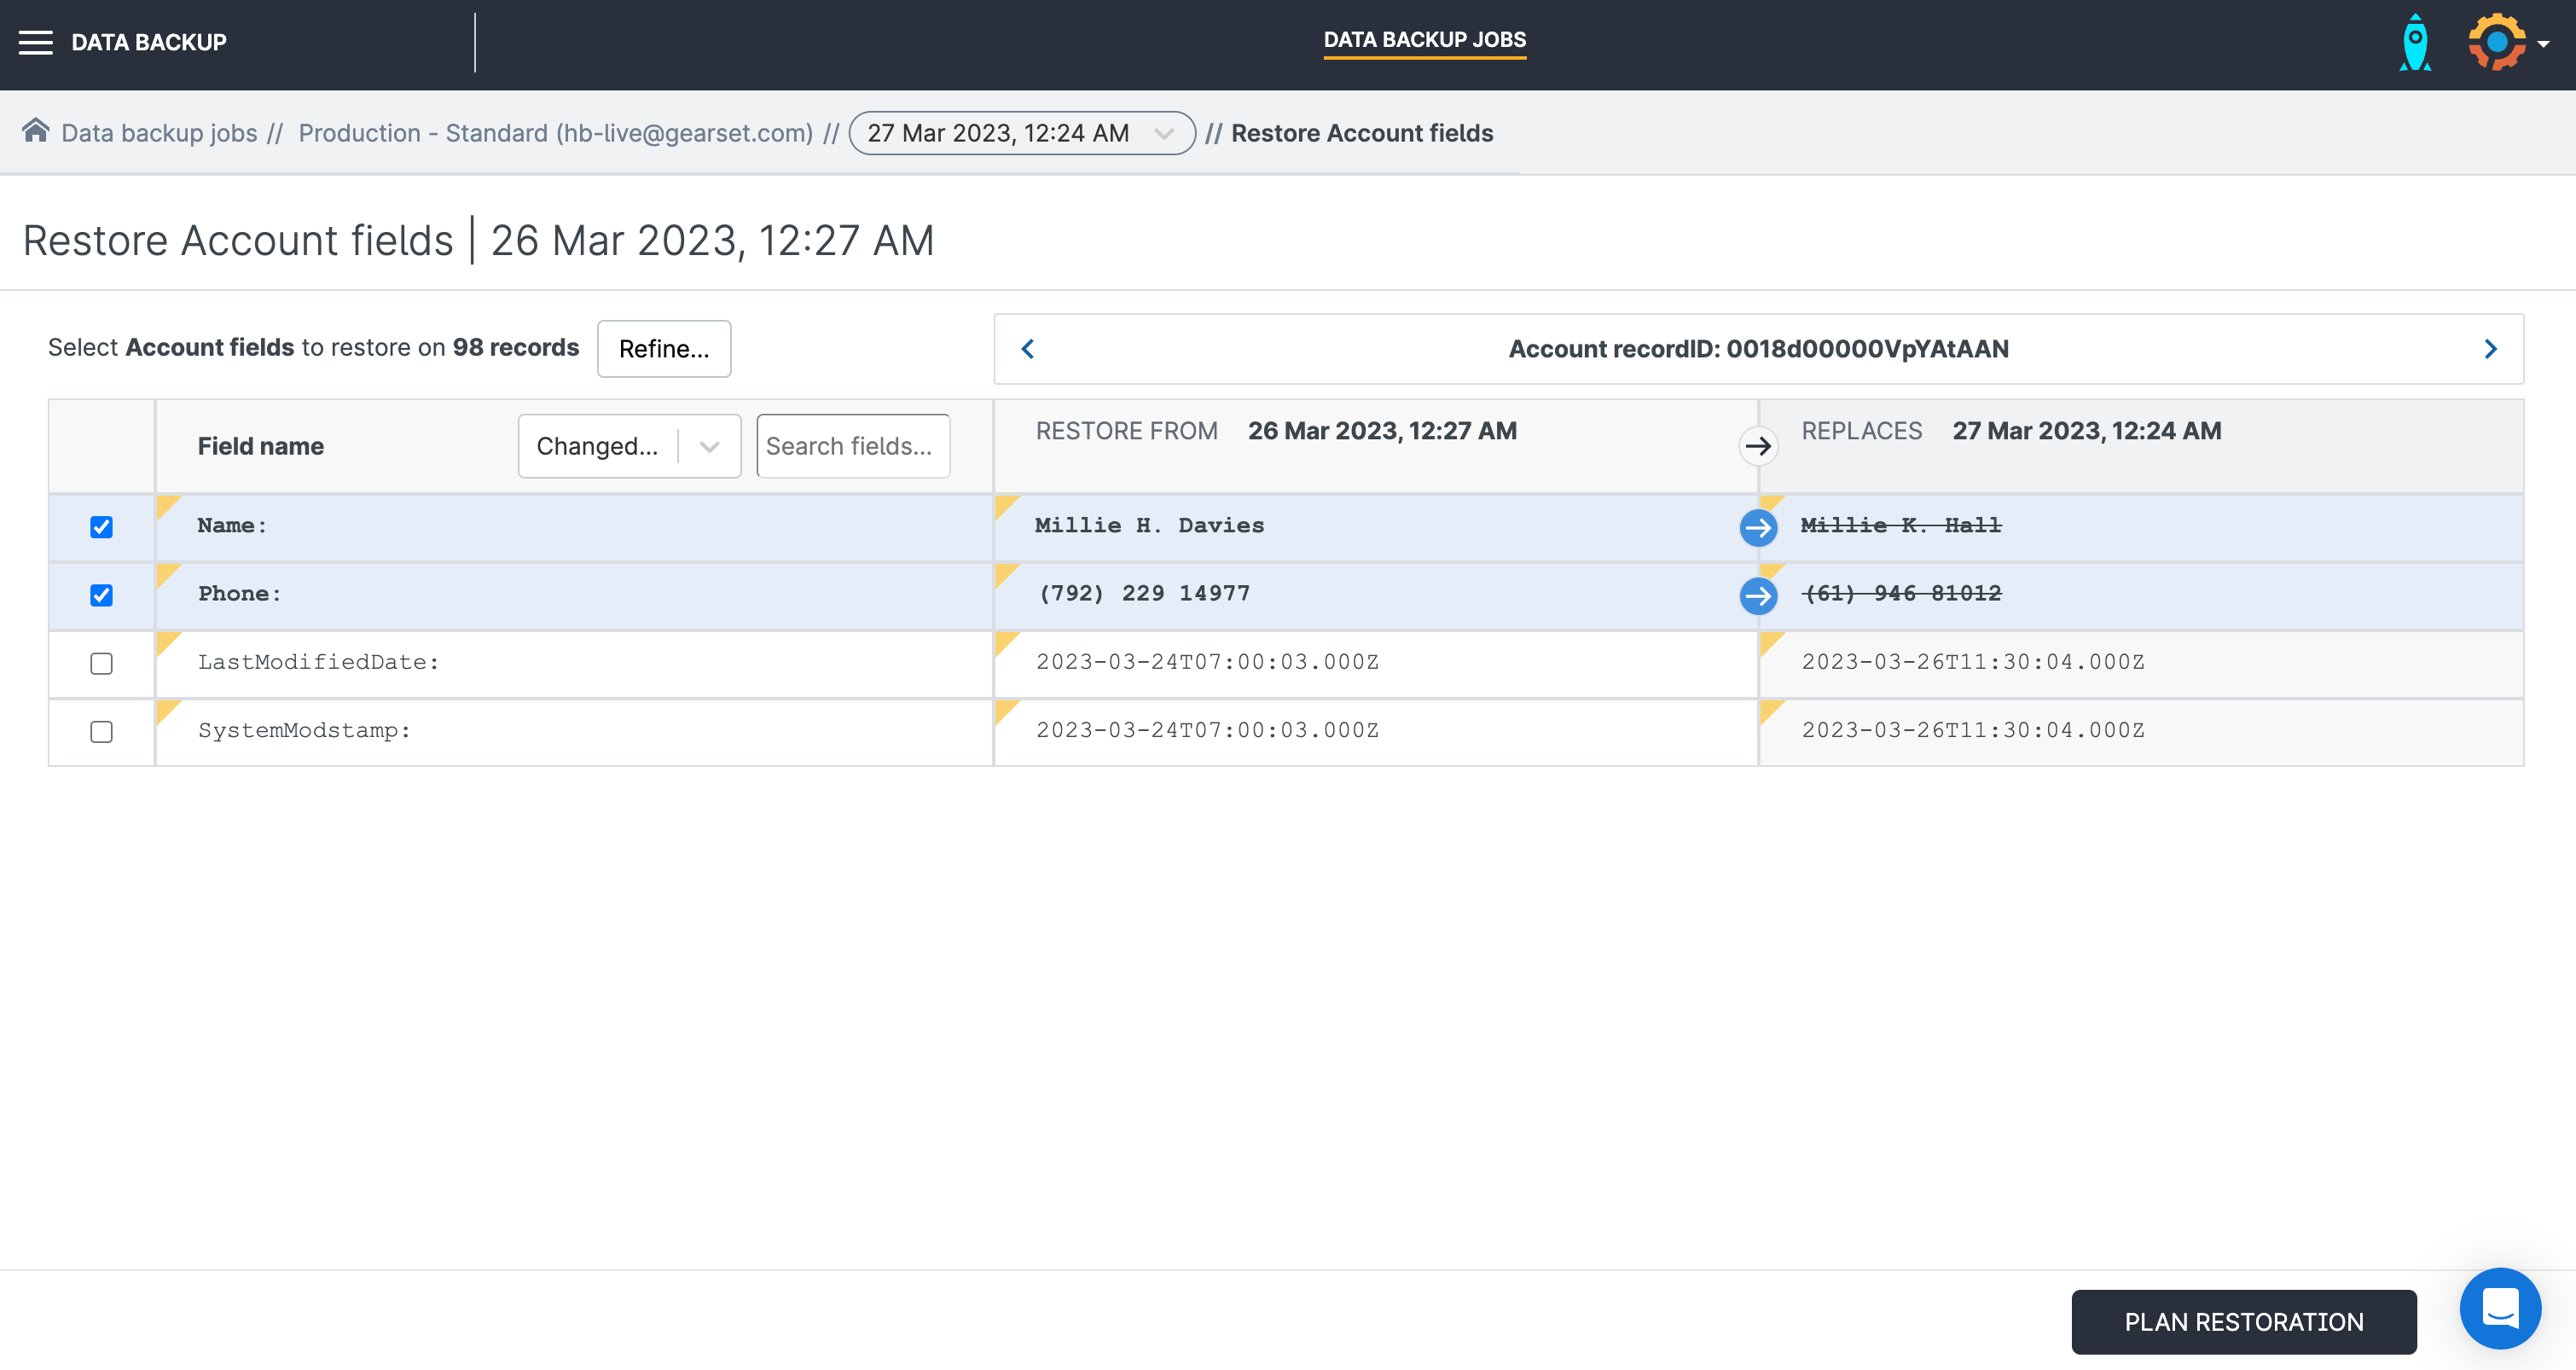
Gearset will show you exactly which fields are included in the restoration plan, so you can continue with the confidence that no other fields will be impacted by the restore.

Restore records without dependencies
If you simply want to restore an object without restoring records from related objects, this restoration flow allows you to quickly recover changed or deleted records for a single object.
When you click this restore option, you’ll be shown an overview page of every record on that object that’s new, changed or deleted.
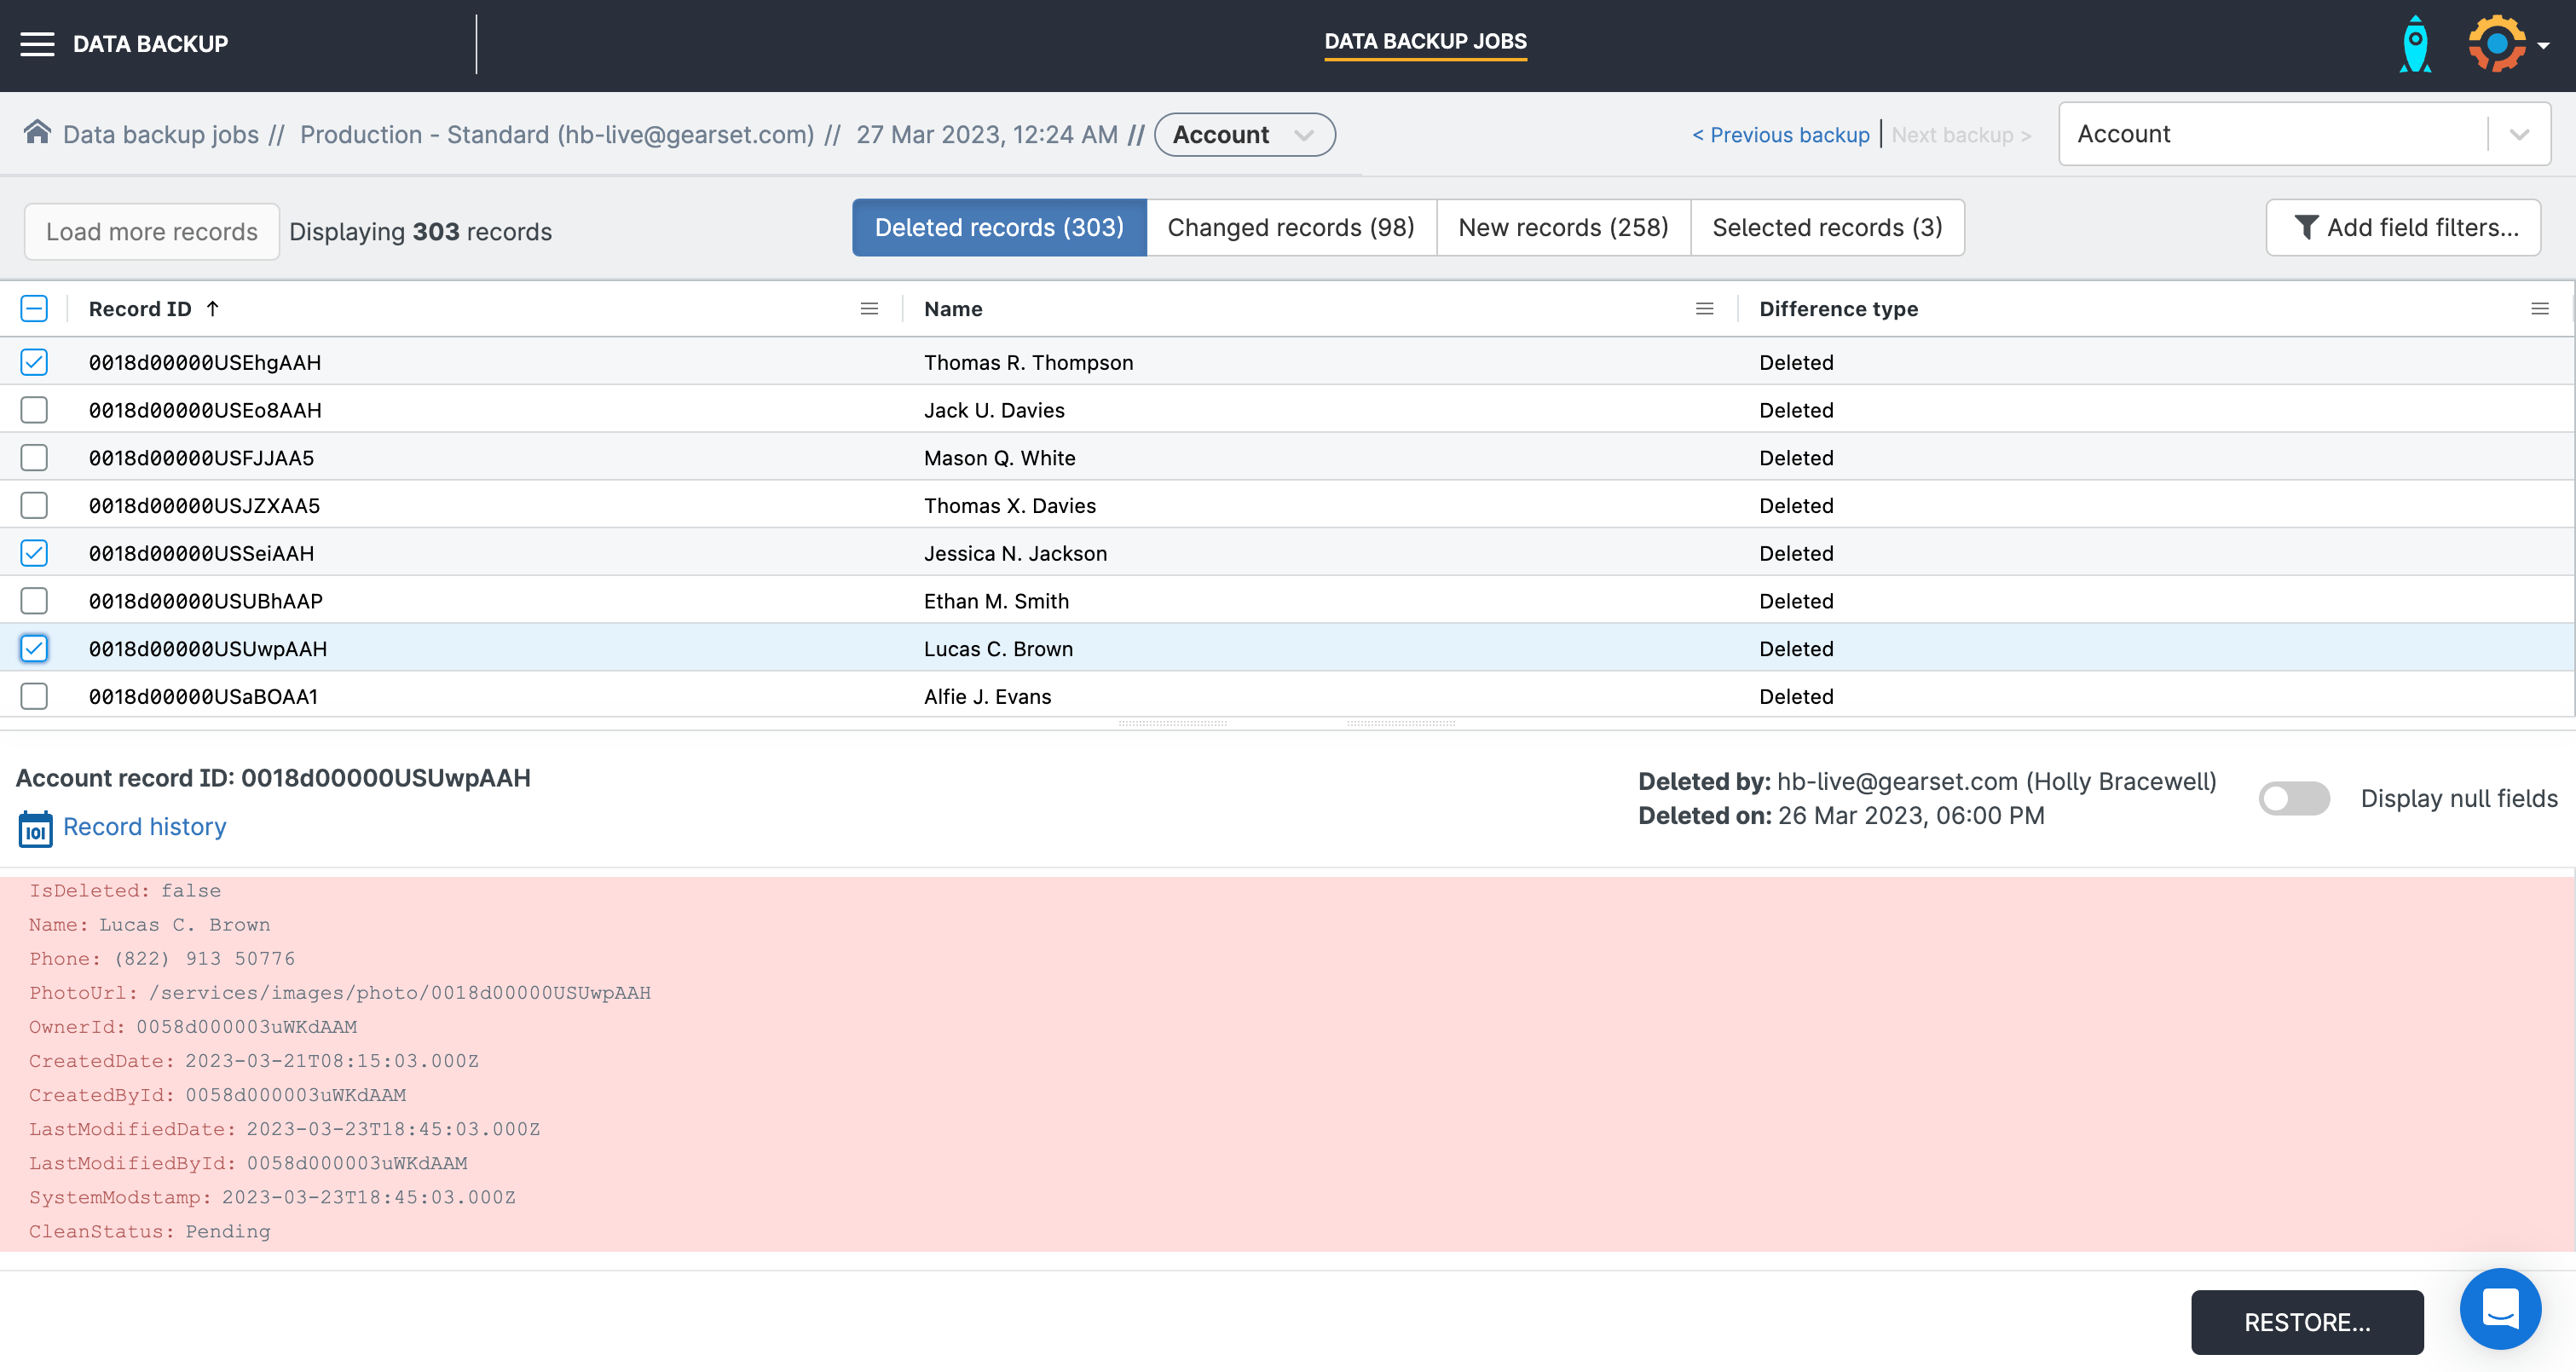
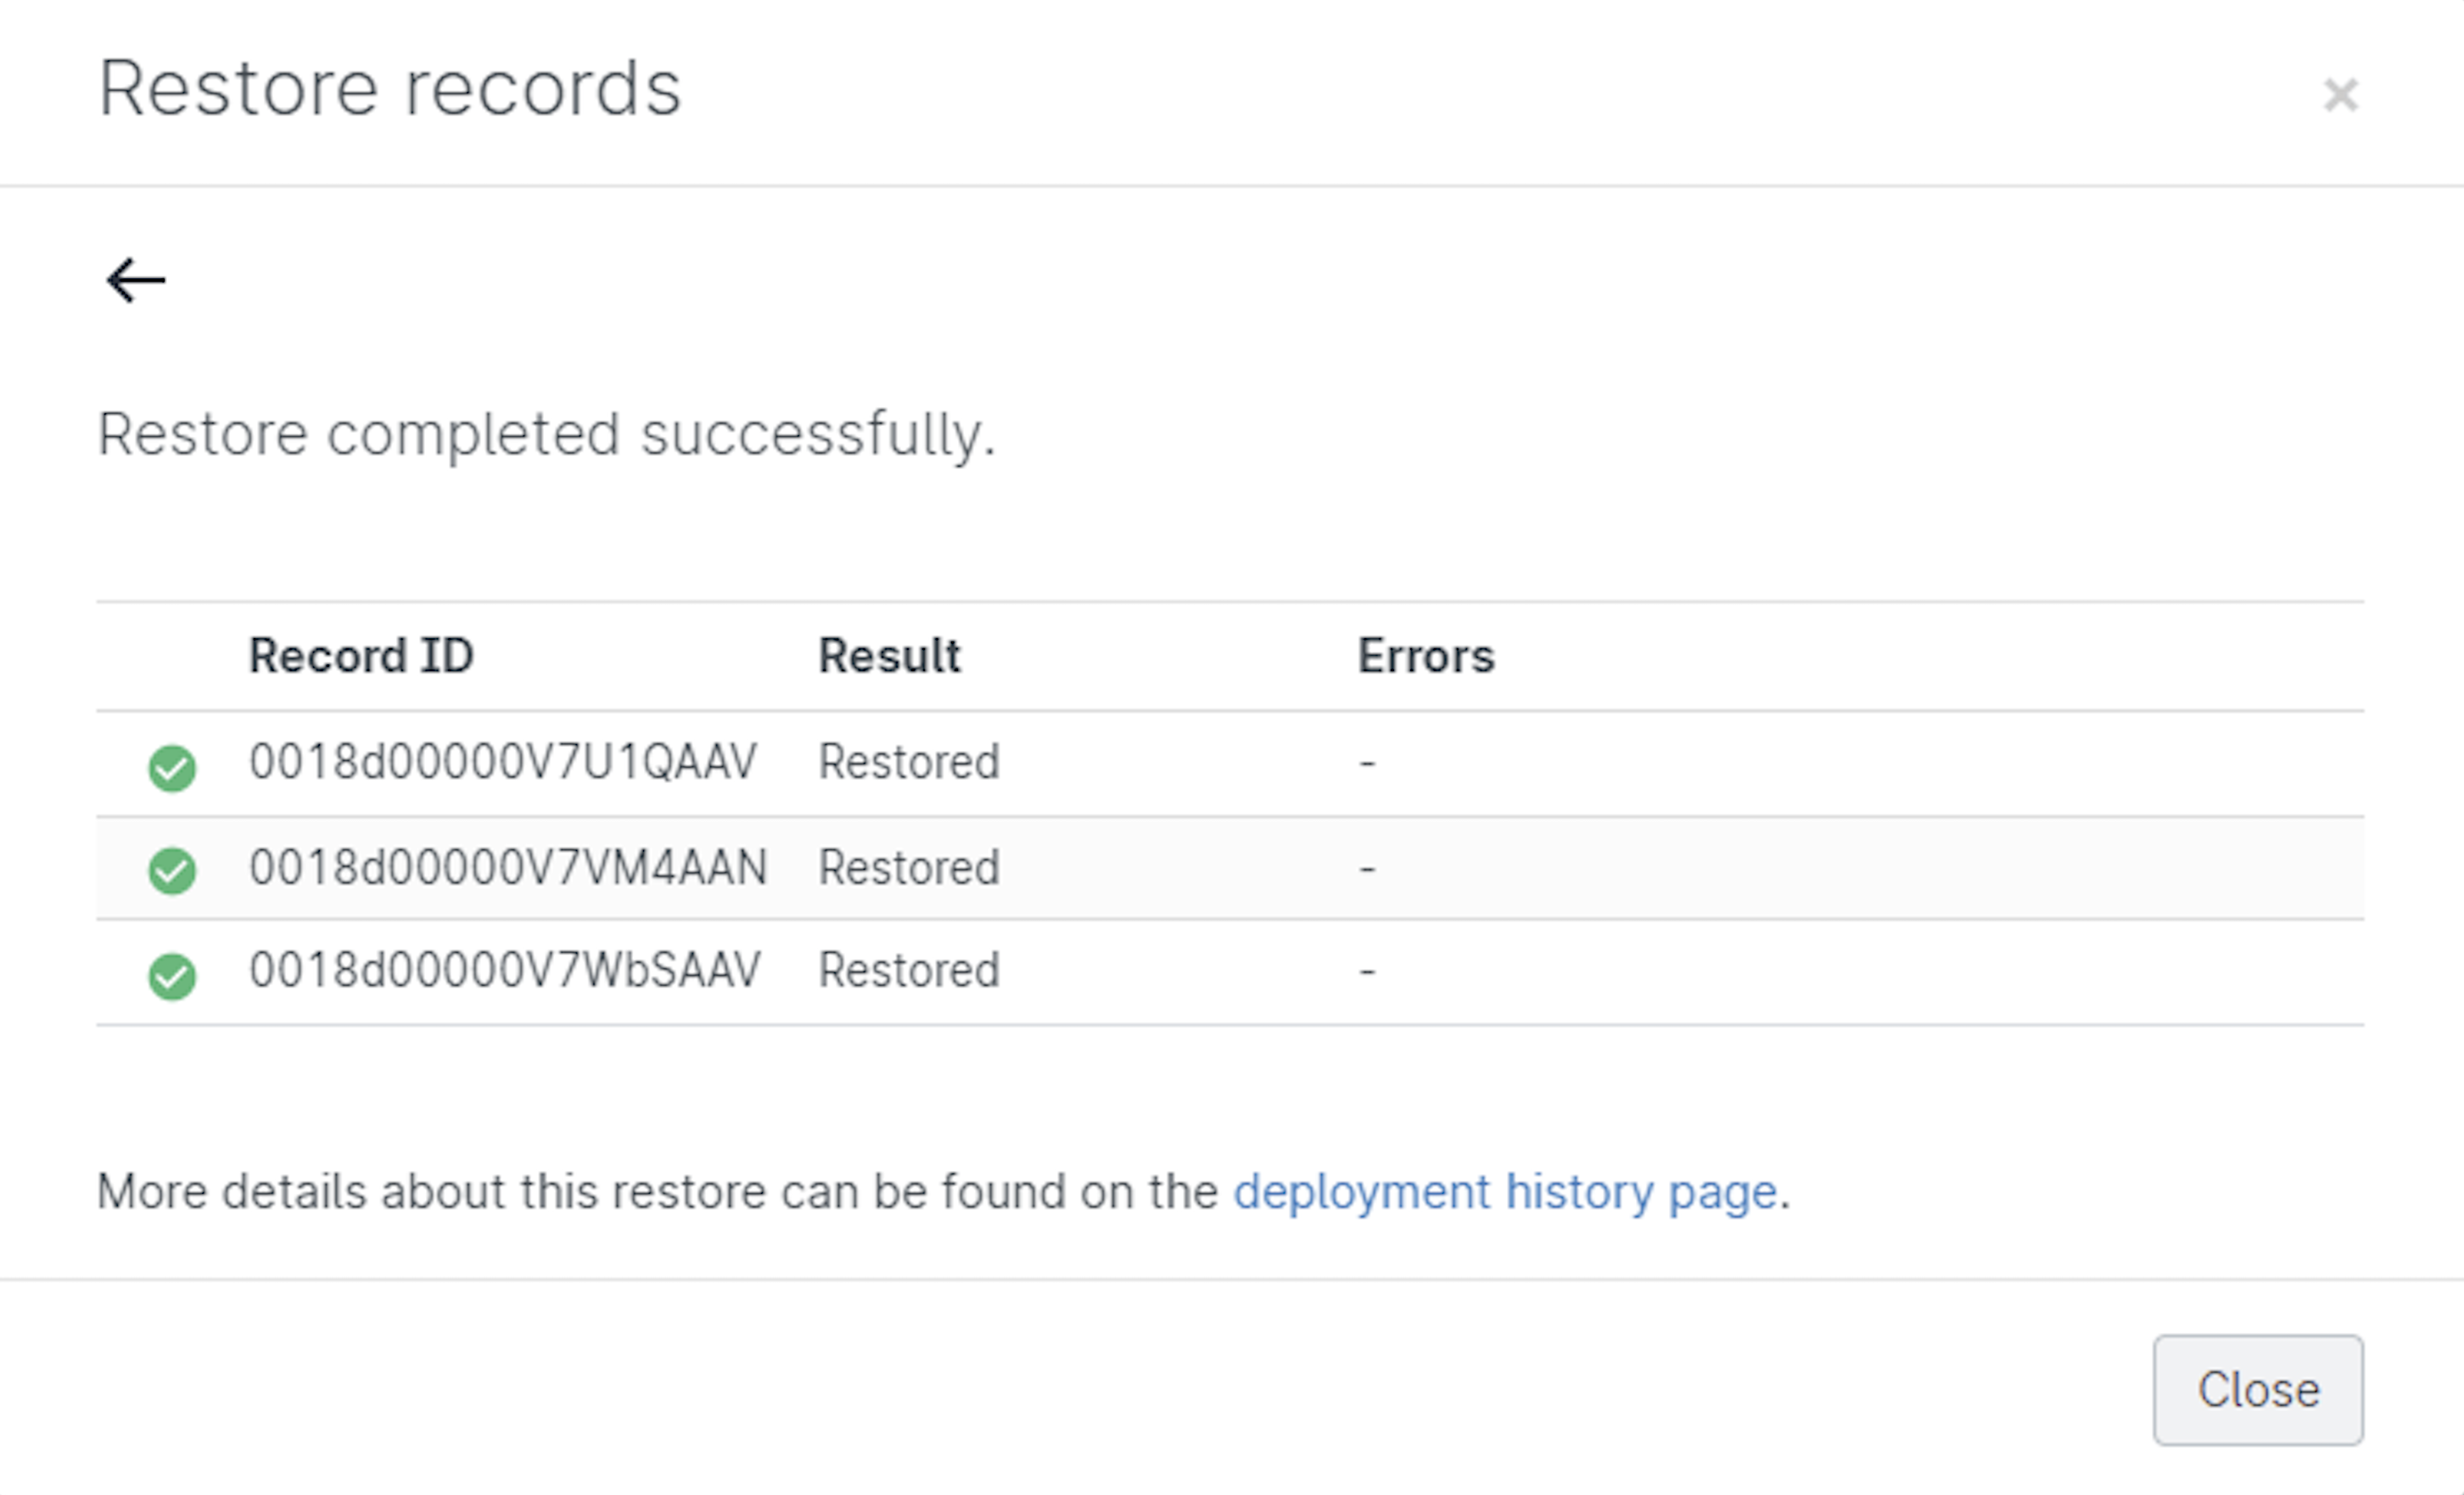
Select the records you want to recover and Gearset will build your restoration package. Once you’ve clicked Restore and the records have been deployed to your environment, you’ll get a summary showing whether each record was inserted successfully.
Restore records to multiple objects
This final restoration flow allows for a large and complex recovery across multiple objects.
When using this restore process, you can select all the objects you would like to include in the restoration.
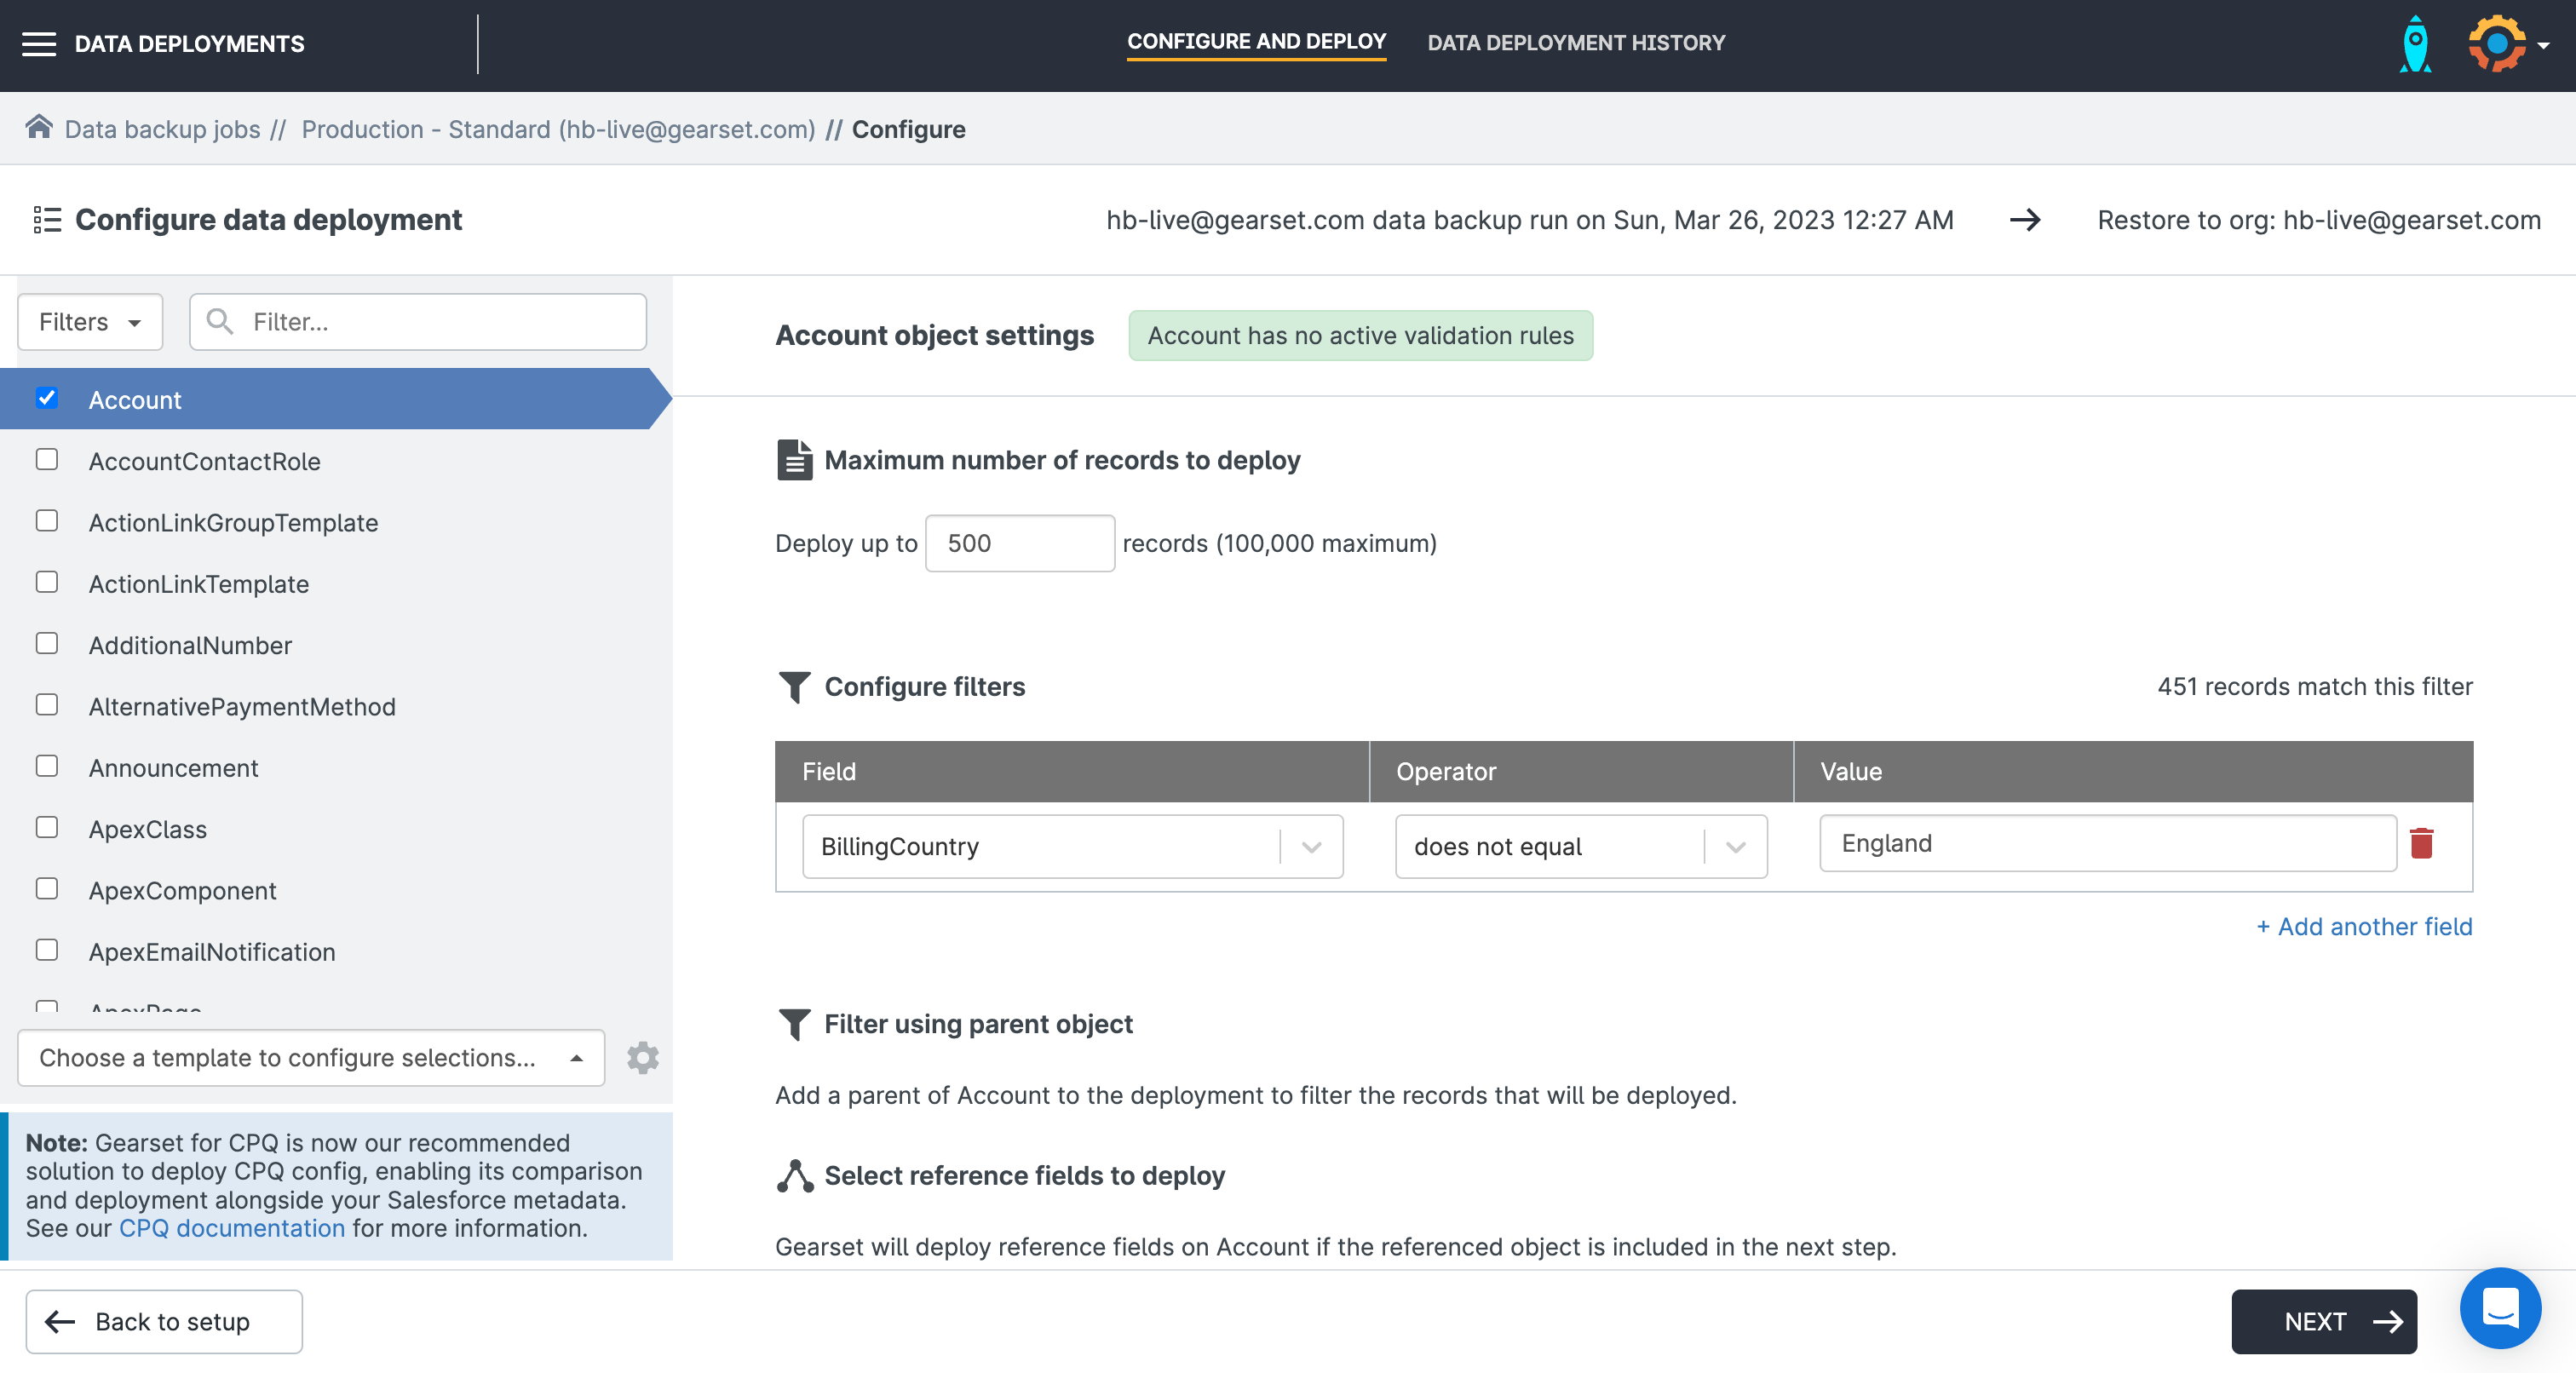
Gearset will highlight if any validation rules are active for that object — it’s useful to disable these before a deployment as it will fail if you attempt to recover data that doesn’t comply with an active validation rule.
Not only can you specify the number of records to deploy for each object, you can configure complex filtering to narrow down which records will be restored even to a single field.
For child objects, choose whether to include only the records that are children of the parent records you’re restoring.

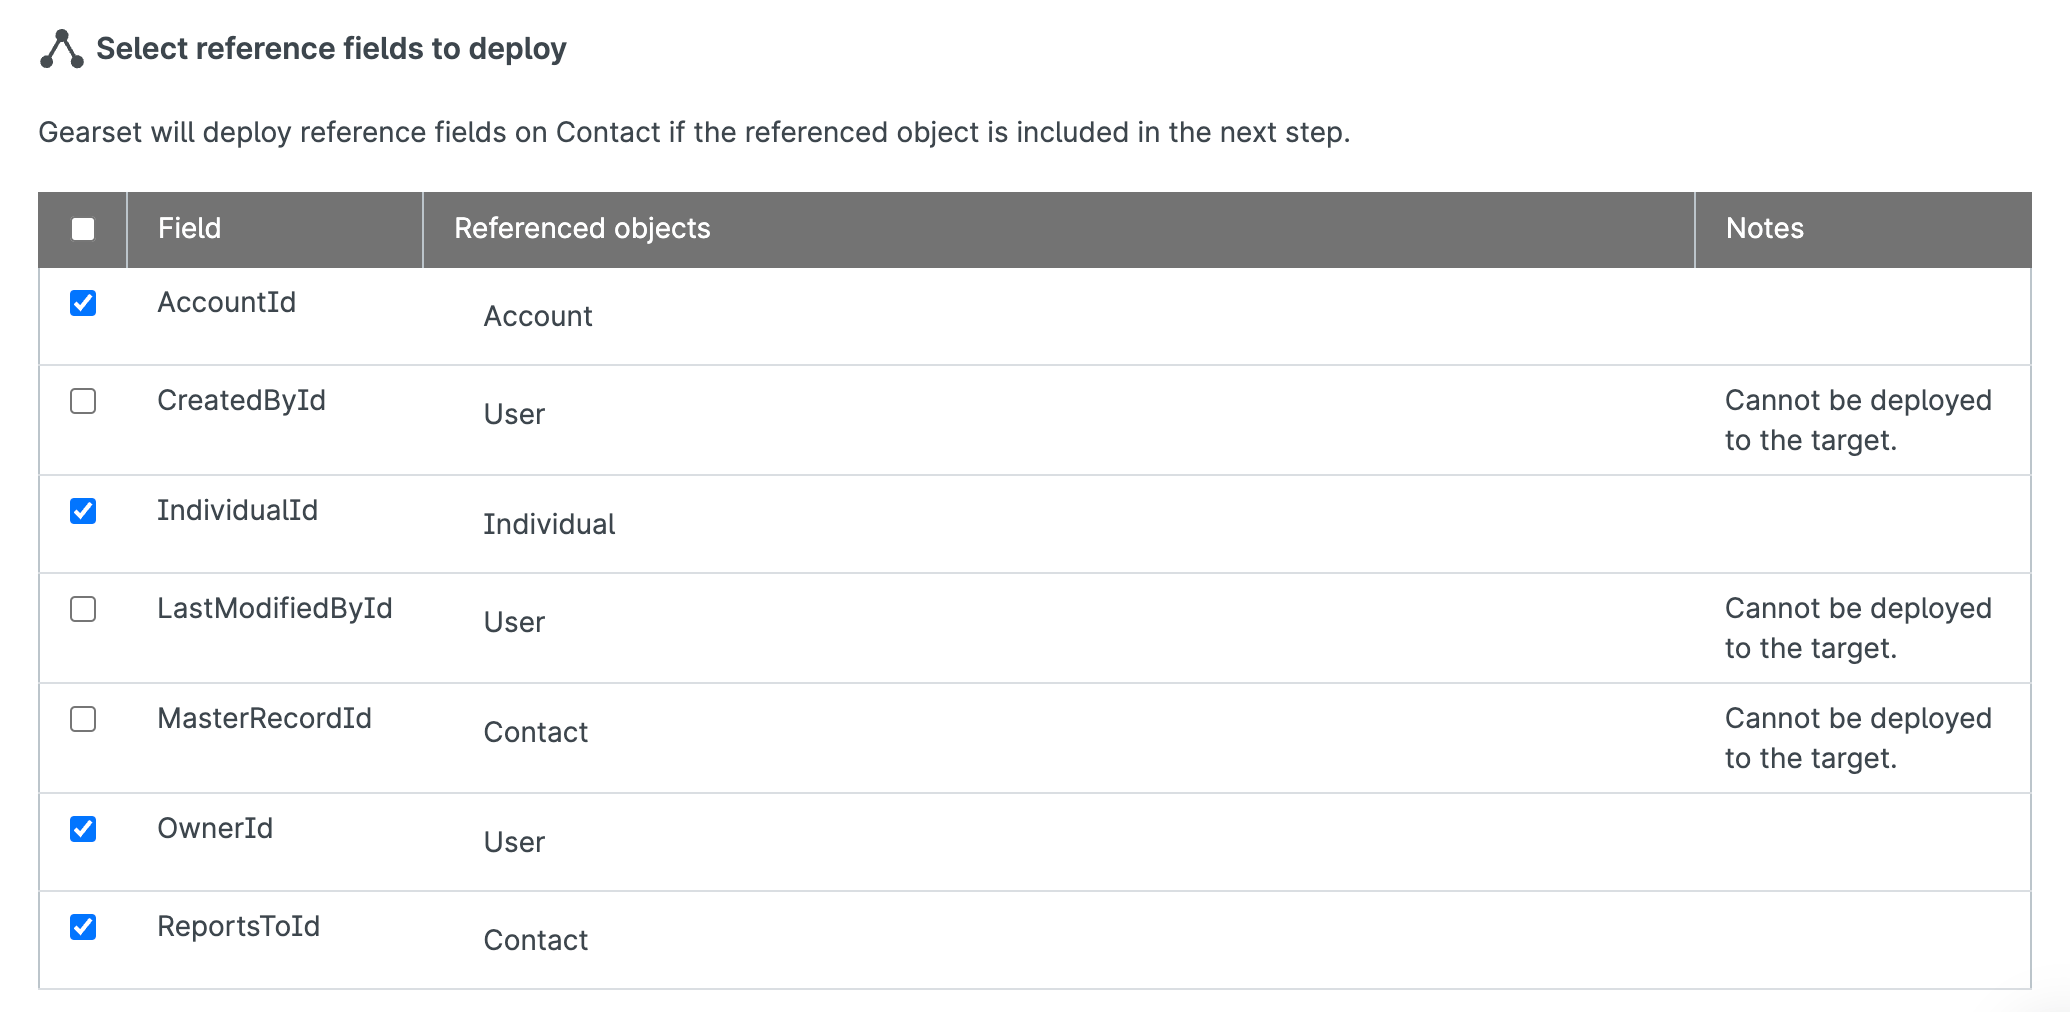
Once you’ve selected which reference fields to include in the deployment, you’re ready to continue to the next stage of this restoration flow.
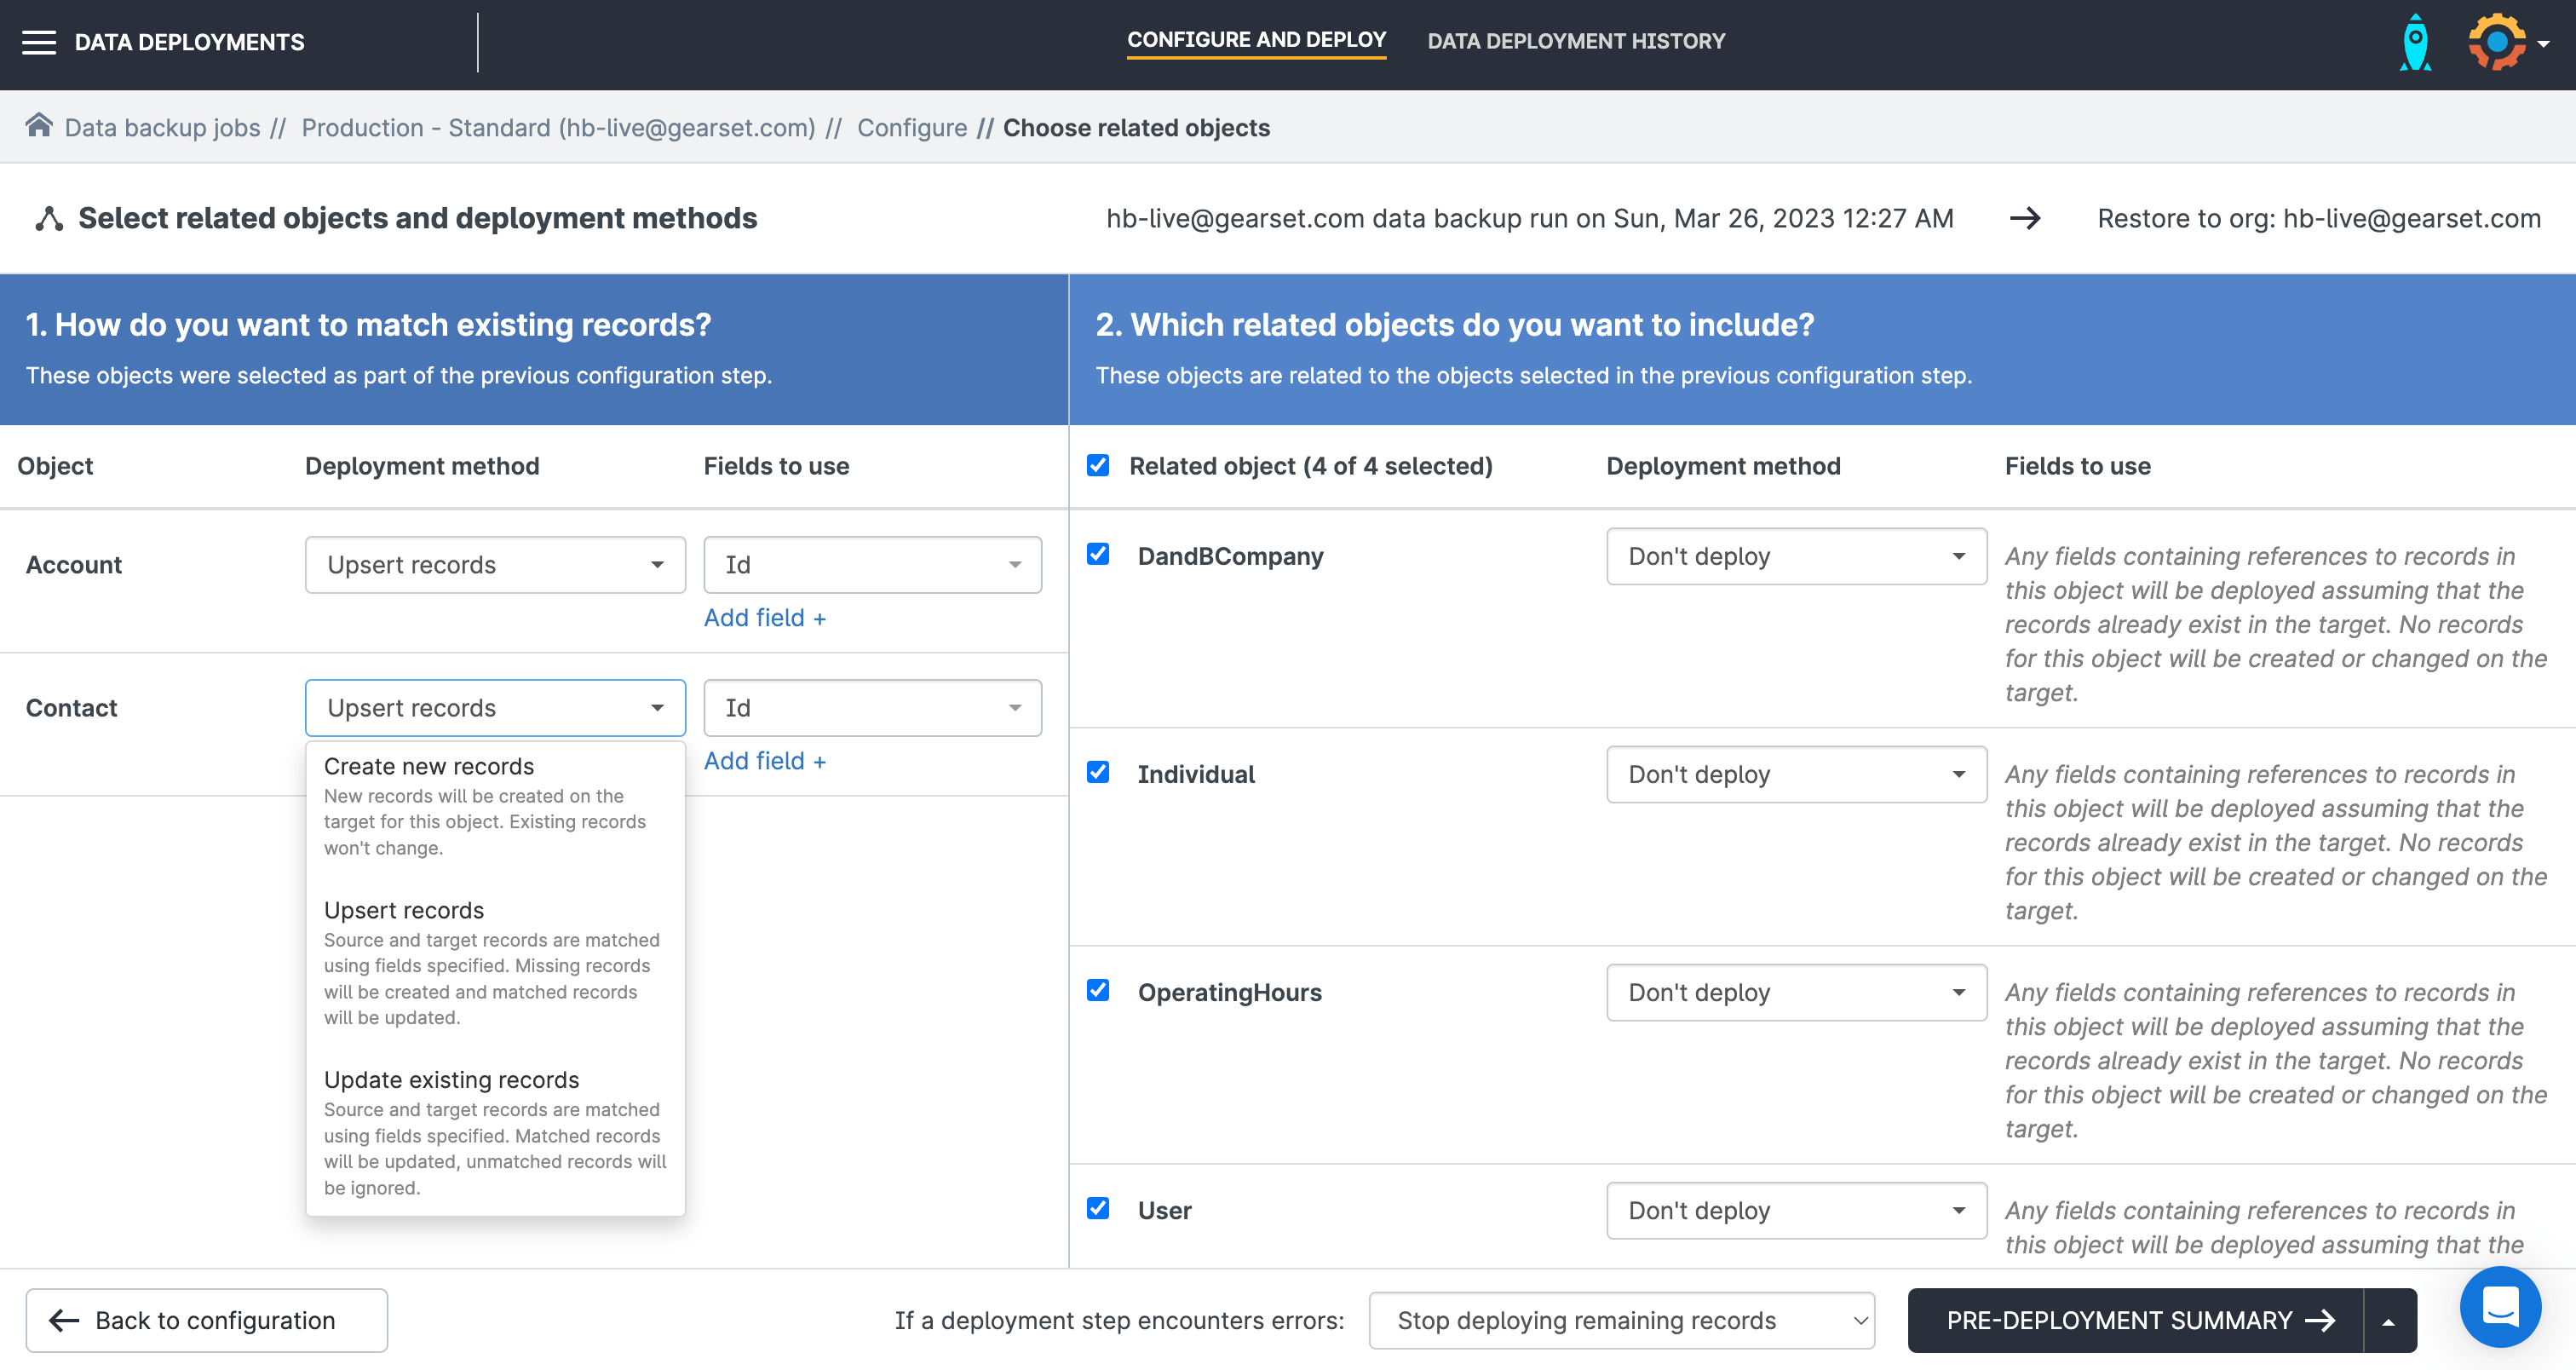
Decide how you’d like to deploy the data in your restoration:
- Create new records
- Upsert records
- Update existing records
Select which fields to use for this mapping process and choose whether you’d like Gearset to stop the deployment in the case of an error or continue deploying other records.
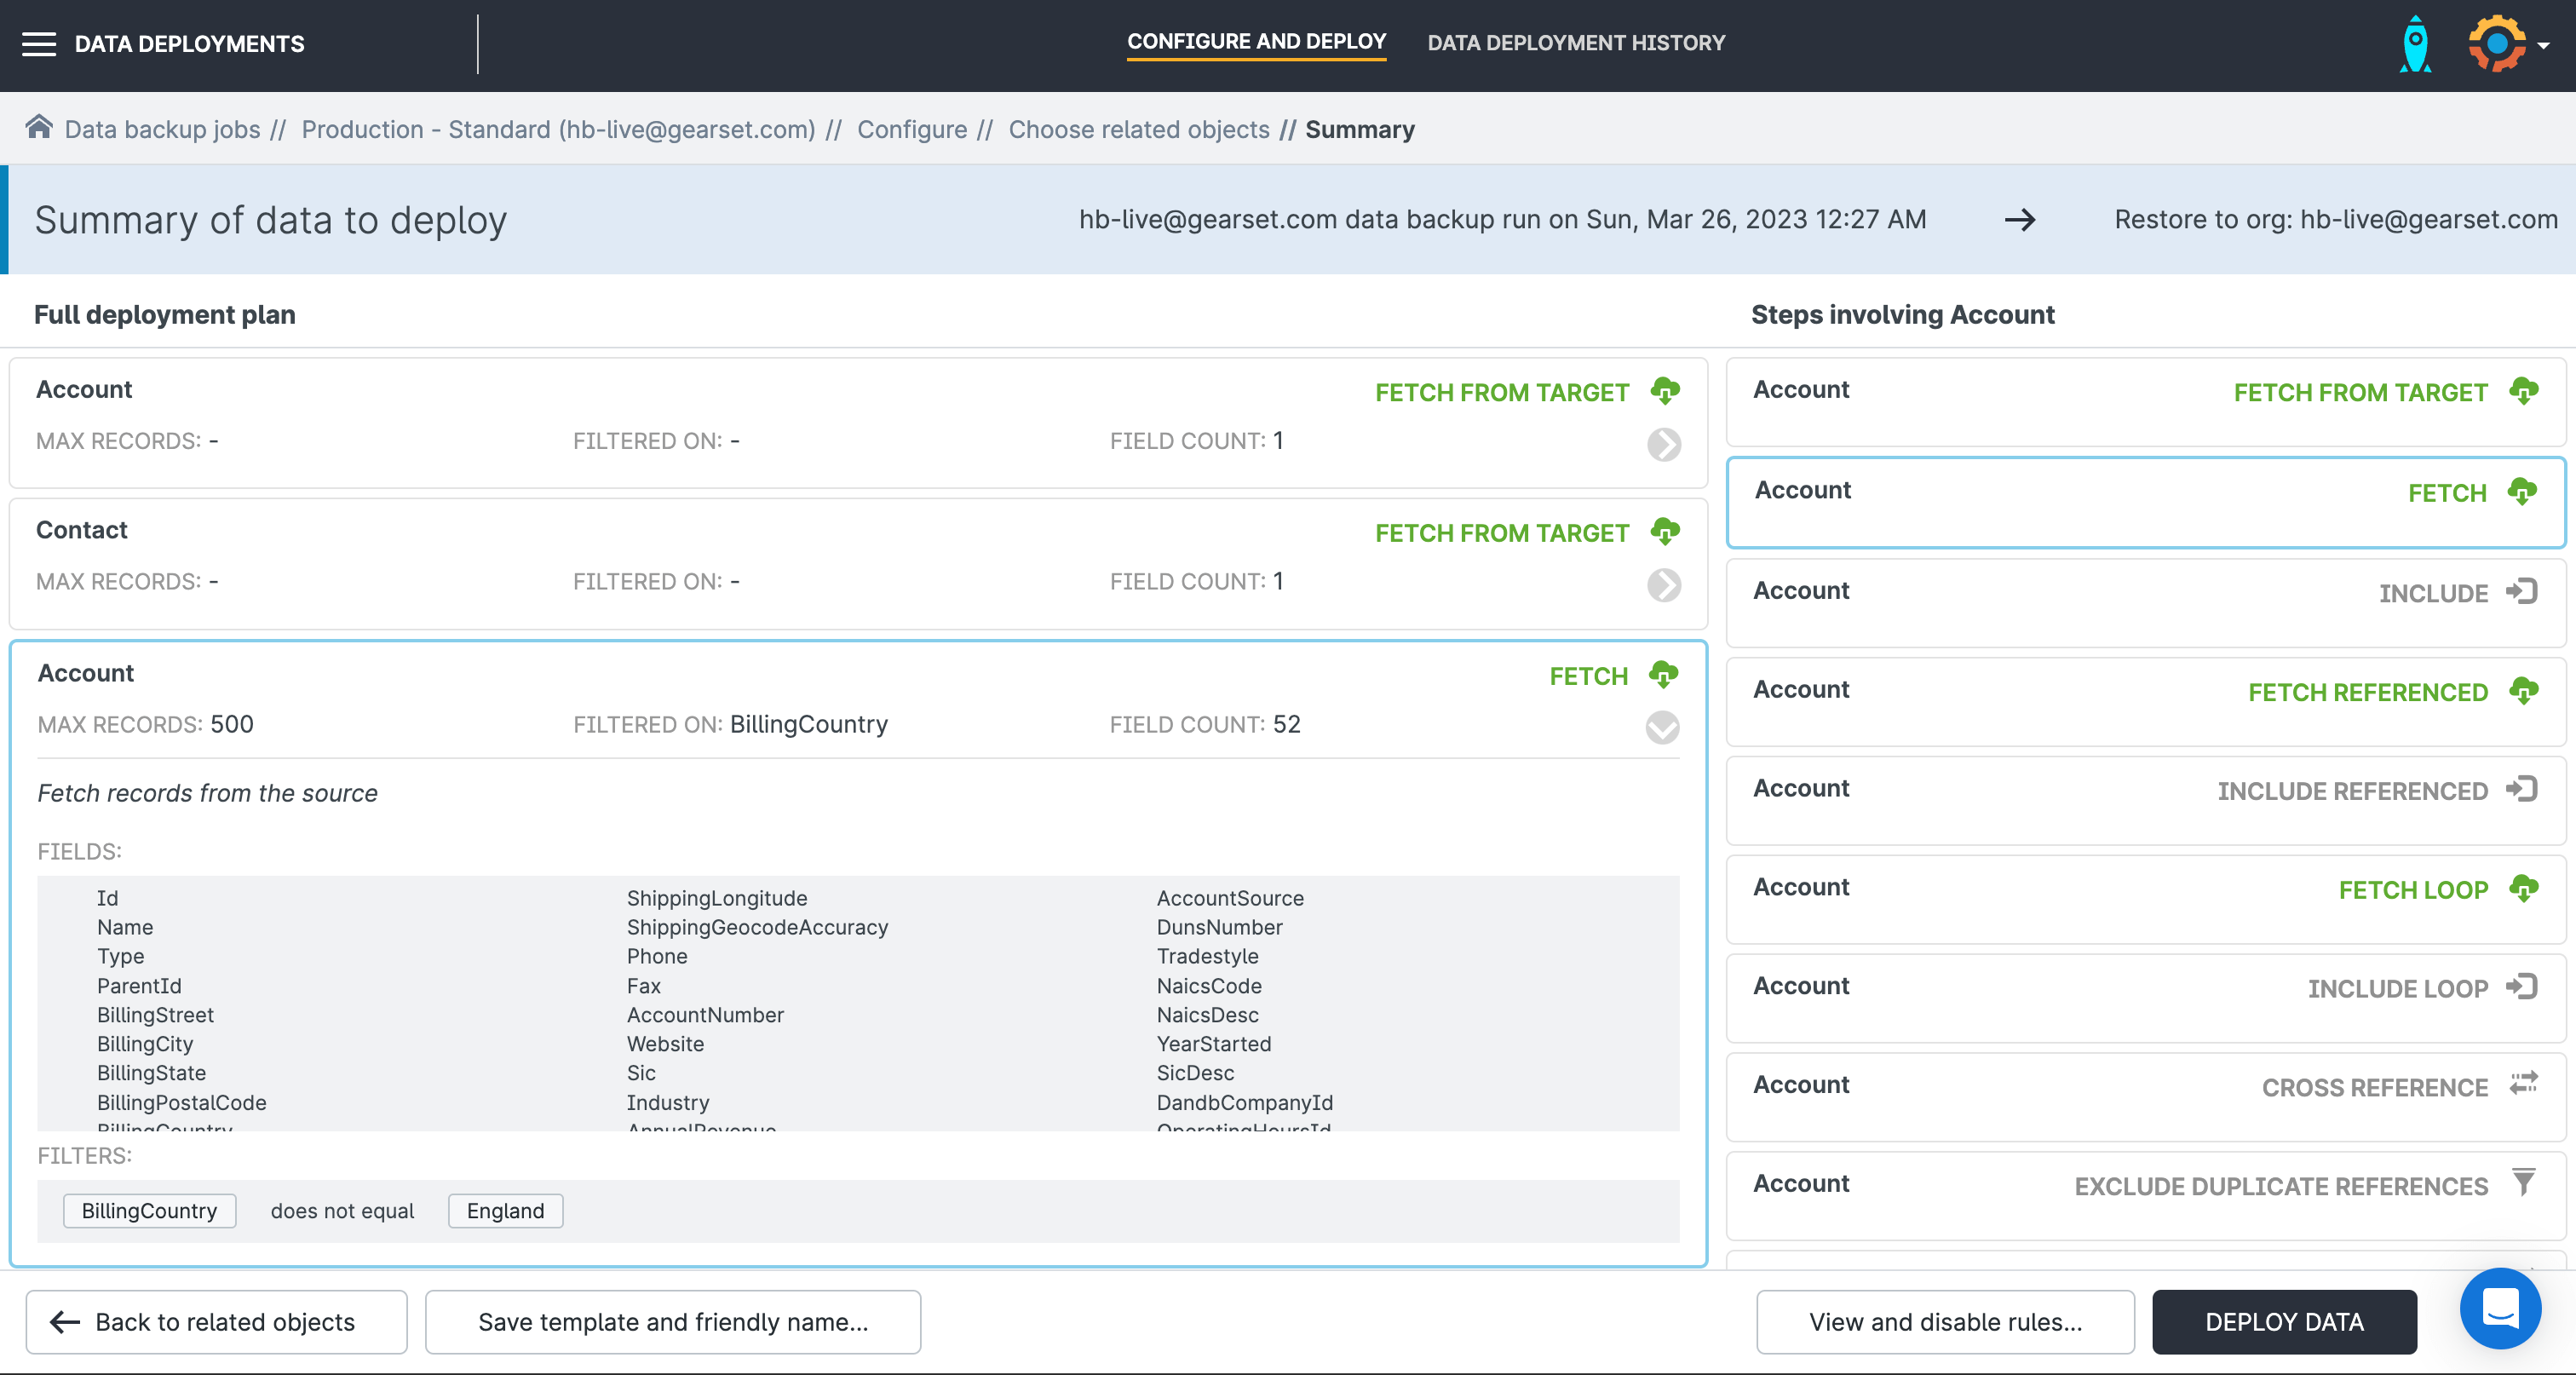
The pre-deployment summary page will give you a detailed overview of each step that Gearset will carry out as part of the recovery process. Check the plan, then click Deploy Data and Gearset will start your recovery deployment.
Don’t wait for a disaster to test your recovery plan
Even if you’re confident in your recovery plan, there are two types of testing you should always carry out.
Test your restoration before deploying to production
In the same way that you test your metadata before deploying to production, when you restore data to your org you should proceed carefully. It’s best practice to restore metadata and data to a sandbox first, and check everything there without risking further damage to your production org. Only then should you restore everything to production.
It can be tempting to skip restoring to a sandbox environment because running multiple restore jobs takes more time. But this is a false economy; restoring with care and avoiding mistakes is much faster overall than trying to restore so quickly that you cause more damage and confusion. When it comes to something as important as restoring your org, it’s a case of more haste, less speed.
Regularly test your recovery process
You don’t want an actual data loss incident to be the first time you’ve tried your restore process. Set a regular cadence for testing your restore process; the more often you practice, the more prepared you’ll be — most companies aim to test their process at least annually. If your Salesforce team grows or changes significantly, you should test your process again sooner. You need to make sure everyone is familiar with your restore process, and their responsibilities in the event of an incident.
Have confidence in your ability to restore your org
Restoring an org after a data loss incident is always going to be stressful. But you should never be in a position where you have doubts about your team’s capability to restore your org accurately and effectively. Start backing up your Salesforce data and metadata with Gearset, test your restore process, and have confidence in your ability to restore after any type of data incident.
Gearset’s Backup and Archiving suite powers the Operate stage of your Salesforce DevOps lifecycle — keeping your orgs fast, compliant, and always recoverable. If you want to learn more about Gearset book a demo with one of our experts.
