Successful metadata deployments are key to building Salesforce orgs that work for your business. But moving changes between environments inevitably stalls if your deployment process can’t keep up. It can be easy to miss dependencies, overwrite changes and arrive at a failed deployment at the end of a development cycle.
As teams grow and business requirements scale it can seem like a daunting prospect to find a deployment solution that works for everyone. While it’s great that Salesforce’s clicks-not-code approach has made the development process accessible to more people, it can feel like deployments put up an extra barrier. But teams shouldn’t have to deploy metadata following totally separate release processes. Whether you’re creating custom objects, Flows or Apex code, this post will help you find a release process that works for your whole team.
Harnessing the Salesforce Metadata API
There are a few options for deploying Salesforce metadata. Most of them have the same foundation in Salesforce’s Metadata API, which is used to retrieve and deploy metadata between environments. This might be between Salesforce orgs, or between orgs and version control systems such as Git.
While the majority of Salesforce metadata can be deployed using the API, there are a few metadata types that aren’t supported. The good news is that these unsupported metadata types are rarely used so they’re unlikely to be a cause for concern for most users. With the right release process, you should find that the API can empower your team to deploy successfully.
Change sets
Inbuilt tools from Salesforce, like change sets, are the default choice most teams start off with. Change sets use clicks not code and are free and easy to enable in the Salesforce UI, but their limitations have been well documented, and they most likely won’t set you on a path towards strong metadata deployment practices.
There are two main steps for working with change sets: outbound change sets are uploaded from the source org to a target org, like a sandbox or production environment, and then are deployed as inbound change sets in the target org.
To create a change set, you’ll need a user with an admin profile to enable certain system permissions before you can get started. Once you’ve got these permissions added to your profile you can log in to your target environment. Once there, you can navigate to Setup > Deployment Settings and select Edit next to the name of the org that will be sending the change set. Then select Allow inbound change sets > Save.
To check the connection has been made successfully, head to the Deployment Settings page where you should be able to see a green arrow visible from the source org’s name to the target org’s name.
Limitations of change sets
If you’ve ever used change sets before, we don’t need to tell you how frustrating they can be. Salesforce users find them slow, complex and labor intensive for the following reasons:
Change sets are mostly manual
Although you’re able to clone outbound change sets from a source to deploy in other target orgs, you can’t clone an inbound change set from a target org to the next environment in your pipeline. Instead, you have to rebuild the whole change set. And while you can view any dependencies for the components while you’re building a change set, you’ll need to add these manually to avoid a failed deployment. If the deployment fails, you’ll find yourself needing to log back into your orgs to rebuild the whole change set from scratch.
Change sets have a narrow scope
There’s a lot of useful functionality that isn’t included in change sets. They don’t offer visibility into your target orgs, so you won’t be able to spot where you might be deploying conflicting changes that overwrite other work. There also isn’t any way to roll back a deployment and revert to a previous version of an org once your changes are committed. Change sets are also limited in that you can only deploy between affiliated orgs that share a production environment and there are a few types of metadata, such as sections of profiles and standard picklist values, that aren’t supported.
Change sets aren’t DevOps ready
When considering how to deploy metadata you’ll want to think about how your deployment process might look in the future. Change sets can’t be integrated with version control, so they aren’t the best choice if your team is expanding or moving towards DevOps maturity.
Deployments with changes sets also fail half the time. The foundation for successful DevOps has to be reliable, repeatable deployments.
To find out more about what it takes to get your deployments DevOps ready, why not explore our free course on DevOps Launchpad.
DevOps Center
Change sets aren’t the only native Salesforce tool for metadata deployments. As more teams adopt Salesforce DevOps best practices and move away from releasing org-to-org, Salesforce has responded with the creation of DevOps Center.
Built with collaboration in mind, DevOps Center can be used by low-code and pro-code team members through a clicks-not-code UI. DevOps Center groups metadata changes as “work items”, which can be pushed from development to production, so there’s no need to recreate a package from scratch to move it between stages in the pipeline.
Another way DevOps Center offers an upgrade from change sets is in the introduction of version control. DevOps Center only supports source-driven development and a Git-based workflow that enables teams to keep a record of changes.
To try DevOps Center, you’ll need to install it as a managed package in the final org in your release pipeline rather than in a sandbox. To do this, log into your production org and go to: Setup and search “DevOps Center” in the Quick Find box. Next, select DevOps Center > Install. If you’re using a Professional edition org, make sure to allow API access before you install.
You’ll then need to create a connected app, so that DevOps Center is accessible from the App Launcher, and assign the relevant permission sets to yourself and anyone else working with DevOps Center.
Limitations of DevOps Center
For a team ready to upgrade from change sets, DevOps Center is a step in the right direction towards collaboration and continuous integration. But it can seem like a big jump if you’re not already implementing DevOps processes and can set you back in the long term as you come up against some of the ways it constrains your development lifecycle.
DevOps center can’t keep your orgs in sync
DevOps Center doesn’t offer metadata comparisons or back promotion, which means your team will have to manually check that changes you’ve made are properly reflected in both the source and target orgs.
DevOps Center won’t take you all the way to DevOps maturity
DevOps Center doesn’t support automated testing, meaning you’ll find it harder to implement CI/CD. There’s also no support for rollback and backup, so it isn’t an end-to-end DevOps solution for metadata deployments and you’d need to add in third-party tools if you want to implement an automated CI/CD pipeline.
Salesforce developer tools
Alongside click-based options like DevOps Center, Salesforce also allows metadata deployments through command-based programming. Salesforce offers this through the Command Line Interface (CLI) which was released as part of the Salesforce Developer Experience (Salesforce DX or SFDX), a set of open tools for collaborative development on Salesforce.
The Salesforce CLI is an iteration of the earlier Ant Migration tool, which continues to function but is now retired and no longer being supported or updated.
You can deploy metadata using the Salesforce CLI by downloading and installing it onto your local machine. You can then create a new Salesforce DX project and open it in an IDE tool like VS Code.
Limitations of developer tools
Although Salesforce DX enables flexible, fast and package-based development, it has been designed for experienced developers and so is unlikely to be the best fit for members of your team using clicks not code. Teams can use DX and automation tools to build out a DevOps process that’s more accessible to low-code team members, but processes like this can take a lot of time and effort to develop and maintain.
Some teams do use a mix of tools but multiple methods can increase the chances of conflicts like overwrites or deployment failures. And you won’t have a single audit trail for development if you have lots of admins and developers working together.
Stop flying blind: How Truckstop brought clarity to a complex org
Gearset: the complete Salesforce metadata deployment solution
If you’re looking for a metadata deployment process that will work for your whole team and support you on a journey towards DevOps maturity, make sure you consider a third-party platform like Gearset.
Unlike change sets, when you deploy with Gearset you get full visibility into your orgs. Your whole team can see any changes to metadata between your environments and visualize changes to flows and layouts. And you can take full advantage of a source-driven workflow, without needing to use a command line tool. Everyone can see and manage the entire release process — all in one place.
Metadata deployments that just work
Using Gearset, you can compare the metadata between orgs or Git branches to see exactly what’s different. Deployments can be built in a few clicks and, with Precision Deployments, you can even cherry pick individual elements within the metadata or specific lines of XML to deploy. As you build your deployment, Gearset’s problem analyzers automatically catch common causes of deployment failure and fix them before they derail your release. Once you’ve deployed changes, you can easily redeploy them from the target to another environment or roll back if something needs reverting.
Streamline your Salesforce release process in a few simple steps
See how easy metadata deployments can be in the following step-by-step guide. And if you want to try it for yourself in your own orgs, you can get started now with a free trial of Gearset.
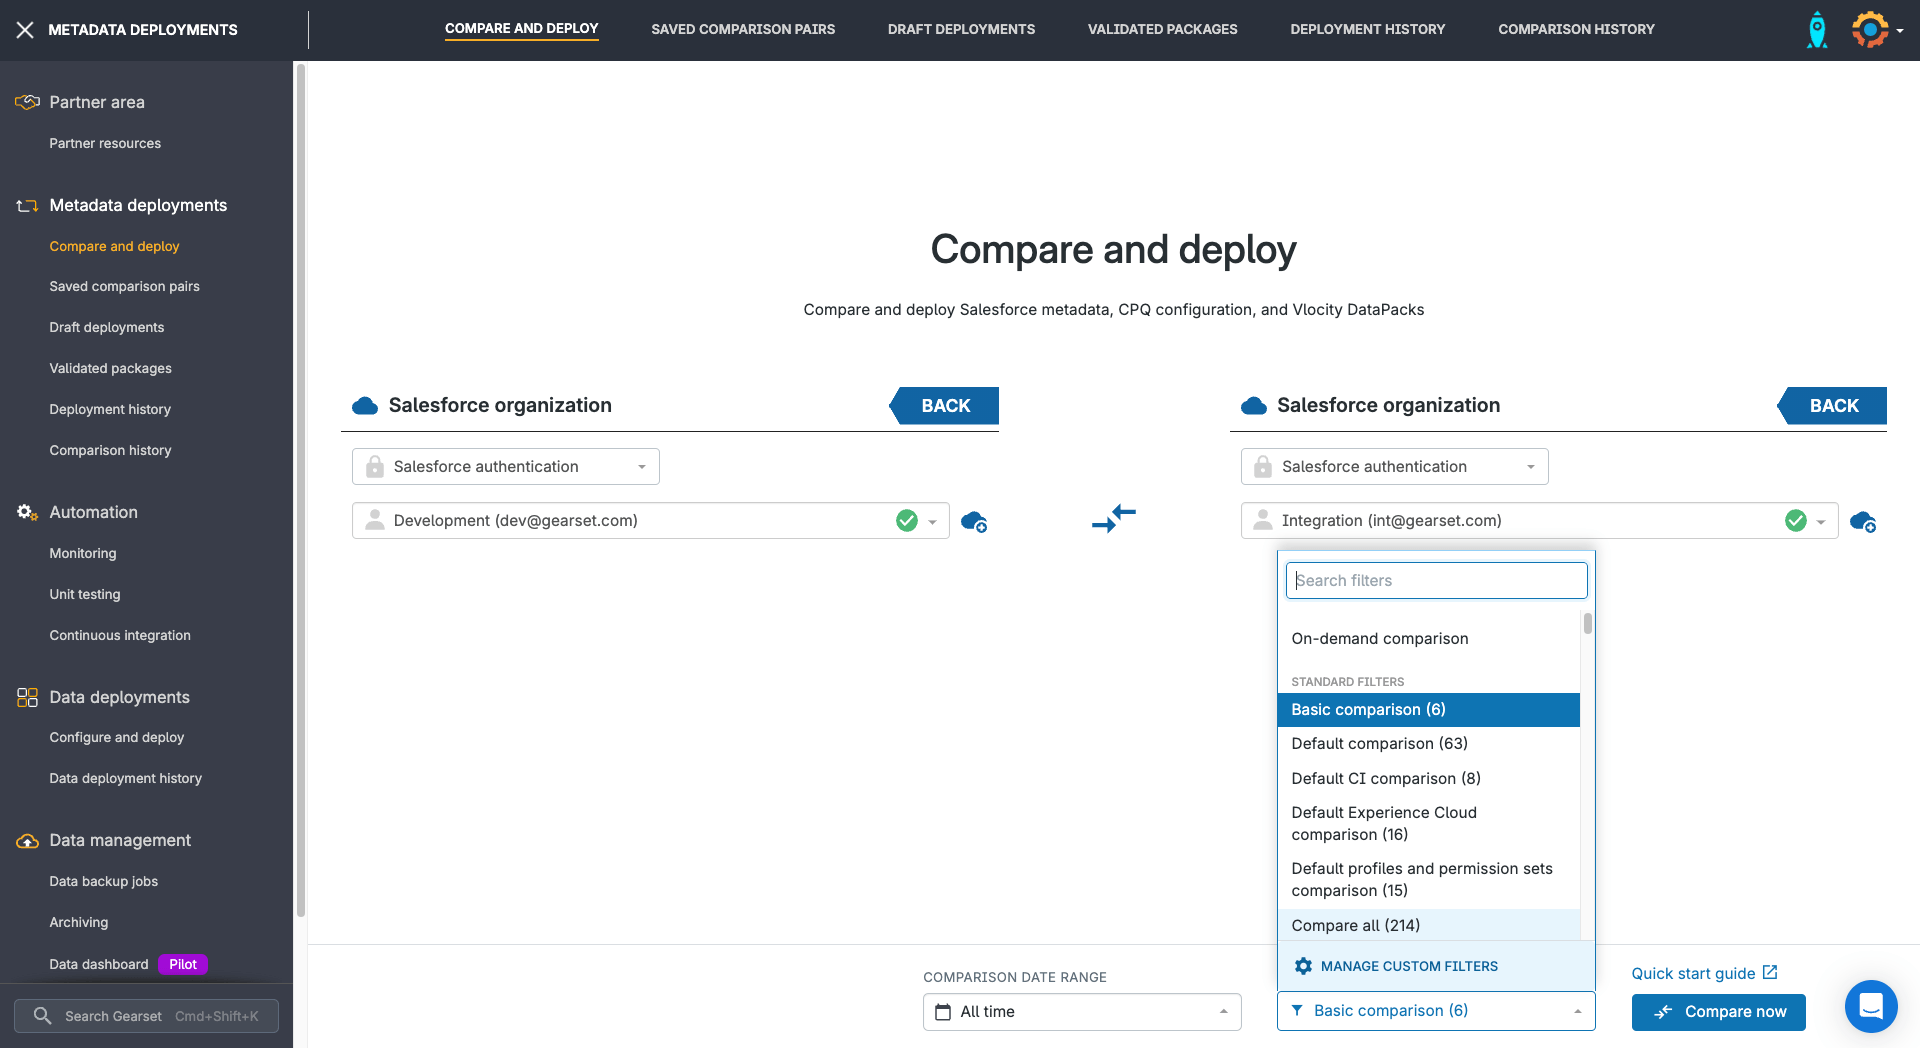
1. Select your source and target orgs
First, choose the environments you want to deploy changes between. These can be any kind of Salesforce org, Git branches or even local files. Choose the relevant metadata to retrieve from the Comparison filter. You can still make changes to this later in the process, so don’t worry if you might not have selected all the metadata you need. Once your metadata is selected click Compare now.

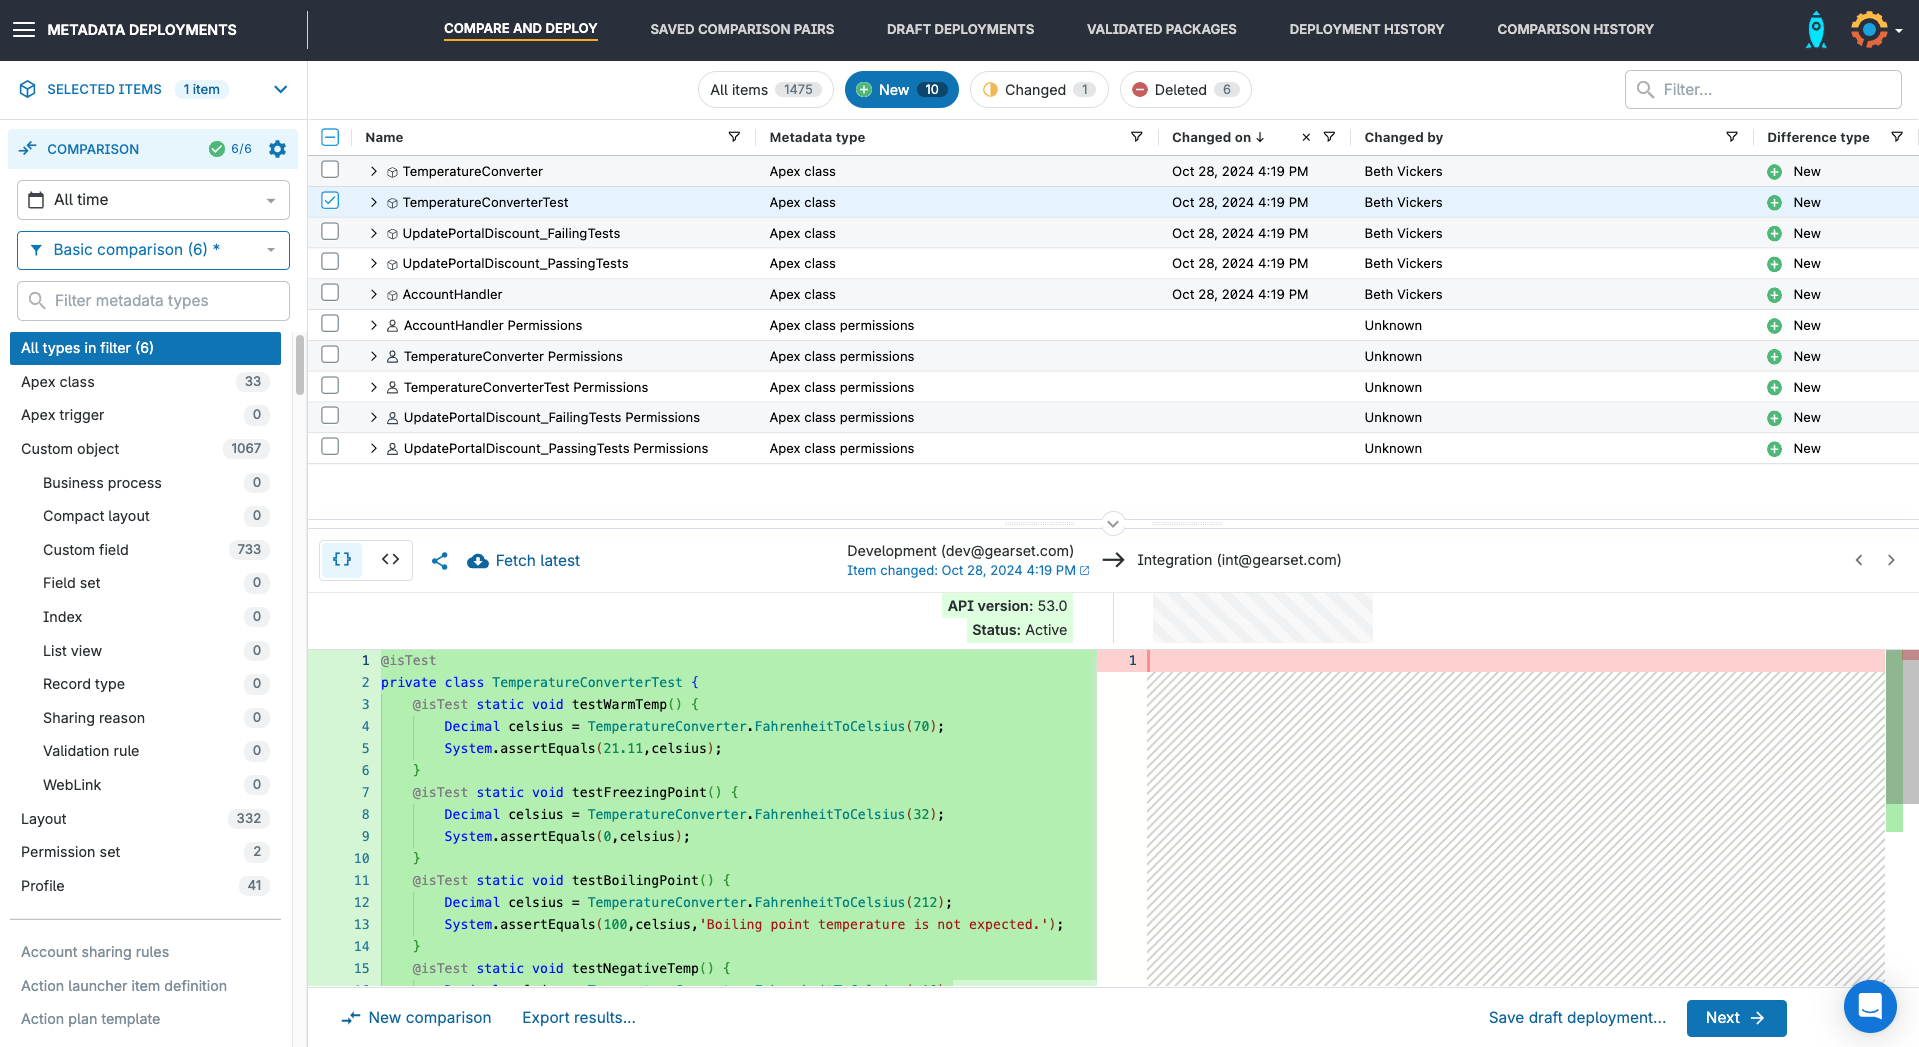
2. Choose the changes you want to deploy
Gearset will now show you a side-by-side view of all the differences between your orgs. You’ll see them organized into New, Changed and Deleted tabs at the top of the screen and below you’ll be able to see the specific differences between the source and target for whichever item you select. You can also drill down to see the dependencies for each item.
Once you’re happy you’ve got the items you want to deploy selected you can click Next to finalize the deployment package.

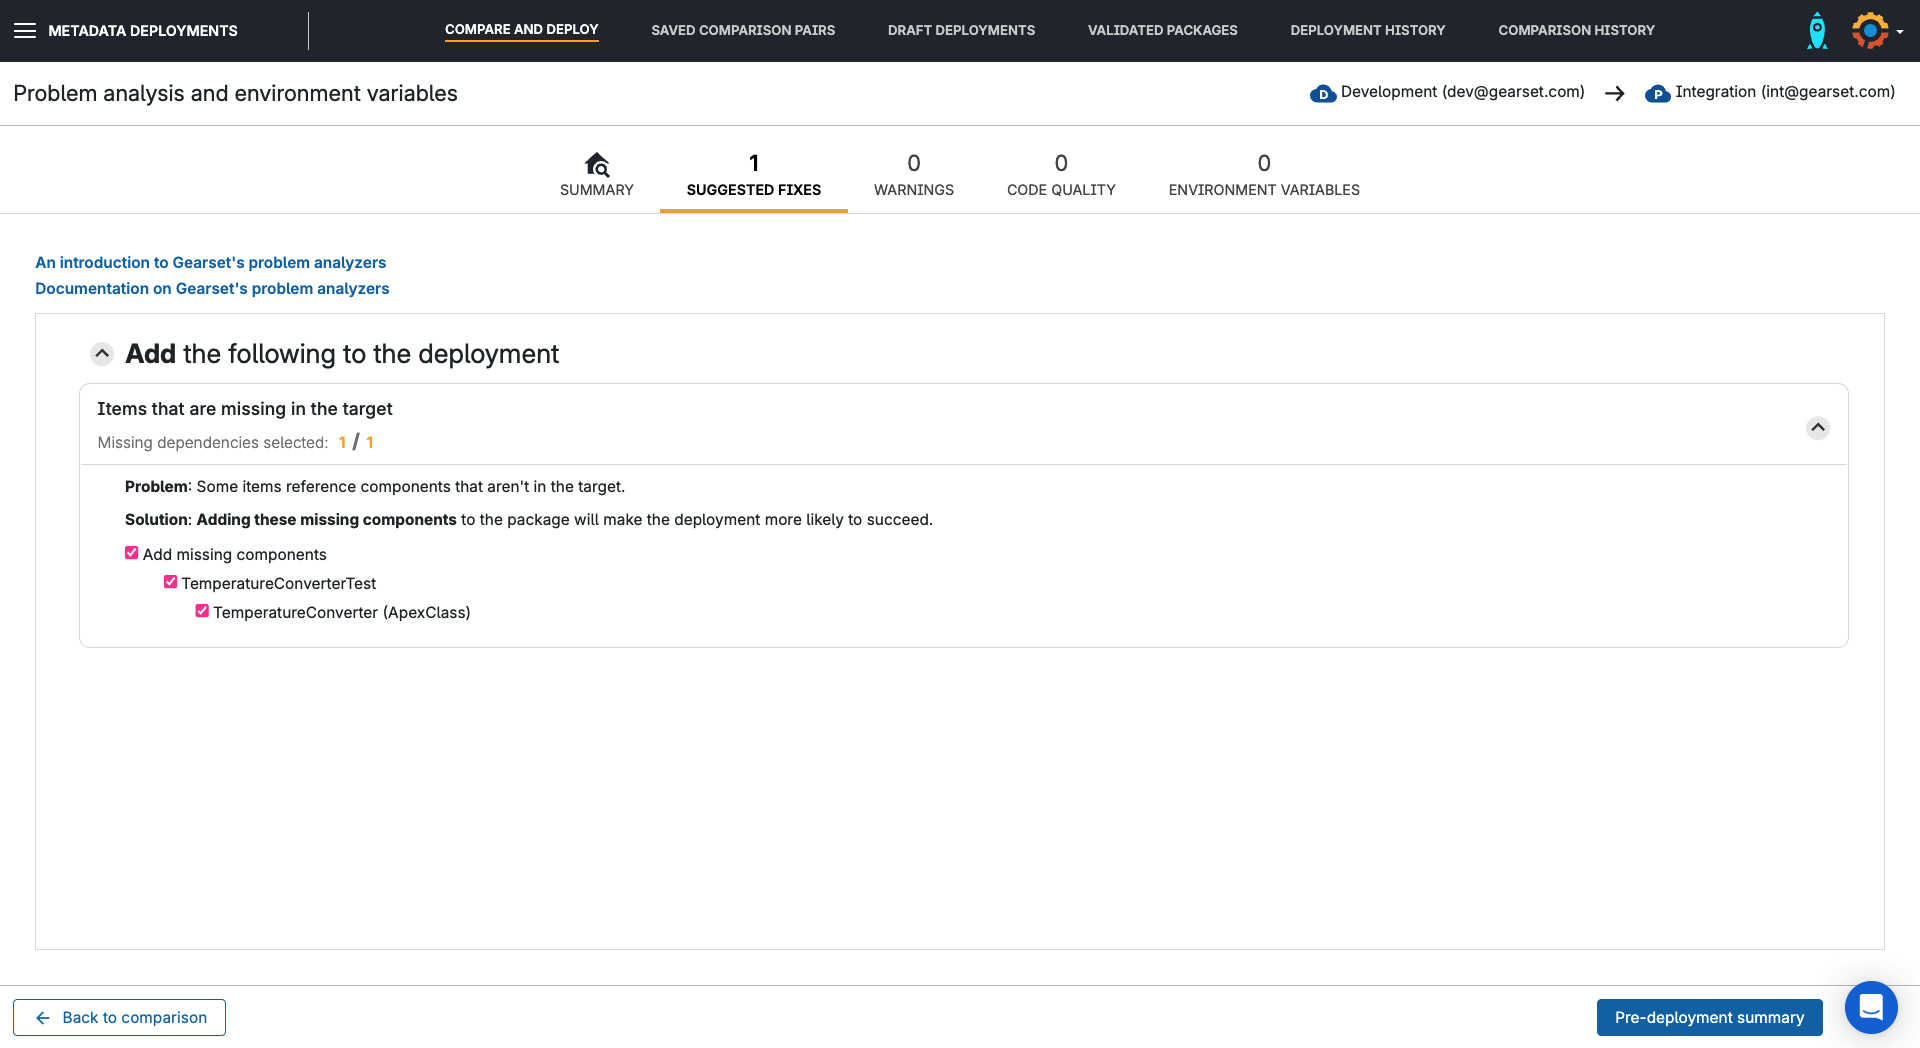
3. Run problem analysis
Gearset’s problem analyzers automatically check your deployment package and catch any issues that are likely to cause the deployment to fail. They also suggest ways to fix them before you deploy. When you select Pre-deployment summary you’ll see a final summary of your deployment and then can move on to deploying or scheduling for later.

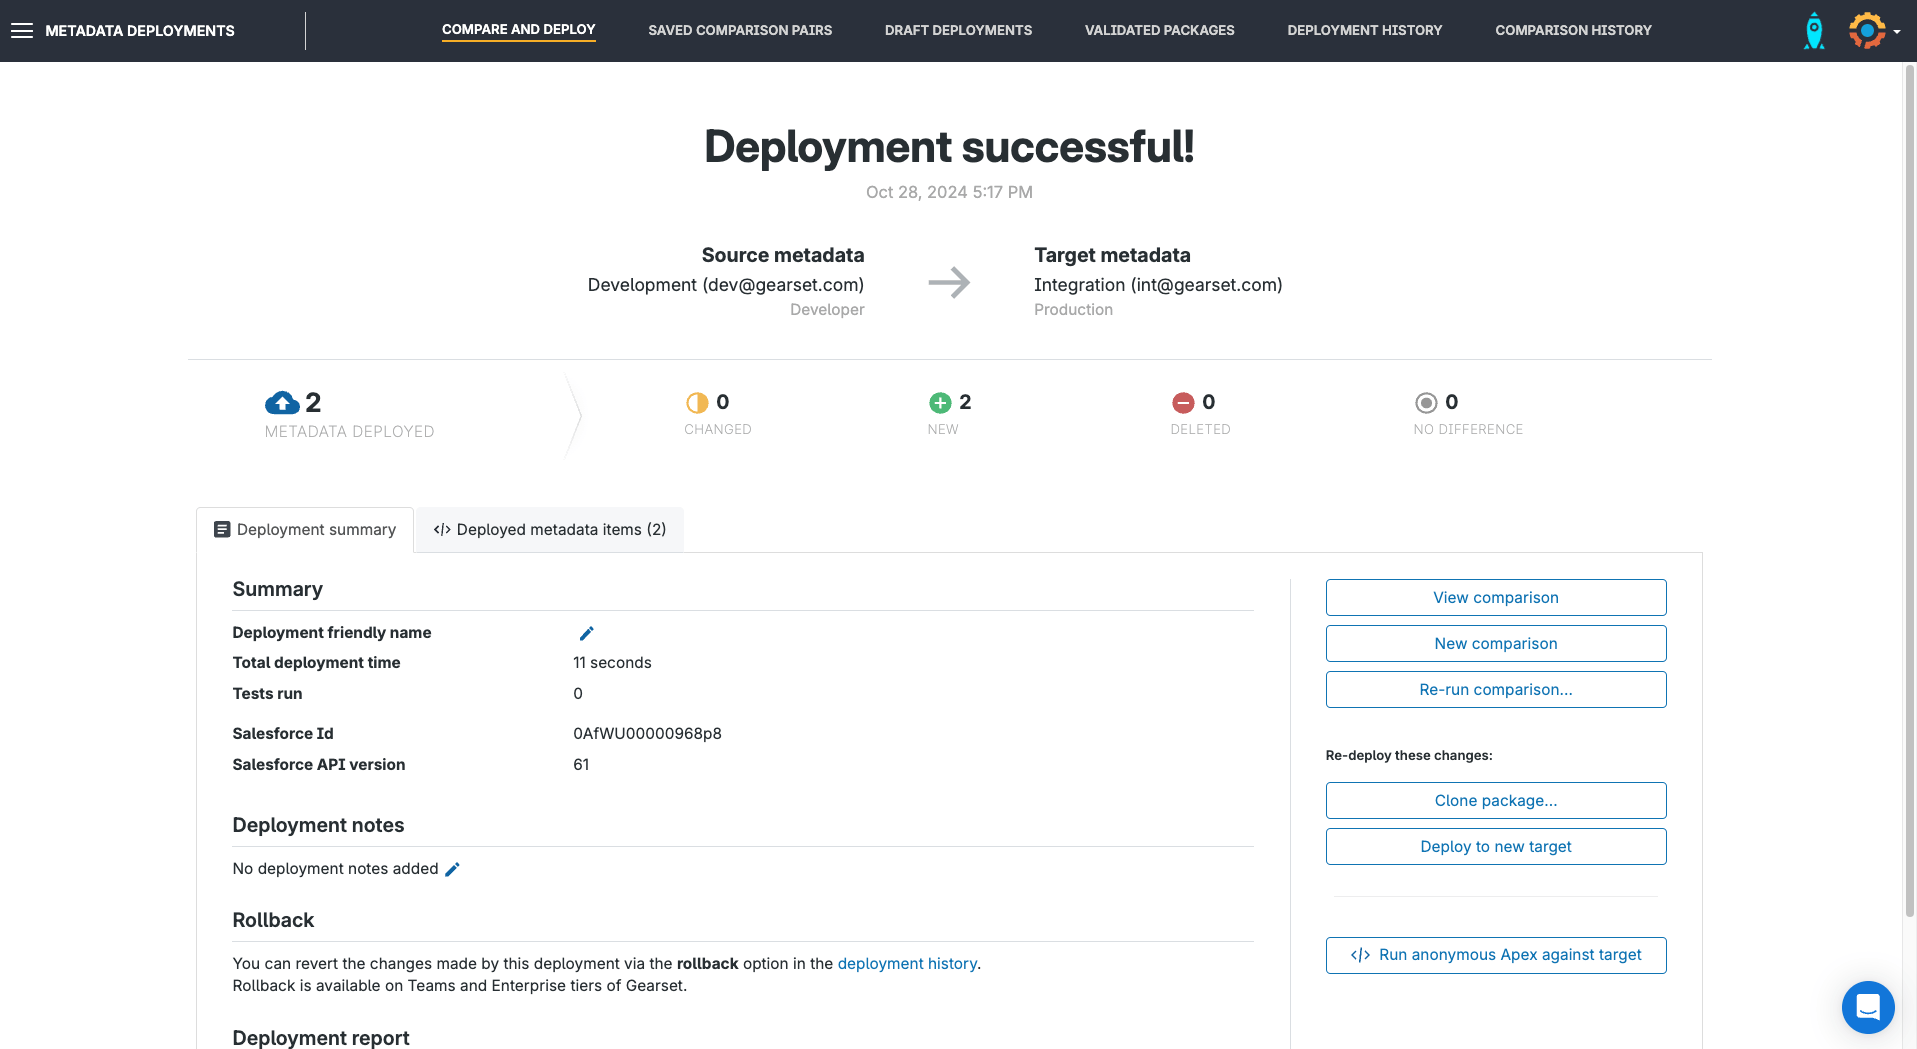
4. Deploy now or schedule for later
Your deployment package can be validated ahead of time and scheduled for release. All you need to do is watch for a text or email to confirm your deployment has been successful!

Deploy your metadata with confidence
Don’t settle for change sets or get lost in a mix of tools. With Gearset, your team can work together to deploy the metadata you need quickly and reliably.
Gearset was built to solve the problem of frustrating releases, and delivering successful metadata deployments remains at the core of what we do. With an average deployment success rate of 99%, you can deploy with confidence.
If you’re ready to get started, find out more about stress-free deployments with Gearset or begin a free trial today and join the thousands of Gearset users enjoying a metadata deployment process they can control at every step.


