
Record-Triggered Flows automate actions like assigning a permission set or sending email updates. While they’re a great tool for admins looking to trigger actions, deploying Record-Triggered Flows isn’t as simple.
Read on to learn how to create your own Record-Triggered Flows, and how to navigate the complexities of Flow deployments — from Flow versions to destructive changes.
What is a Record-Triggered Flow?
A Record-Triggered Flow is a piece of business automation that can perform Salesforce actions once a triggering record is created and/or updated, or deleted.
Record-Triggered Flows are a kind of Autolaunched Flow, meaning they don’t require user interaction to run. They’re triggered by data changes behind the scenes, unlike Screen Flows which depend on user input.
As Salesforce are set to retire both Workflow Rules and Process Builder in the near future, Record-Triggered Flows are now the low-code alternative to Apex triggers.
TDX
What’s the difference between a Record-Triggered Flow and a Schedule-Triggered Flow?
While Record- and Schedule- Triggered Flows both allow you to automate the execution of business processes, the difference between them is what triggers this process. Scheduled Flows run based on a predefined schedule, such as at 2pm every Tuesday. By contrast, Record-Triggered Flows run due to changes on records.
Both Flow types have their place — you’ll want to use Record-Triggered Flows to perform specific actions like notifying customers the time of a meeting has changed, and Schedule-Triggered Flows to maintain org health and consistency, such as updating Account Objects to change contract statuses.
How can you use a Record-Triggered Flow?
There are endless possibilities for Record-Triggered Flows, but here’s some of the most useful functionalities.
1. Before-save and after-save
A before-save Record-Triggered Flow is quicker than your existing record-change process. It can run actions on a record before it’s saved in the Salesforce platform as either a new, updated or deleted record. For example, a before-save trigger can update fields in a record before your end user has even finished their work, meaning these changes are more rapidly reflected in your org.
An after-save Record-Triggered Flow will run after a record is created or updated, but cannot run for a deleted record. This can be used for a wider variety of needs than before-save triggers as it can affect records other than the one you’re creating or changing, and you can use it for specific actions like sending email alerts, custom notifications or triggering another Flow.
2. Custom error messages
Record-Triggered Flows can also be used to support your end users. Previously, if your Flow ran into an error, it would fail without displaying a specific error message to your user. This would leave end users stalled and put the pressure on admins to unpick the issue.
Now you can add Custom Error Message elements that are triggered by record creation, updates or deletions. These will give end users real-time feedback on their work, such as alerting them to an accidental deletion of a critical record or prompting them to fill in blank fields.
3. Bulkification
Bulkification allows you to perform multiple operations on multiple records at once, rather than running the operation on each record one after the other. This means you can create Record-Triggered Flows that perform actions on 50 records at once, rather than building multiple Flows or hitting governor limits because too many separate actions are run each day — but more on governor limits later!
How to create a Record-Triggered Flow in Salesforce
It’s easy to set up a Record-Triggered Flow on the Salesforce platform — let’s walk through the process.
1. Create a new Flow
Start off by searching Flows in the Quick Find box, click Flows, and then hit the New Flow button.
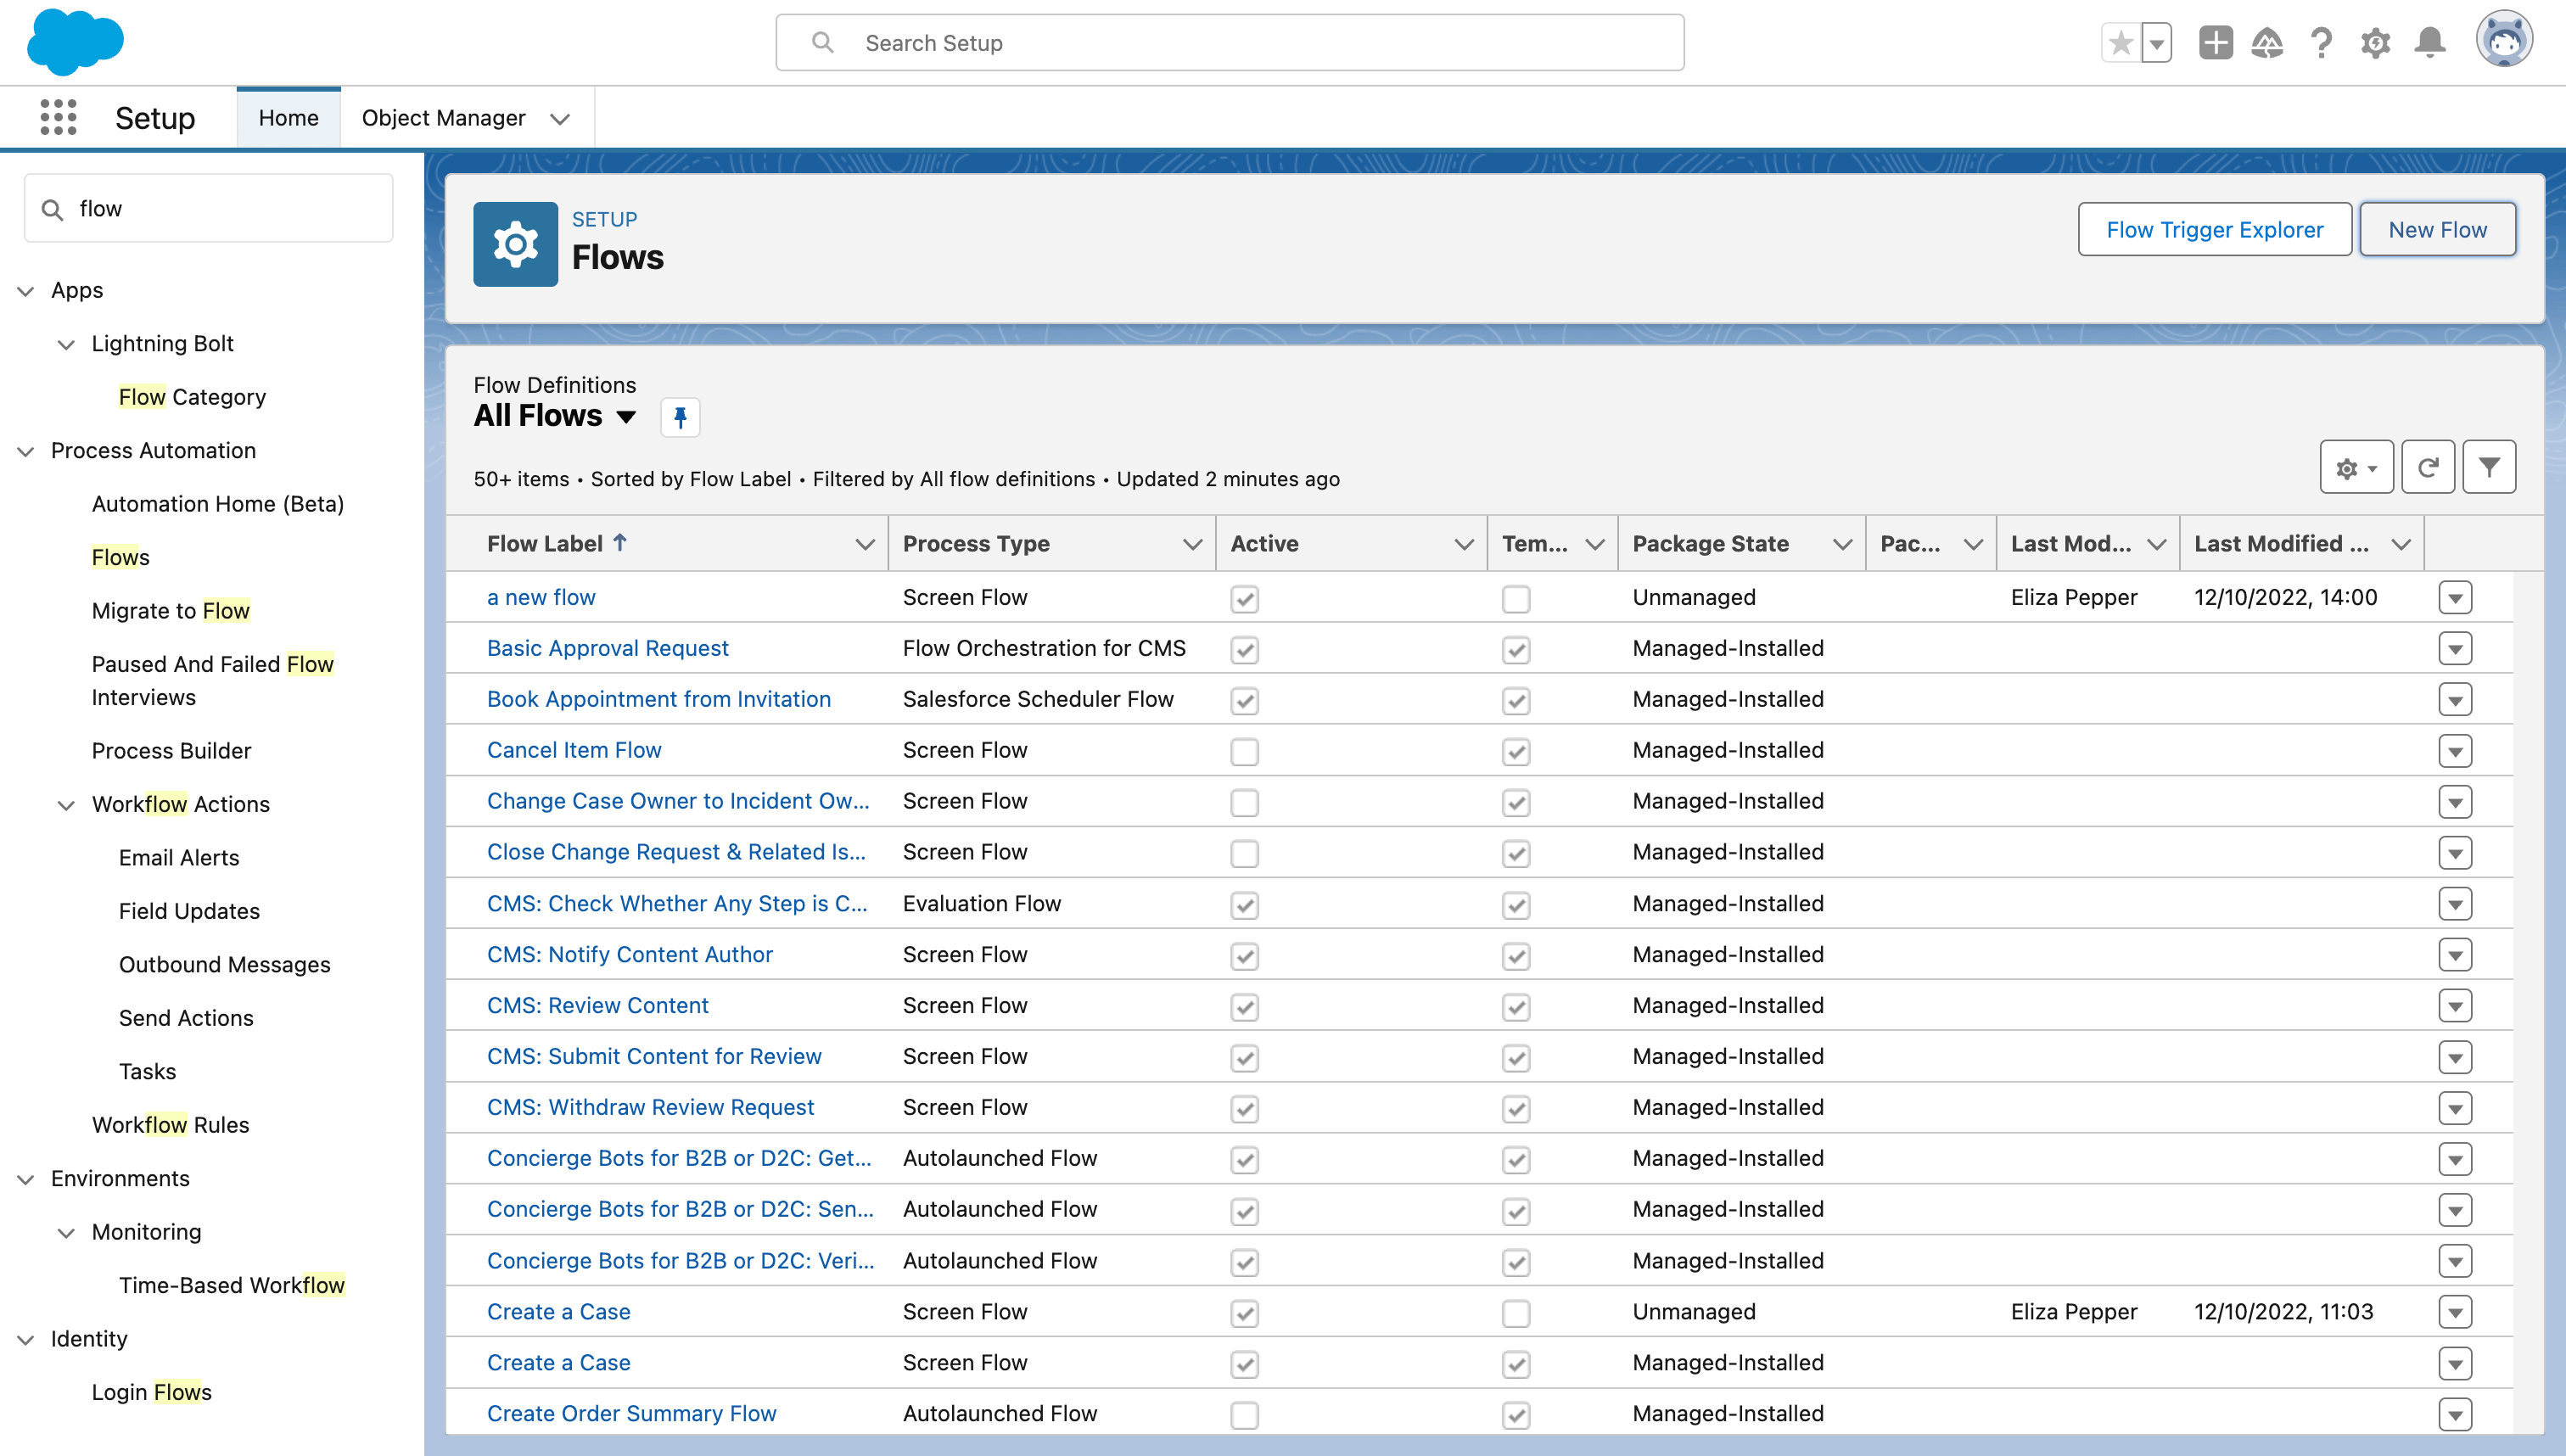
This will open up Flow Builder in a new tab, where you can select Record-Triggered Flow and hit Create to start configuring your new Flow.
2. Set your requirements
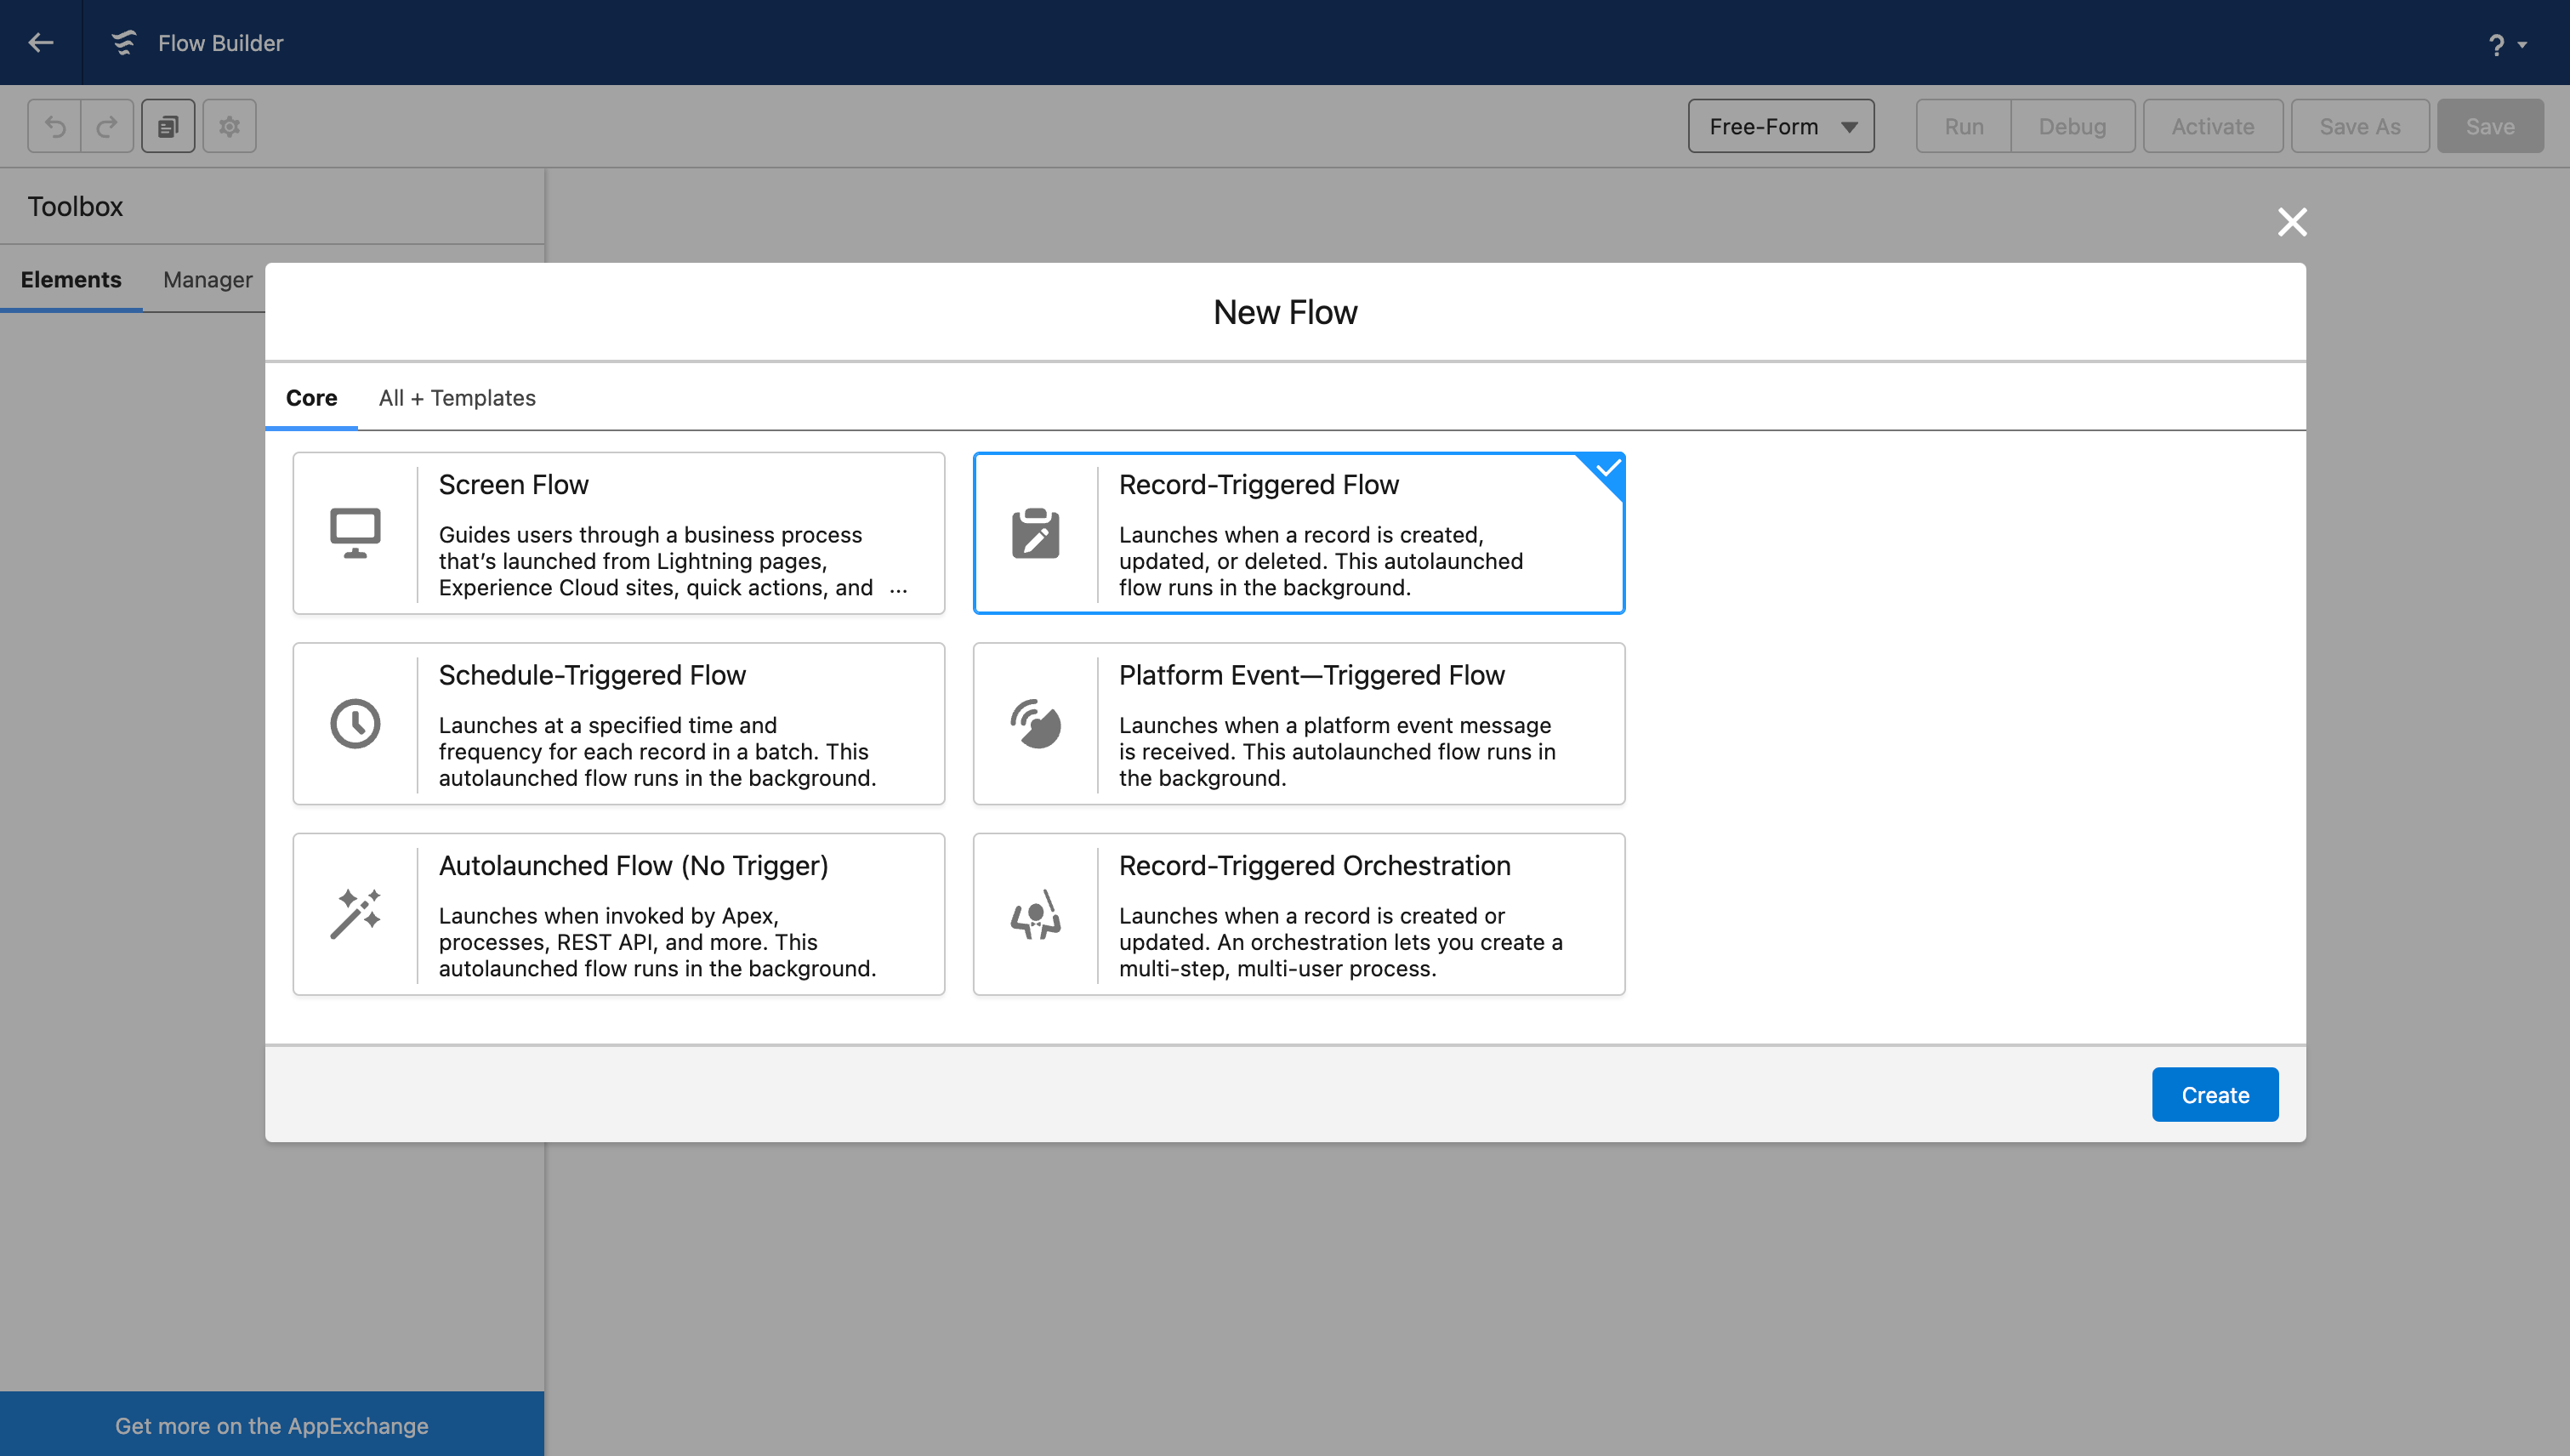
On the Configure Start page, you’ll be prompted to select which object you want the Record-Triggered Flow to run for. You can also select which record action triggers the Flow:
- A record is created
- A record is updated
- A record is created or updated
- A record is deleted
For example, let’s say you want to set up a Flow that sends an email to your customer support team each time a new active account is created. Start off by selecting the Account Object. Then, under the Configure Trigger section, set the Flow to run each time “A record is created or updated”.
The Set Entry Conditions section allows you to make sure your Flow only runs when relevant changes are made by your end users. In this case, it’s your sales team creating a new active account, so choose “All conditions are met” for the creation of a new Account Object and that the sales team have answered “yes” on the active field for the account.
3. Optimize your Flow
Now that you’ve set your conditions for when the Flow will be triggered, you’ll want to optimize when the Flow completes its actions. You have two options:
- Fast Field Updates, meaning the Flow will run before the record is saved.
- Actions and Related Records, which will run the Flow after the record is saved to the database.
In this example, select Actions and Related Records, so customer service will only be updated after a new active Account is finalized.
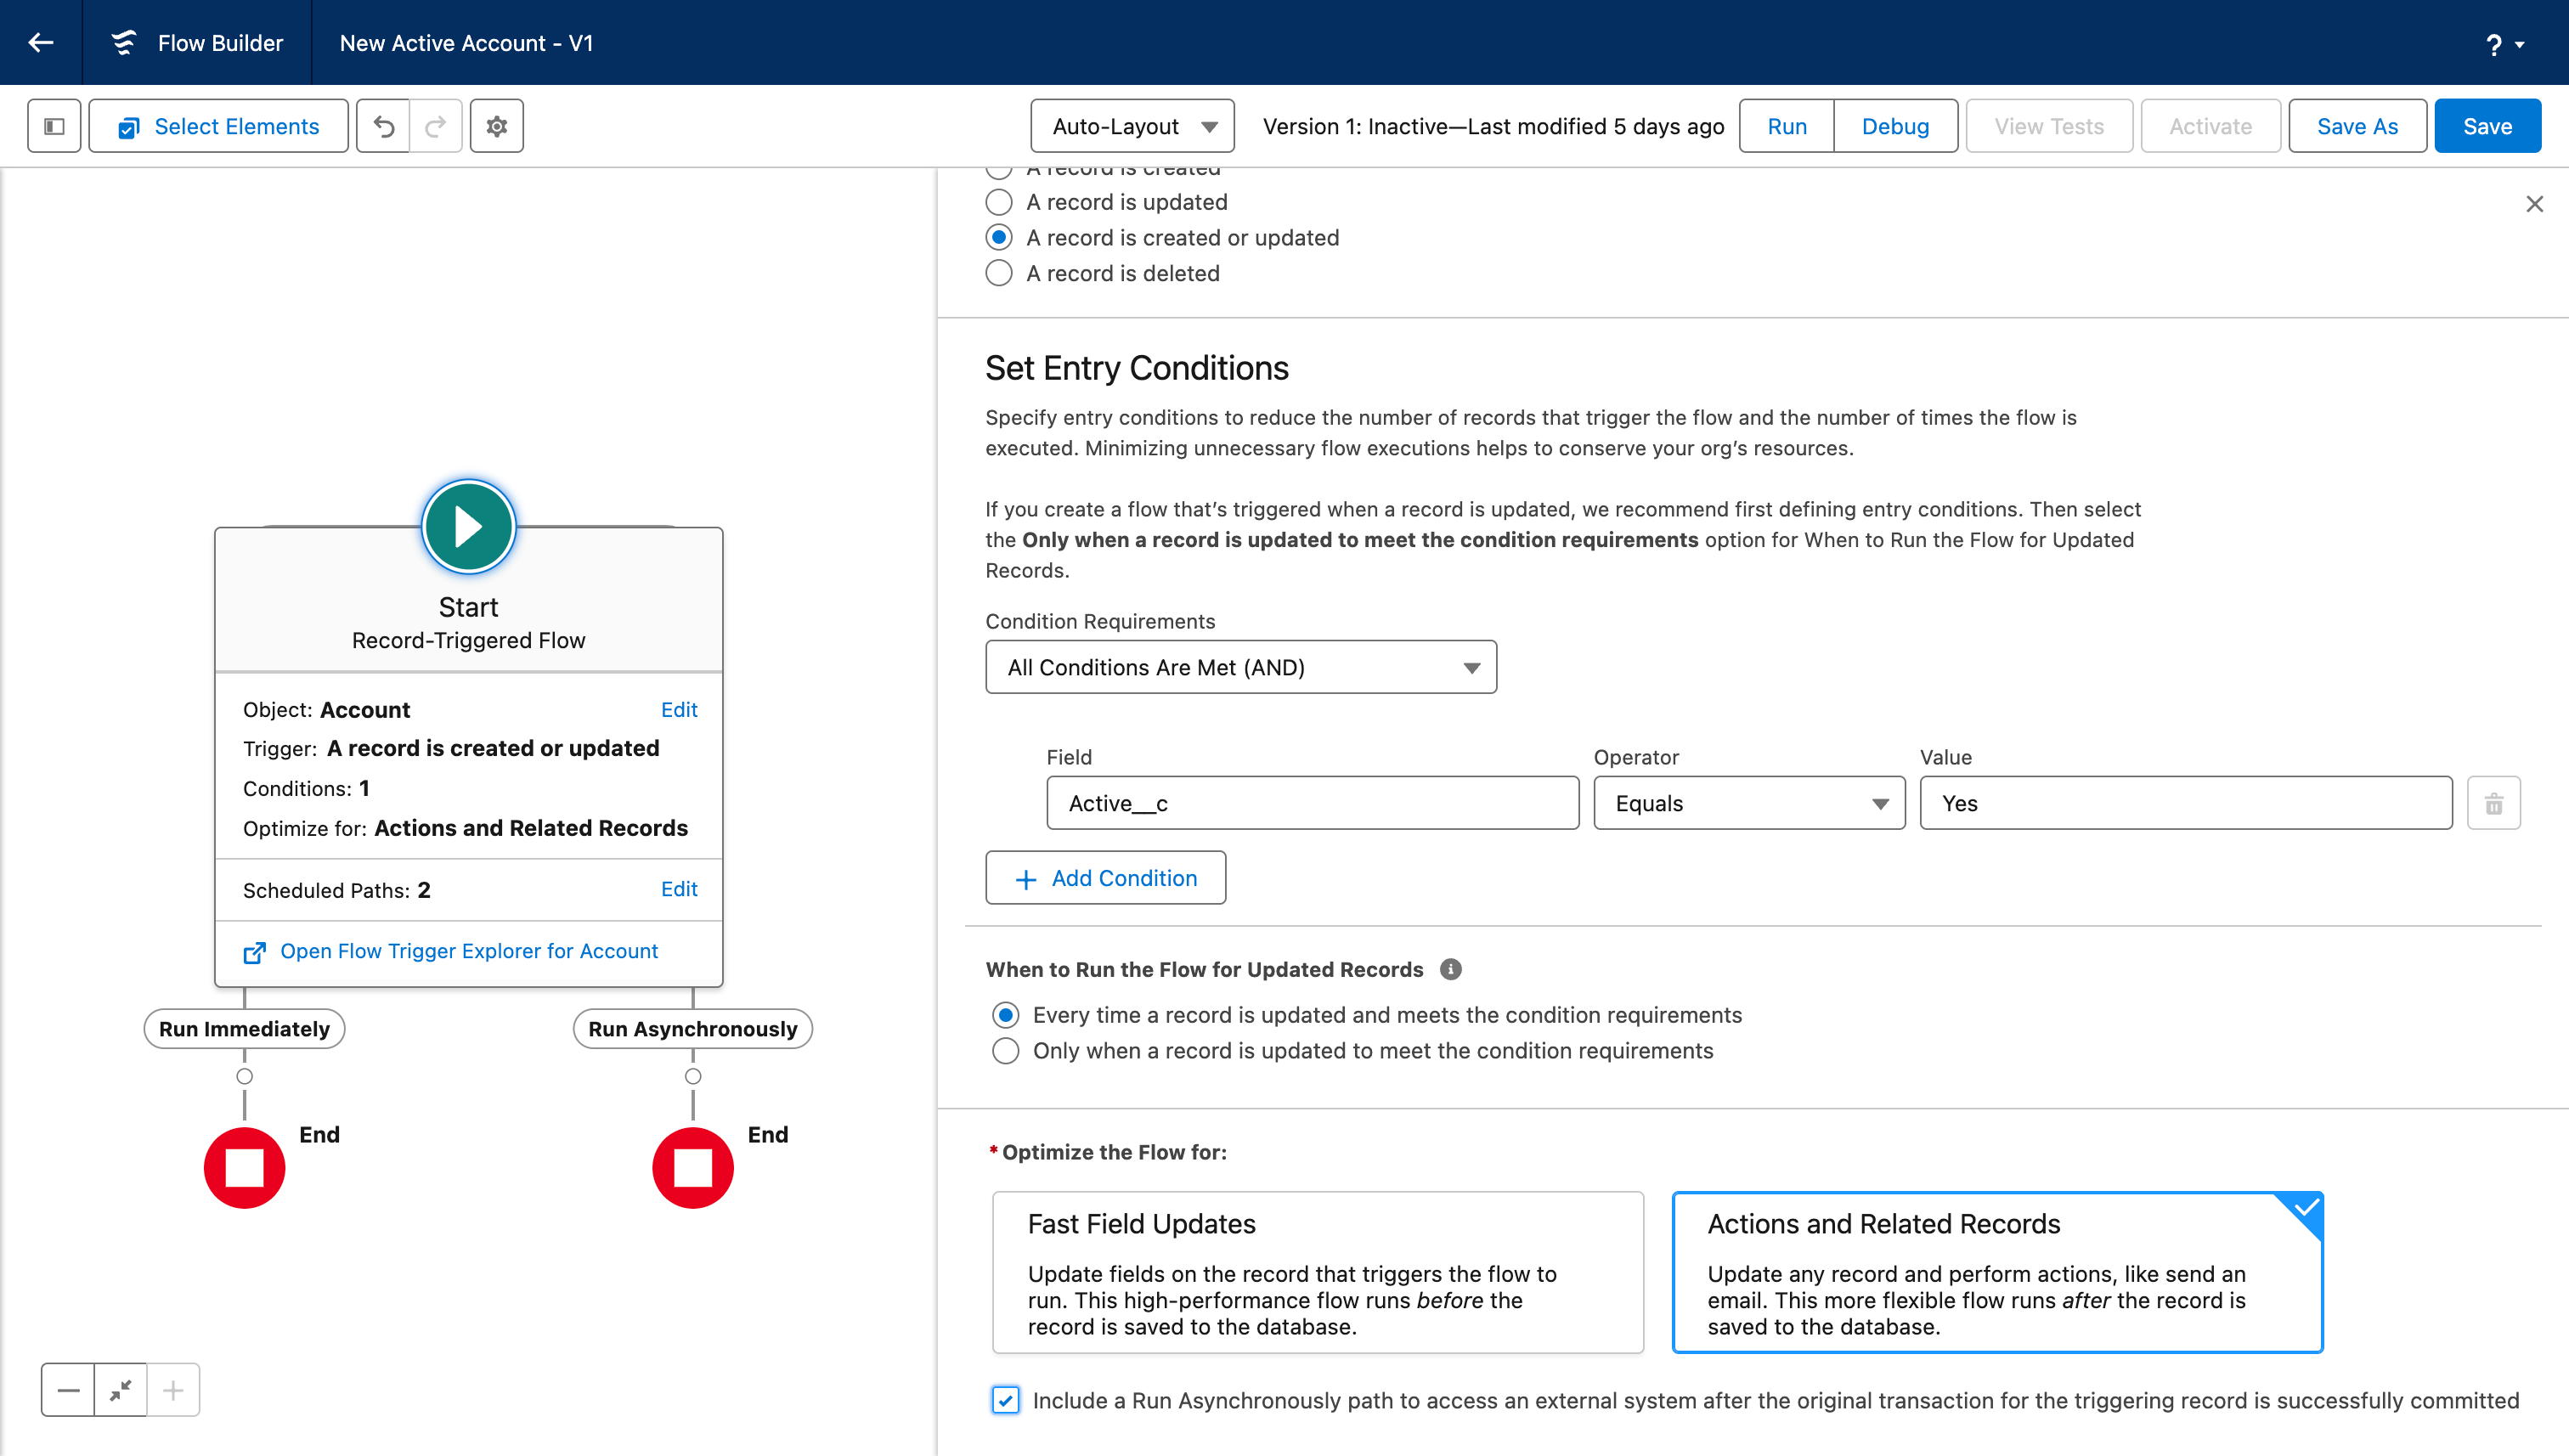
You can also optimize the Flow by ticking “Include a Run Asynchronously path”, which allows your Flow to run certain actions immediately while you leave other actions that take a long time to execute to run in the background. When you’re done, hit Save to name your Flow and give it a description.
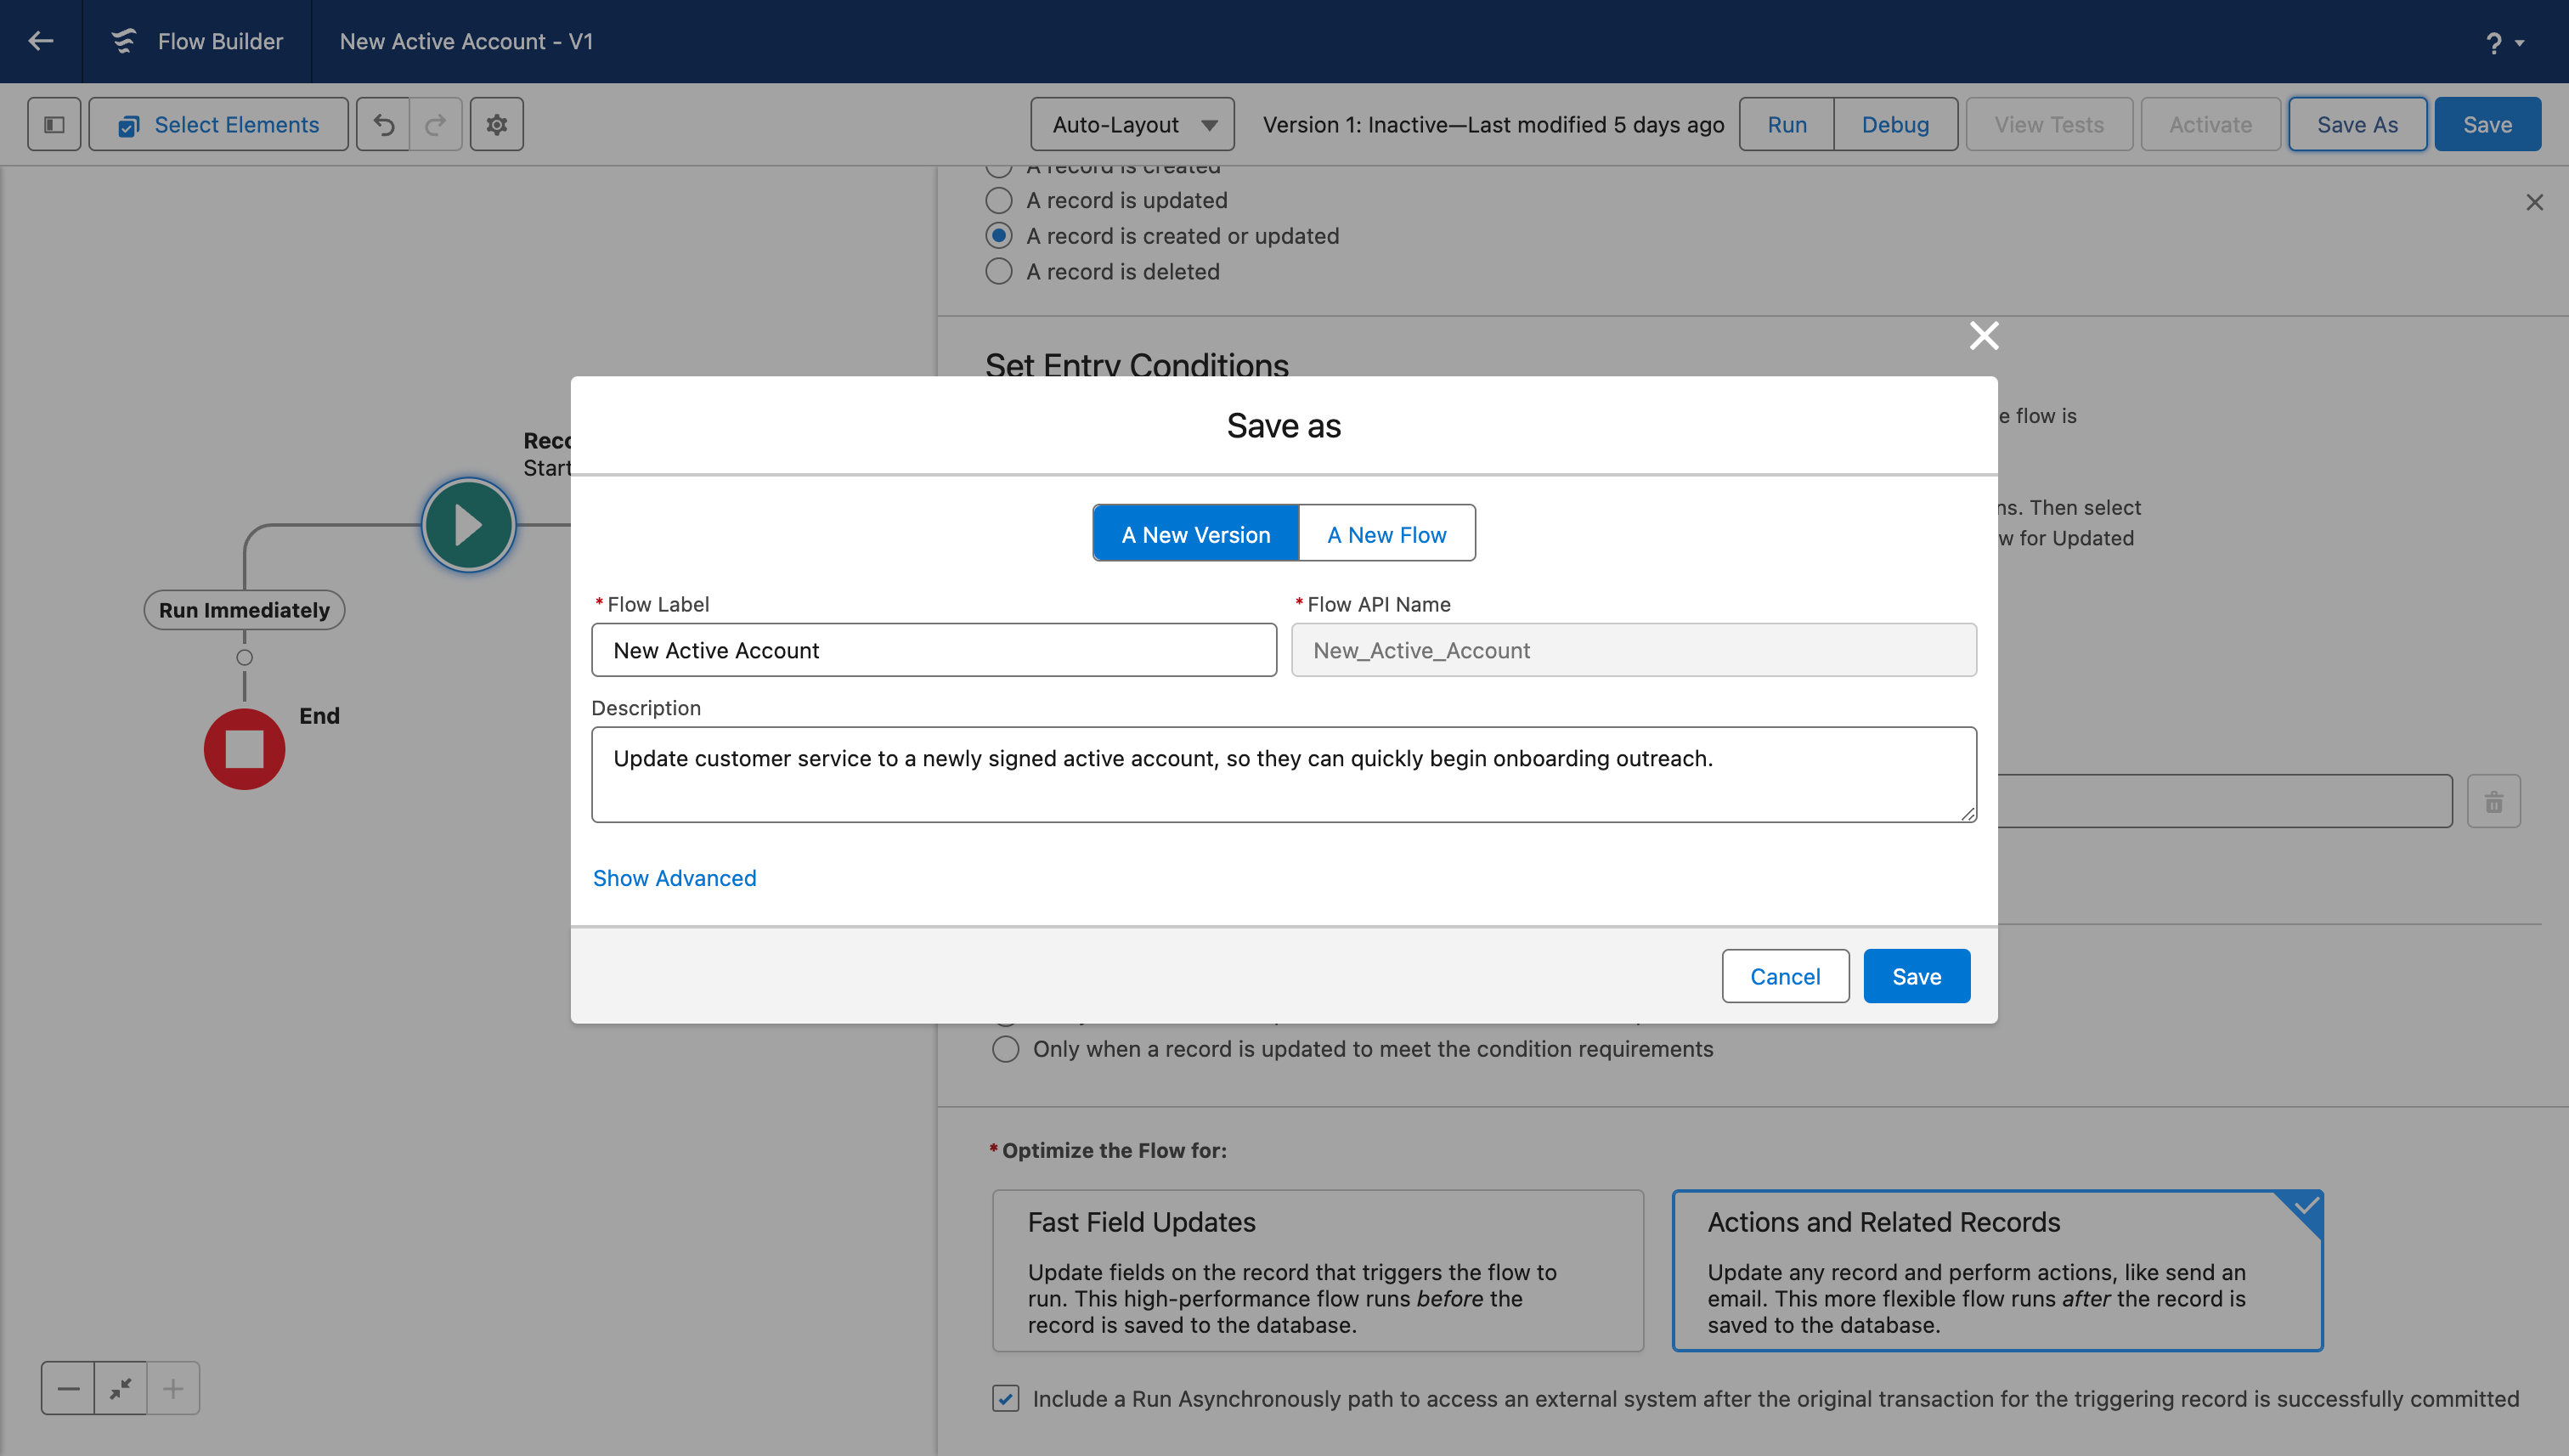
You can also click Show Advanced to make changes such as altering the “API Version for Running the Flow” or setting the “Trigger Order” for this Flow to run if you have other Triggered Flows running for this Object.
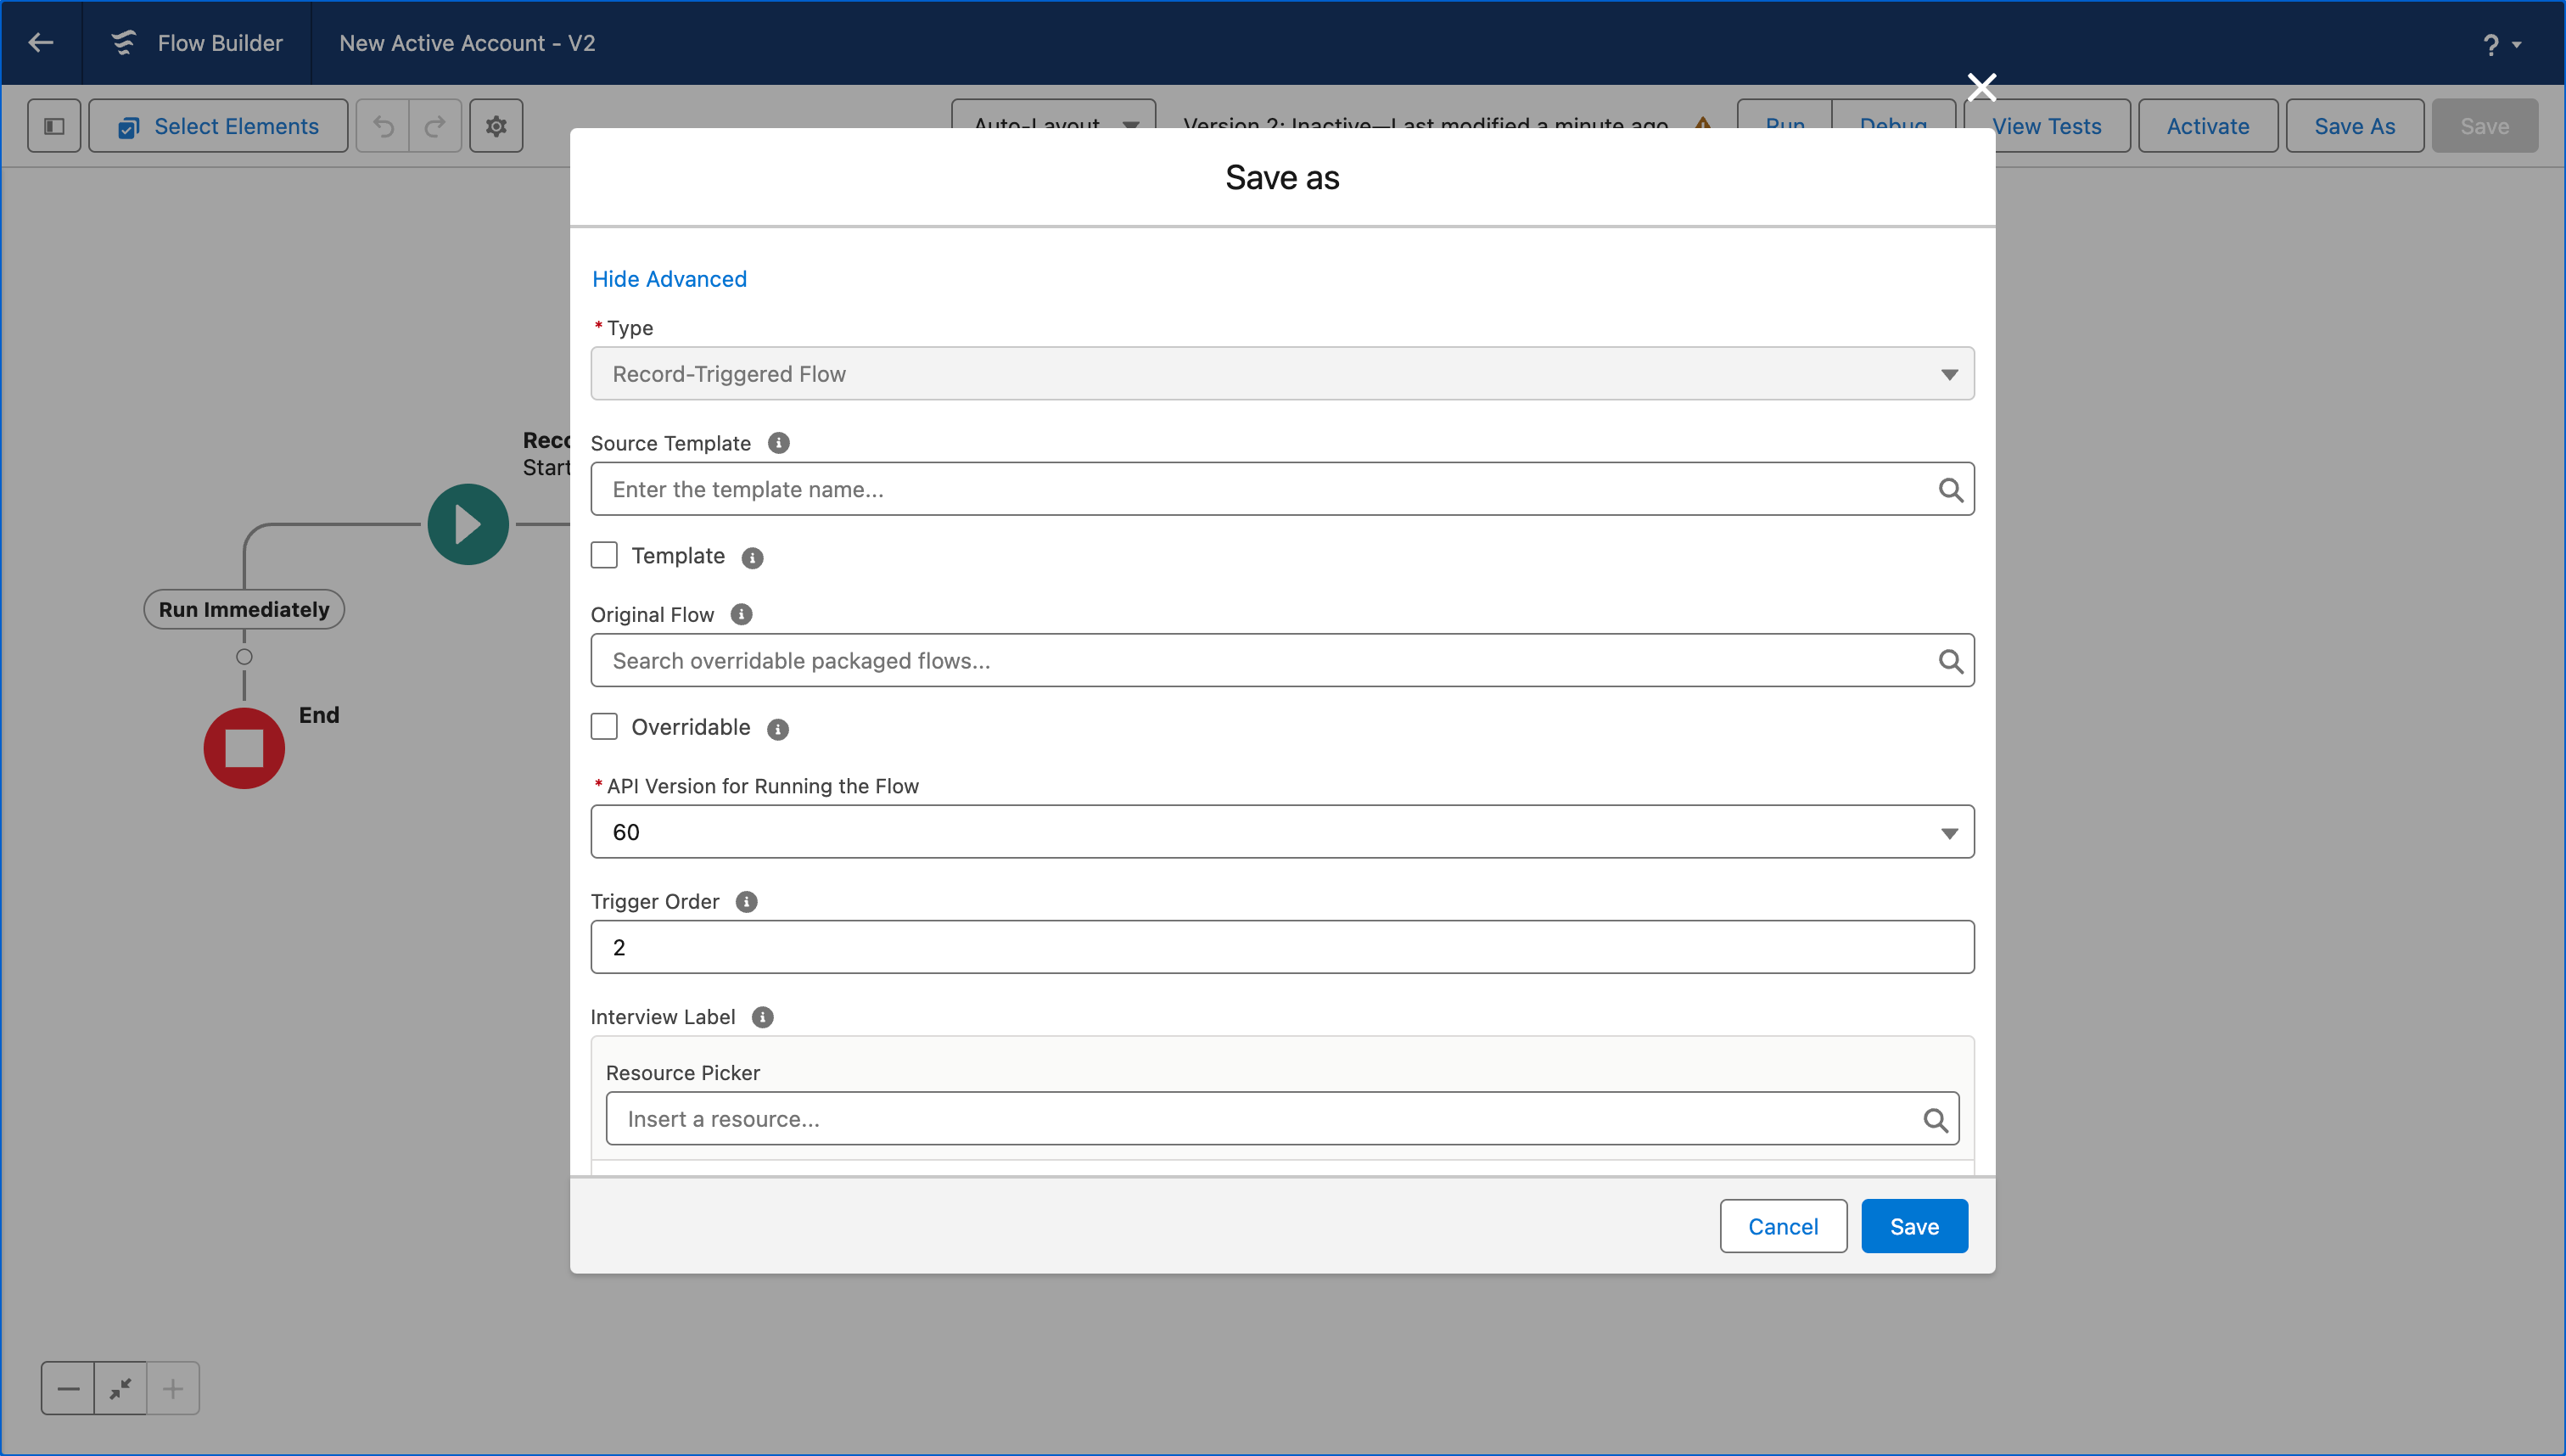
Hit Save again to create your Flow!
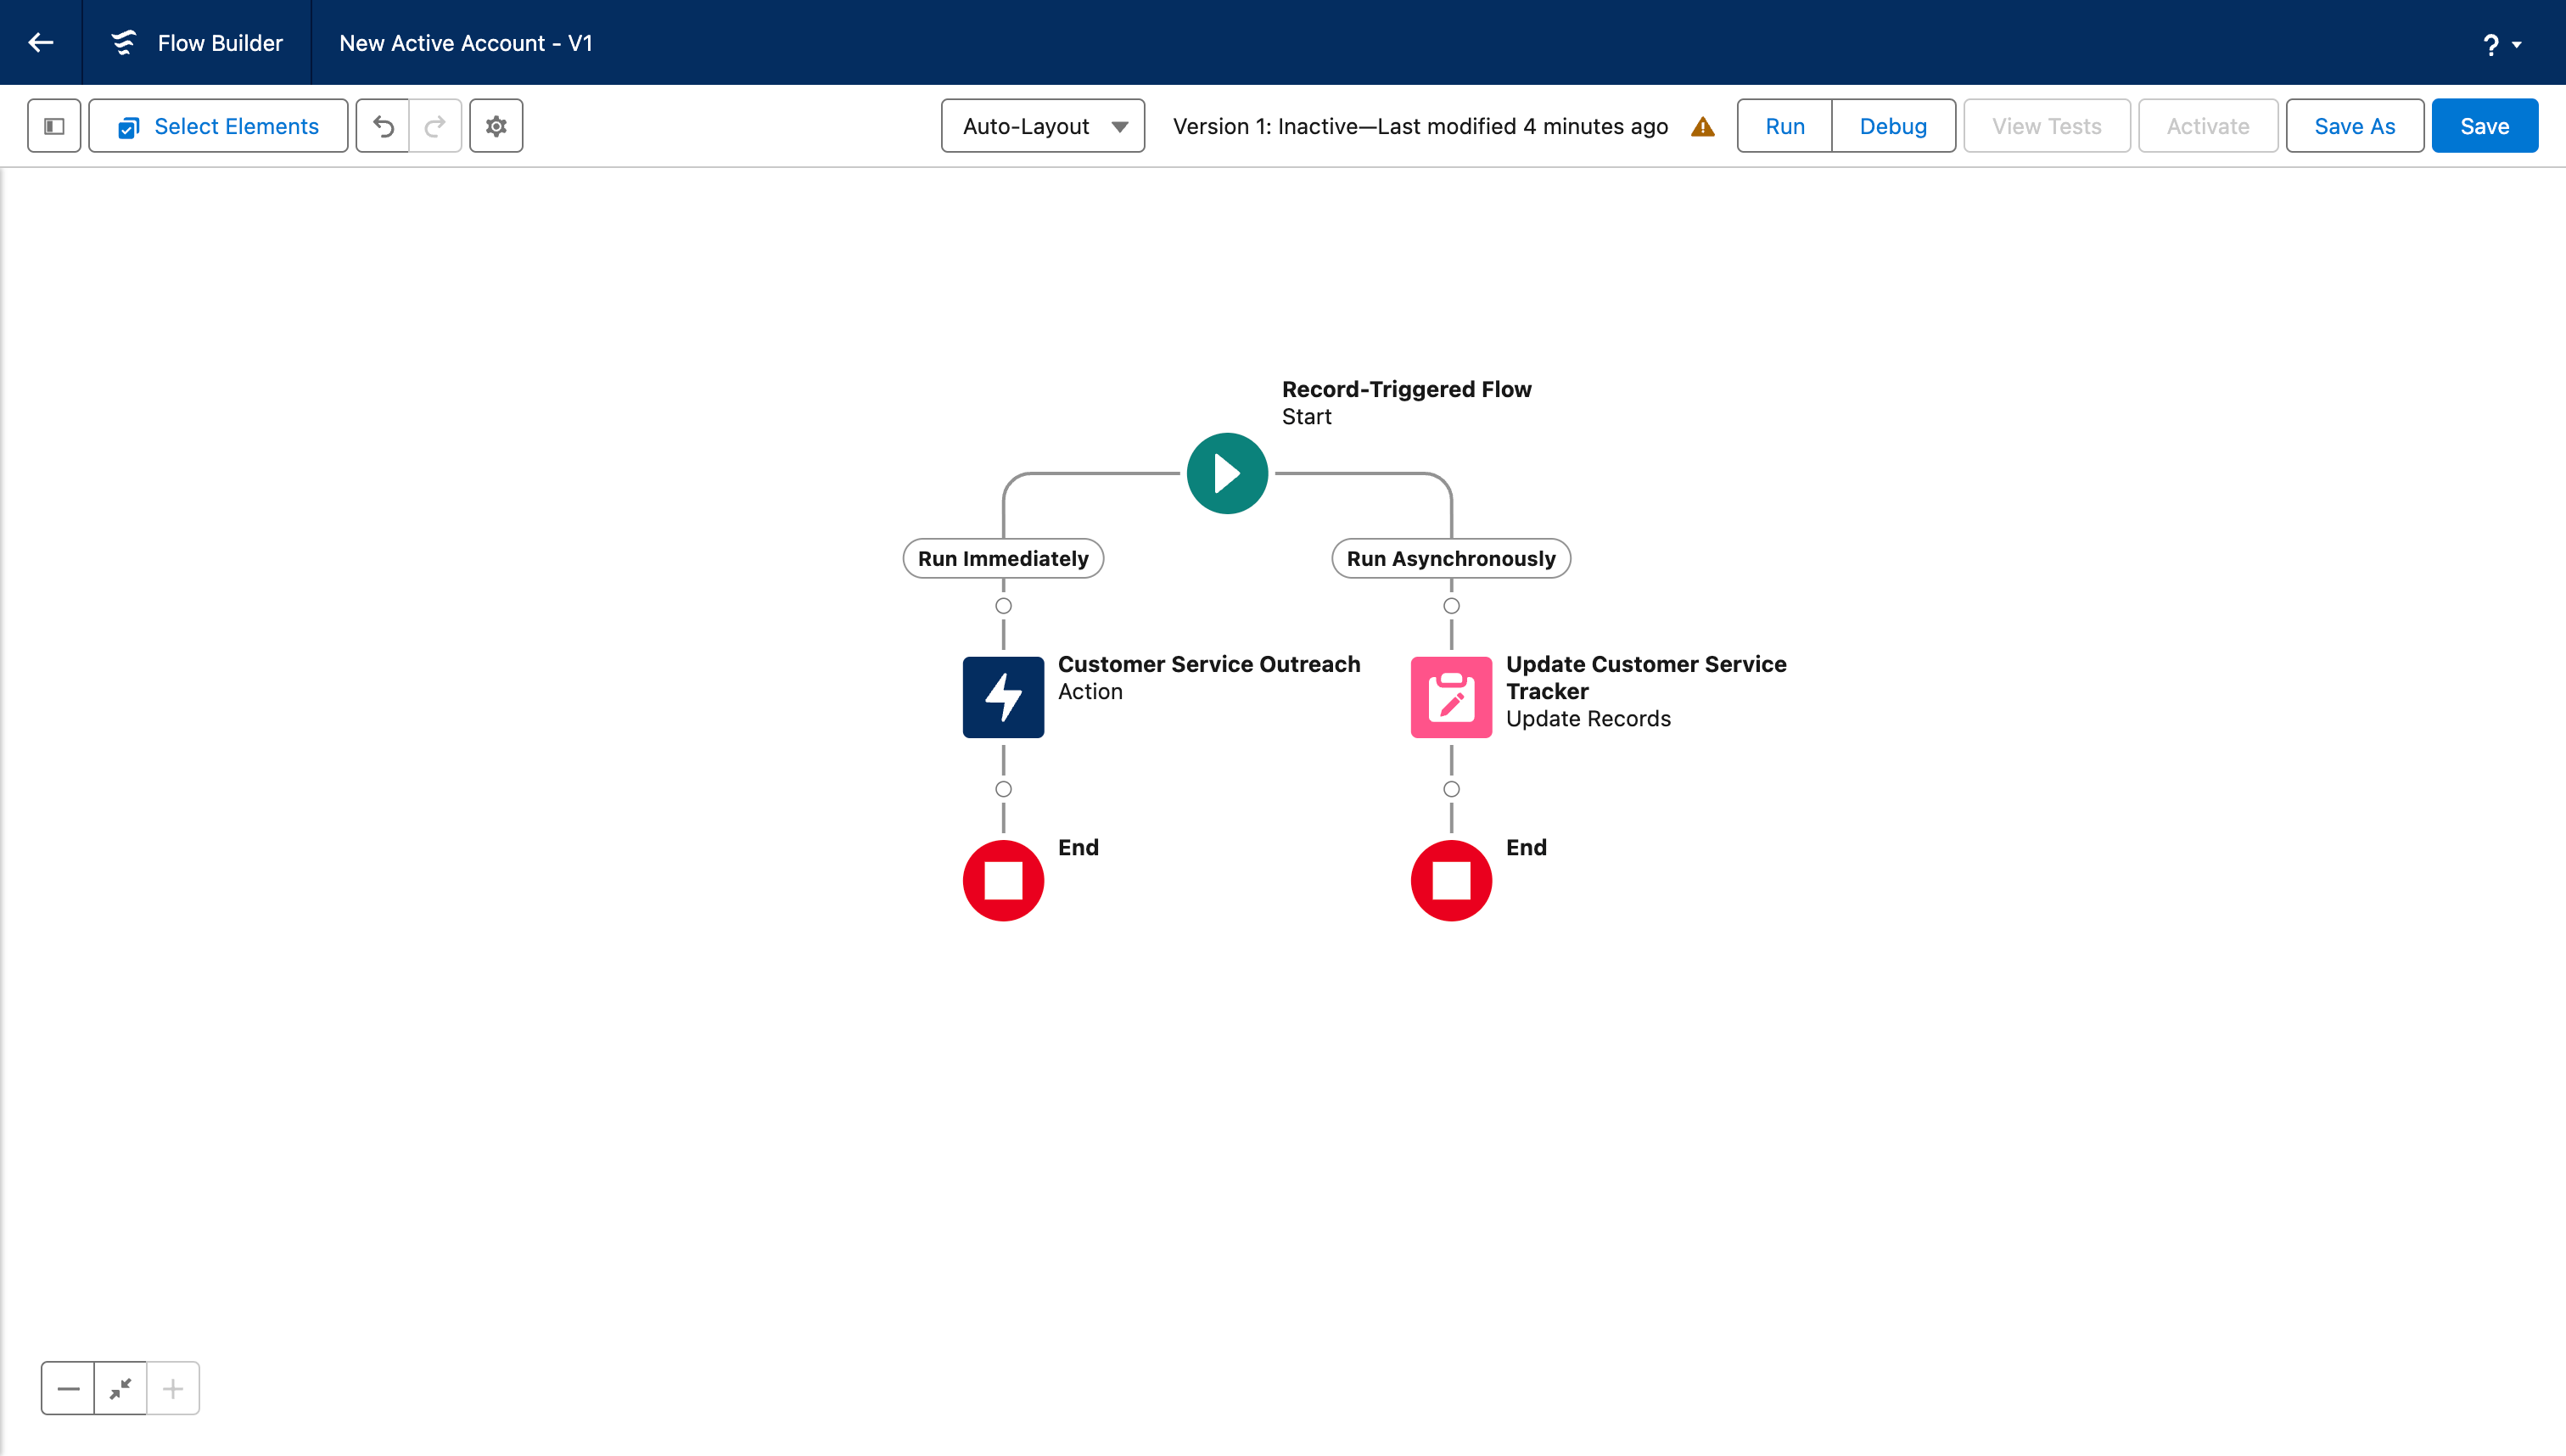
4. Establish further actions
Now you’ve created your new Record-Triggered Flow, you can use Flow Builder to add in further actions that will execute either immediately or in the background when the Flow is triggered. This will help get information or actions to end users as quickly as possible, while still allowing you to build out a comprehensive automation.
In this example, you might want the Action that triggers customer service onboarding work to run immediately when a new active account is created, but for updates to the Customer Service Tracker, which could take a long time, to run in an asynchronous path that executes in the background.
Record-Triggered Flow limitations
While Record-Triggered Flows are hugely useful in automating routine tasks, enforcing business rules, and ensuring data consistency across Salesforce objects without manual intervention, they have their fair share of limitations.
Some limitations are specific to Record-Triggered Flows:
- Governor limits are strict. The maximum number of interviews per 24 hours is 250,000, or the number of user licenses in your org multiplied by 200, whichever is greater. This means that you can quickly reach the limit of actions performed per day if you don’t make the most out of bulkification.
- If an object has multiple active Record-Triggered Flows that are configured to run before the record is saved, we can’t guarantee the order in which those flows are executed.
Other limitations are part of a wider difficulty with Flows:
- You have to be careful when setting your conditions for the Flow to be activated — it’s easy to set a rule that’s too broad and acts on too many records or too specific and fails to run for records that you’d like to be updated.
- Flows may take a long time to execute, which can slow down your end users. You can combat this by creating an asynchronous path within your Flow that can run independently without affecting the execution of the rest of the Flow.
- Flows are notoriously difficult to deploy.
How to deploy a Record-Triggered Flow with change sets
While it’s easy to get to grips with Record-Triggered Flows with a bit of practice, deploying them can be a real challenge, especially with basic tools like change sets.
If you want to deploy a Record-Triggered Flow with change sets, there are a few key considerations:
- Flows always reference a lot of components and have a variety of dependencies. You’ll need to make sure you manually list and then include the referenced components and dependencies in your outbound change set.
- Only include one version of the Flow in your change set and be aware that deploying a Flow will create a new version of the Flow in your target org, which isn’t helpful when you have several different Flows or Flow versions in your orgs.
- Manually activate your Flow in your target org, as change sets automatically deploys active Flows as inactive.
- Remove any Flows that you no longer need by deleting them in production, as you can’t deploy destructive changes with change sets.
The limitations of deploying Record-Triggered Flows can prove a real hassle for admins, which is why many teams opt for a specialized metadata deployment solution that can handle the complexities of Flows.
How to deploy Record-Triggered Flows with Gearset
Let’s look at how to deploy Record-Triggered Flows in only a few quick steps with Gearset! With specialized problem analyzers and visualization of your Flows, you’re less likely to hit errors or be left in the dark about what you’re deploying. Check out the walkthrough below and sign up for a free trial of Gearset to follow along.
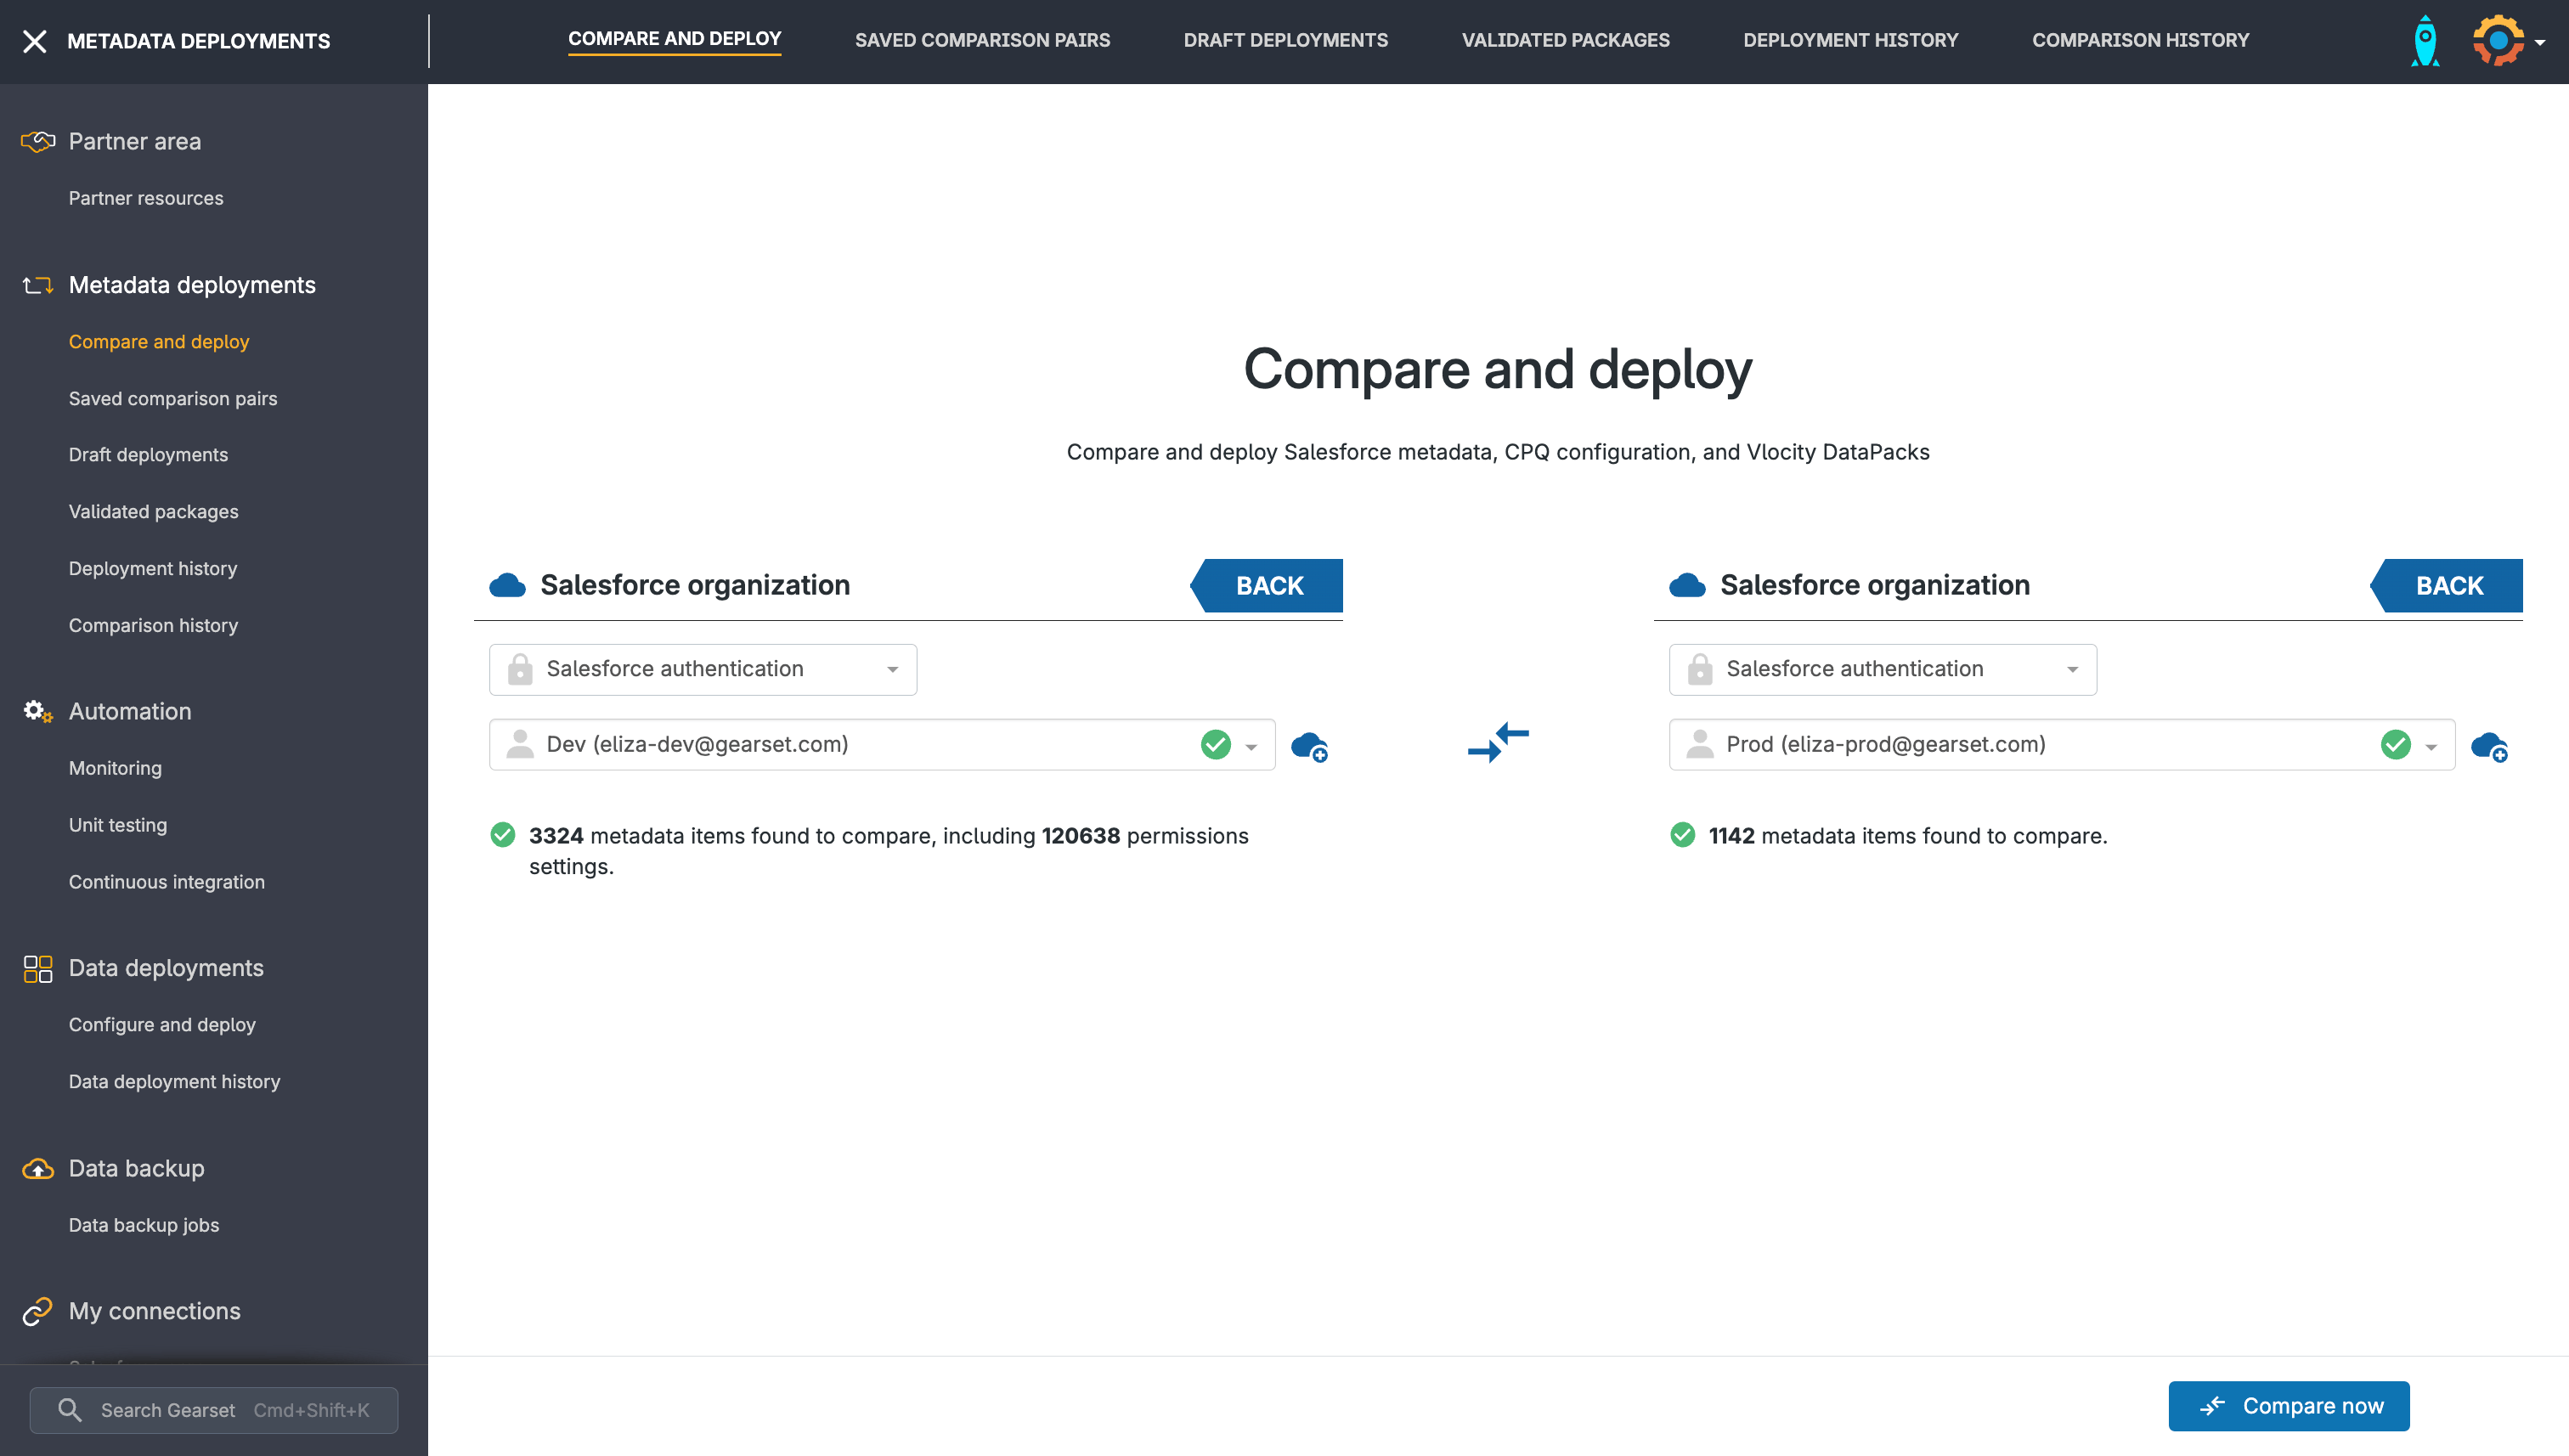
1. Select your source and target orgs
Start off by selecting your source and target orgs, then hit Compare now.
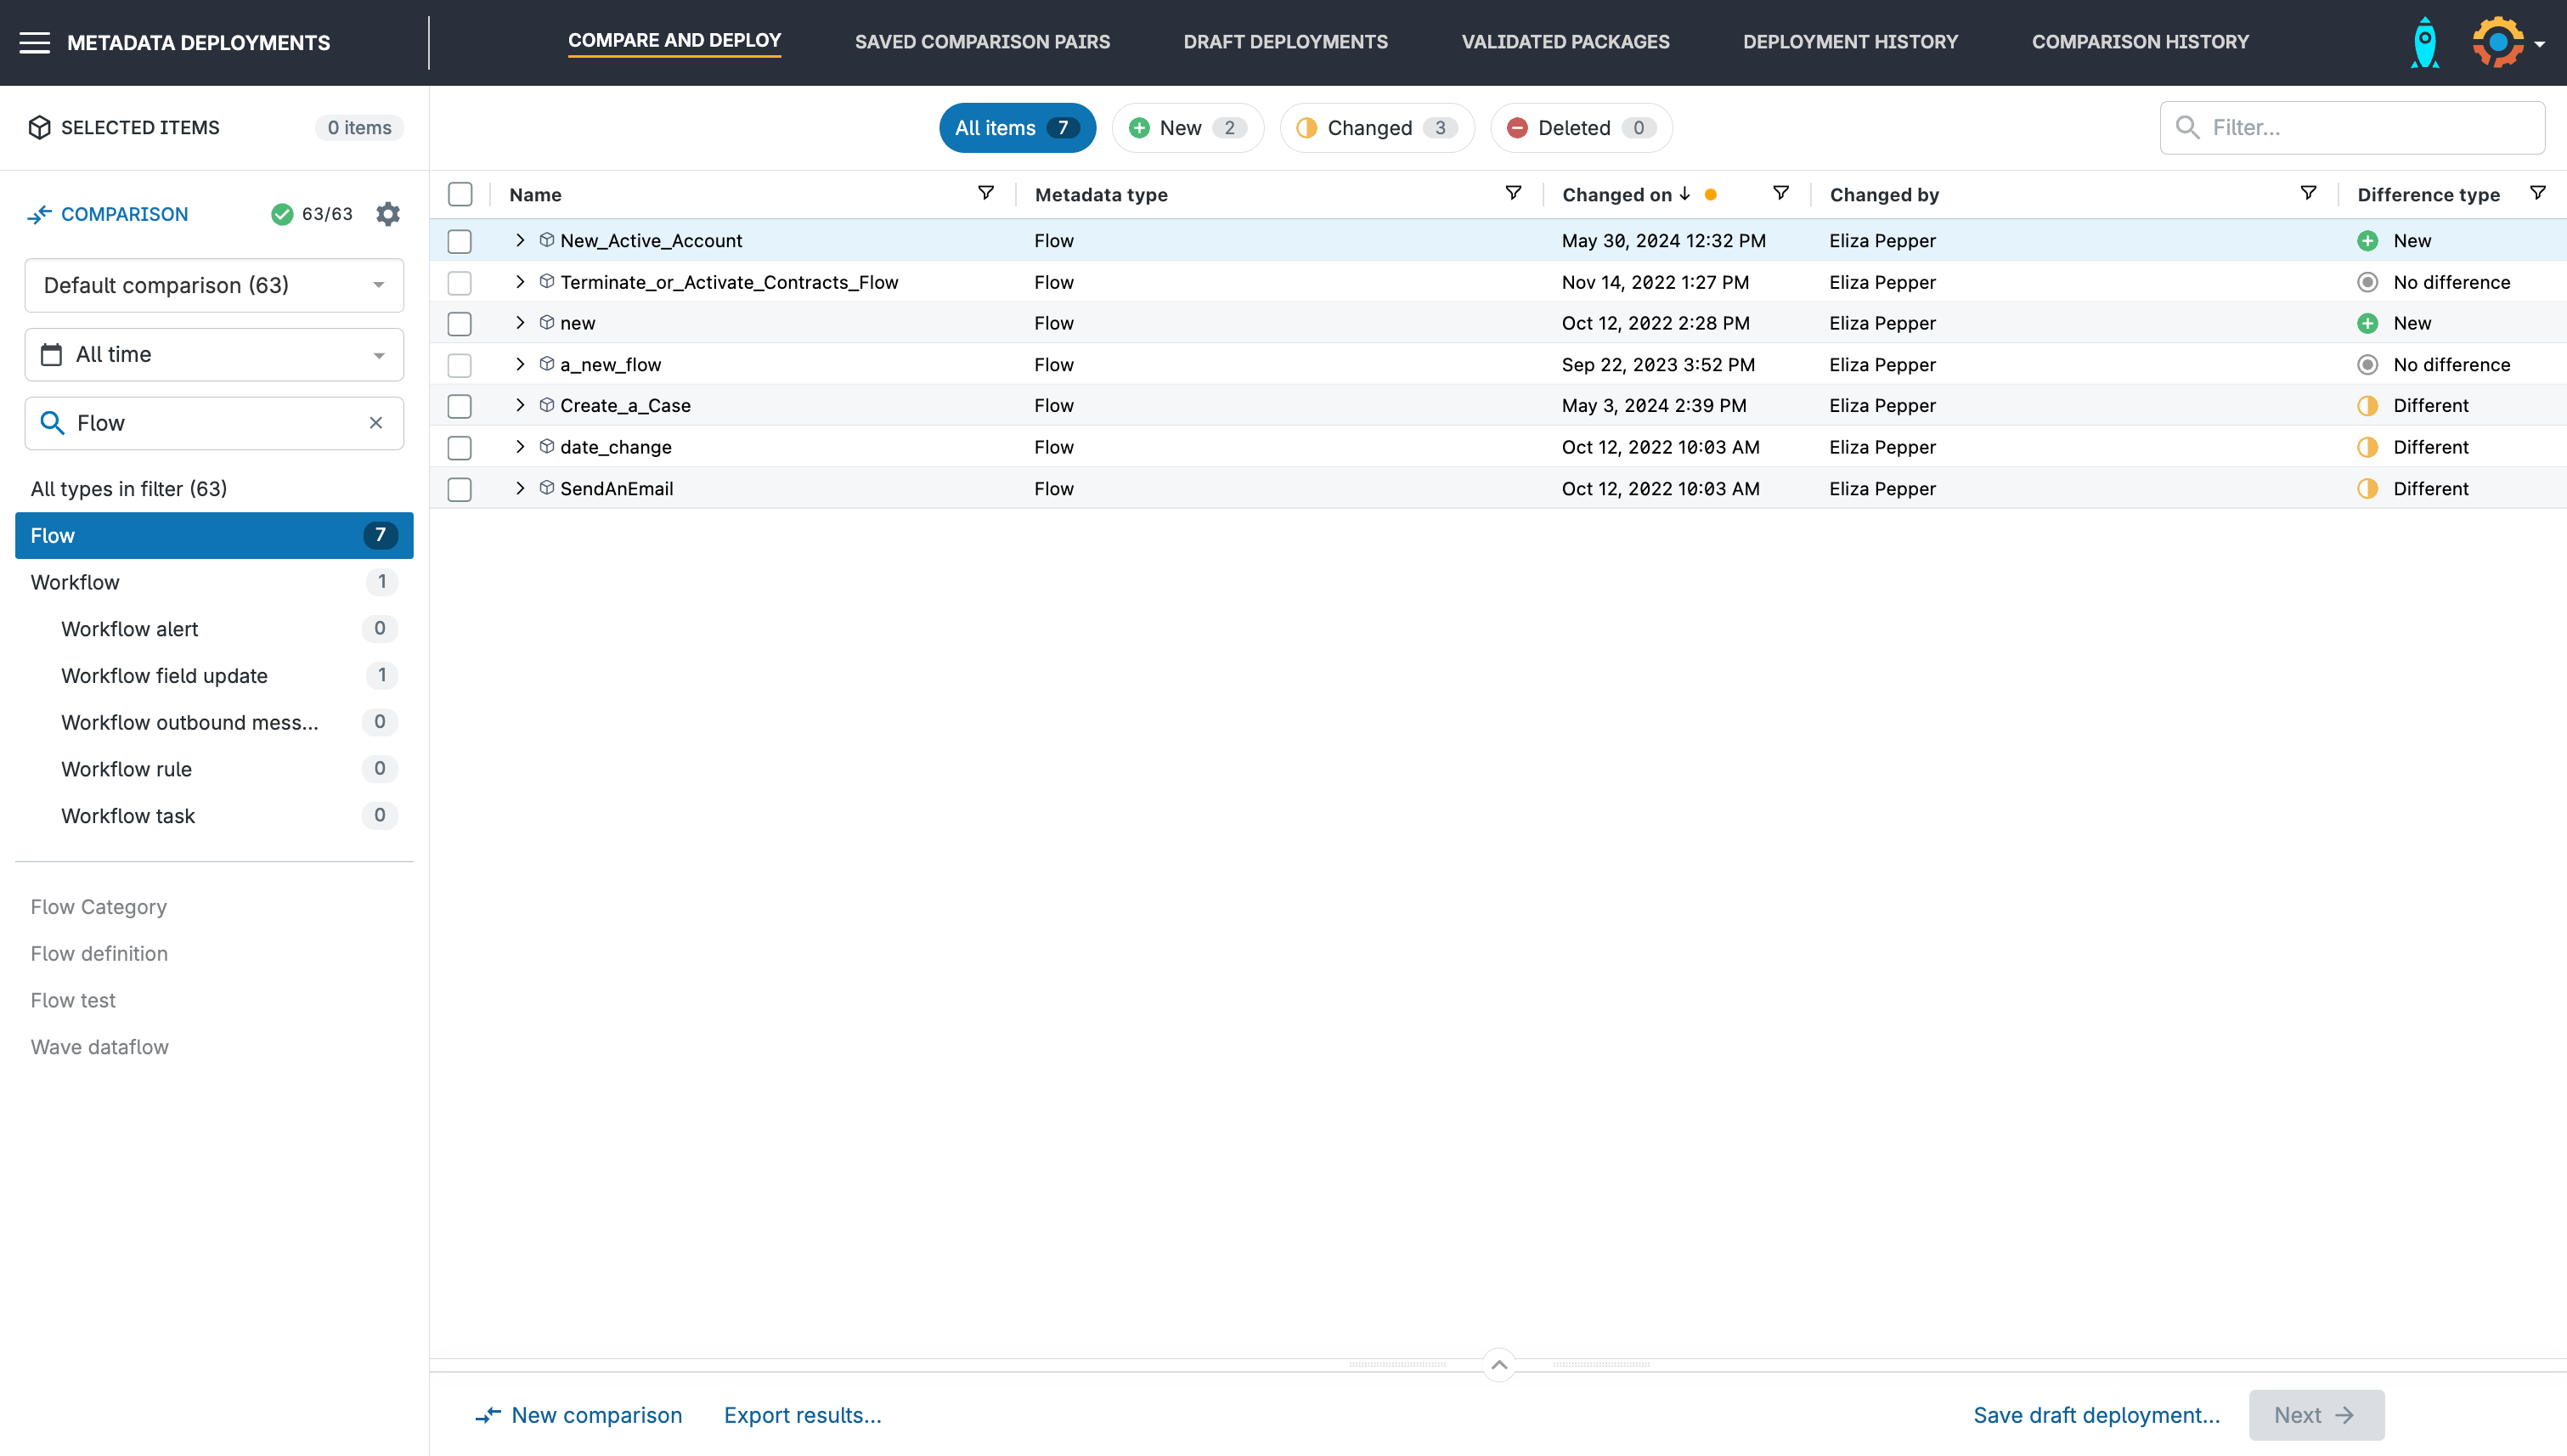
2. Filter metadata for comparison
Using the left hand menu, select the metadata filter for your comparison. This will help speed up your comparison process by only looking at relevant metadata. You can set up custom filters and specify which metadata types you’d like to compare, but Gearset’s default comparison includes the most frequently updated metadata types — and includes Flows!
3. View metadata changes
Select the Flow you want to deploy, and Gearset will render it in XML and in our Flow Navigator, which displays your Flow as it appears in Salesforce’s Flow Builder.
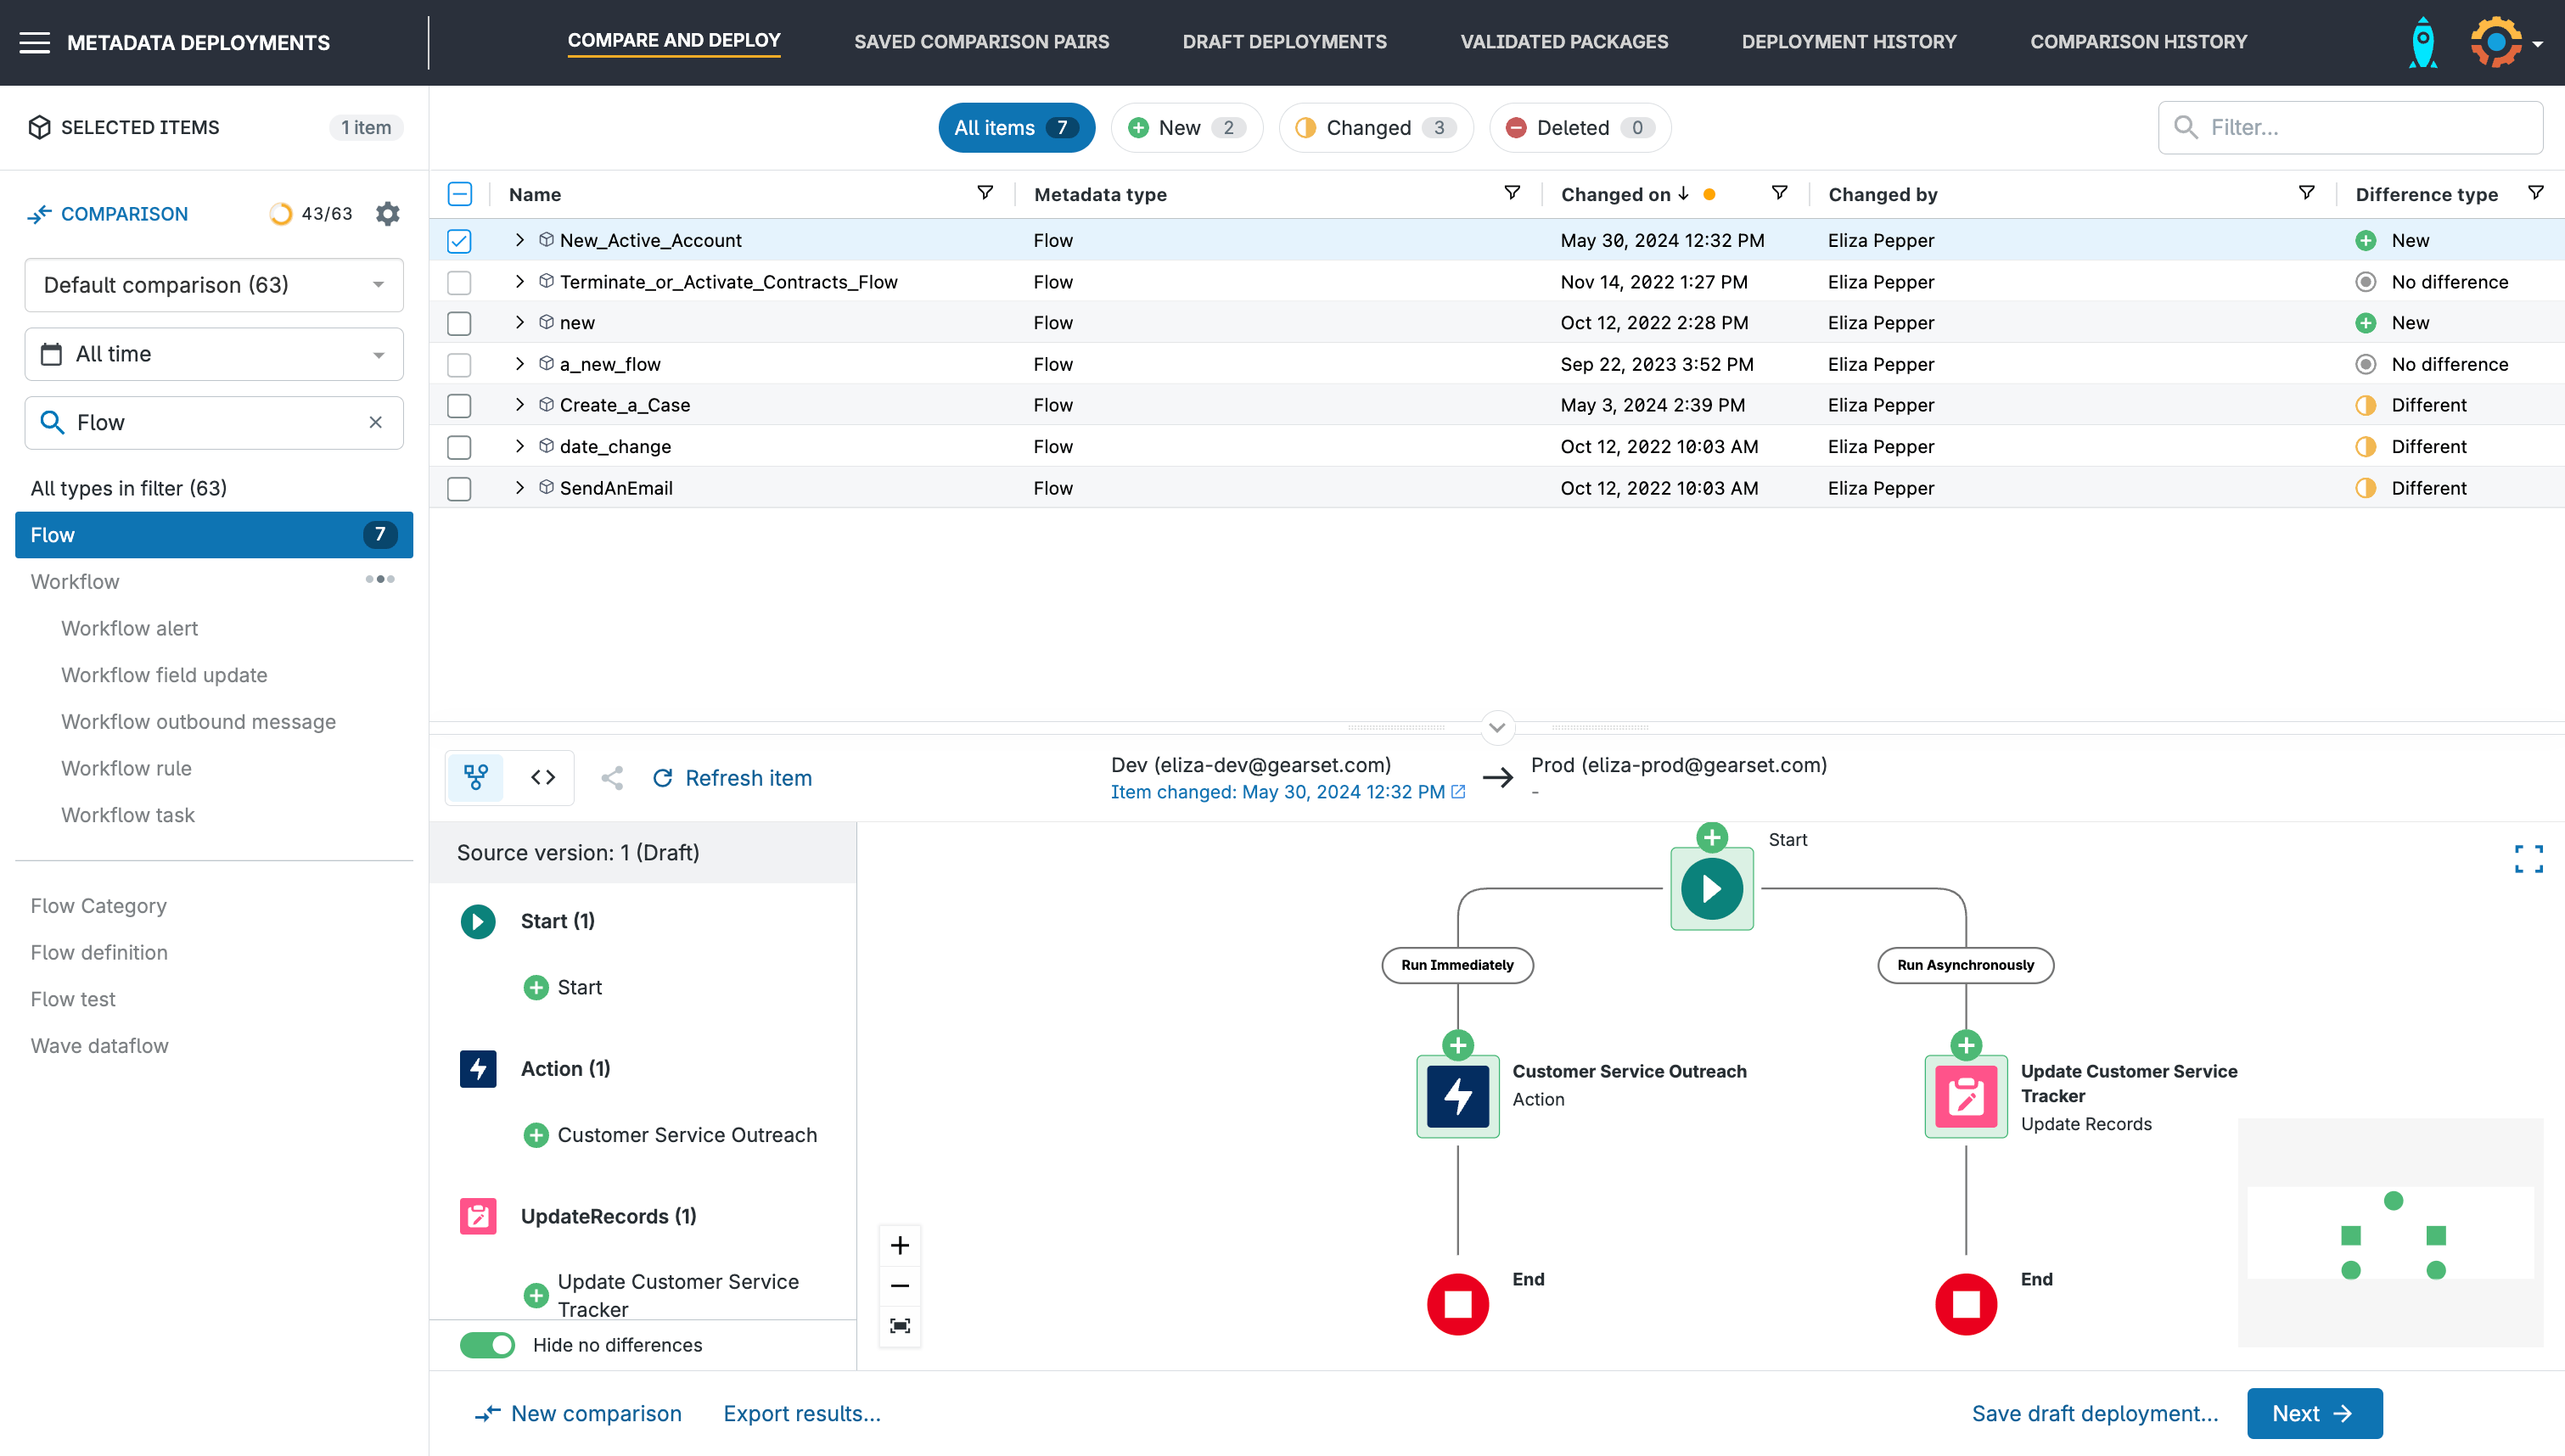
Any new changes will be highlighted in green and destructive changes will be shown in red. Select the changes you want to include in your deployment then press Next.
4. Achieve Flow success with Gearset’s problem analyzers
Gearset’s advanced analyzers will review your deployment to look for errors, such as missing dependencies or failing static code analysis. A range of functionality has been built specifically to make Flow deployments easier, with Gearset’s smart problem analyzers picking up on issues with:
- Flow Definitions being used to set active state of Flows, which is no longer needed as Salesforce are retiring Flow Definitions.
- Supporting you with deleting Flow Definitions, which is painful with other deployment engines.
- Deleted active Flows, which could unintentionally remove active automation in your orgs.
- Deleting all versions of a Flow if you select to delete one.
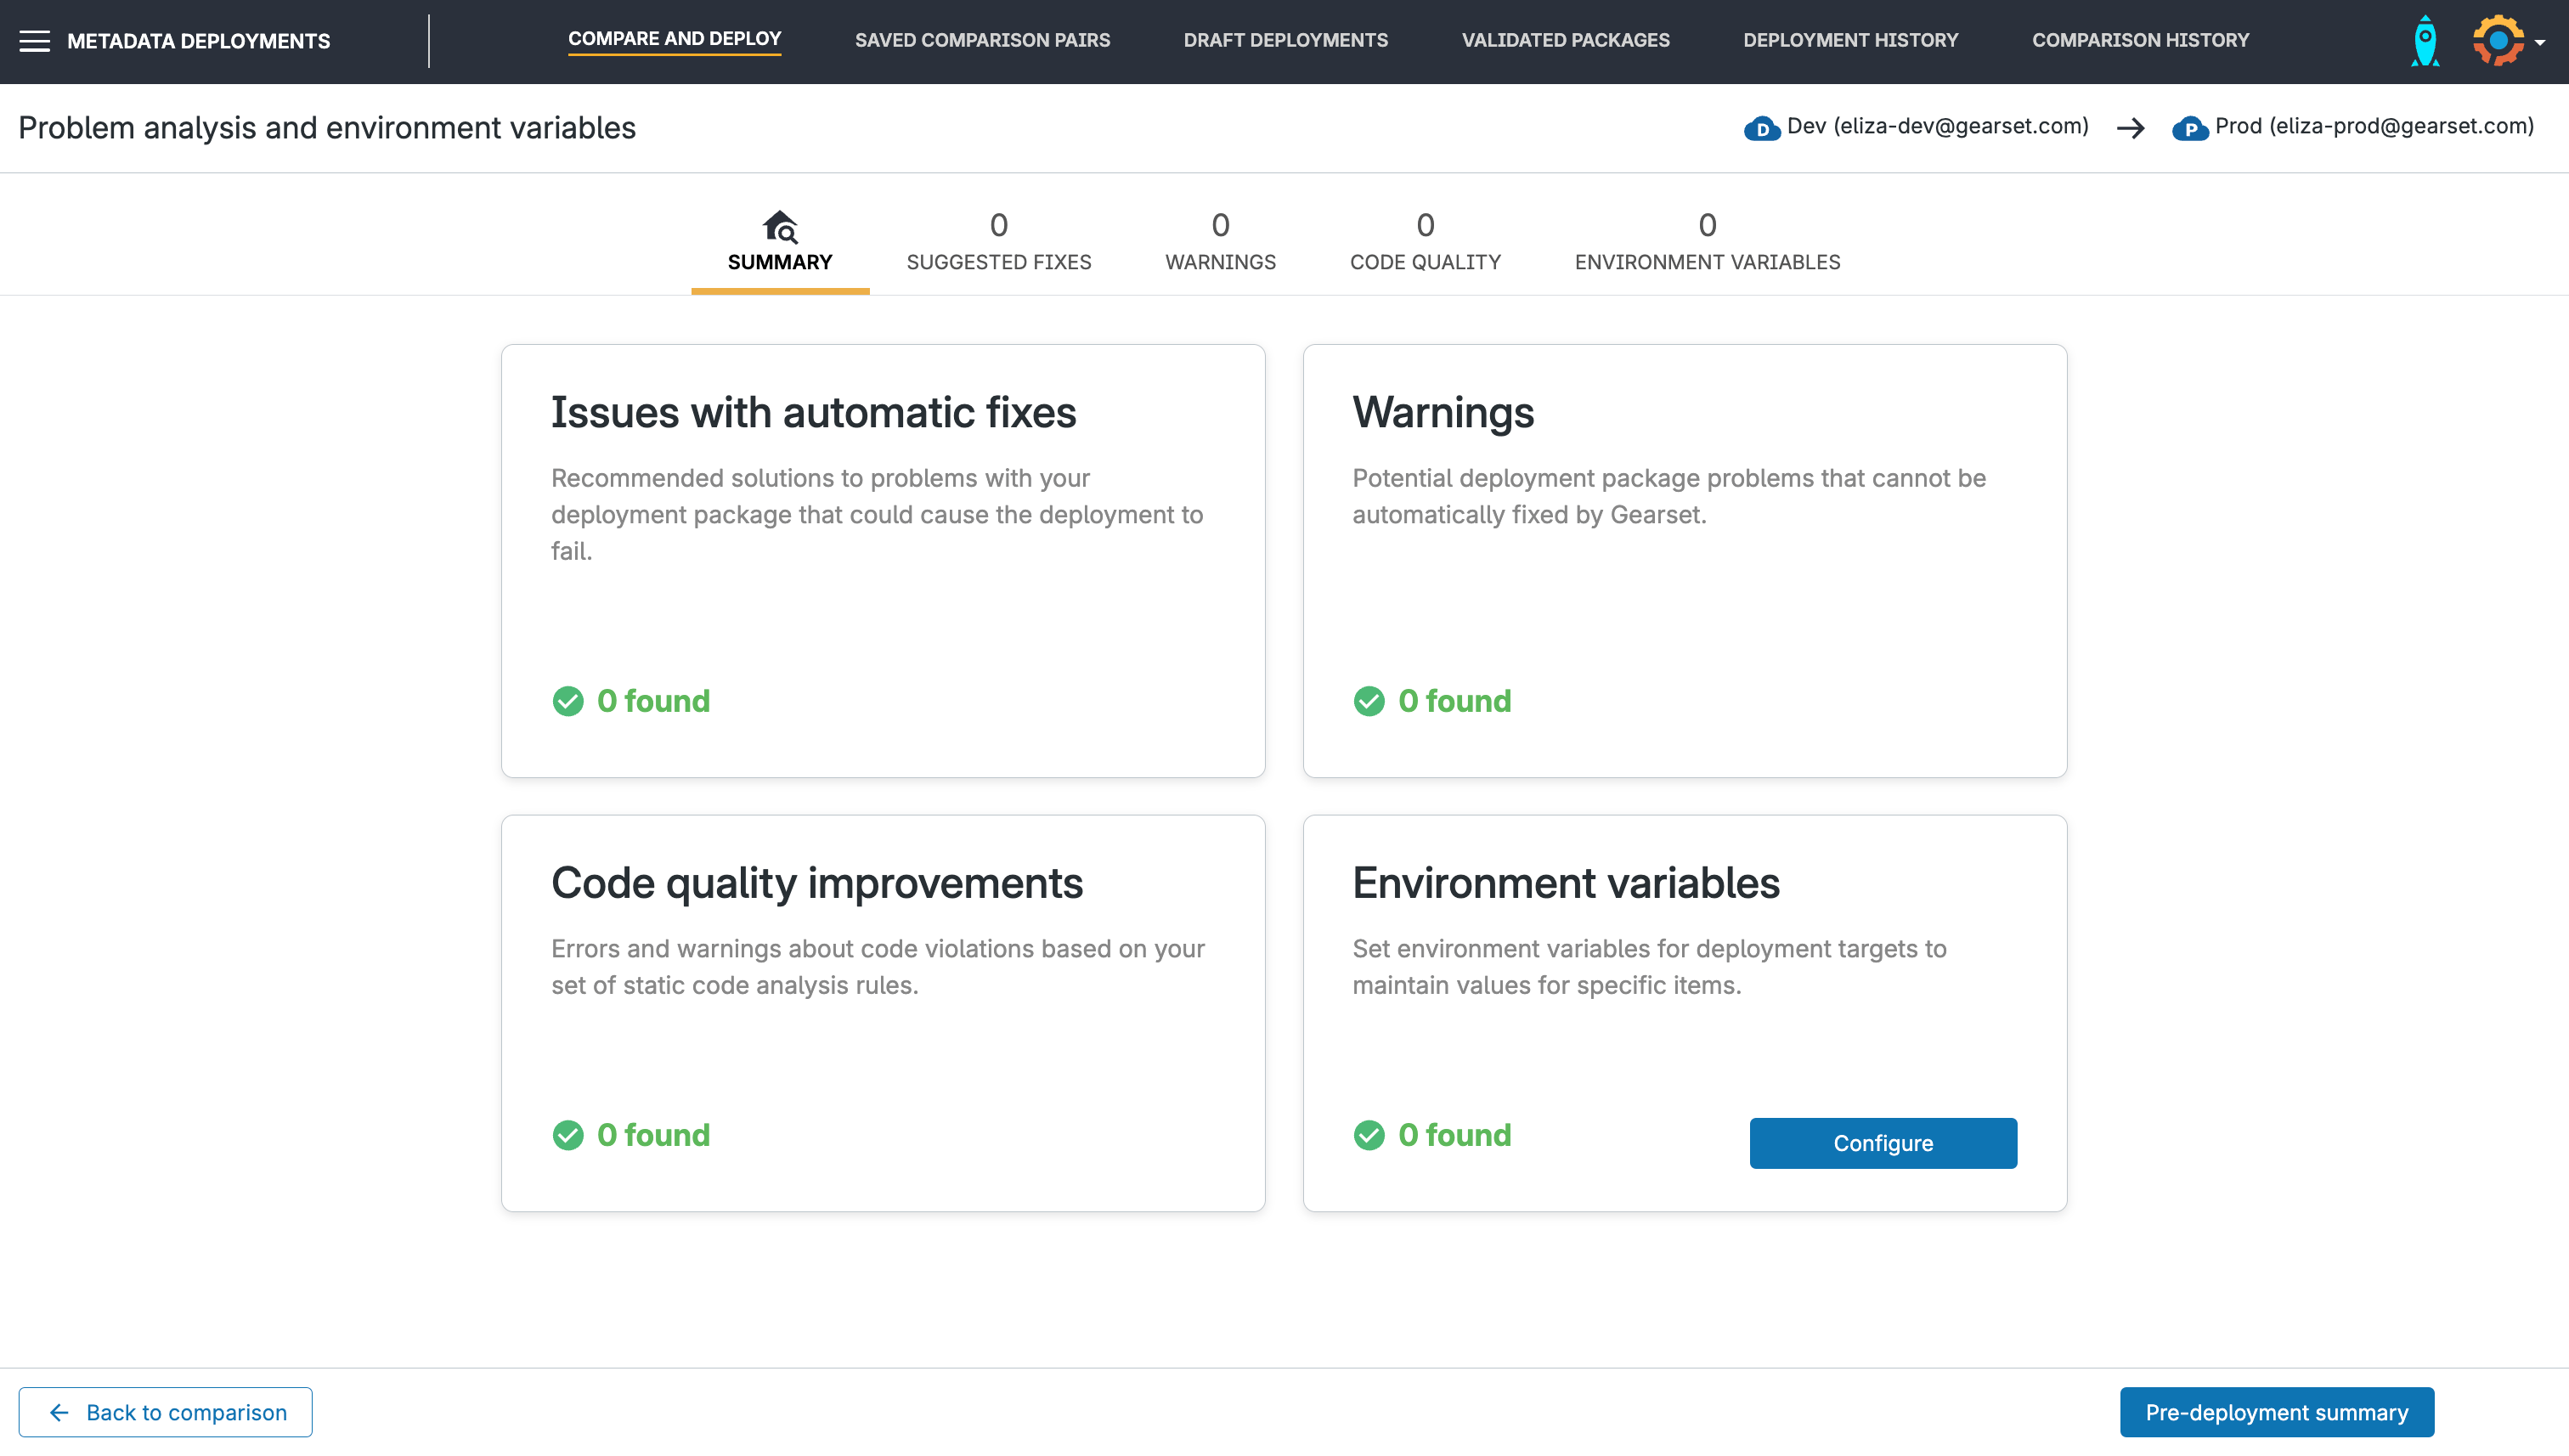
If any issues are detected, Gearset will suggest a fix for you to make yourself or you can opt for it to be made automatically. Once you’re happy with the analysis results, hit Pre-deployment summary.
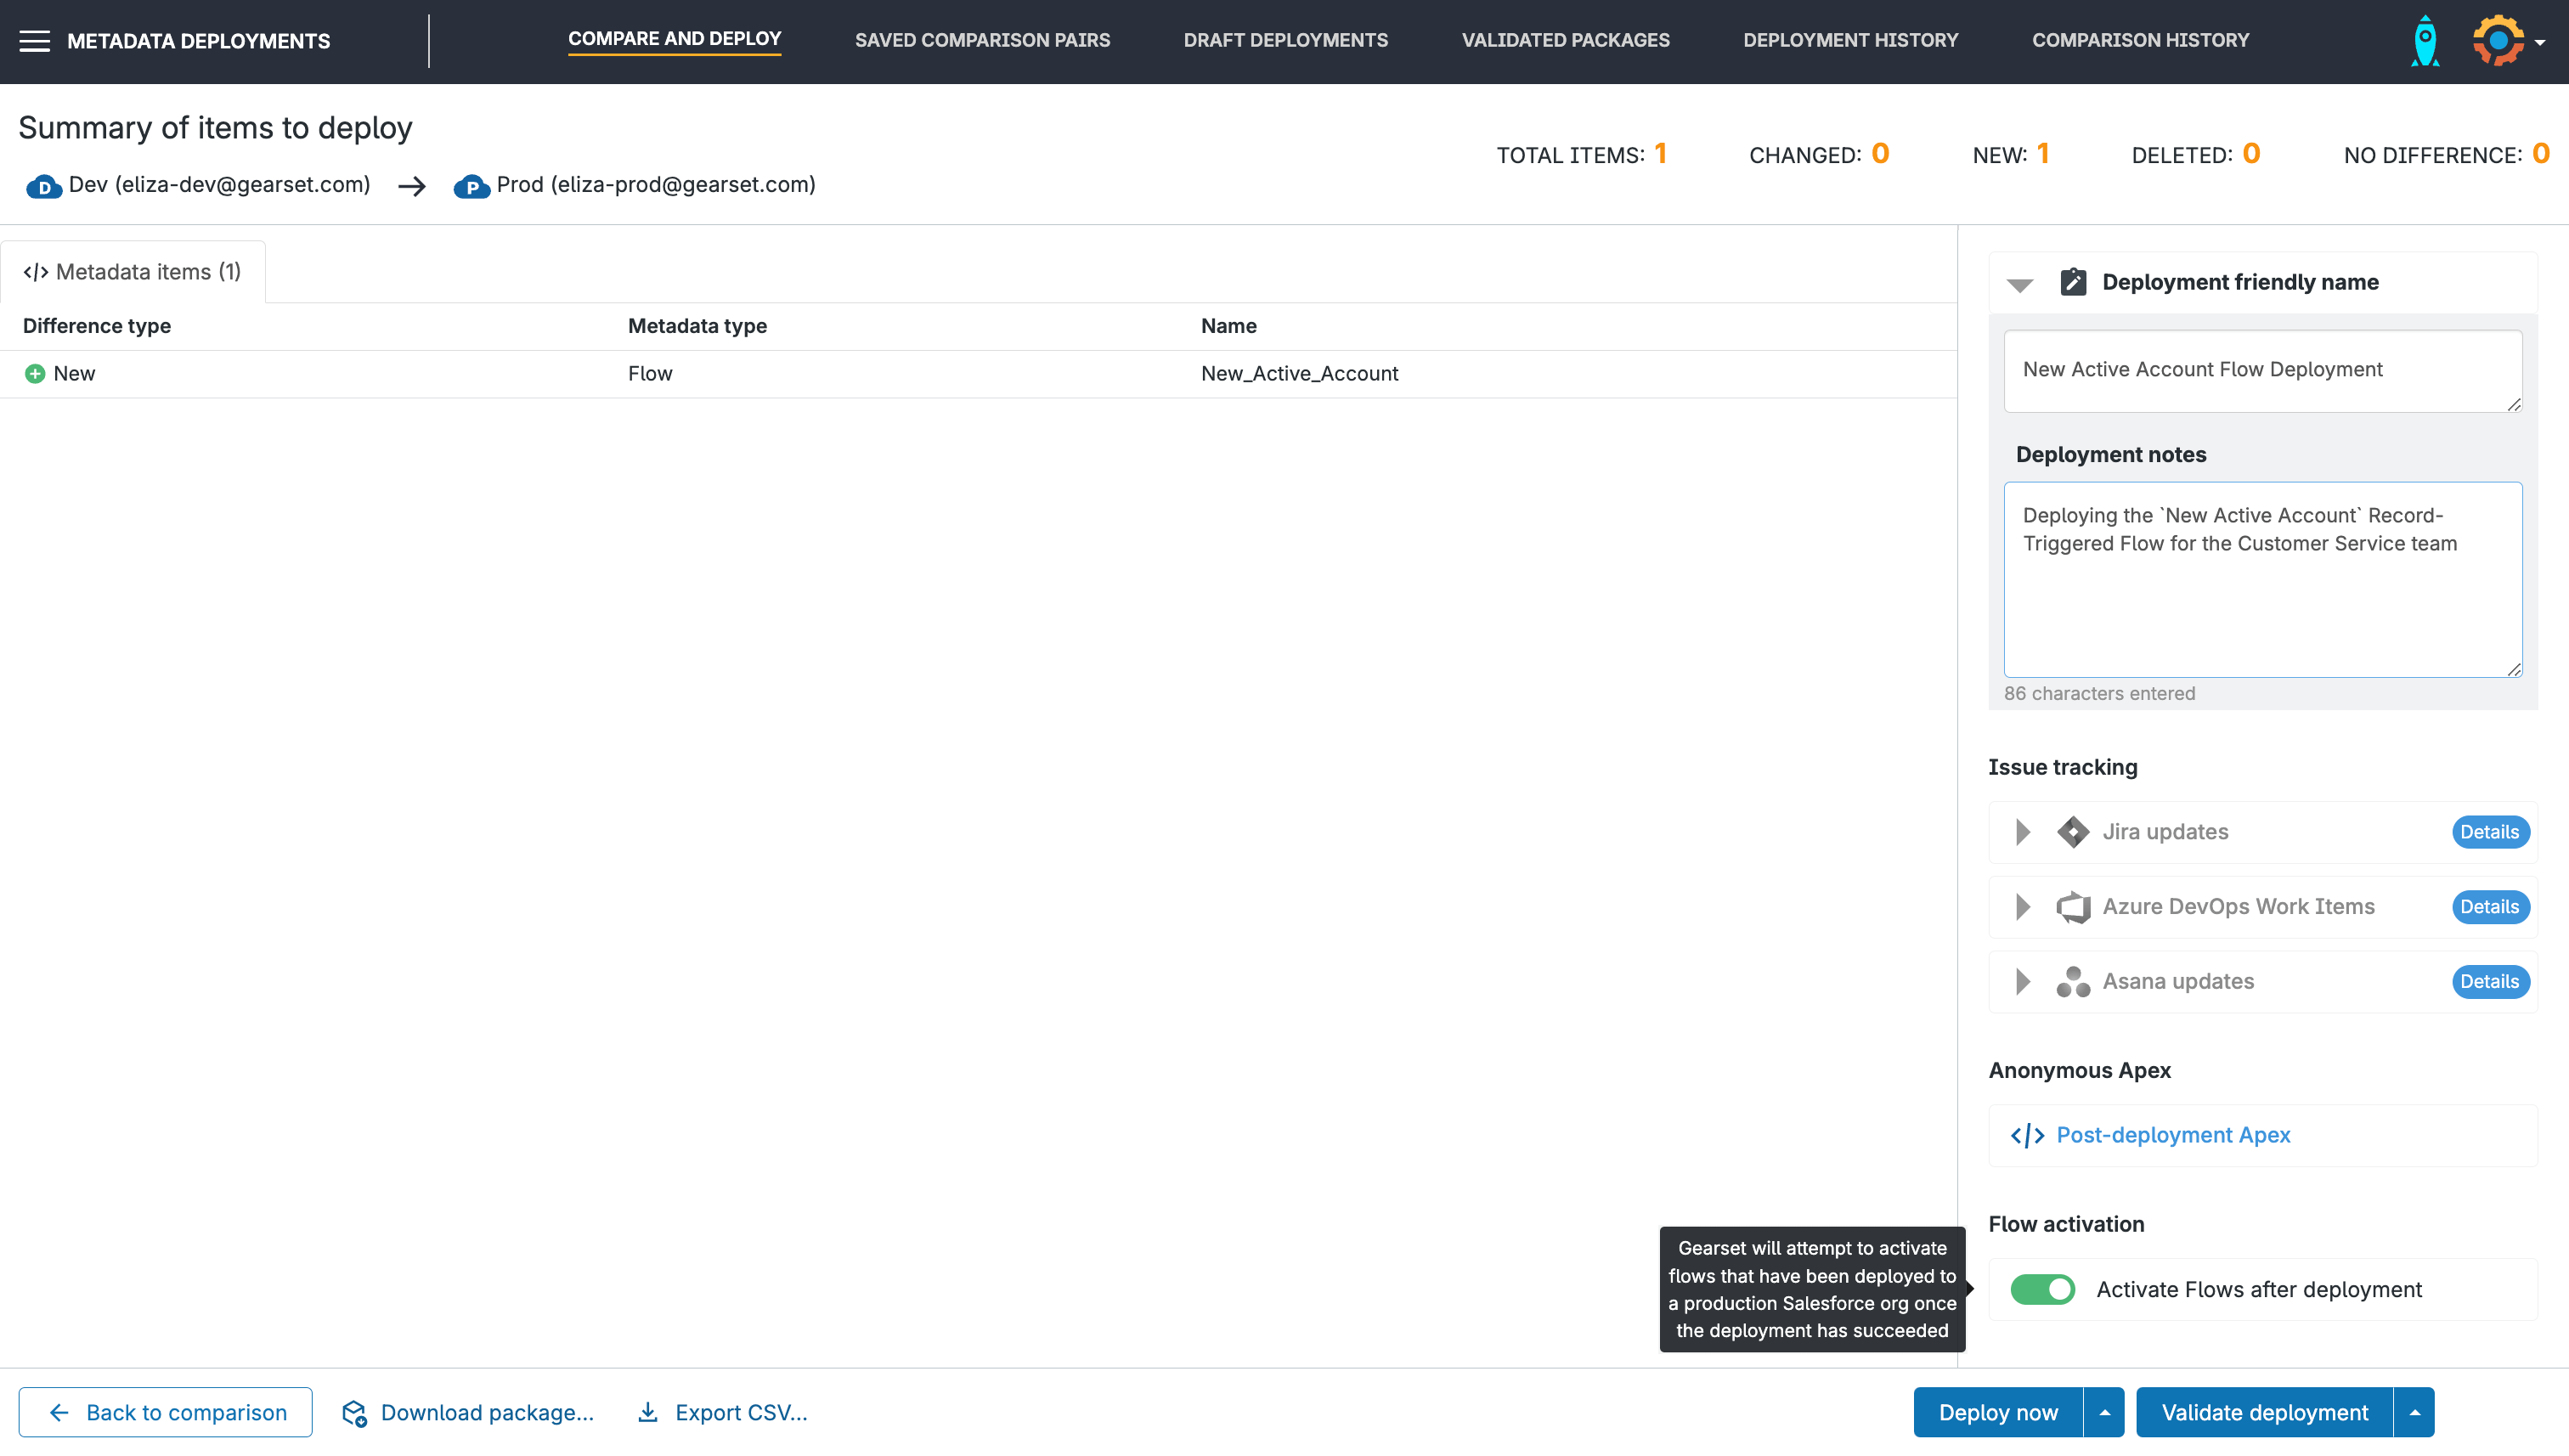
5. Deploy successfully
In the deployment summary, you can give your deployment a friendly name and description to help your team keep track of changes.
And if you accidentally deployed your Flow as inactive or still in draft stage when you actually want it to be active, you can toggle Flow activation to automatically activate your Flow once it’s in your target environment — no need to head into Salesforce and do this manually yourself!
Once you’re done, hit Deploy now to release your changes or schedule them for later.
Catch Flow errors before they hit your end users
Flow error monitoring gives teams total visibility into failing Salesforce Flows — before problems hit your users. As soon as an error occurs, Gearset automatically logs the failure, capturing every detail: the name of the Flow, the error message, the record that triggered it, and the time it happened. Instant alerts and an in-depth error log are available in the Gearset UI.
It’s engineered to help admins and developers troubleshoot issues fast, without wading through logs or fielding support requests. With historical tracking and trend analysis built in, you can strengthen your automation strategy and respond before issues escalate. Think of it as built-in resilience for your Salesforce automations.
Embrace automation
Forward-thinking organizations rely on their Salesforce teams to get the most out of their customer relationships, and business automation like Flows enables your end users to deliver the most for your business and customers.
Make sure your DevOps platform secures your success by supporting quick and reliable deployments for even the trickiest of metadata types. If you’re ready for smooth-flowing Salesforce releases, start a free 30-day trial of Gearset today or book a custom demo to see it in action for yourself!
