
If you want to automate processes in Salesforce without user input, Autolaunched Flows might be just what you need. These behind-the-scenes automations can fire from a user action or another process, helping you streamline repetitive tasks and keep your org running smoothly.
In this post, we’ll break down what Autolaunched Flows are, when to use them, and how they can streamline your background automation.
What is an Autolaunched Flow?
Autolaunched Flows are one of the two main categories of Salesforce Flow and cover a wide range of behind-the-scenes automation. Many of the most commonly used Flow types, like Record-Triggered Flows, Schedule-Triggered Flows, and Platform Event-Triggered Flows, are subtypes of the Autolaunched category, because they don’t involve user interaction. Each subtype aligns with a different process type — whether you’re responding to data changes, scheduled events, or custom triggers.
In this blog post, we’re focusing on a specific type of Autolaunched Flow — one that doesn’t have a trigger defined within the Flow itself. These Autolaunched Flows run only when something else starts them manually — such as another Flow, a custom button, custom link, or Apex class — rather than running automatically when a record changes or on a schedule.
Unlike Screen Flows, the other main Flow category, Autolaunched Flows don’t include any user interaction — no forms, prompts, or buttons. They’re designed to do their work silently in the background, which makes them a great choice to run automation for repetitive, logic-heavy tasks that don’t require human input.
TDX
What to consider when designing an Autolaunched Flow
Salesforce Autolaunched Flows are powerful — but without careful design, they can quickly become hard to manage or prone to failure. Here are a few key things to keep in mind when building yours.
Naming conventions
Flows are easier to maintain when everything’s clearly named. Stick to a consistent naming pattern, like the SFDX Flow Naming Conventions. Instead of naming a flow something vague like “Assign Tier”, follow the convention of “Object_Flow Type_Purpose_Flow” to create a name like “Opportunity_SFL_AssignTierFromAmount” that makes it obvious what the Flow does, when it runs, and what object it’s tied to. This also helps to map your Flow logic to your business requirements — so you can clearly see how each variable, condition, or action supports what you want to achieve.
Variables
Use consistent naming patterns and include descriptions that show each variable’s purpose and data type. Only set input/output access when needed — especially for Flows called by buttons, Apex, or other Flows. And make sure variables referencing records use the correct object type and fields to avoid runtime errors.
Security and permissions
When building Autolaunched Flows, remember that session timeouts don’t roll back in-progress Flow interviews. Actions like Create Records will still complete, which can result in unintended data changes if a session expires mid-process — a potential security concern in regulated environments. Autolaunched Flows also can’t filter or sort encrypted fields in elements like Get Records or Update Records. If your automation relies on Shield Platform Encryption, this can affect logic accuracy or lead to exposure risks if not handled correctly.
Bulkification
Autolaunched Flows don’t always run one record at a time — sometimes they’re triggered by hundreds at once. That’s why it’s important to build them with bulk processing in mind. Instead of looping through records individually, use collection variables and actions to handle them in batches. Skip the hard-coded IDs, keep loops to a minimum, and make sure your Flow stays well within Salesforce’s governor limits. Bulkifying your Flow keeps it fast, safe, and ready for real-world scale.
How to build an Autolaunched Flow using Flow Builder
Flow Builder is your visual workspace for designing automations — it’s a declarative tool so there’s no code needed.
To find Flow Builder in Salesforce, go to Setup and search ‘Flows’. In the Flows panel, click New Flow. You can also do the same from the Automation Lightning app, just click New to launch the Flow Builder in a new tab.
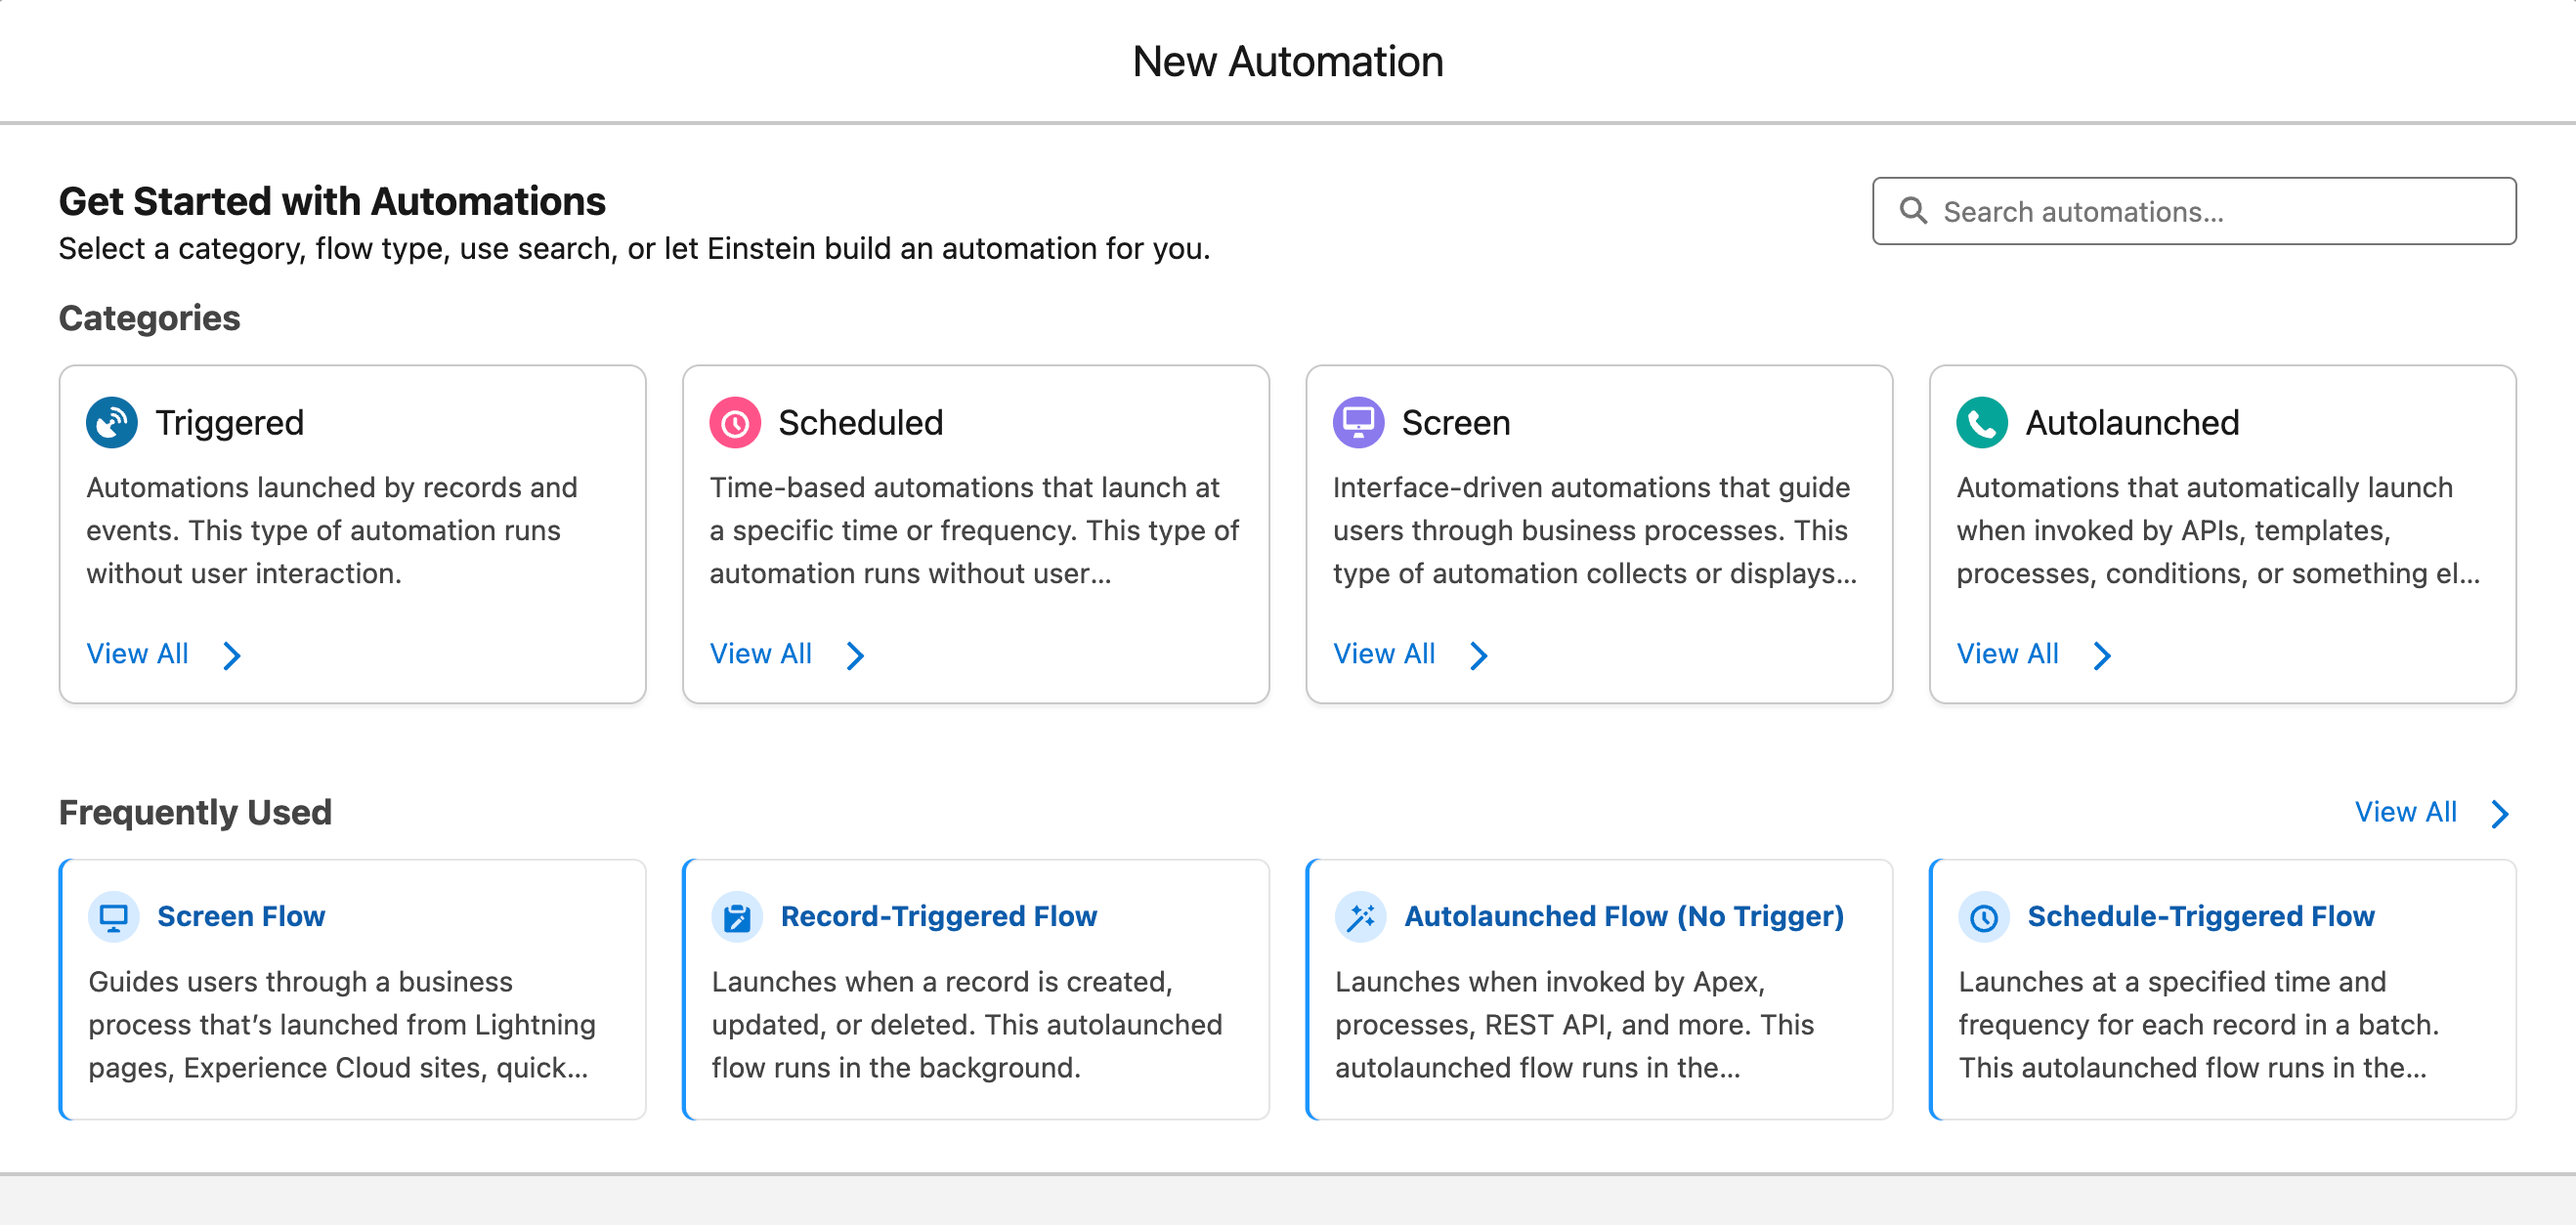
1. Start a new Autolaunched Flow
Select Autolaunched Flow (No Trigger) and Create to start configuring your Flow.
In this example, we’re building an Autolaunched Flow to streamline follow-up for high-priority Cases. Support agents often create a manual Task to check in a week later. This Flow creates that Task automatically, prefilled with Case details, and can be triggered with a custom button on the Case record.
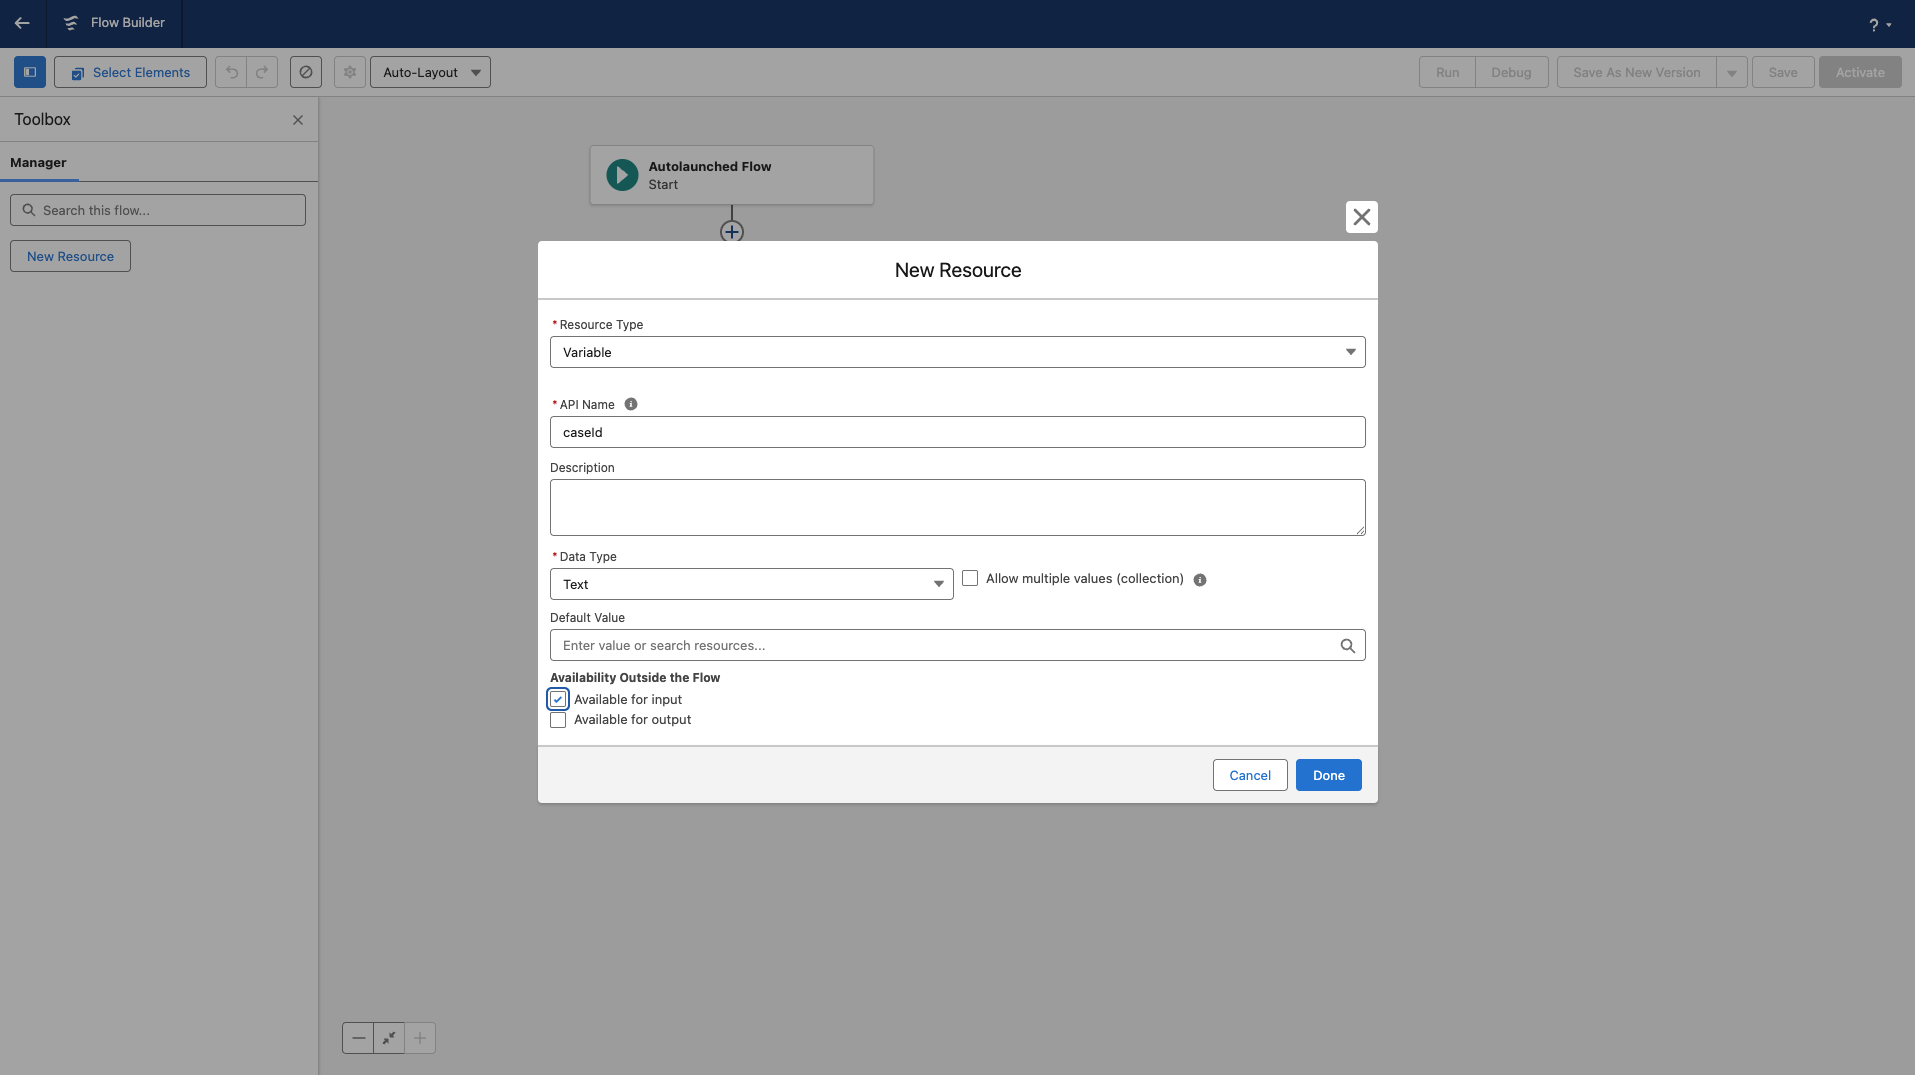
2. Define input variables
To give the Flow the right context — like which Case it should create a Task for — you need to create input variables. To do this, open the Toolbox and click New Resource. Select Variable as the Resource Type, then define its API name, data type, and whether it accepts input from outside the Flow.
3. Add elements
The next step is to add elements that tell the Flow what to do with the variables. In this scenario, we’re using a Create Records element to build the follow-up Task, using the case and Flow details that were passed in as input variables — such as the record ID (Case ID) and Owner ID, along with any other values the Flow needs to make decisions or populate fields. You can also use merge fields here to personalise the Task, such as including the Case Subject or Customer Name in the Task’s subject line or description.
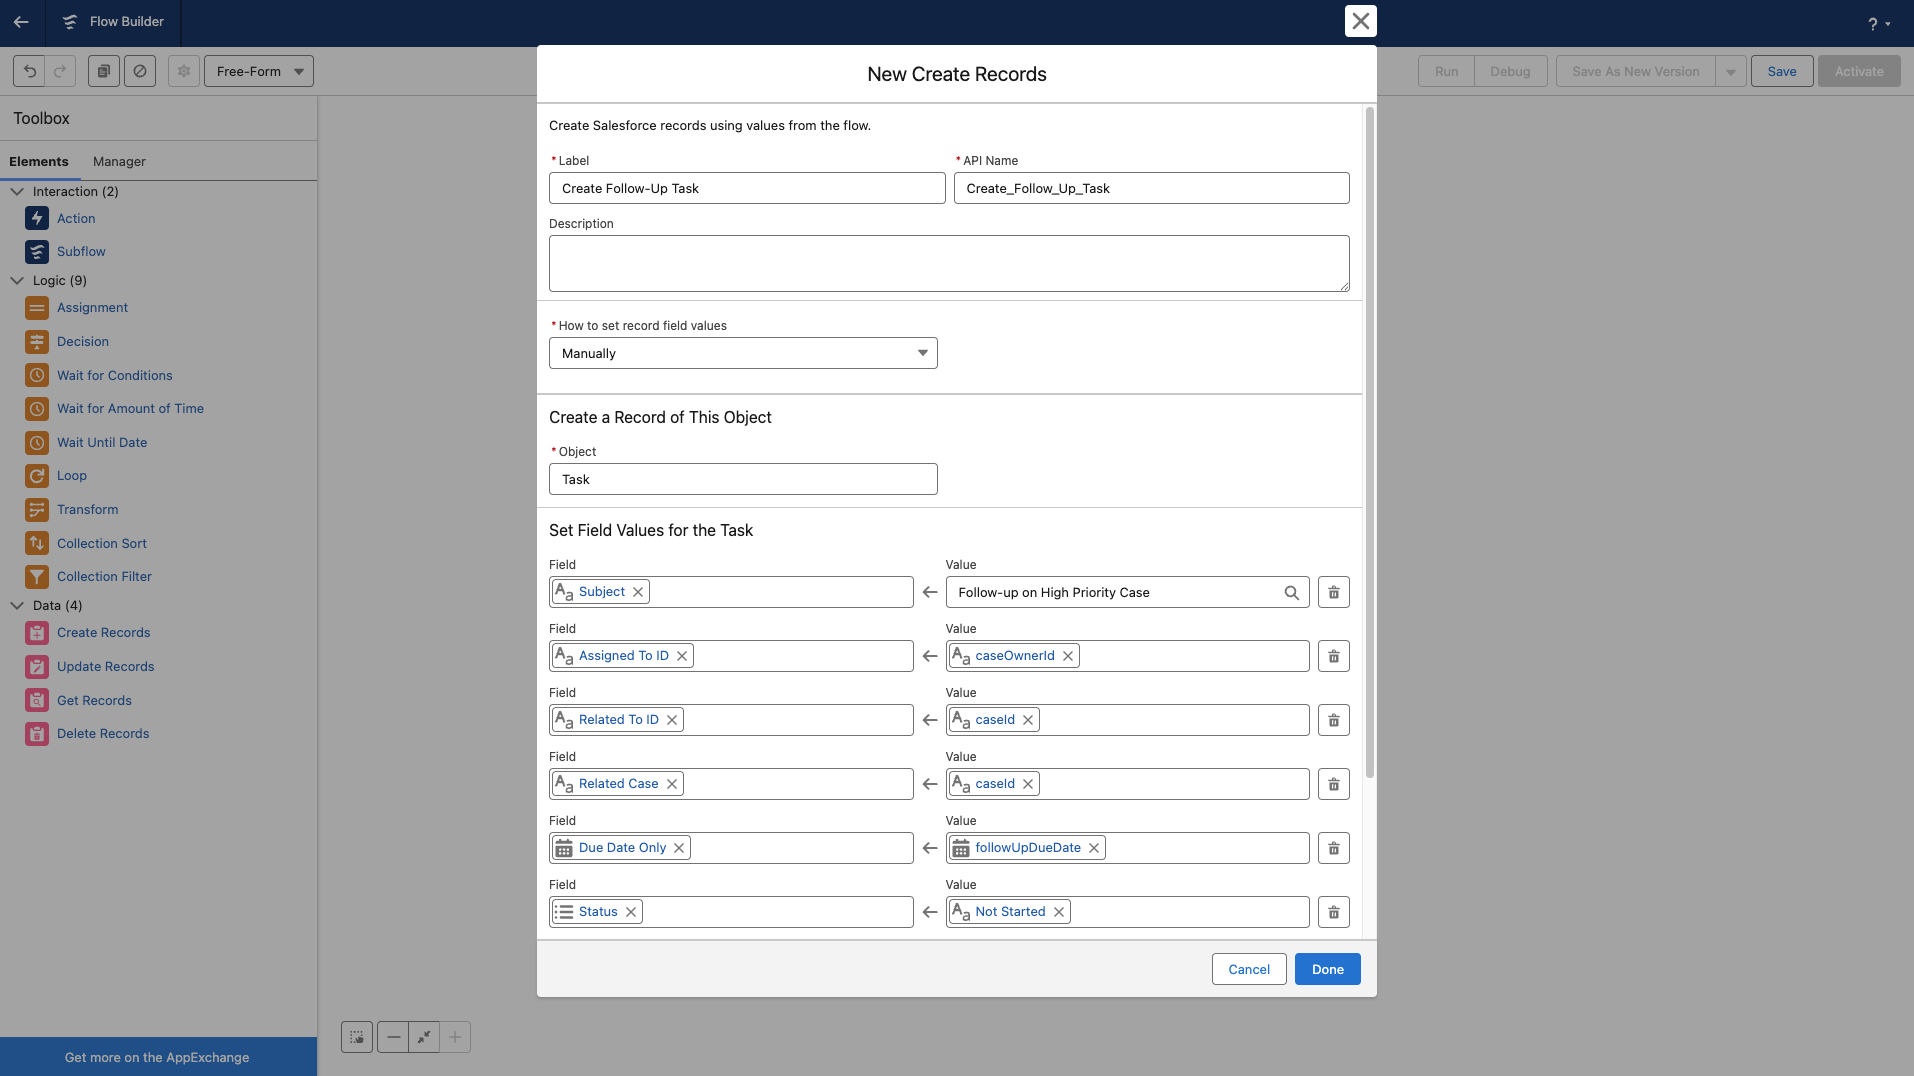
To add an element, switch the canvas to Free-Form and drag the element onto the canvas from the toolbox. This will open a new window where you can define your element and click Save to add it to your Flow.
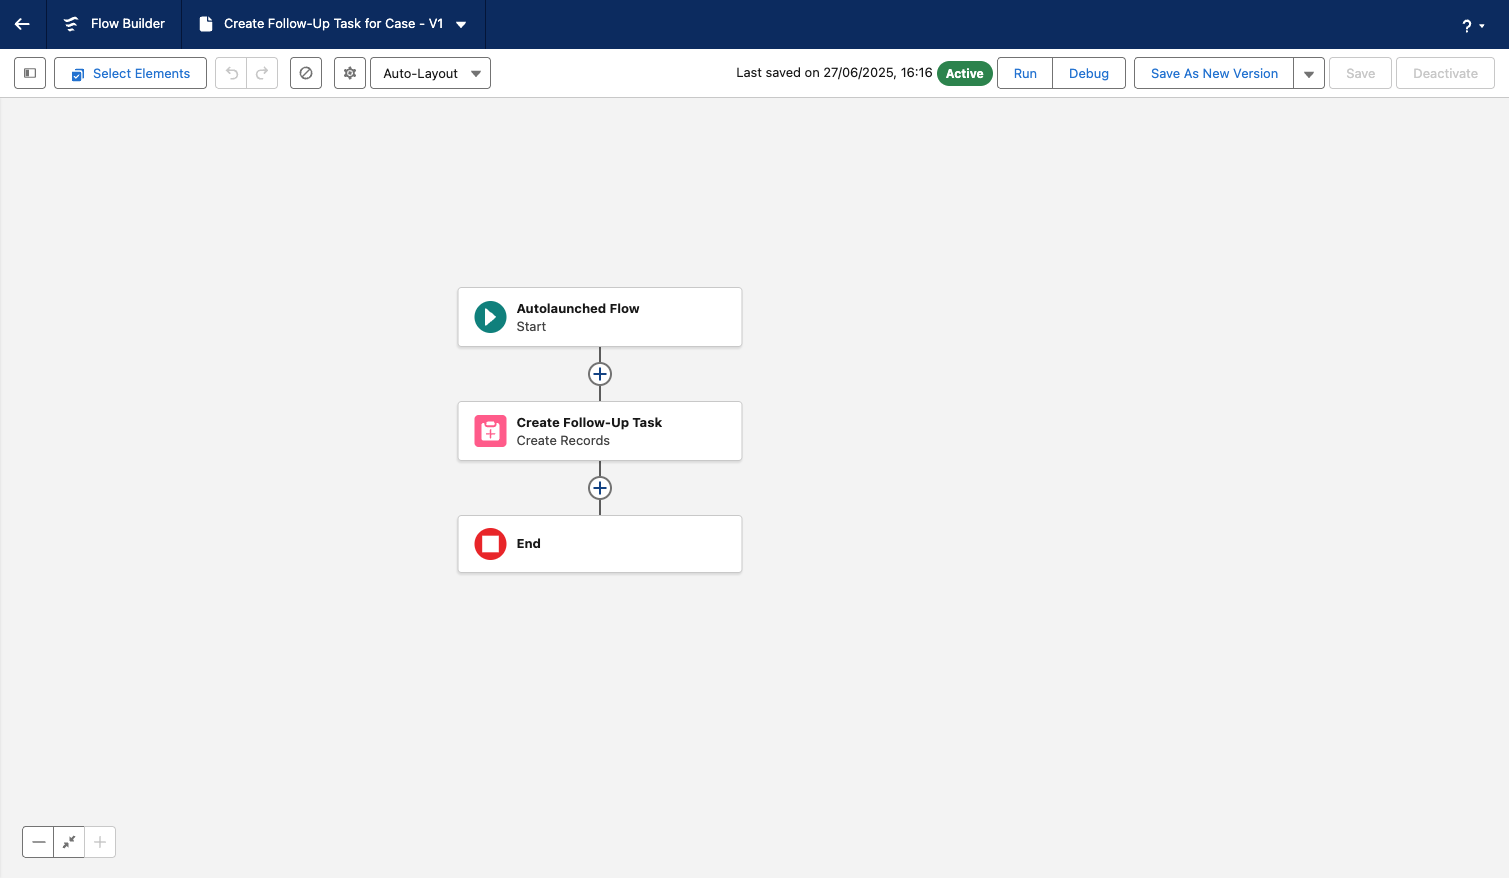
4. Connect and save
Once your elements are added, draw a connector from your Start element to your other elements in order to connect the Flow. When you’re done, click Save to name your Flow and give it a description and then click Activate. Your Flow is now ready to be called.
Now that your Autolaunched Flow is built and activated, you’ll need a way to call it — because it doesn’t run on its own. This could be Apex, another Flow, an external system, a custom button, or a Visualforce page that calls Apex to launch the Flow behind the scenes.
You can create a button on the related object (like a Case) that links to the Flow URL and passes in the input variables needed for the Flow to work. This lets users launch the Flow directly from the record page. If the Flow is triggered from a custom button, you’ll also need to make sure the button is added to the relevant page layout so it’s visible to users. You can also use dynamic actions to control when the button appears on the record page — for example, only showing it when certain criteria are met.
Autolaunched Flow limitations
Autolaunched Flows come with the usual Flow quirks — they’re great when they work, but can get tricky when things go wrong. These include a steep learning curve for complex logic, limited version control support, and challenges with bulkification and error handling in large-scale implementations. While Flow is a powerful low-code tool, it doesn’t always offer the precision, flexibility, or reusability that pro-code alternatives like Apex provide.
Here are some more limitations of Autolaunched Flows to keep in mind:
- No screen support: Autolaunched Flows don’t support screens, so they can’t collect or display information during execution.
- Trigger restrictions: While they can be initiated by a variety of events, they don’t support all Salesforce event triggers.
- Lack of support for local actions: Because they run in the background, Autolaunched Flows can’t make use of local actions that interact with the user’s browser session.
- Harder to debug: With no user interaction or UI feedback, debugging Autolaunched Flows can be more difficult — especially if the Flow fails silently or mid-process.
- Dependent on external triggers: Autolaunched Flows don’t have built-in Flow triggers, so they only run when started by something else, such as another Flow, Apex, or a Process Builder.
How to deploy an Autolaunched Flow with change sets
If you want to deploy an Autolaunched Flow with change sets, there are a few key considerations:
- Autolaunched Flows often reference other components like Apex classes, objects, fields, and subflows. With change sets, there’s no automatic way to identify or include these dependencies, you’ll need to track them down yourself and manually add them to the outbound change set. Miss one, and your deployment could fail.
- You’ll also need to be careful with Flow versions. Change sets can only deploy one version at a time, and they always create a new version in the target org. That’s not ideal if your Flow is already active and running smoothly, especially in environments with multiple versions.
- Change sets always deploy Flows as inactive. So even if your Flow is active in the source org, it won’t be active after deployment. You’ll need to log into the target org and activate it manually — something that’s easy to forget and can leave business processes broken until it’s fixed.
- Change sets don’t support destructive changes, so any cleanup of old or unused Flows needs to happen manually in production.
So while the actual deployment process follows the standard change set flow — create your outbound set, add the Flow and its dependencies, upload to the target org, then deploy and activate — the manual effort involved makes this approach error-prone and time-consuming. A purpose-built DevOps like Gearset can handle Autolaunched Flow deployments more reliably, helping you track dependencies, manage versions, and even deploy deletions safely.
How to deploy an autolaunched flow using Gearset
Deploying Autolaunched Flows is quick and straightforward with Gearset. Its smart problem analyzers, automatic dependency handling, and visual Flow comparison take the guesswork out of deployments — so you’re far less likely to hit errors or miss components. If you’d like to follow along with the walkthrough and you’re not already using Gearset, start a free trial.
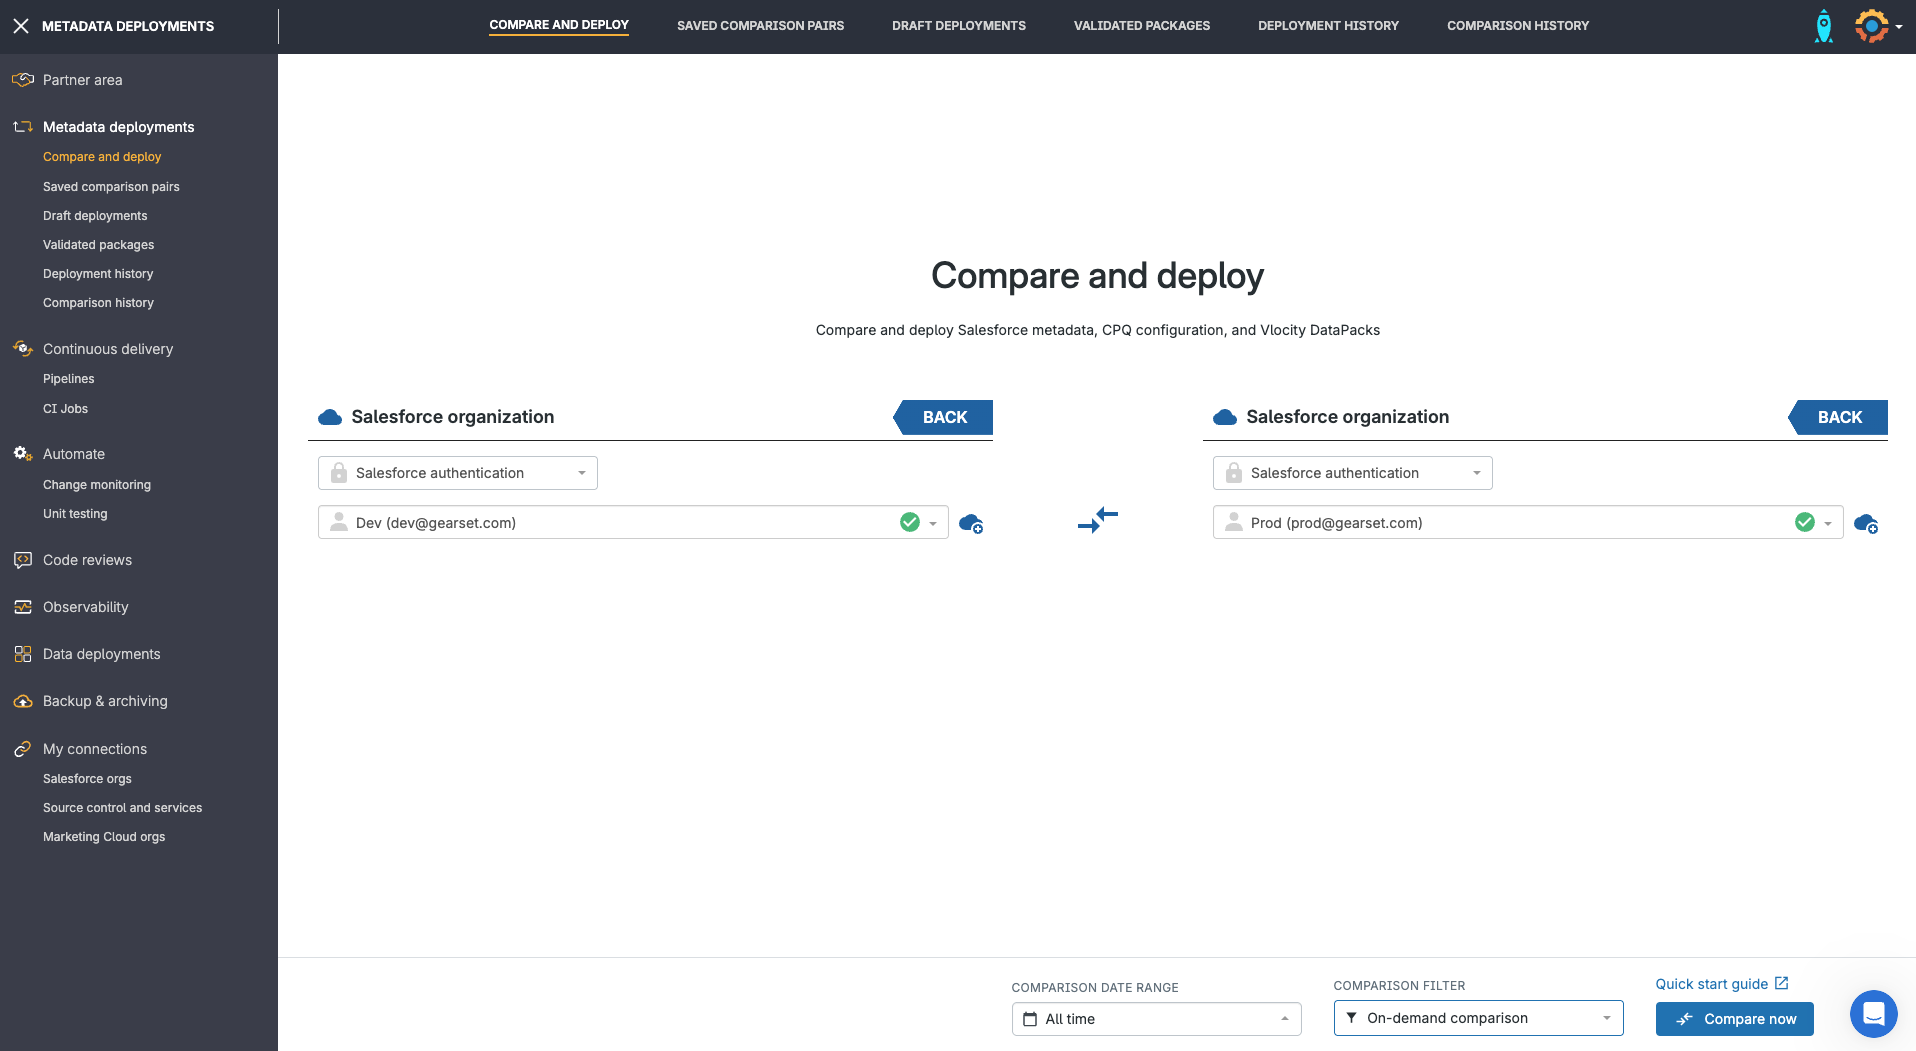
1. Select your source and target orgs
Start off by selecting your source and target orgs, then click Compare now.
2. Filter metadata and compare changes
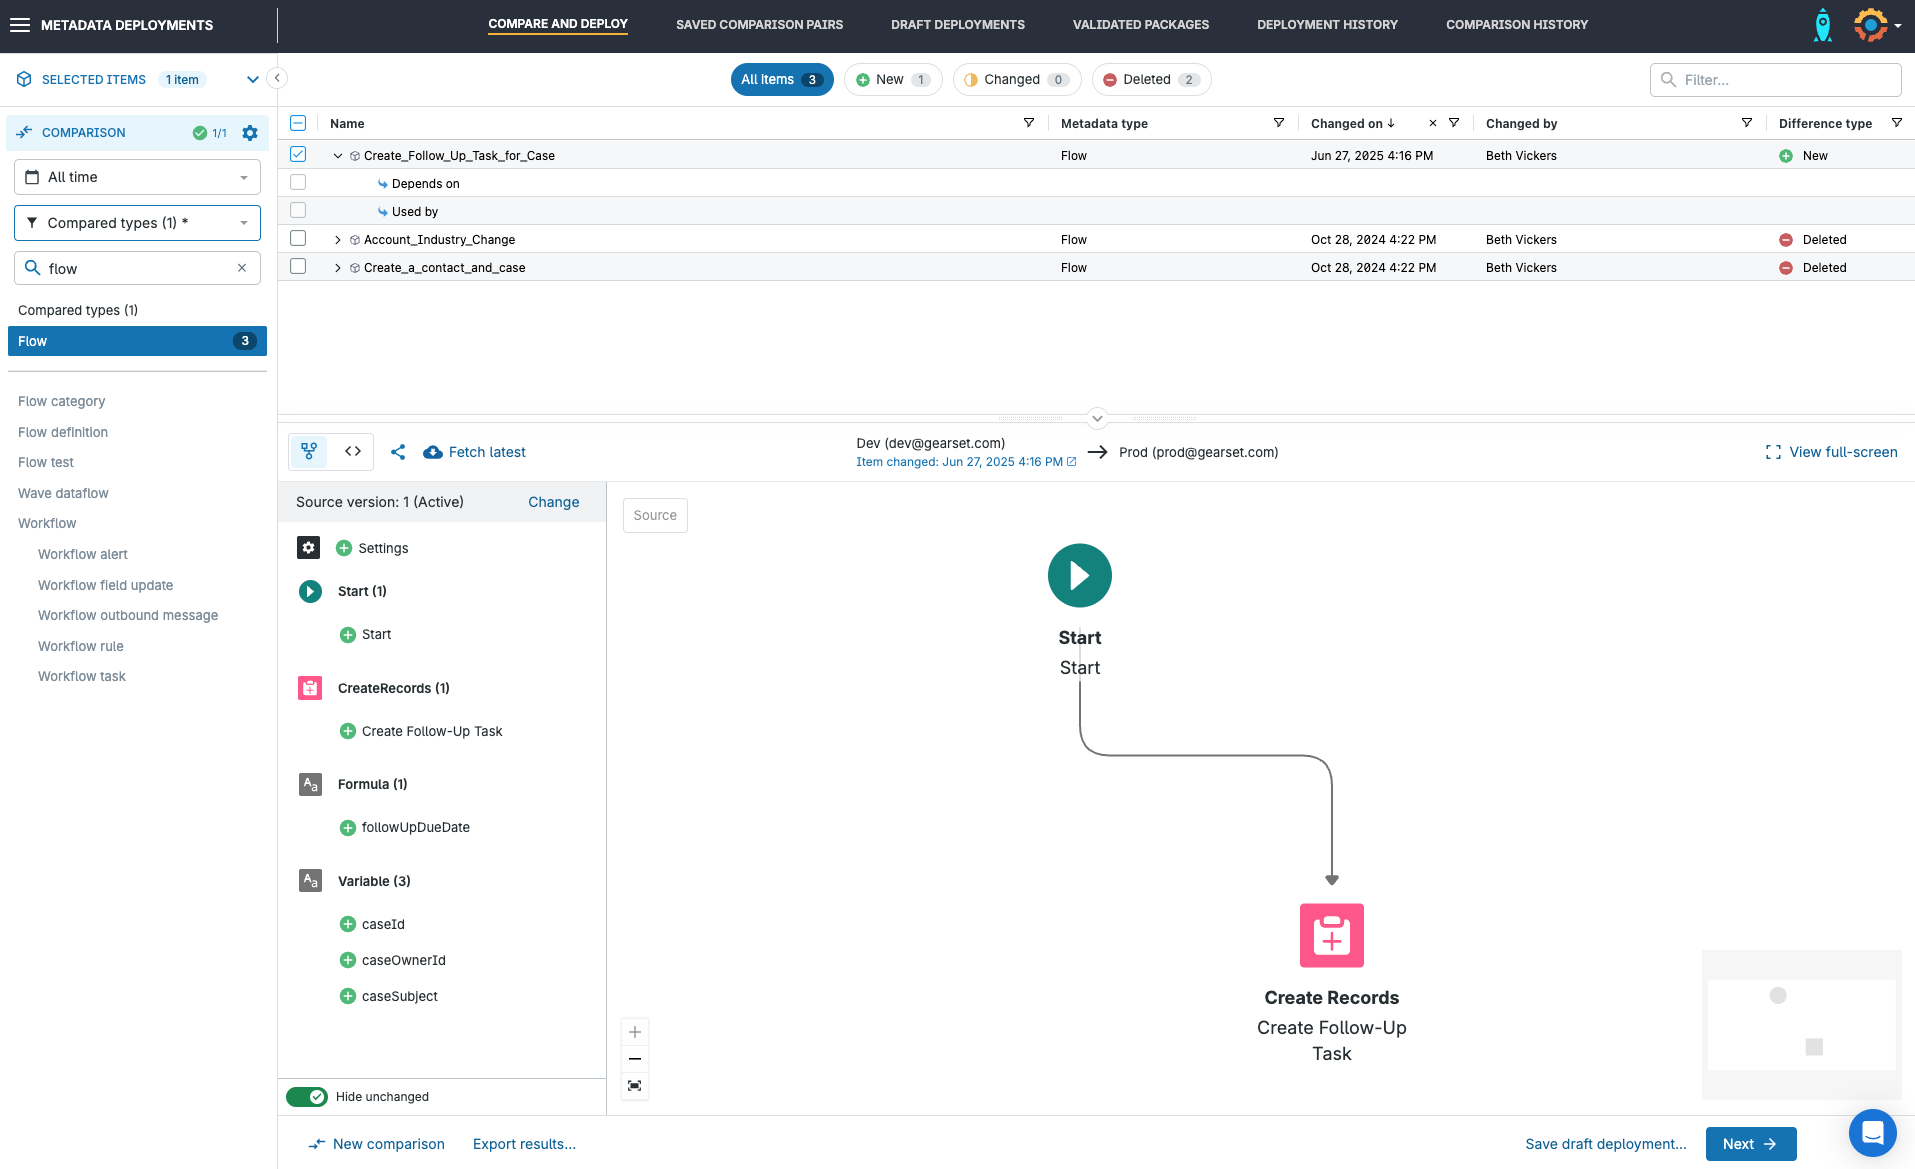
Use the menu on the left to select the metadata types you want to compare. You can create custom filters to target specific types, or use Gearset’s default — which covers the most commonly updated metadata, including Flows.
In the comparison list, choose the Flow you want to deploy. Gearset’s Flow Navigator will display the Flow just as it looks in Salesforce’s Flow Builder, with any changes highlighted, and you can easily toggle back to view the XML.
Gearset will flag metadata changes that relate to your Flow — such as:
- Apex classes that call or are called by the Flow
- Custom fields used in Flow conditions or record updates
- Email templates or custom labels referenced in Flow actions
- Permission sets that control access to objects or fields touched by the Flow
Selecting these alongside your Flow ensures all dependencies are deployed together. Once you’re happy with your selection, click Next to continue.
3. Review your Flow deployment with Gearset’s problem analyzers
Gearset’s advanced analyzers scan your deployment for issues like missing dependencies or static code analysis failures. There are also dedicated problem analyzers for Flows. If any problems are found, Gearset suggests fixes you can accept with a click without rebuilding your package. Once you’re happy with your Flow’s deployment package, continue to the Pre-deployment summary.

4. Deploy successfully
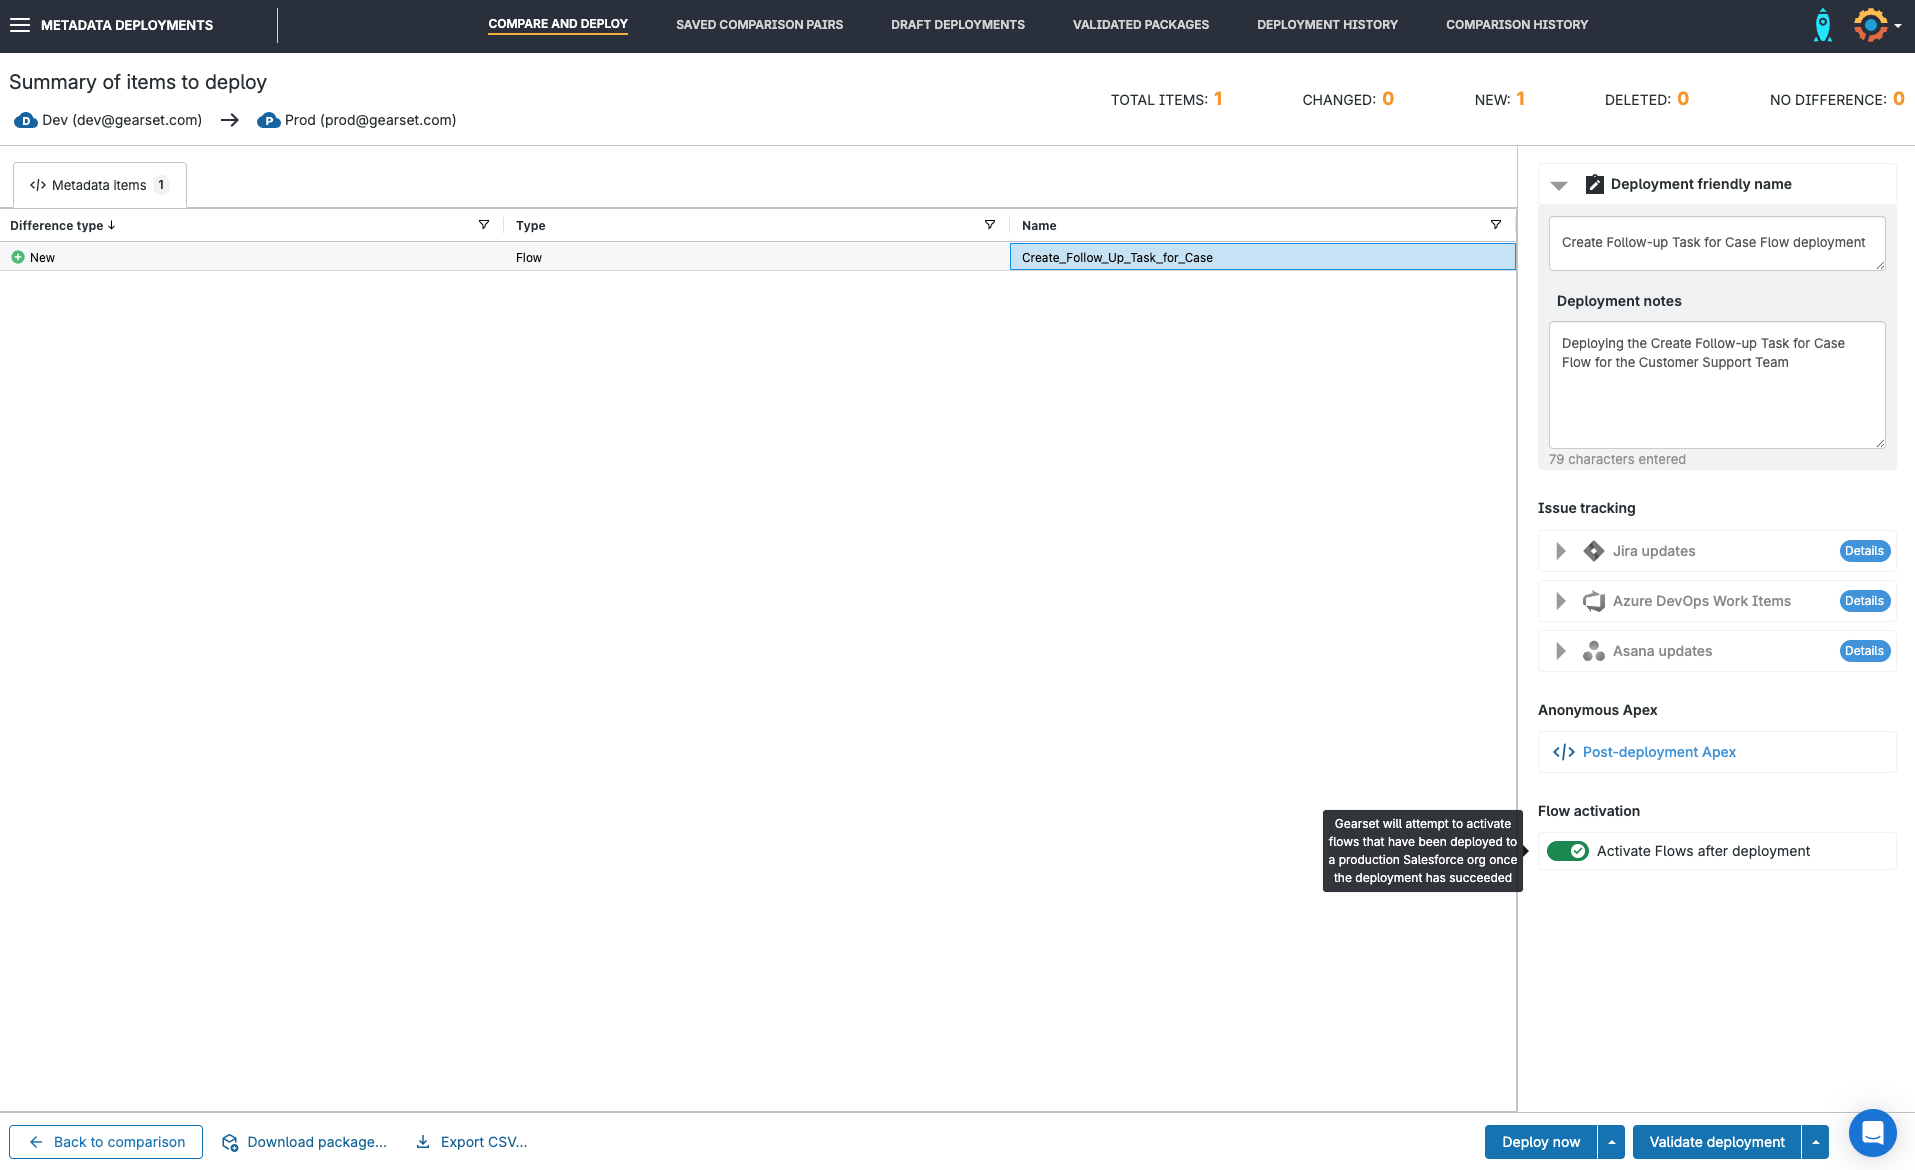
In the deployment summary, you can give your deployment a friendly name and description to help your team keep track of changes. Gearset lets you link the deployment to a user story ticket so you get full traceability and your team can easily see what’s changing and why.
And never get caught out by forgetting manual Flow activation — simply toggle on Flow activation to automatically activate your Flow once it’s in your target environment.
Once you’re done, click Deploy now to release your changes.
Catch autolaunched Flow errors proactively
Gearset’s Flow error monitoring gives your team full visibility into failing autolaunched Flows — so you can catch issues early, before they affect business processes or user experience.
Whenever an error occurs, Gearset automatically logs the failure with all the context you need: the Flow name, error message, triggering record, and timestamp. Instant alerts and detailed error logs appear directly in the Gearset UI.
Built for admins and developers, this feature helps you troubleshoot quickly — no digging through debug logs or relying on user-reported issues. And with historical tracking and trend insights, you can spot recurring problems and strengthen your automation over time.
Launch into better Flow deployments
Autolaunched Flows are great for background automation, but getting them deployed without errors can be tricky. With Gearset, you can build, test, and release Flows that work like you want them to.
Ready to deploy Autolaunched Flows with ease? Start a free 30-day trial of Gearset today.
