

Testing new development is an important step in any Salesforce release pipeline. Deploying to production without thorough testing can put your org’s functionality and even your critical business data at risk.
There’s a tension between getting realistic test data and maintaining data security. Deploying customer data from production to other Salesforce orgs gives teams realistic test conditions, but risks exposing sensitive information and breaching compliance regulations — especially when data sets include PII (Personally Identifiable Information).
In this article, we’ll explore how data masking can resolve the security and compliance concerns associated with using production data in your testing environment. We’ll look at how to mask data natively with Salesforce Data Mask. Then we’ll see how Gearset’s in-place masking gives you a safe and streamlined process for Salesforce data masking.
Realistic test data — without undermining data security
Full copy sandboxes mirror your production org’s data and metadata, but refreshing a sandbox is often slow. And whenever sensitive data is copied outside production, it raises the risk of internal or external data breaches. Other sandboxes and developer environments need populating with test data.
Basic, fictional data sets in sandboxes can be fine for unit tests, but they rarely reflect the real-world complexity of your Salesforce org. Fictional data won’t capture relationships between records, data structures, or how different types of data behave in real workflows.
To capture the complexity of your production data model, it can be tempting to seed sandboxes with data from your live environment. Having realistic data in your testing environment makes testing more reliable and helps developers find bugs before changes hit production. But using your production data for testing isn’t always possible due to regulatory compliance and security concerns.
Salesforce teams need to comply with a growing number of data protection frameworks, such as GDPR, CCPA, DPA, HIPAA, SOX, and PCI DSS. These regulations set strict governance rules for handling personally identifiable information (PII). It’s best practice not to give your developers access to customer data, and compliance often requires that PII be obfuscated before it’s used in testing. Masking data is also critical to prevent accidents like test emails being sent to real customers.
TDX
What is data masking?
Data masking makes it possible to test with data that looks and behaves like production records, without the compliance and security risks of exposing real customer information that comes with testing with production data. Data masking strategies replace sensitive records with realistic imitation data while helping to maintain data consistency so dependencies between records stay intact. This means you get the accuracy of production data without compromising security.
Masking can be static or dynamic. Static data masking, the type most commonly used in Salesforce, permanently replaces sensitive values with fictitious but realistic alternatives, making it ideal for software development and testing where teams need usable but safe sandbox data.
Dynamic data masking doesn’t alter the underlying records — it changes the data in real time as users access it, so the original values remain intact in the database. This makes dynamic masking less useful for Salesforce sandboxes, where developers need permanent, obfuscated test data.
What’s the difference between encryption and masking in Salesforce?
Data masking is sometimes confused with data encryption. Data encryption turns plaintext data into ciphertext using an encryption algorithm, making the data unreadable. A decryption key is needed to return the data to plaintext format.
This is ideal for securing live production records but useless in a sandbox. Masked data looks and behaves like the real thing, which keeps sandboxes functional for testing and development while removing the compliance risks of exposing actual data.
What’s the difference between data masking and tokenization?
Tokenization replaces sensitive values with randomly generated “tokens,” while the originals are stored in a secure vault and can be swapped back only by authorized systems. This reversibility is essential in highly regulated contexts such as payment processing, but isn’t ever necessary for sandboxes.
Compliance frameworks that require data masking
Compliance frameworks set strict governance rules for how different systems handle PII. If you’re subject to any of these frameworks, it’s important to identify sensitive data and apply controls for safeguarding sensitive information before it’s used in testing.
GDPR — Requires organizations to minimize the use of personal data and apply “appropriate technical measures” to protect it. Masking lets teams replace identifying details (names, emails, phone numbers) in Salesforce sandboxes so developers aren’t working with real customer data.
CCPA — Grants California residents control over how their personal data is used. Masking ensures that any data copied into non-production environments doesn’t count as unnecessary processing or exposure of personal information.
CPRA — Extends CCPA with stricter rules about protecting sensitive information such as financial records, precise geolocation, or healthcare records.
HIPAA — When PHI (Protected Health Information) is copied into a sandbox for testing or development, it must be either de-identified or masked so individuals can’t be re-identified.
PCI DSS — The Payment Card Industry Data Security Standard (PCI DSS) requires the protection of cardholder data in all environments. Masking credit card numbers, bank account numbers, CVVs, and other payment details ensures developers can test integrations without handling real card data.
SOX — While best known for financial reporting rules, SOX also requires strict internal access controls for financial data. Masking means sensitive financial records won’t reach sandboxes, preventing unauthorized access.
ISO 27001 — A global standard for information security management. While not prescriptive about masking, it requires technical and organizational controls to protect data.
Common data masking techniques
There’s more than one way to mask sensitive data in Salesforce, depending on how you want to strike the balance between usability and anonymity. The most common data masking techniques for keeping customer information secure are:
Scrambling
Scrambling jumbles characters in a field (like shuffling the letters in a name or the digits in a phone number) to break the link to the real value while keeping the same format. This is lightweight but effective for test data.
Anonymization
Anonymization removes or irreversibly alters identifiers so records can no longer be traced back to real people but can still support data analysis. This is often a compliance requirement, especially where regulations like GDPR and HIPAA apply.
Data substitution
Substitution swaps sensitive values with fake but realistic alternatives. This keeps testing environments functional and workflows intact without exposing real data.
Is Salesforce data masking permanent or can it be reversed?
Applying data masking is an irreversible process — once sensitive values are replaced, the original data can’t be restored. That’s what makes masking so effective for compliance and security: the sensitive data doesn’t exist in the sandbox, removing the risk of exposure during a data breach.
How to mask data with Salesforce
Data Mask is Salesforce’s main native option. It’s a managed package and a paid add-on that can be used to obfuscate or delete sensitive records.
Since acquiring Own, Salesforce has also made two of their products available alongside Data Mask. Accelerate streamlines the process of populating Salesforce sandboxes with up-to-date, realistic data and its features now live under Salesforce’s Data Mask & Seed umbrella. Anonymize is a separate managed package that lets teams build anonymization templates to disguise PII and other sensitive values, either by running a standalone anonymization job or as part of a seeding workflow.
Installation and setup of Salesforce Data Mask
Before you install Data Mask, make sure MyDomain and Lightning Experience are enabled in your orgs. Once you’ve installed the managed package, assign yourself the user profile System Administrator and the permissions Modify All Data and API Enabled. Finally, assign yourself the permission sets Data Mask User and Data Mask.
Data Mask is installed in production and will then be automatically enabled in any sandbox created or refreshed after installation. If you want to retroactively enable Data Mask in any existing sandboxes, take the URL from the Data Mask managed package link and manually change the subdomain from login.salesforce to test.salesforce.
This setup process is a bit convoluted, but upgrades and maintenance will happen automatically because Data Mask is a managed package.
How to use Salesforce Data Mask to protect sandbox data
You can configure a Data Mask job in production, then use it in any sandboxes you create or refresh afterwards. Or you can configure a job directly in an existing sandbox.
You’ll need to choose how to mask the data in your standard and custom objects. You can replace records with readable but randomly generated values, or you can replace them with records from one of these libraries: First Name, Last Name, Company Name, Email, Street, City, Country, Country (Abbr.), State, Postal Code, Phone Number, Social Security Number.
There’s also the option to specify any sensitive data that should be completely deleted. Case comments, emails and Chatter feeds, for example, are highlighted for you to consider masking or deleting.
Seeding masked records with their relevant relationships is the key to realistic test data, but Data Mask doesn’t always make that possible:
- It can sometimes skip over records with master-detail or lookup relationships, usually indicated by the error messages
UNABLE_TO_LOCK_ROWorunable to obtain exclusive access. You’ll need to reconfigure and run the masking job again to try and get these records deployed. - It doesn’t support checkbox, lookup and picklist field types, so records may come through incomplete or lacking fields.
- It can skip over records if there are multiple masking rules for that object. To overcome this, you need to configure an additional user that can bypass the duplicates and run masking from this profile.
Given the implications for security and compliance, it’s always a good idea to spot check records are being masked as expected.
Recent updates to Salesforce Data Mask
Salesforce’s Summer ’25 release introduces improvements to make Data Mask easier to use and faster to run:
- Faster job execution: The Data Mask engine has been optimized so jobs complete more quickly. Automations like workflows and triggers are now bypassed once a job finishes, preventing unintended actions and improving overall performance.
- Clearer visibility into jobs: The old Run Logs tab is now simply Jobs. From here, you can click into any masking job to see which objects were configured, track progress in real time, and review any errors, making it easier to troubleshoot and monitor.
- Automated Data Mask processes: Salesforce Job Scheduler now lets you configure Data Mask to run automatically on a daily, weekly, or monthly basis. This applies to sandboxes created from production orgs that have the latest Data Mask managed package installed.
How to run in-place masking with Gearset
Gearset makes sandbox protection quick and reliable with in-place masking. You can obfuscate data that’s already sitting in a partial or full copy sandbox, keeping PII safe while still leaving the environment usable for testing.
In-place masking is part of our sandbox seeding solution, which also lets you deploy masked data from production or another org into a sandbox and apply masking during the deployment.
1. Enable data deployments
Data deployments aren’t enabled by default in your Gearset account. Before configuring your first in-place masking, a team owner will need to go to Data management, via My Account —> Backup and archiving (under Data deployments) and select Enable data deployments to developer and sandbox orgs for my team. This is a one-time setup and won’t need to be repeated.
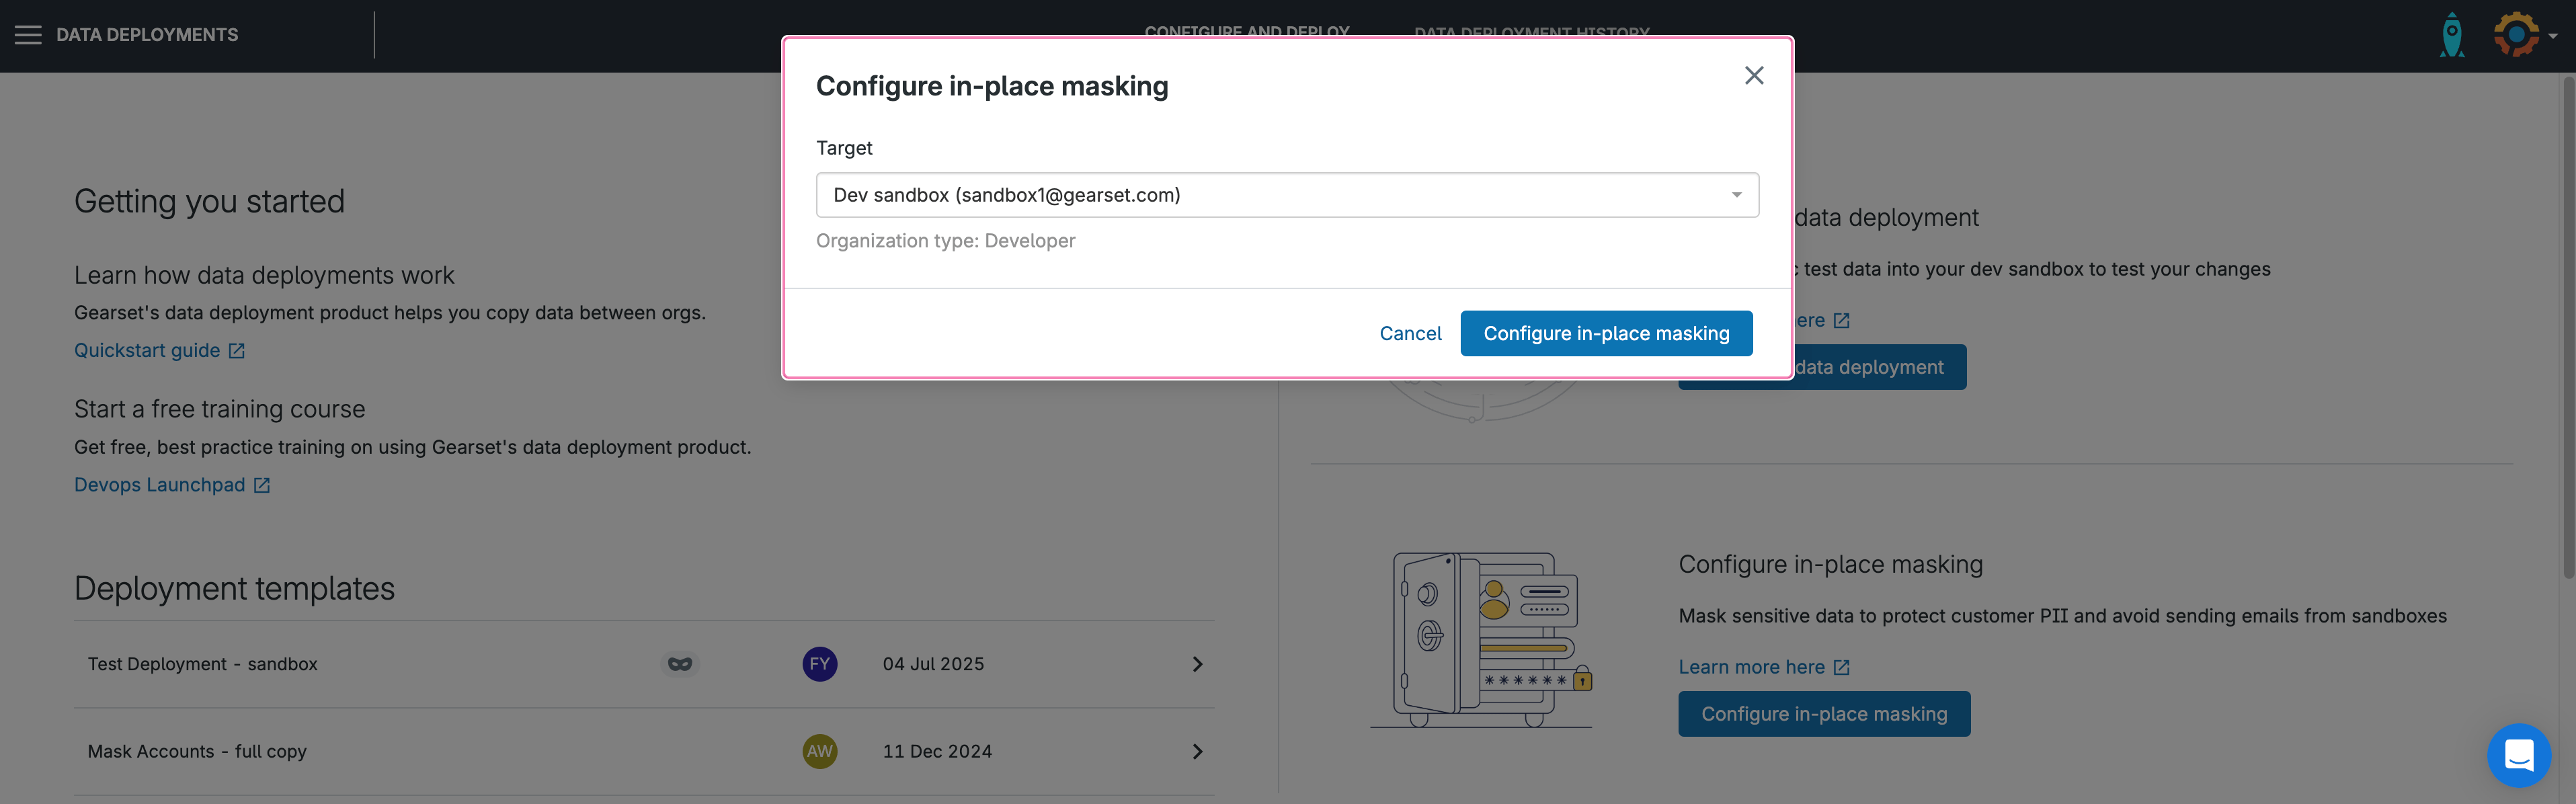
2. Select target org
Once data deployments are enabled, you’re ready to get started. Navigate to Data Deployments —> Configure and deploy. If you have data deployment templates saved, you can select them here or opt to configure your data deployment from scratch.
Click on the Configure in-place masking button. This will launch a dialog box where you can select the target org. Team-owned orgs cannot be used for in-place masking, so this will need to be a sandbox you’ve connected to Gearset with your own user credentials.
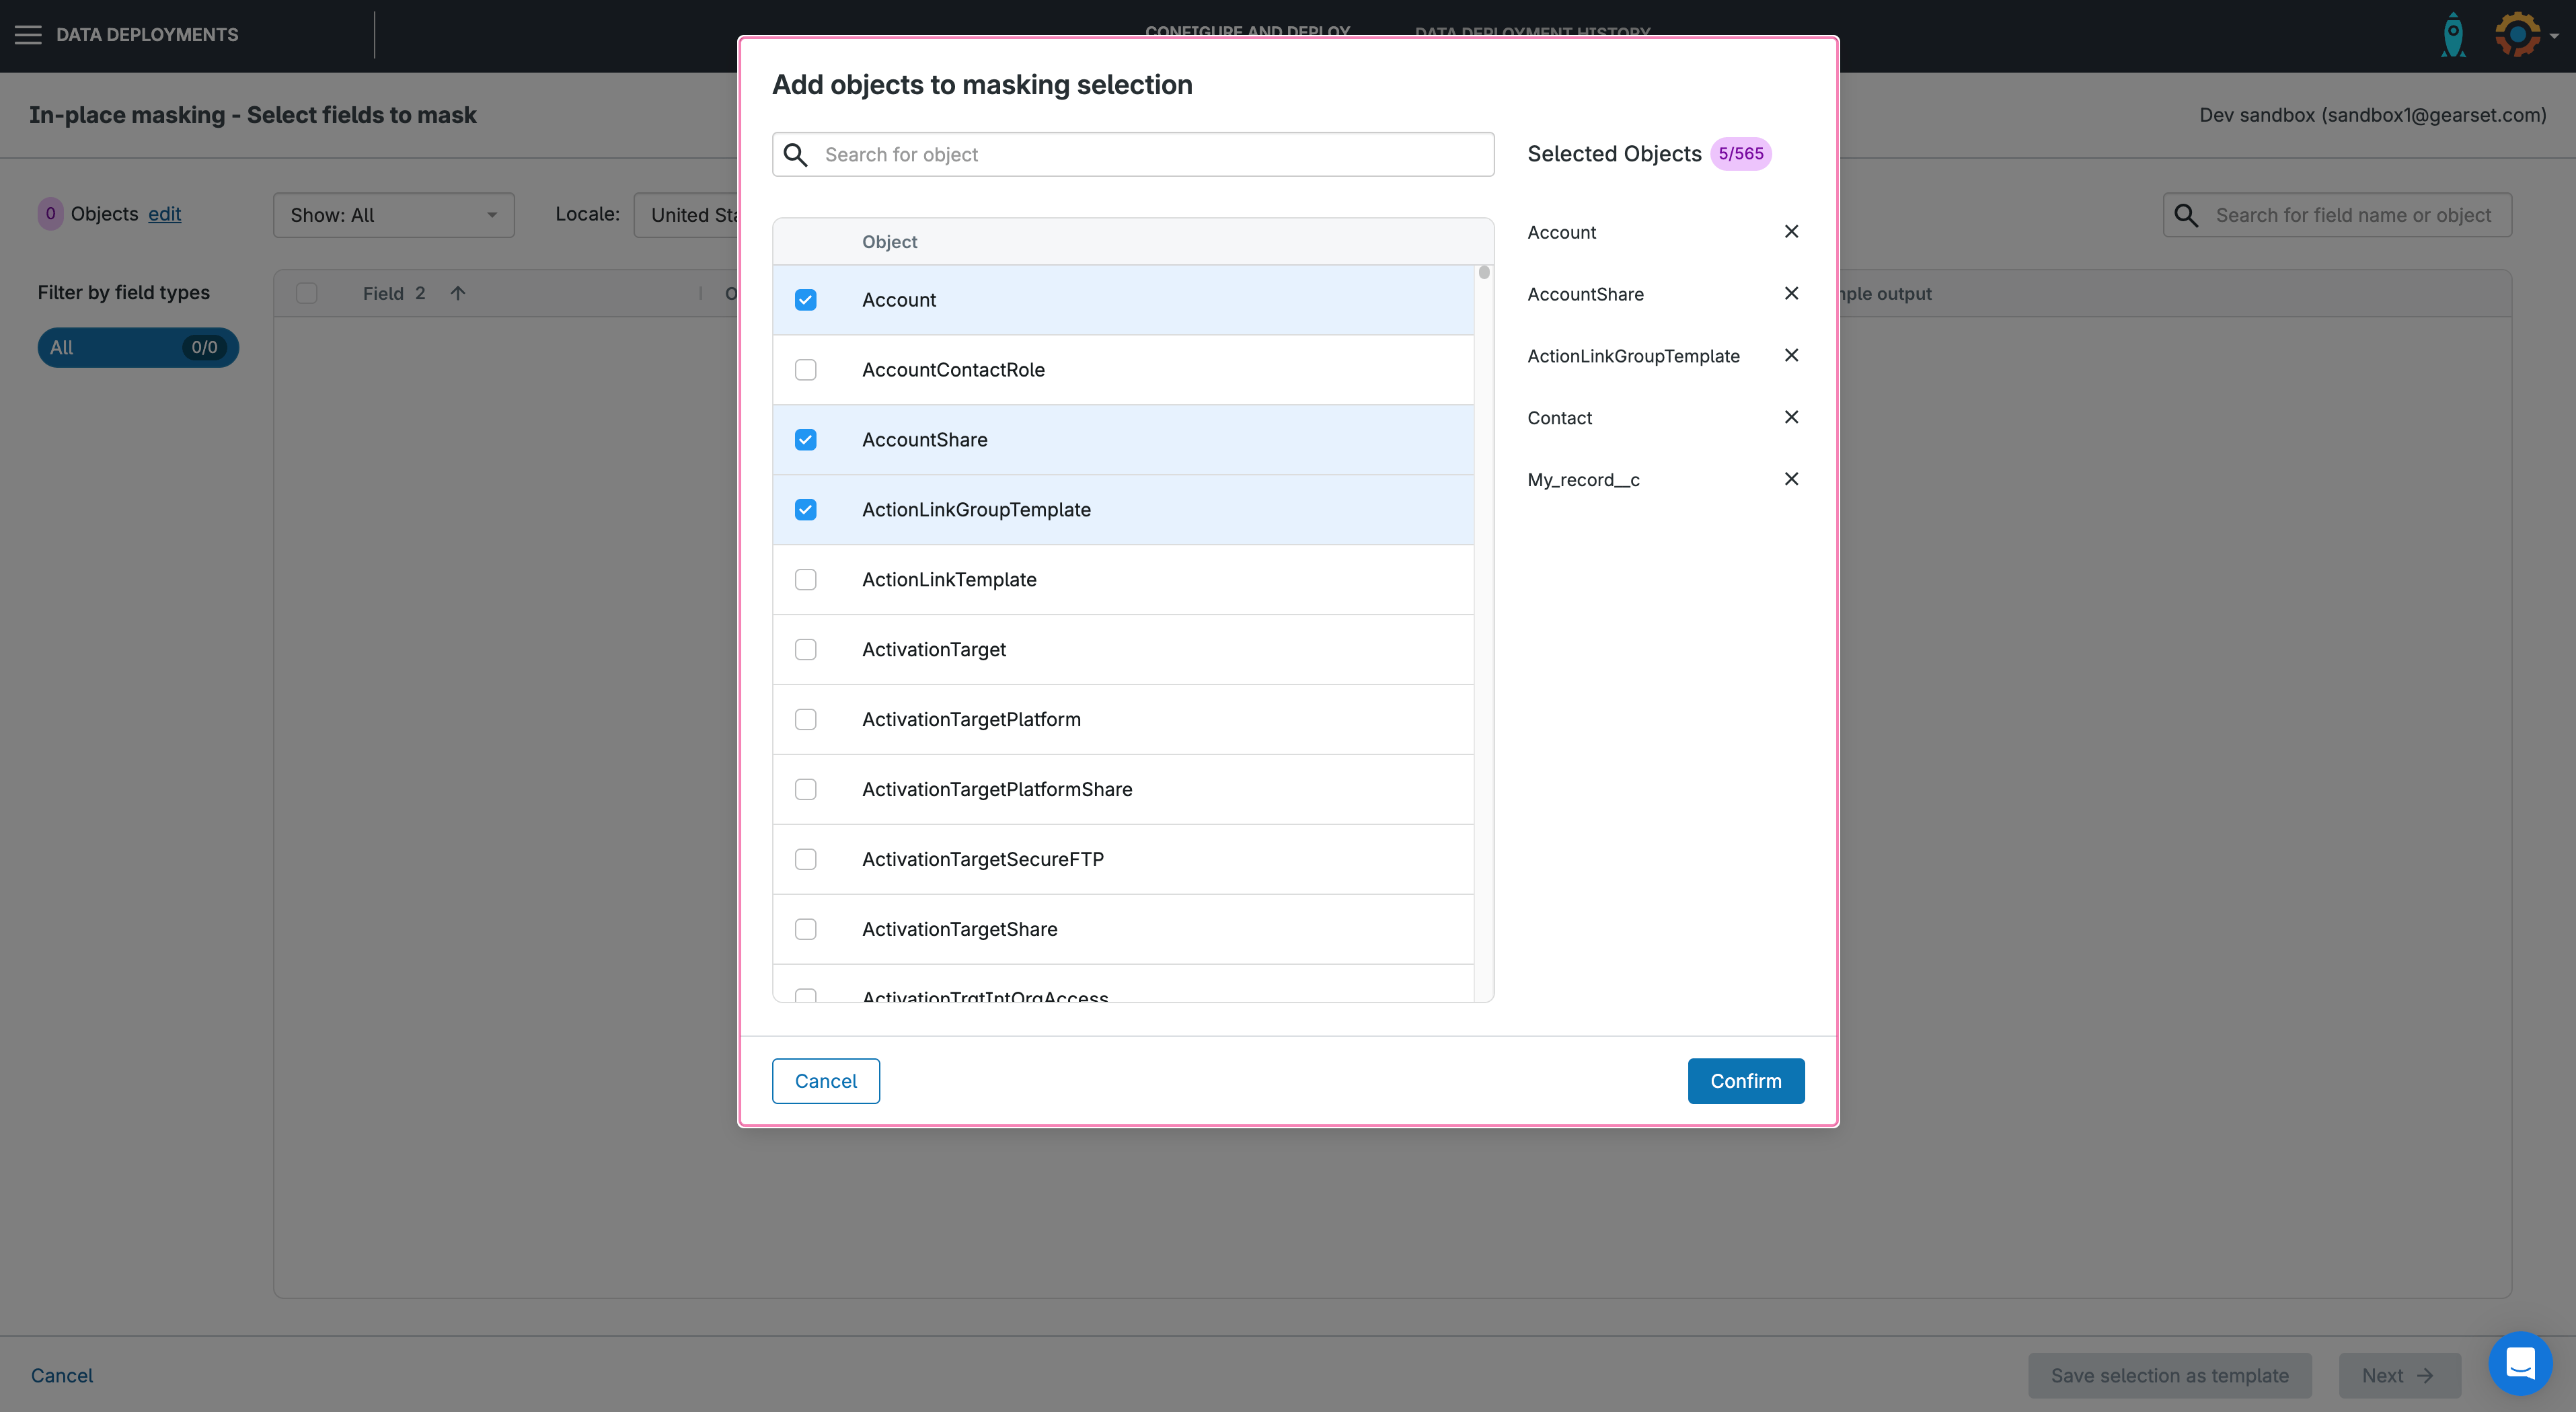
3. Select the objects you want to mask
After pressing Configure in-place masking, Gearset will list all objects that are available for masking. You can select all the objects you want to mask and click Confirm.
4. Select the fields you want to mask
Use the search box to filter the list of fields by the object and field name or use the filters on the left to filter by field type. Select all the fields you want to mask.
For standard fields, Gearset provides localized masking options to make sure the data is as accurate and representative of your production data as possible.
For example, you can choose to mask phone numbers in US format or UK format — Gearset will then automatically use the correct country code and number of digits.
You can also customize masking for some fields by selecting a mask method. Check the sample output in the right hand column and click Next.

5. Disable rules, triggers and Flows
Gearset will automatically flag any active rules, triggers or Flows in your target org. You can disable these while the in-place masking is running. They can be reactivated in just a few clicks afterwards. Simply clicking Deactivate will deactivate the selected automations via a metadata deployment. When it has completed, click Next.
You can also disable field history tracking. If it’s left on, Salesforce will create a history record for every masked field — storing both the old and new values. To prevent this, select the relevant objects with history tracking in the rules and automations list (seen here on the object My_record__c).
Once your masking job has finished, you can roll back everything you disabled in a couple of clicks, using the same smooth rollback process Gearset gives you for data deployments.

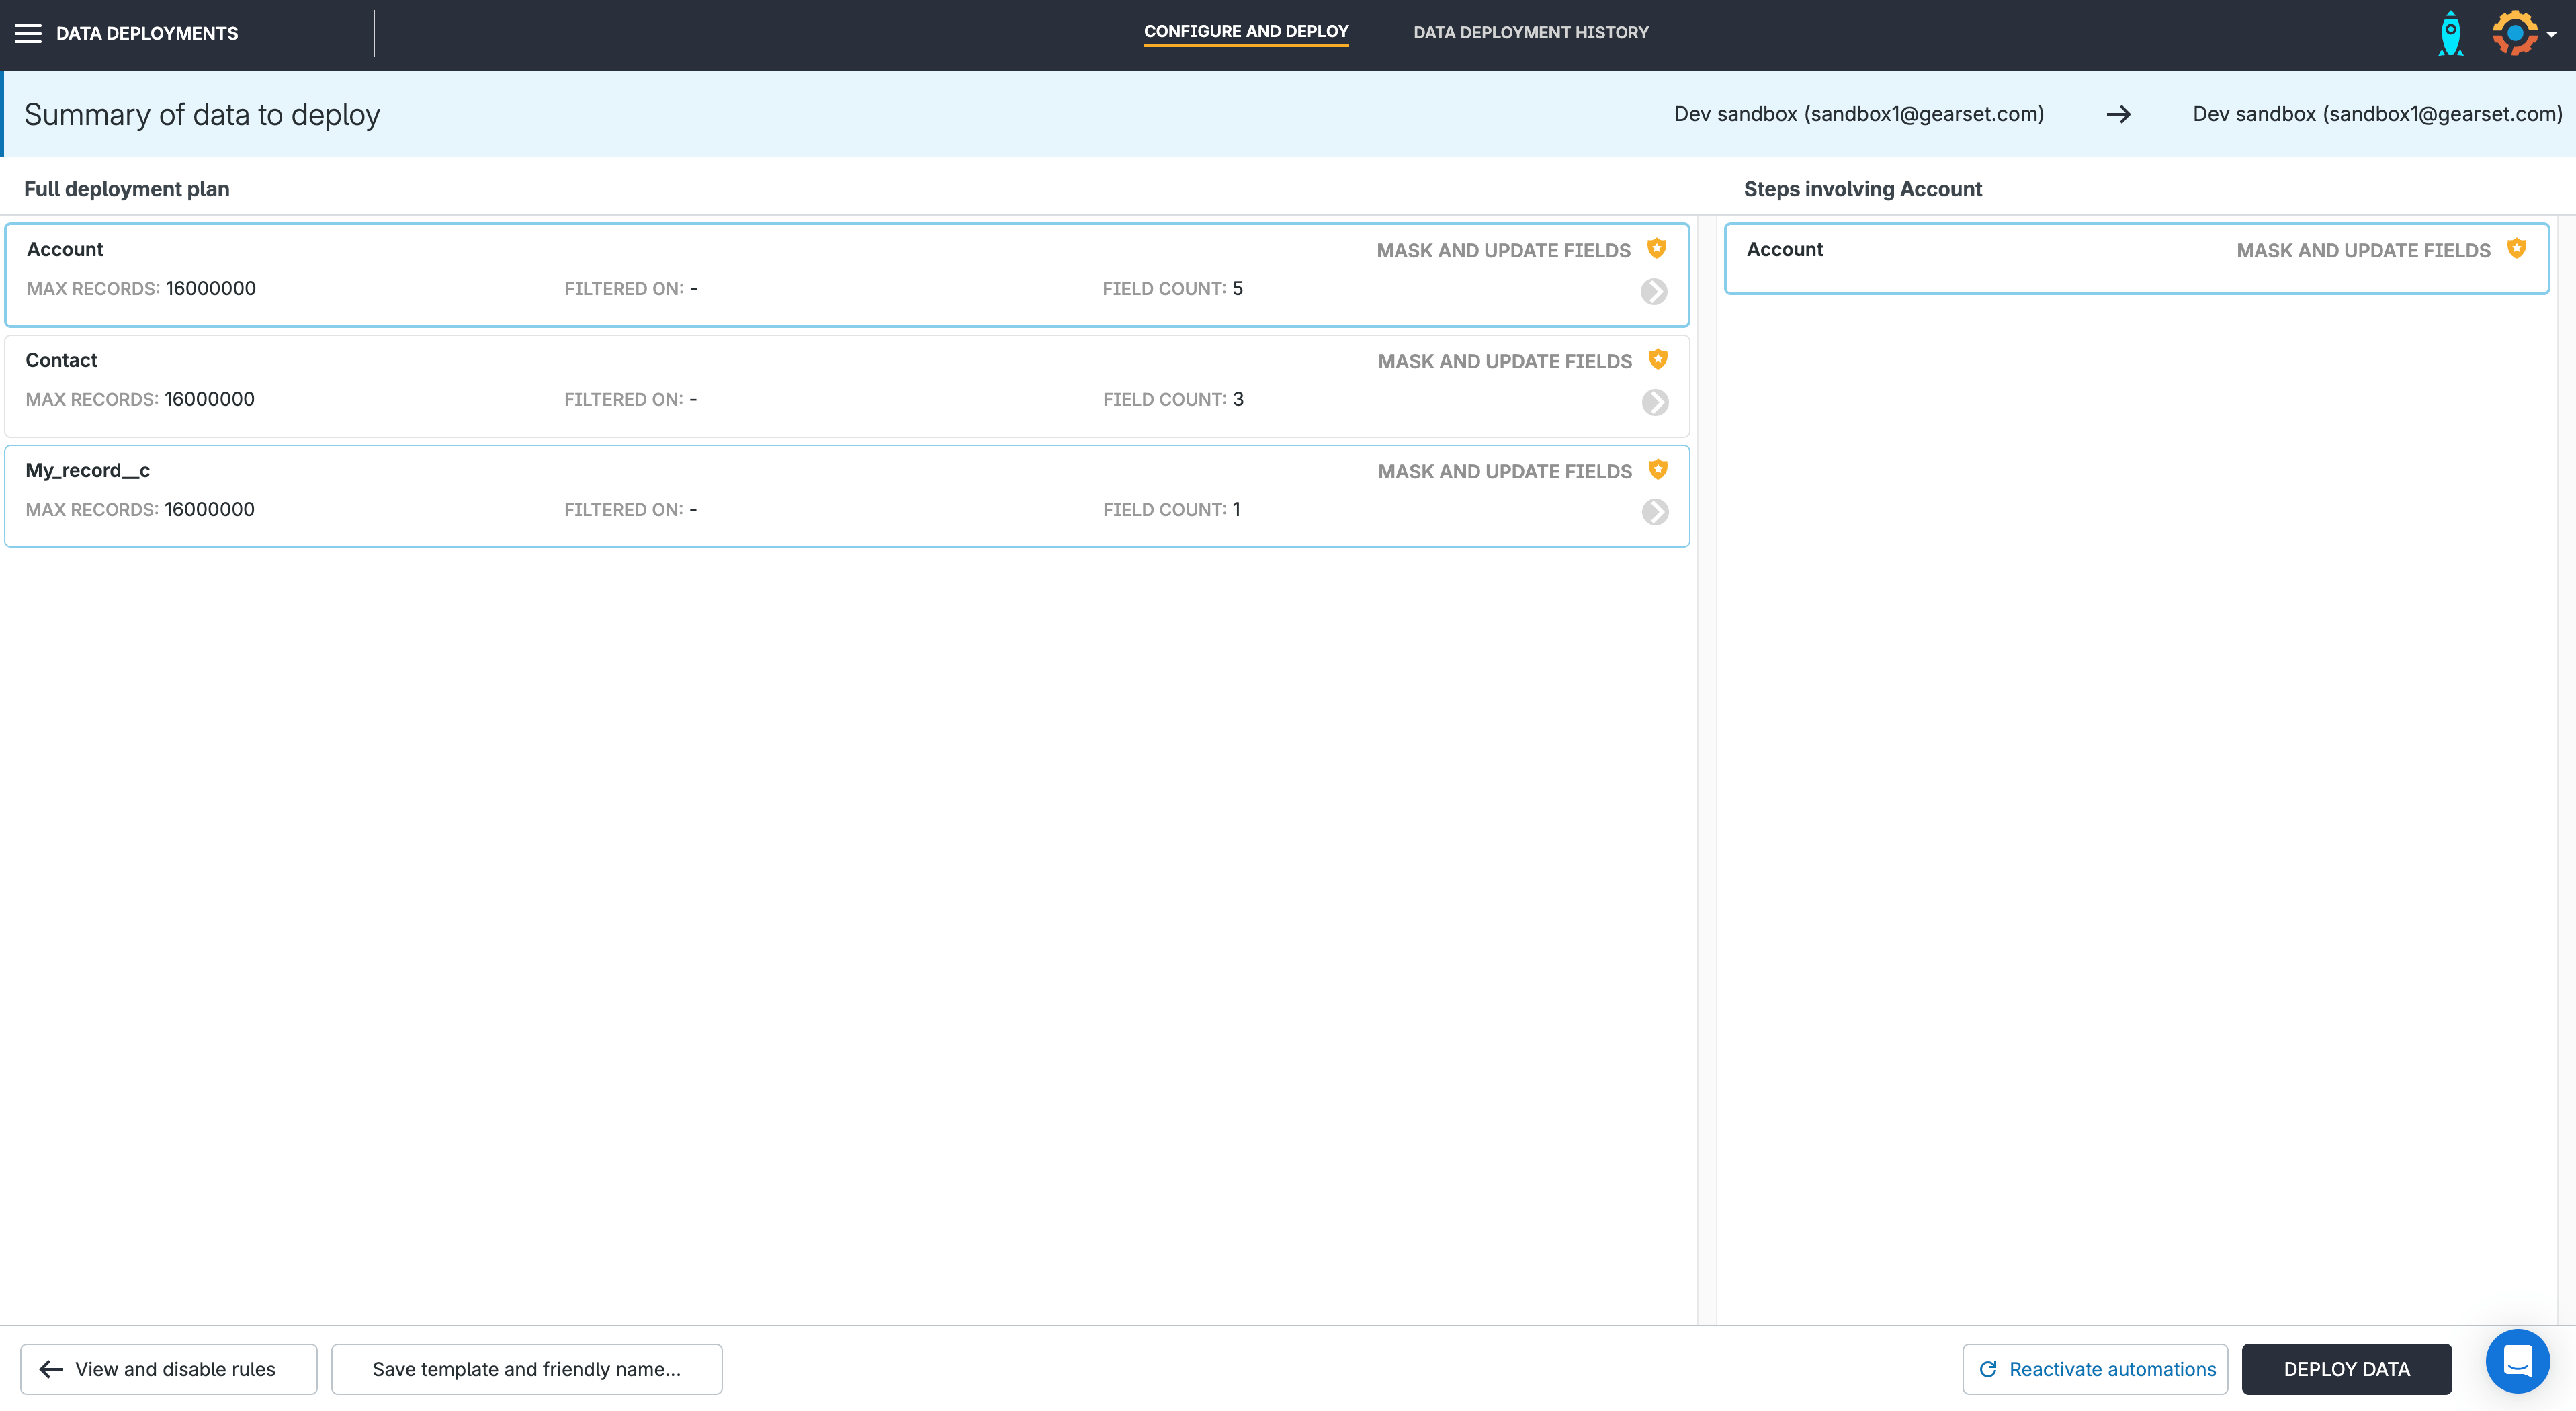
6. Start your in-place masking
Gearset will show you the object records to be deployed and any actions taken to retrieve the records — like fetching, masking, and updating — as well as the field count. When you’re ready to continue, press Deploy data. When the in-place masking is running, each stage will mark as completed and show you how many records have been processed in each step.
Once the deployment has run, your testing environment will be ready to go with masked test data.
You’ll be able to see your in-place masking deployments in your data deployment history. And if you disabled any rules, this can be reversed by clicking on Rollback deactivation deployments at the bottom of the page.
Choosing your data masking solution
When it comes to finding the right data masking tools for Salesforce, teams can choose between a few different data masking solutions: Salesforce-native tools, a Salesforce-specific DevOps solution like Gearset, or a general purpose, multi-system ETL (Extract, Transform, Load) platform. Here’s a look at how they compare:
Salesforce Data Mask is the main native option. It’s a managed package installed in production, and it only supports in-place masking. While it can preserve referential integrity automatically, it has limitations: picklists, formula fields, checkboxes, and roll-ups can’t be masked. Jobs can be scheduled inside the app, but with no API or external integration, Data Mask can’t be embedded in a broader DevOps workflow. Logging is also limited to the Jobs tab, with no export for external auditing. Pricing is an add-on SKU, usually around 10% of your Salesforce net spend.
Anonymize (Own from Salesforce) is a separate managed package for production-derived sandboxes. It offers a broader range of format-preserving anonymization functions than Data Mask, so you can disguise PII while keeping masked data realistic. Relationships are kept intact, though the main focus is on field-level obfuscation. It includes reporting for compliance teams, but like Data Mask, integration with DevOps pipelines is limited. Pricing varies by Anonymize add-on package.
Gearset’s in-place masking is part of its complete DevOps platform, so masking fits naturally into the same workflow you already use for deployments, CI/CD, and release management. Connecting orgs is quick with OAuth. Gearset masks any queryable field and auto-detects and maintains relationships between records. You’ll also use the same UI for masking during data deployments and masking jobs are logged in your deployment history for exportable audit trails.
Third-party ETL tools like Informatica are general-purpose rather than Salesforce-specific, and masking features typically won’t appear in a Salesforce-style UI. Some ETL platforms can support both sandbox seeding and in-place masking, but setup is often done object-by-object and relationships need to be configured manually.
Quality testing without the risk
If you’re running a large Salesforce org with millions of records, working in a heavily regulated industry, or handling sensitive customer data, the stakes for testing are high. You need a sandbox seeding and data masking solution you can rely on to protect sensitive data.
Your sandbox data masking process should never force you to choose between protecting customer data and ensuring quality releases. The closer your test data is to production, the more reliable your testing will be — and the less likely you are to face unexpected issues on release day.
Get the confidence of realistic test data without the risk of exposing sensitive information. Try out Gearset’s data masking for yourself, start a free 30-day trial with nothing to install in your orgs.
