
Reports and dashboards are one of the most used parts of Salesforce. Across the business, managers and their teams depend on insights from Salesforce data to evaluate their progress, make strategic decisions, and report on their performance.
It’s best practice to work on reports and dashboards in a sandbox, before deploying them through your release pipeline to production. While this massively reduces the likelihood of errors impacting the wider business, it can be a slow process that delays your end users from seeing value.
In this post, we’ll show you how Gearset helps you easily migrate dashboards and reports between orgs.
The difference between Salesforce reports and dashboards
Your Salesforce end users may need some help deciding on the best tools for their data exploration, and you can help by explaining the difference between reports and dashboards in Salesforce.
If they’re looking for an overview of their performance across multiple KPIs, a series of charts and graphs on a dashboard will help them to visualize the data. If they’re looking for a more in-depth and interactive way to scrutinize a particular area, a report is ideal.
There are four types of Salesforce report to choose from:
- Tabular. Provides a simple table with rows of data, useful for straightforward analysis of a basic dataset.
- Summary. Allows data to be organized into groups, helping teams to analyze datasets by category.
- Matrix. Adds another dimension to the grouping, so teams can see two types of data categorization in combination.
- Joined reports. Combines multiple reports into one so teams can analyze related datasets together.
This post focuses on regular Salesforce reports and dashboards, but you can also create custom report types that are represented with ReportType metadata. If data needs to be pulled in from other platforms, your team might consider CRM Analytics (formerly Wave Analytics, Einstein Analytics, and Tableau CRM).
Virtual Summit: Taking control of complex orgs
Report and dashboard folders in Salesforce
Reports and dashboards are all kept in folders, and there are a few things about these folders to bear in mind during deployments.
When you deploy a report, the report folder must either already be present in the target org or deployed along with the report — and the same applies when deploying dashboards.
Reports and dashboards can be kept in the Private Reports and Private Dashboards folders. In Salesforce Classic these folders are called My Personal Custom Reports and My Personal Dashboards. There’s no way to deploy these private reports and dashboards — they need to be moved to other folders first. Access can always be controlled using permissions settings, if they need to stay private.
Users can create new folders for public reports and dashboards. But by default, public reports will be stored in the Public Reports folder (Unfiled Public Reports in Classic). As we’ll see, not every tool can deploy those reports.
Can you deploy reports and dashboards in Salesforce using change sets?
It’s possible to deploy reports and dashboards using change sets, but it’s a slow and error-prone process. Common blockers include:
- Reports in the Public Reports folder can’t be deployed via change sets, even though they can be added to a change set.
- Reports and dashboards need to be deployed with their dependencies, but you’ll generally only catch a missing dependency once your change set deployment has already failed with an error message like
Cannot find folder:Foo. - Using change sets, there’s no visibility into how reports and dashboards have changed, no options for rollback, and no support for deleting reports and dashboards as part of the deployment.
How to deploy reports and dashboards using change sets
Let’s walk through how a deployment would look using change sets, and then later we’ll see how the same deployment works with Gearset.
1. Move reports and dashboards to deployable folders
Ensure the report or dashboard you want to deploy is in a folder that can be deployed. Reports in My Personal Custom Reports or Unfiled Public Reports cannot be deployed so you’ll need to move these to a different folder. If a report or dashboard is accidentally left in these folders, it won’t be included in the deployment — even if you select it in the change set.
2. Create an outbound change set
In Setup, search for Outbound Change Sets and select New. Name and save the change set. Add components by selecting Report or Dashboard and choosing the ones you want to deploy. Use View/Add Dependencies to include necessary components like custom report types or fields.
3. Upload the change set
From the change set’s details page, select Upload and the target org. Once you’ve uploaded a change set, it can’t be changed. If you miss a component required for your report or dashboard you’ll need to start over with a new change set.
4. Deploy the change set into the target org
Log into your target org. In Setup, search for Inbound Change Sets, find the uploaded change set, review its details, and select Deploy.
If your deployment fails, you’ll need to work out what went wrong, implement a fix, then try again by creating another change set.
Common deployment error messages (and how to beat them)
Reports and dashboards are tricky to deploy and they can end up failing for a variety of reasons. But don’t worry — some errors are more predictable than others. Here are the usual suspects you might come across in change sets and how you can tackle them with Gearset:
Error 1
Cannot find folder: <folder_name>
This error happens when the report or dashboard folder doesn’t exist in the target org. If you’re using change sets, you’ll need to manually create the folder in the target org, making sure the name matches exactly — including capitalization — before trying again.
If you’ve already upgraded from change sets to Gearset, you’re in luck. Gearset automatically checks for missing folders and includes them in your deployment package. If the folder isn’t there, Gearset will create it for you.
Error 2
Dashboard folder not found
This one’s similar to the folder name error but is specifically for dashboards. If the target org doesn’t have the right dashboard folder, you’ll need to create it manually or go back and include it in the deployment package and then re-do your change set.
If you’re using Gearset, you’ll find it automatically creates missing folders during deployment. Gearset also checks permissions and structure to ensure everything lands where it should.
Error 3
Unknown type name 'Folder' specified in package.xml
This error happens when your deployment package references a folder type Salesforce doesn’t recognize. To fix it, update your change set with the correct folder type (e.g. ReportFolder or DashboardFolder) in the package.xml file.
With Gearset’s metadata deployment solution, this error becomes a non-issue. It ensures the right folder types are included in your deployment package, so you don’t need to worry about manually specifying folder types.
Error 4
Cannot find report: <report_name>
If your reports are in a non-deployable folder (like My Personal Custom Reports) or missing from the deployment package, you’ll see this error. To fix this, you’ll need to either create the missing report in the target org or add it to the deployment package, and then recreate the change set.
Gearset’s problem analyzers flag any missing components, like referenced reports, and let you add them to your deployment package with a couple of clicks.
Why wrestle with deployment errors when you don’t have to? Gearset makes it easy to get your reports and dashboards right the first time, so you can skip the headaches and stay focused on delivering value.
How to deploy Salesforce reports and dashboards with Gearset
The following walkthrough will guide you through a deployment in Gearset, migrating reports and dashboards from a developer org to a staging org. If you want to follow along and deploy your own reports and dashboards, sign up for a free trial of Gearset.
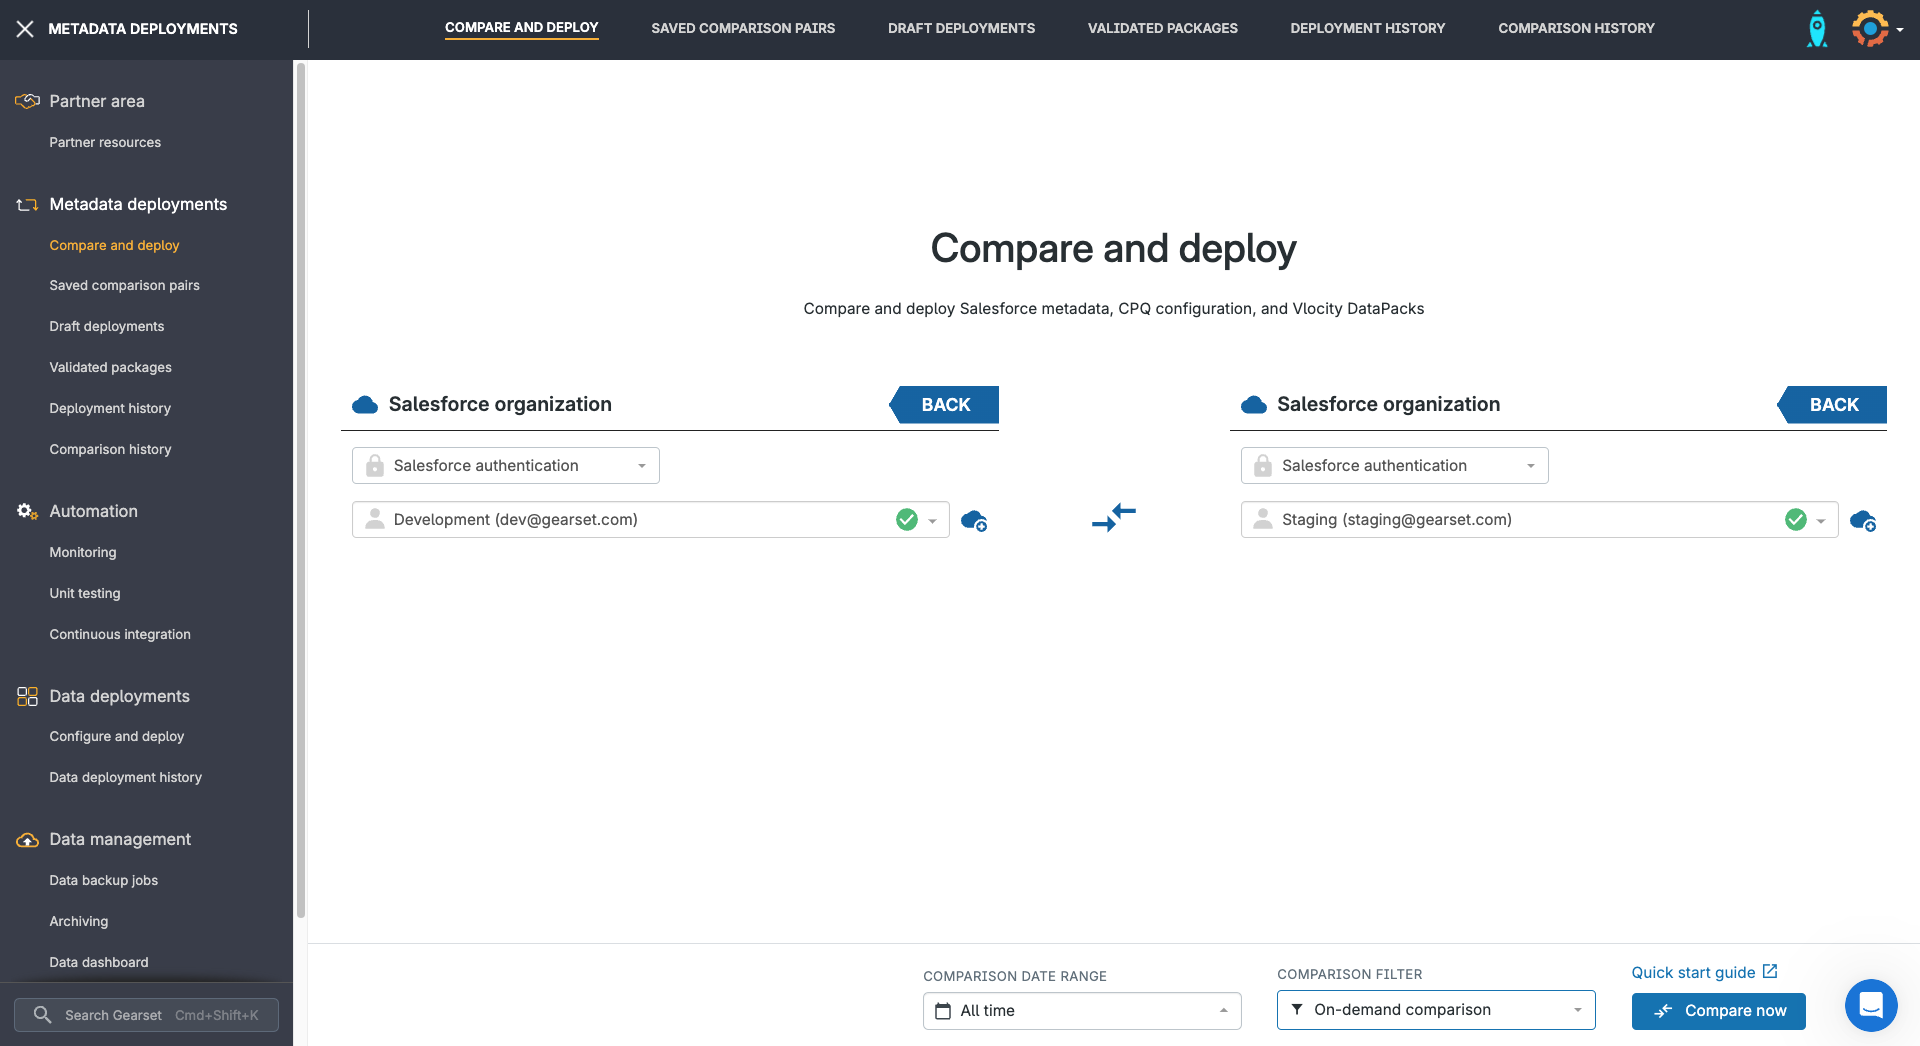
1. Select your source and target
Head to Compare and deploy and select your source and target orgs. Click Compare now.
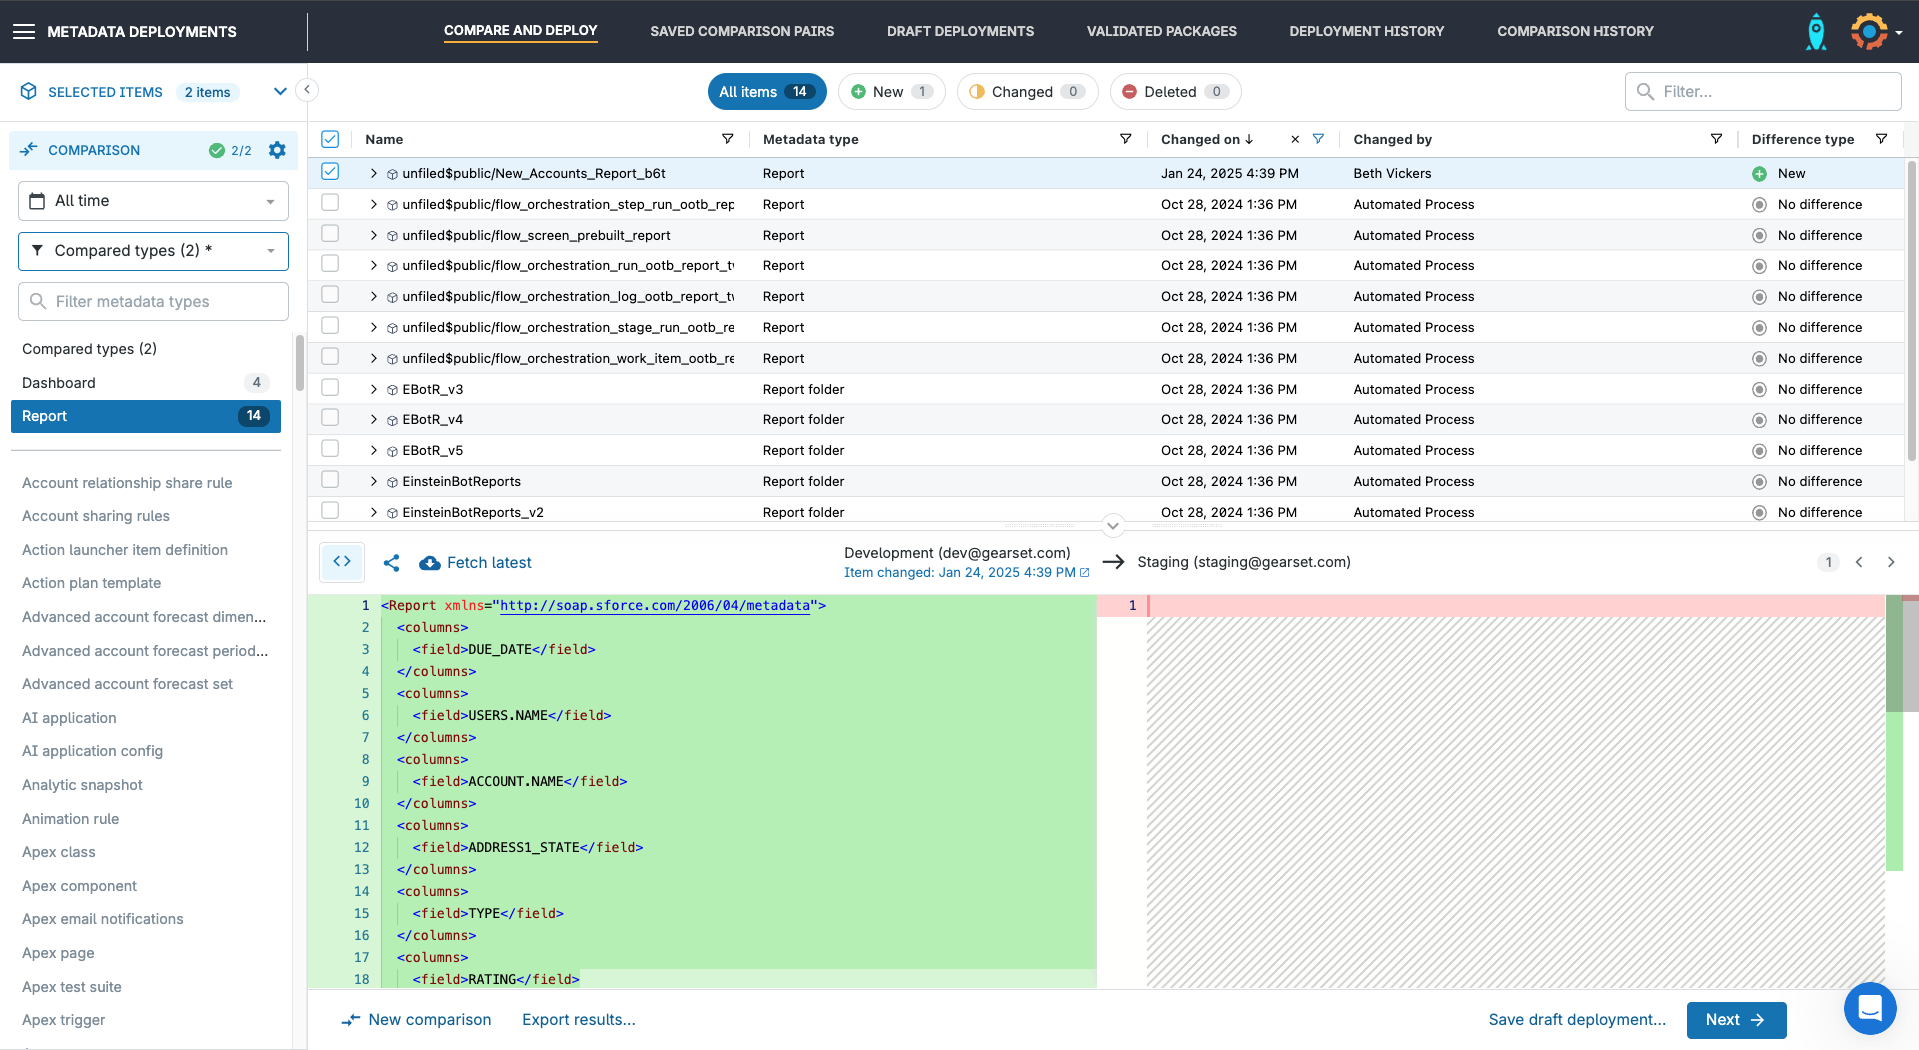
2. Compare your orgs
Gearset will analyze the differences between your source and target org, highlighting all new, changed and deleted metadata items. You can filter by metadata types on the left-hand side. In this example, we’ve selected Dashboard and Report.
Unlike change sets, Gearset lets you compare and deploy reports that are in the Public Reports folder. Normally, the Public Reports folder isn’t returned by the Metadata API when you request all folders, but you can retrieve its reports if you explicitly request all the items in unfiled$public. Gearset knows how to handle this quirk of the API, so it automatically retrieves and lets you deploy reports in the Public Reports folder without the extra manual steps.
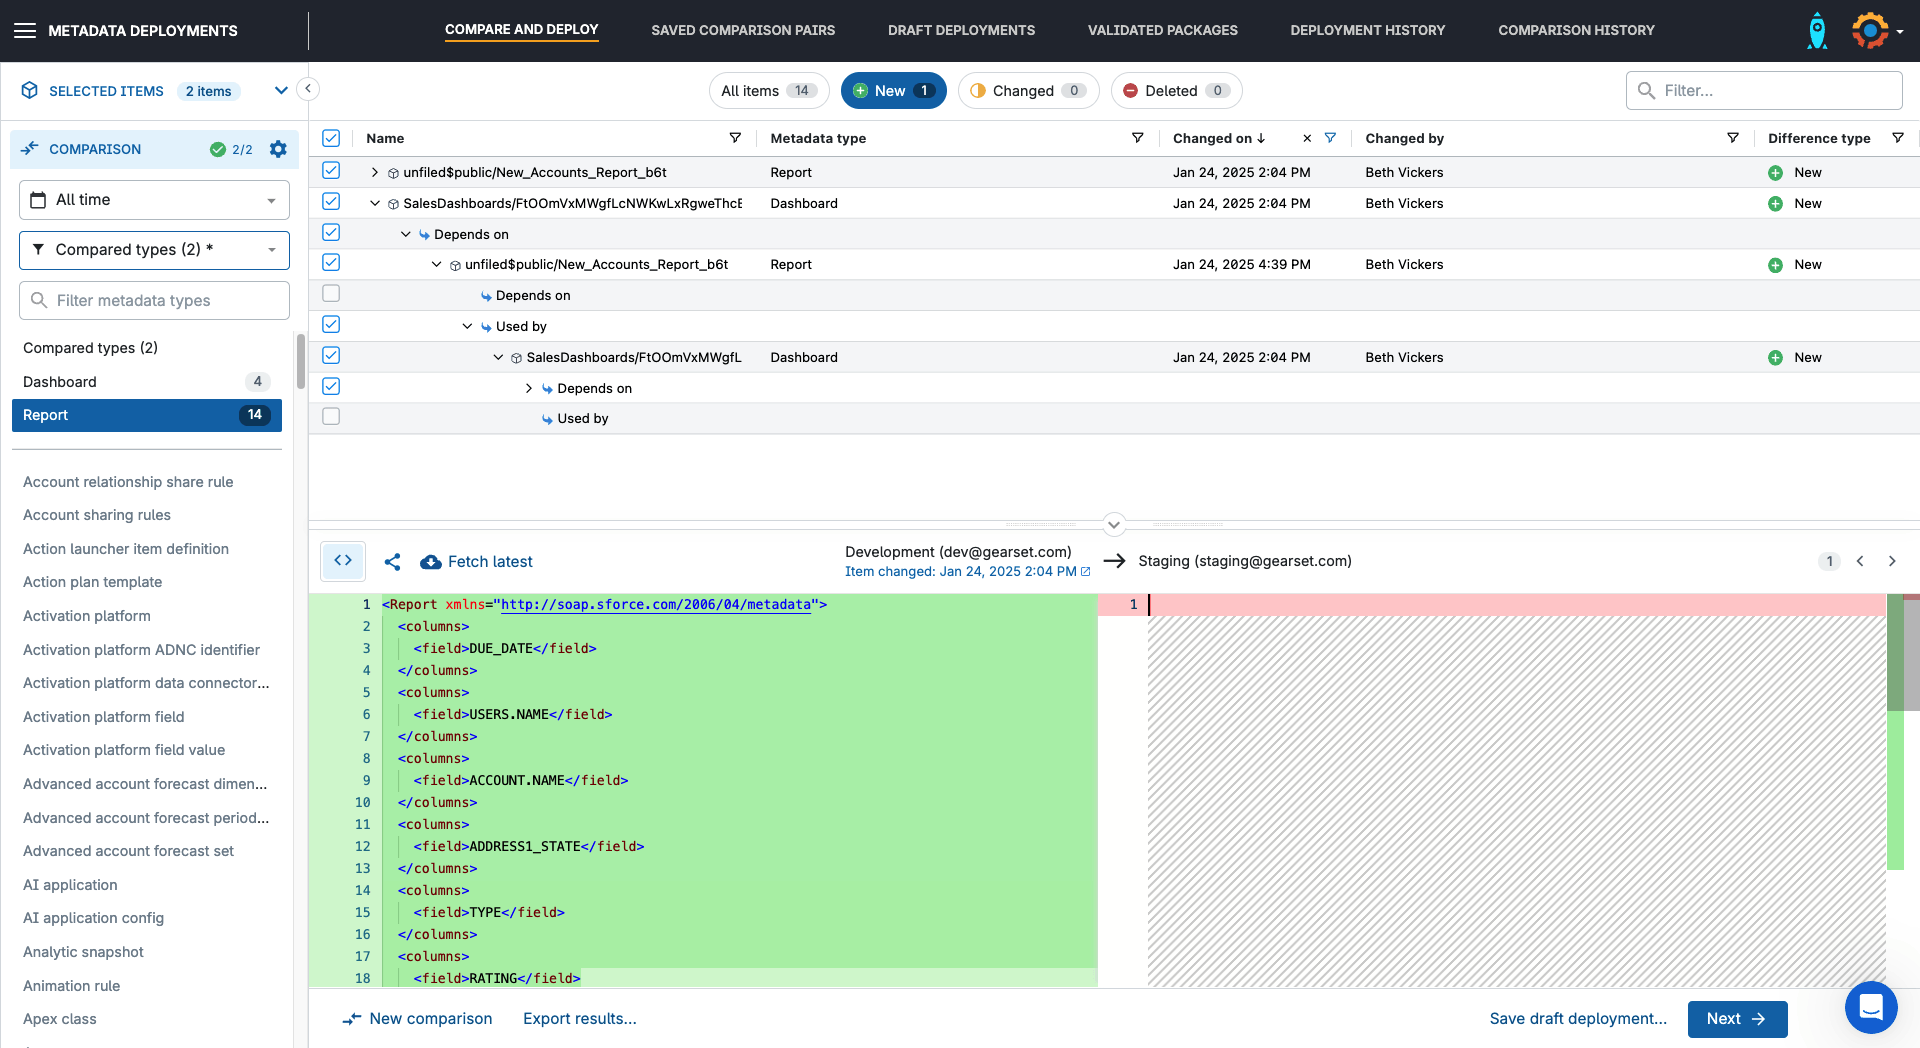
3. Identify the changes you want to deploy
Gearset shows you all the differences between your source and target for each item you select.
Clicking the dropdown for any item will show you the metadata it depends on and that it’s used by. This helps you understand your metadata model and include all the relevant dependencies in your deployment package. Once you’ve selected items to deploy, click Next.
4. Check the package
Gearset runs problem analysis on every deployment package to look for issues that are likely to cause deployment failure. Some of the problem analyzers are purpose-built to improve the deployment success of reports and dashboards. You’ll find these on the Problem analyzer templates page in the app, where you can control which analyzers are automatically applied during CI job runs.
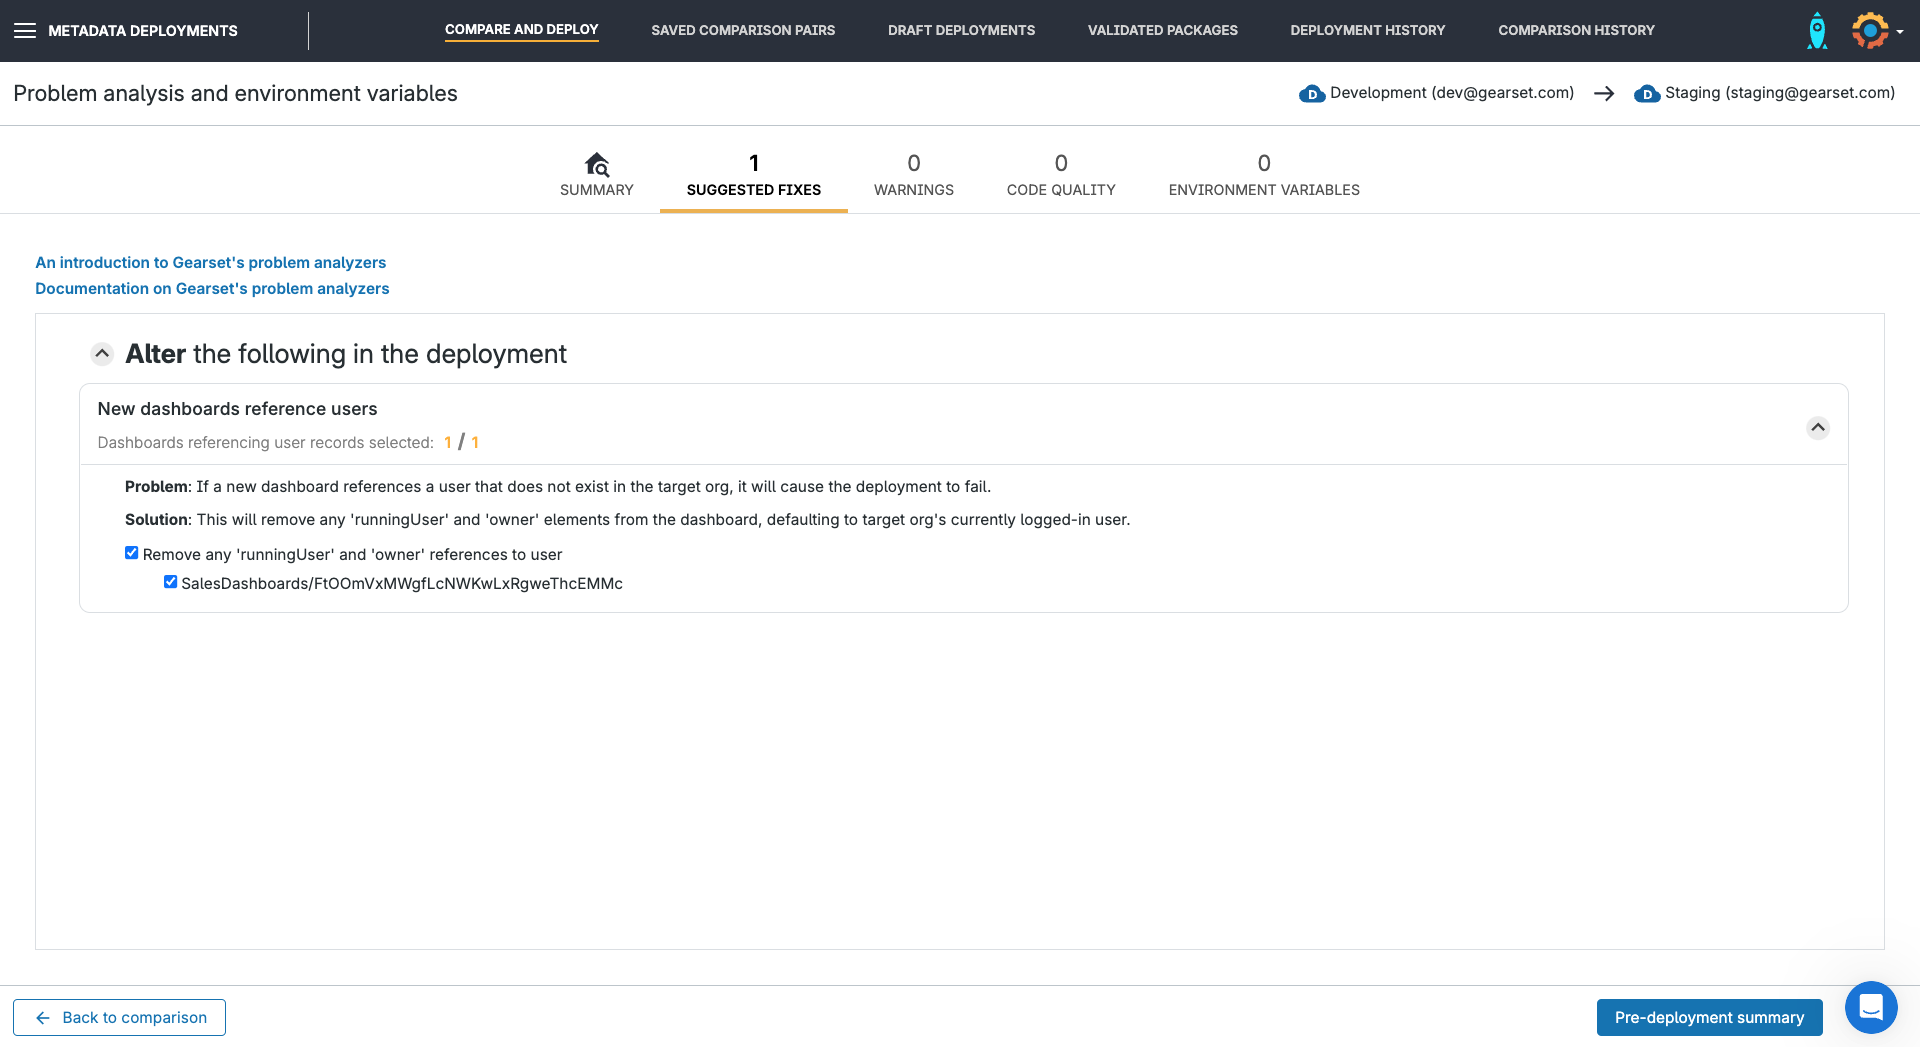
Once you’ve accepted any suggestions, select Pre-deployment summary. Check over the package and then add a name and description to the deployment.
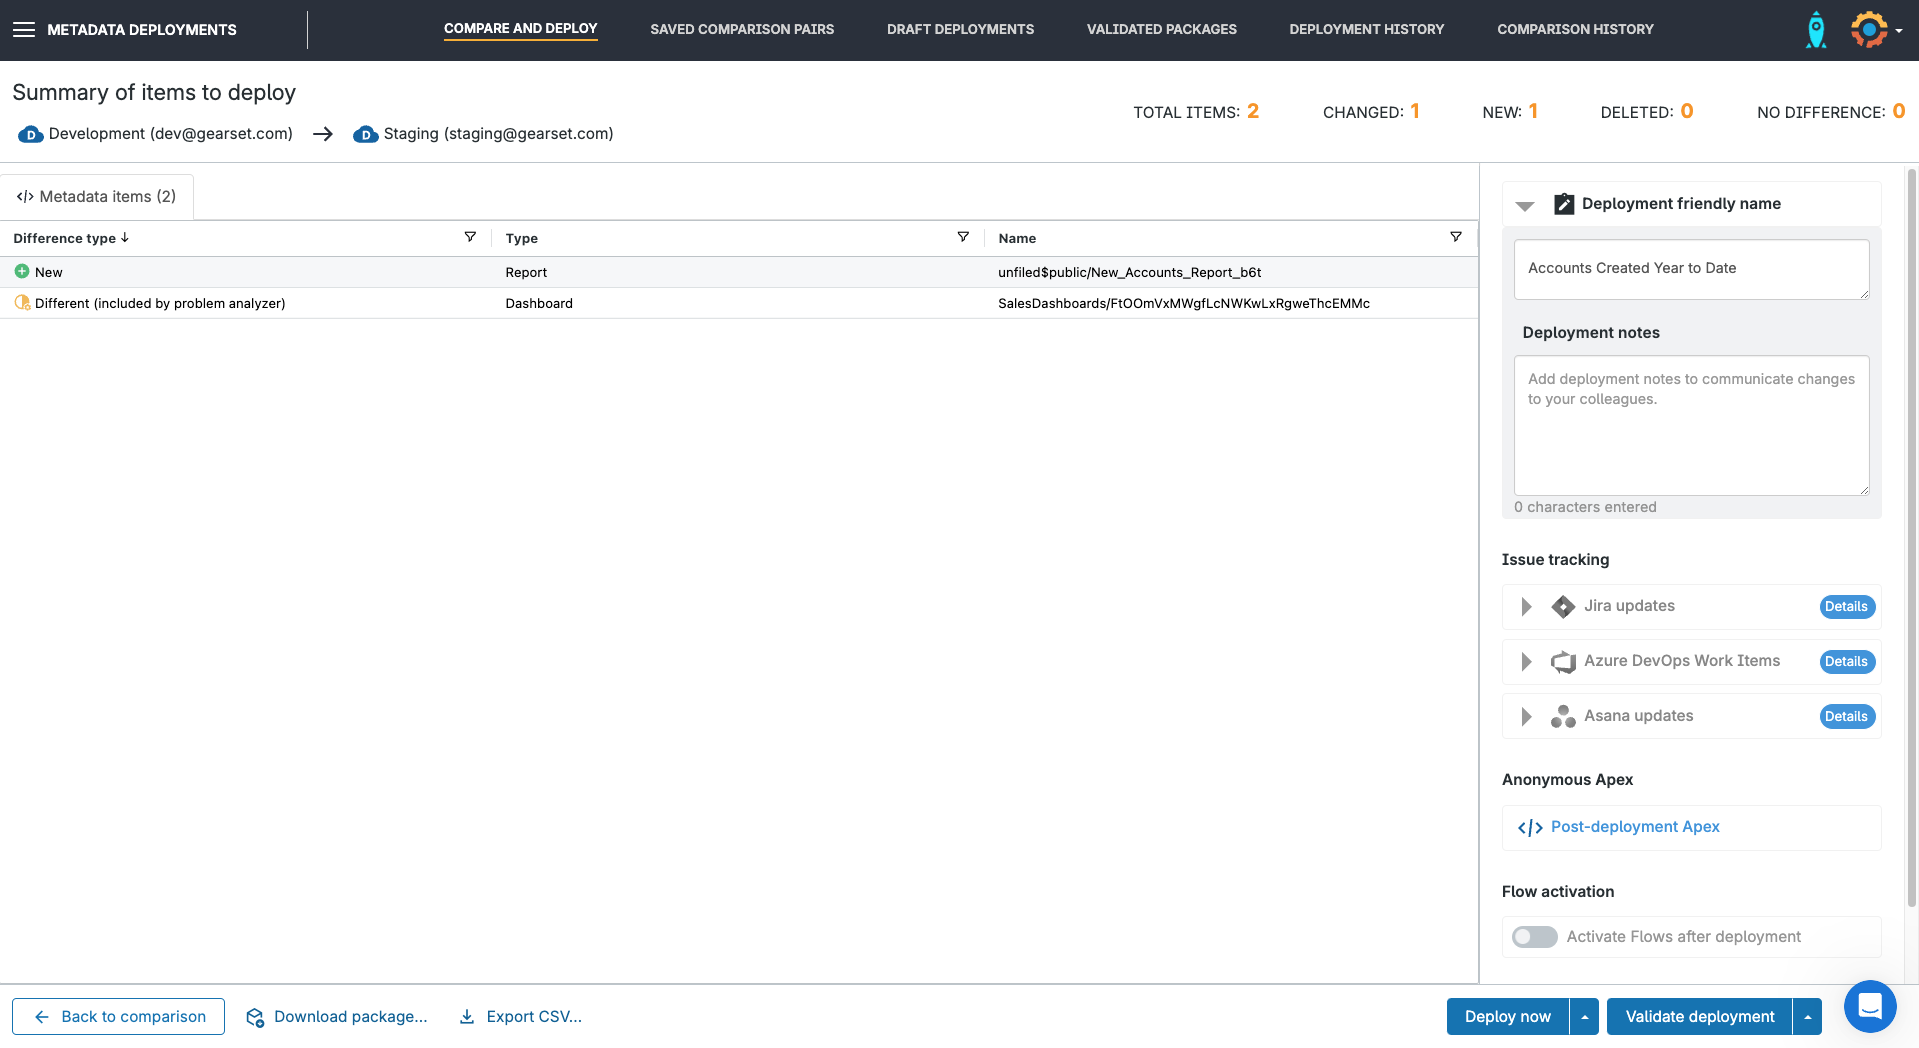
5. Deploy or schedule for later
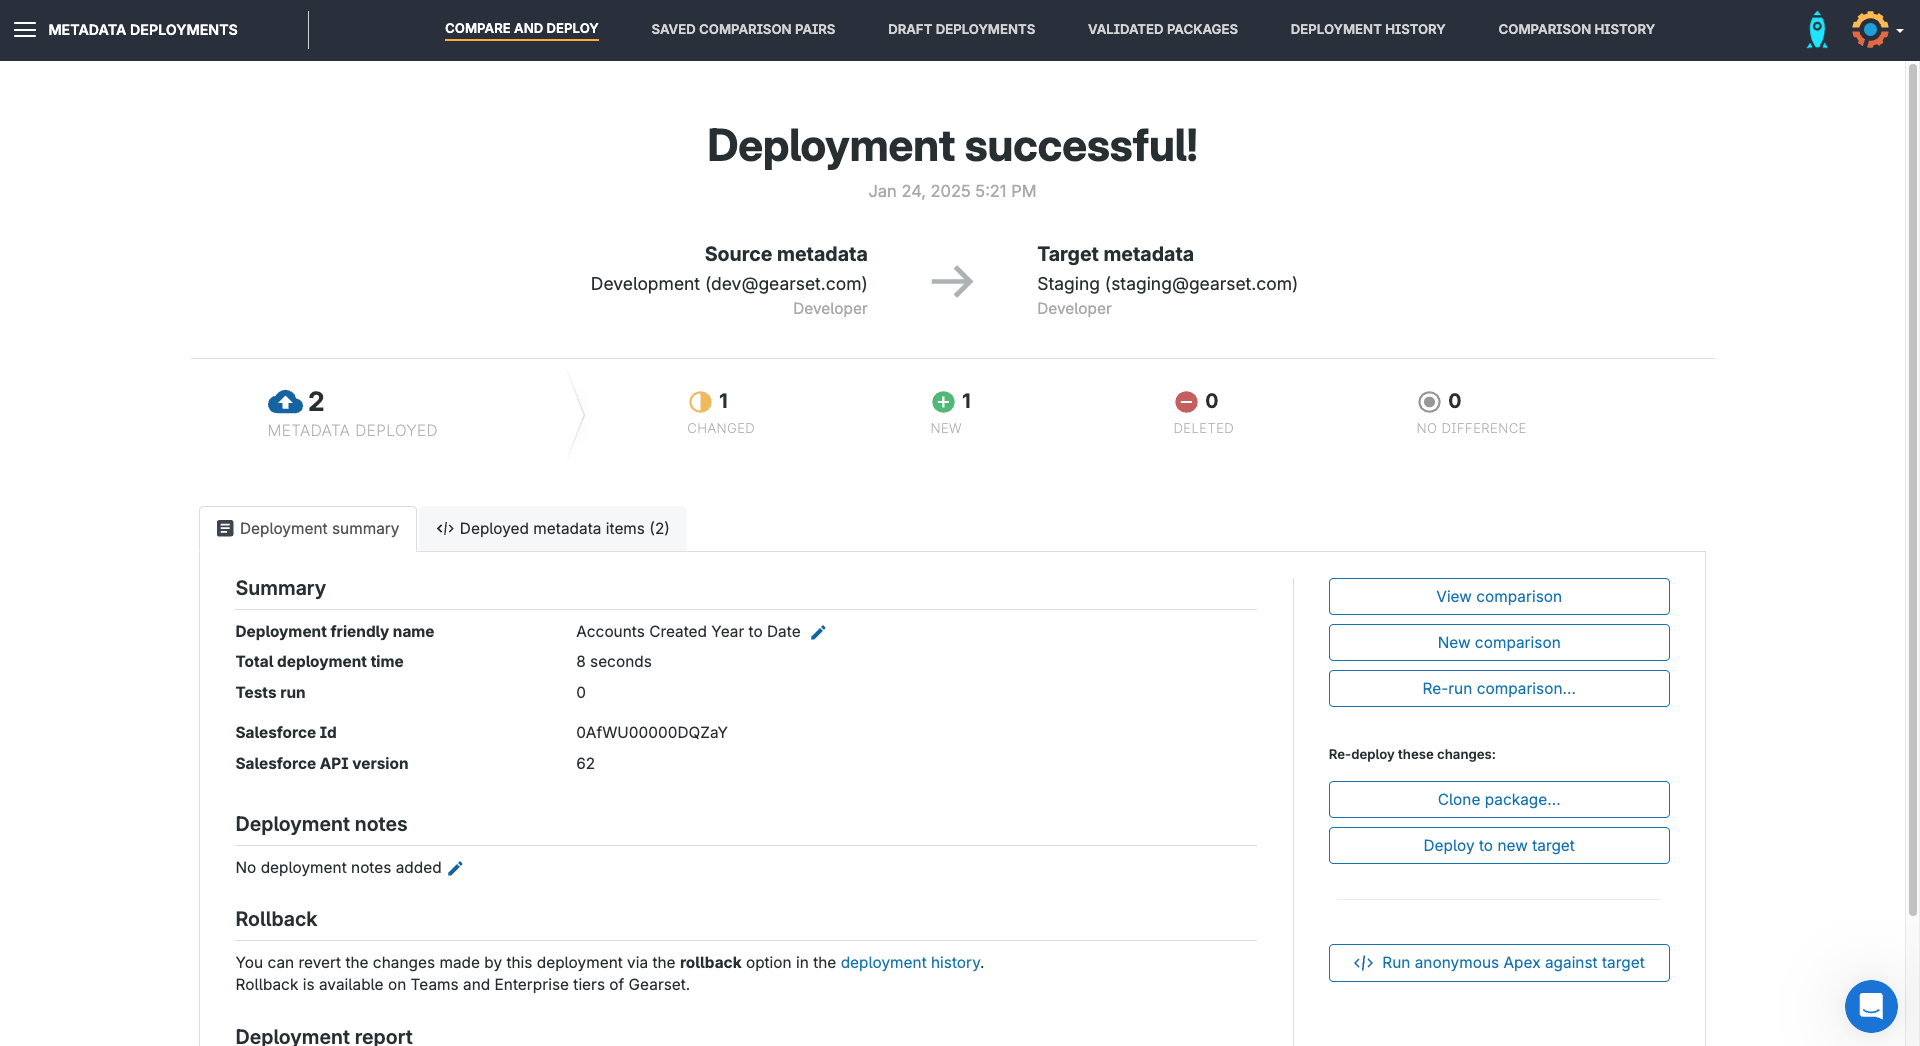
You can choose to validate the deployment first, or schedule the deployment for later. If you’re ready, hit Deploy now to complete your deployment.
Best practices for deploying reports and dashboards
Whatever method you use to deploy, either natively or with a third-party, there are a few steps you can follow to make your report and dashboard deployments as smooth as possible:
Organize reports and dashboards in folders: It’s worth keeping your reports and dashboards organized in custom folders, particularly if you have any reports and dashboards that need to be deployed together. This will make it easier to manage and deploy them efficiently.
Check report and dashboard dependencies: Make sure all the dependencies your reports and dashboards rely on — like custom report types, referenced fields, custom objects, and filters — are included in your deployment package. Dashboards often reference specific reports, so don’t forget to include those too.
Validate report and dashboard metadata: It’s vital that any fields and data your reports and their filters reference also exist in the target org. For dashboards, you’ll want to make sure that any dashboard widgets, like charts, gauges, or tables, are configured properly and have valid data sources.
Test reports and dashboards in a sandbox: Before deploying to production, test your reports and dashboards in a sandbox environment so you know they return the right data.
Deploy your dashboards seamlessly with Gearset
Most Salesforce metadata types have a few quirks that can trip you up during deployments and cost time. Reports and dashboards aren’t super tricky, but Gearset’s metadata deployment solution will make sure you don’t fall foul of those folders.
If you haven’t already begun your free 30-day trial of Gearset, put it to the test with your own reports and folders to see how much time you save.
