

Email templates can be a huge asset to your marketing, sales and support teams. You can set up formats for each department or specific campaigns, helping free up capacity and boost productivity. Email templates also help ensure consistency in tone of voice and branding across external communications.
To help your end users access the right email templates quickly, it’s useful to group templates into folders. For example, if you’re running a discount promotion on one of your products, you can put all the promotional email templates for this campaign together.
While email template folders help to streamline communication for your end users, managing versions and permissions can be tricky for admins. In this blog post, we’ll take a look at the common pitfalls when creating and deploying email template folders, and show you how Gearset helps you to deploy them with ease.
Common gotchas when creating email template folders
Any Salesforce team can take advantage of email template folders, as they’re available in both Salesforce Classic and Lightning Experience. But, Salesforce has separate processes to create folders in either Classic or Lightning. For example, you can’t change Classic template folders in the dedicated section for email templates and must make your changes in Setup.
The separation between Classic and Lightning template folders can cause hiccups when trying to share templates between the two Experiences and setting up your folder hierarchy.
- Classic email templates can’t be saved to Lightning folders and visa versa. This means that you’ll have to recreate your Classic email template in Lightning if you want to save it in your Lightning folder.
- Folder names must be unique between Classic and Lightning. This means you’ll need to keep track of folder names in the two different Experiences as Salesforce won’t allow you to save folders with the same name in a different experience.
- Classic folders have a two-tier structure, which means you can’t create sub-folders like you can in Lightning experience.
Tips for deploying email template folders
There are also a few quirks when it comes to deploying email template folders, so here are our top tips to prepare for smooth deployments.
Check how you’ve set up your template folders before you deploy. For example, if you save Lightning Email Templates in the My private Email Templates space, you cannot deploy them via the Metadata API.
Permission sets configured by your admin can block your email template folder deployments. If you get the error message You don’t have the right to create Lightning pages of type EmailTemplatePage, you need to make sure that your admin has assigned you the relevant permissions on your profile.
You’ll also need to make sure you’ve enabled Lightning Email templates in your target org, or Salesforce won’t allow you to deploy your folder. Keep in mind that Lightning Email Template folders are only supported in first-generation managed packaging. This means you can’t use second-generation managed packages to deploy Lightning email template folders with SFDX.
It’s also easy to deploy your email template but miss out the relevant folder from the deployment package. When this happens, you’ll get the error message Cannot find the folder: folder_name. To resolve this, make sure to include the email template folder in the package.xml file too.
How to deploy email template folders in Salesforce
When you’re ready to deploy your email template folders, you can use native Salesforce tools like SalesforceDX, Ant Migration Tool or Change Sets. Deploying email template folders isn’t directly supported by Salesforce’s Data Loader because this is used for data imports and exports, rather than metadata deployments.
Salesforce’s metadata deployment tools broadly follow the same process when deploying email template folders:
- Prepare your email template folders. Your folder configuration can often block deployments. Avoid failed deployments by checking that you’ve organized your email templates in the correct folders and set the right permissions to give you access in both your source and target orgs.
- Retrieve the email template folder metadata. Using SalesforceDX or Ant Migration Tool, retrieve the email template folder metadata from your source org, which will create XML files of this metadata.
- Check your deployment package. Make sure that you’ve included both the templates and the folder in your deployment package. You’ll also need to check that any custom fields or objects are included in the package, as well as any sub-folders if you’re using Lightning Experience.
- Deploy to a testing environment. It’s best practice to deploy any changes to a Sandbox first, so you can test that they function properly and don’t disrupt your org. It’s especially important to do this when deploying email template folders, as you can check that permissions work as expected.
- Release to production. Once you’re confident that your deployment works as expected in your testing environment, you’re ready to deploy to production. As before, make sure that you’ve enabled the right permissions and configuration in production so your deployment succeeds.
Even if you’ve gone through your deployment package with a fine-tooth comb, it’s still possible to hit frustrating errors when deploying your email template folder, and it’s often hard to spot what’s causing the issue. Thankfully, more advanced deployment tools like Gearset can work around common issues with email template folder deployments and catch issues before they cause the deployment to fail.
How to deploy email template folders with Gearset
Gearset supports smooth deployments for any metadata type supported by the metadata API. Let’s walk through how easy it is to deploy email template folders using Gearset. If you want to follow along yourself, get 30 days access to Gearset for free.
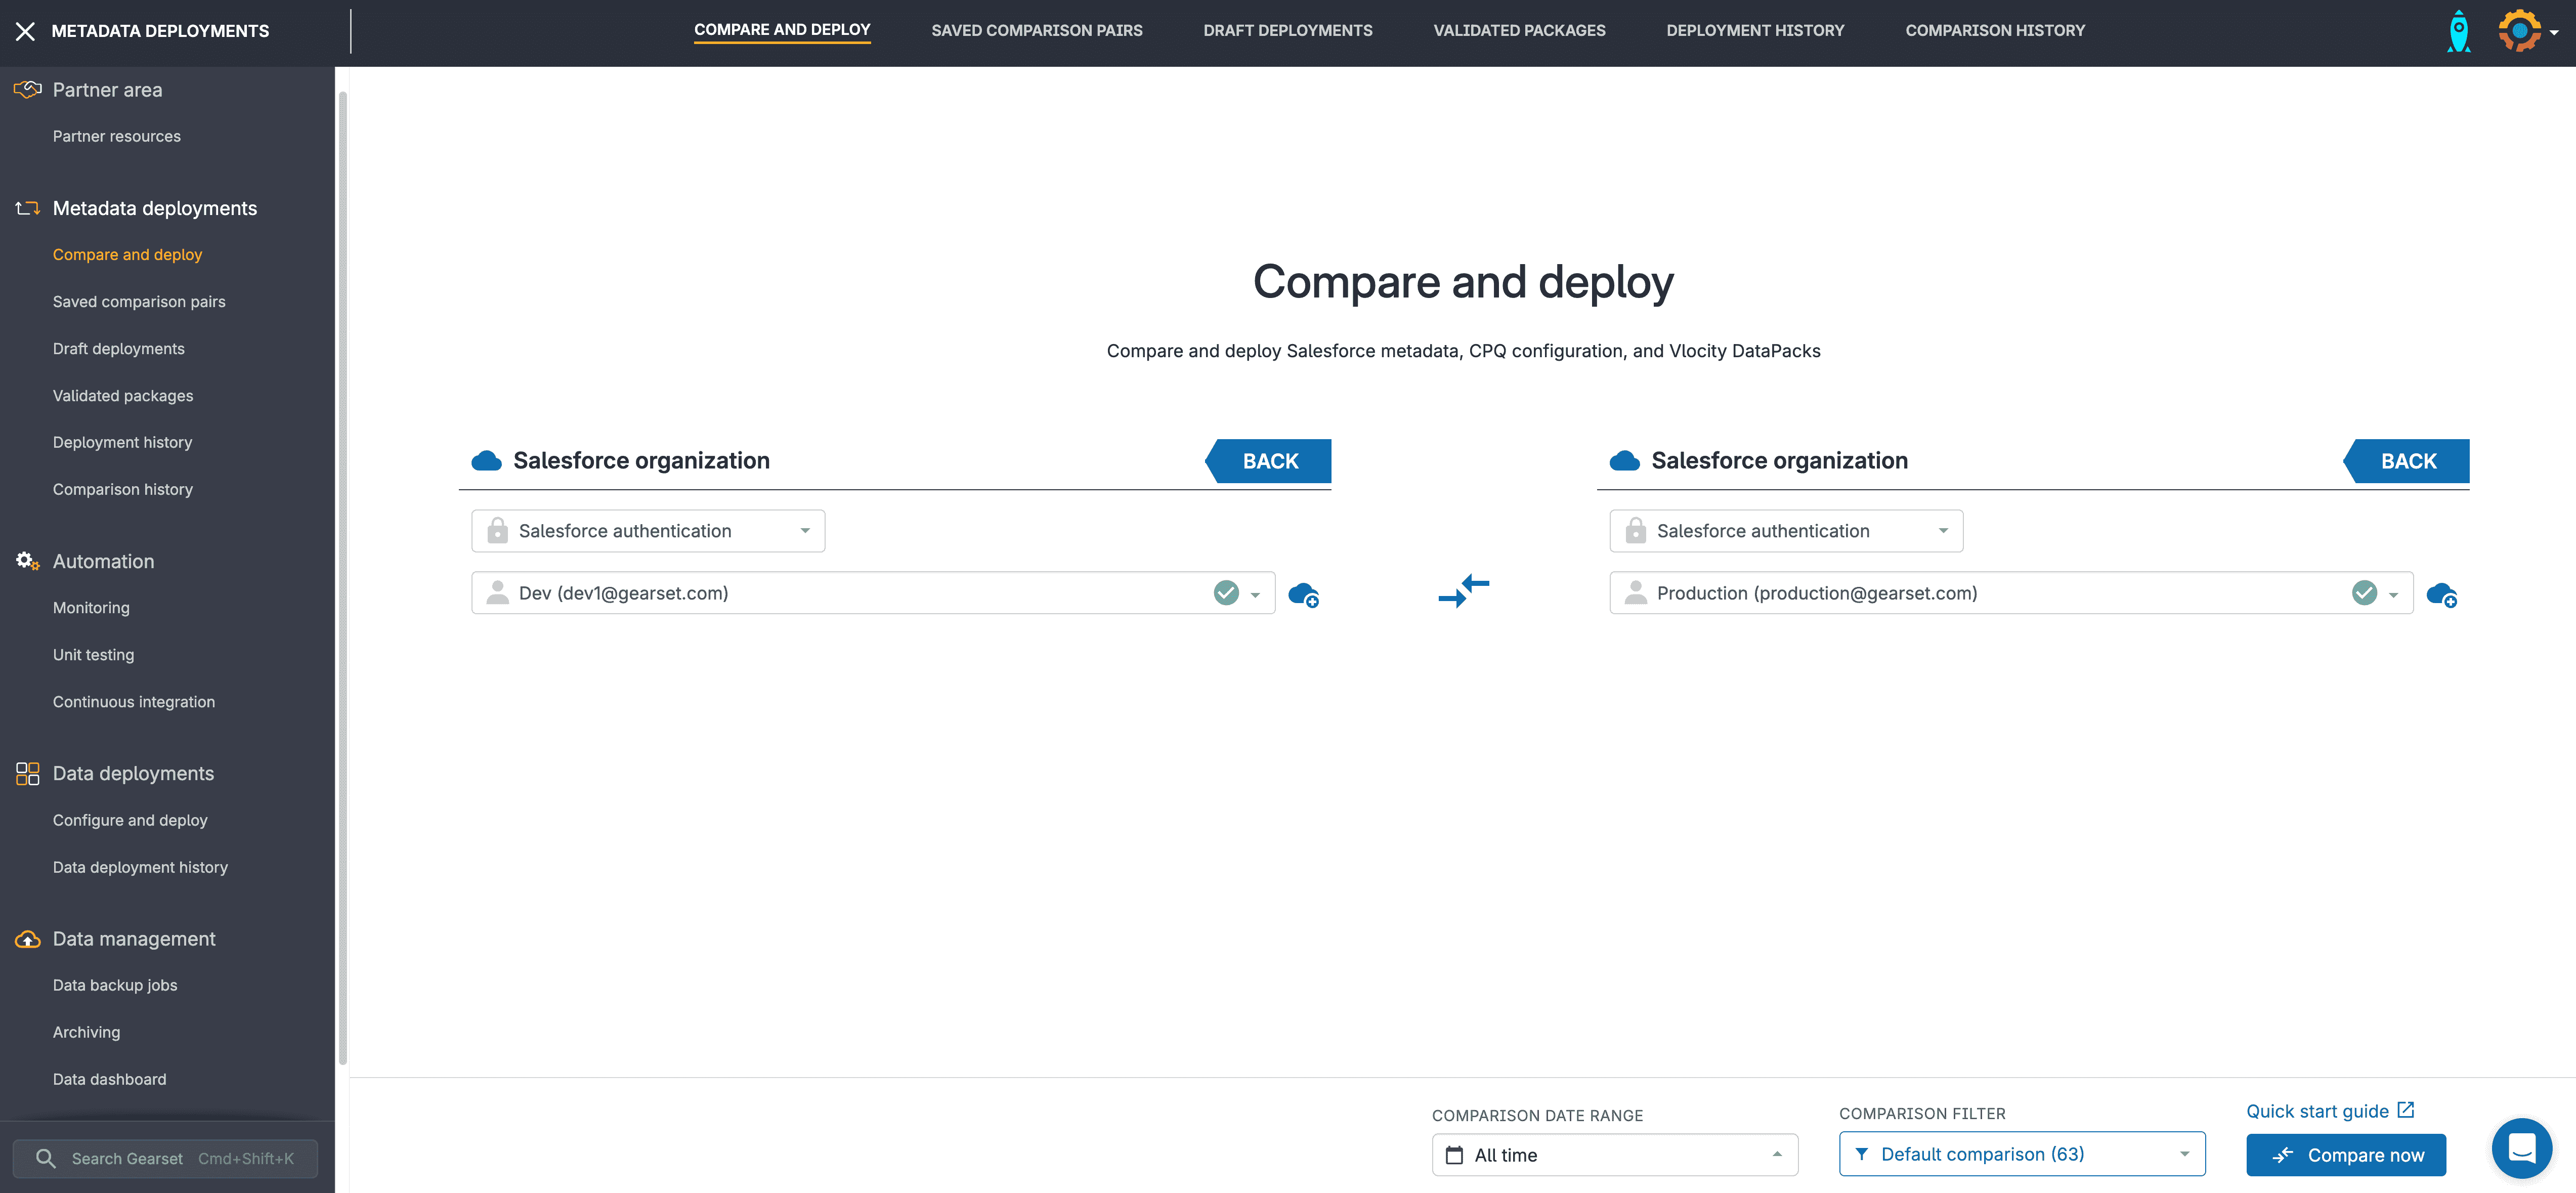
Select your source and target orgs
Start off by selecting your source and target orgs. Hit Compare Now to begin the metadata comparison between your source and target orgs.
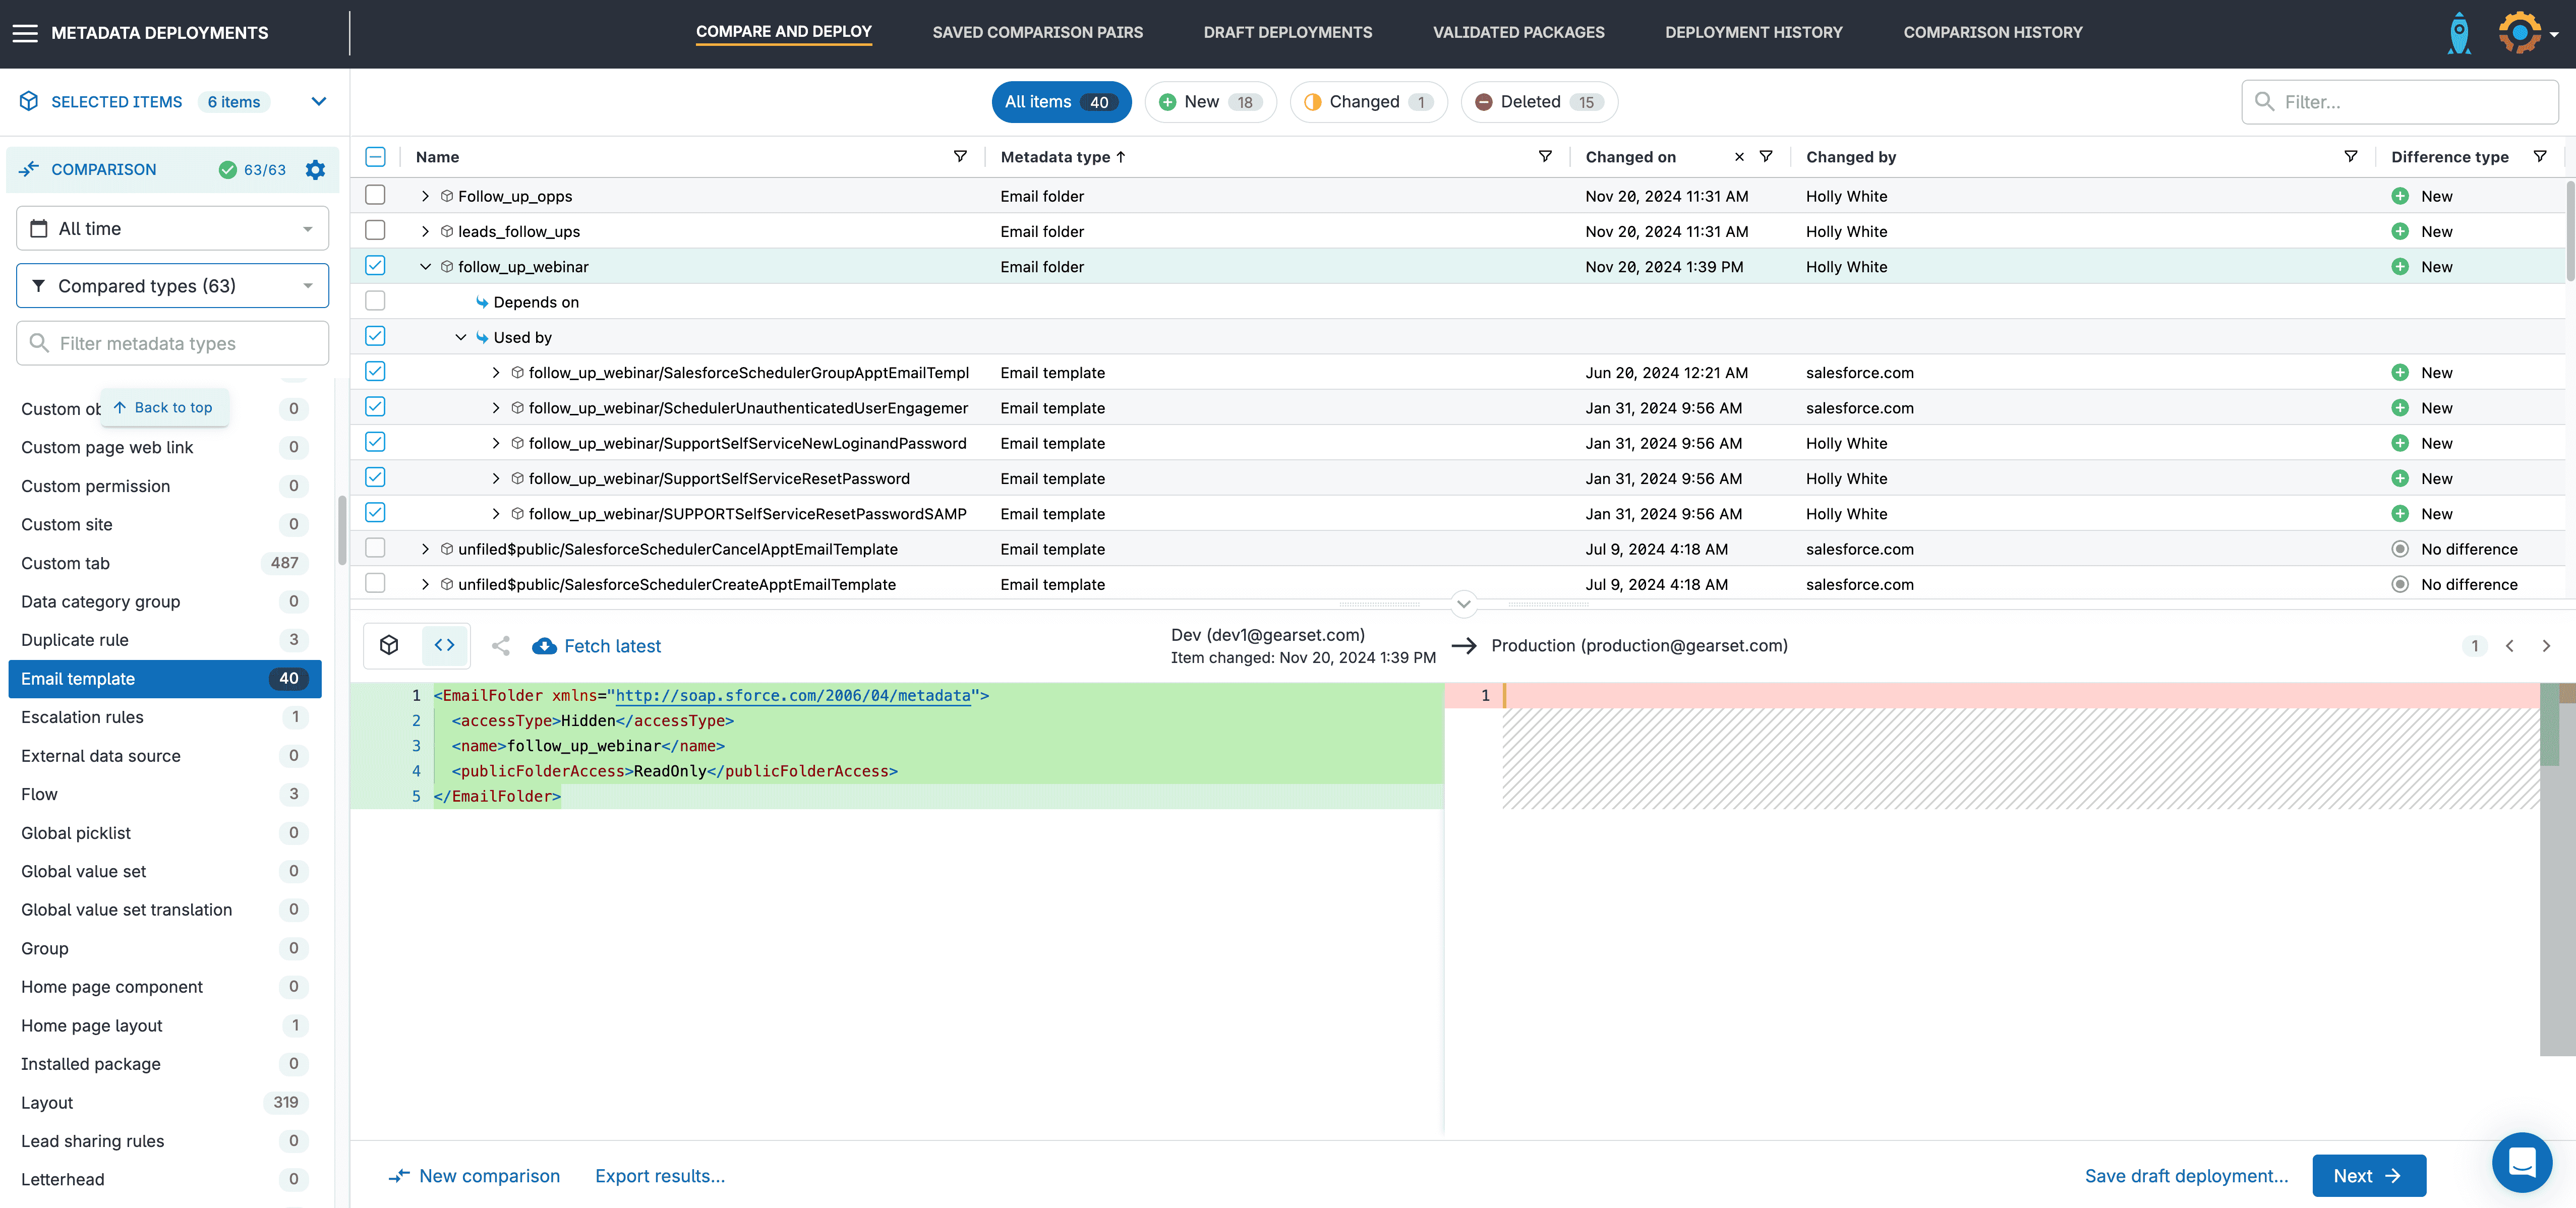
Compare source and target metadata
Gearset will highlight all changed, new and deleted items under different tabs so you can sort by the way your metadata has changed. You can also dig into more detail with our XML diff viewer at the bottom of the screen. Filter your metadata on the left-hand side to see only what you need to.
Add the email template folders you want to deploy to your deployment package. Gearset will show all relevant dependencies and metadata to make sure your deployment package can deploy successfully.
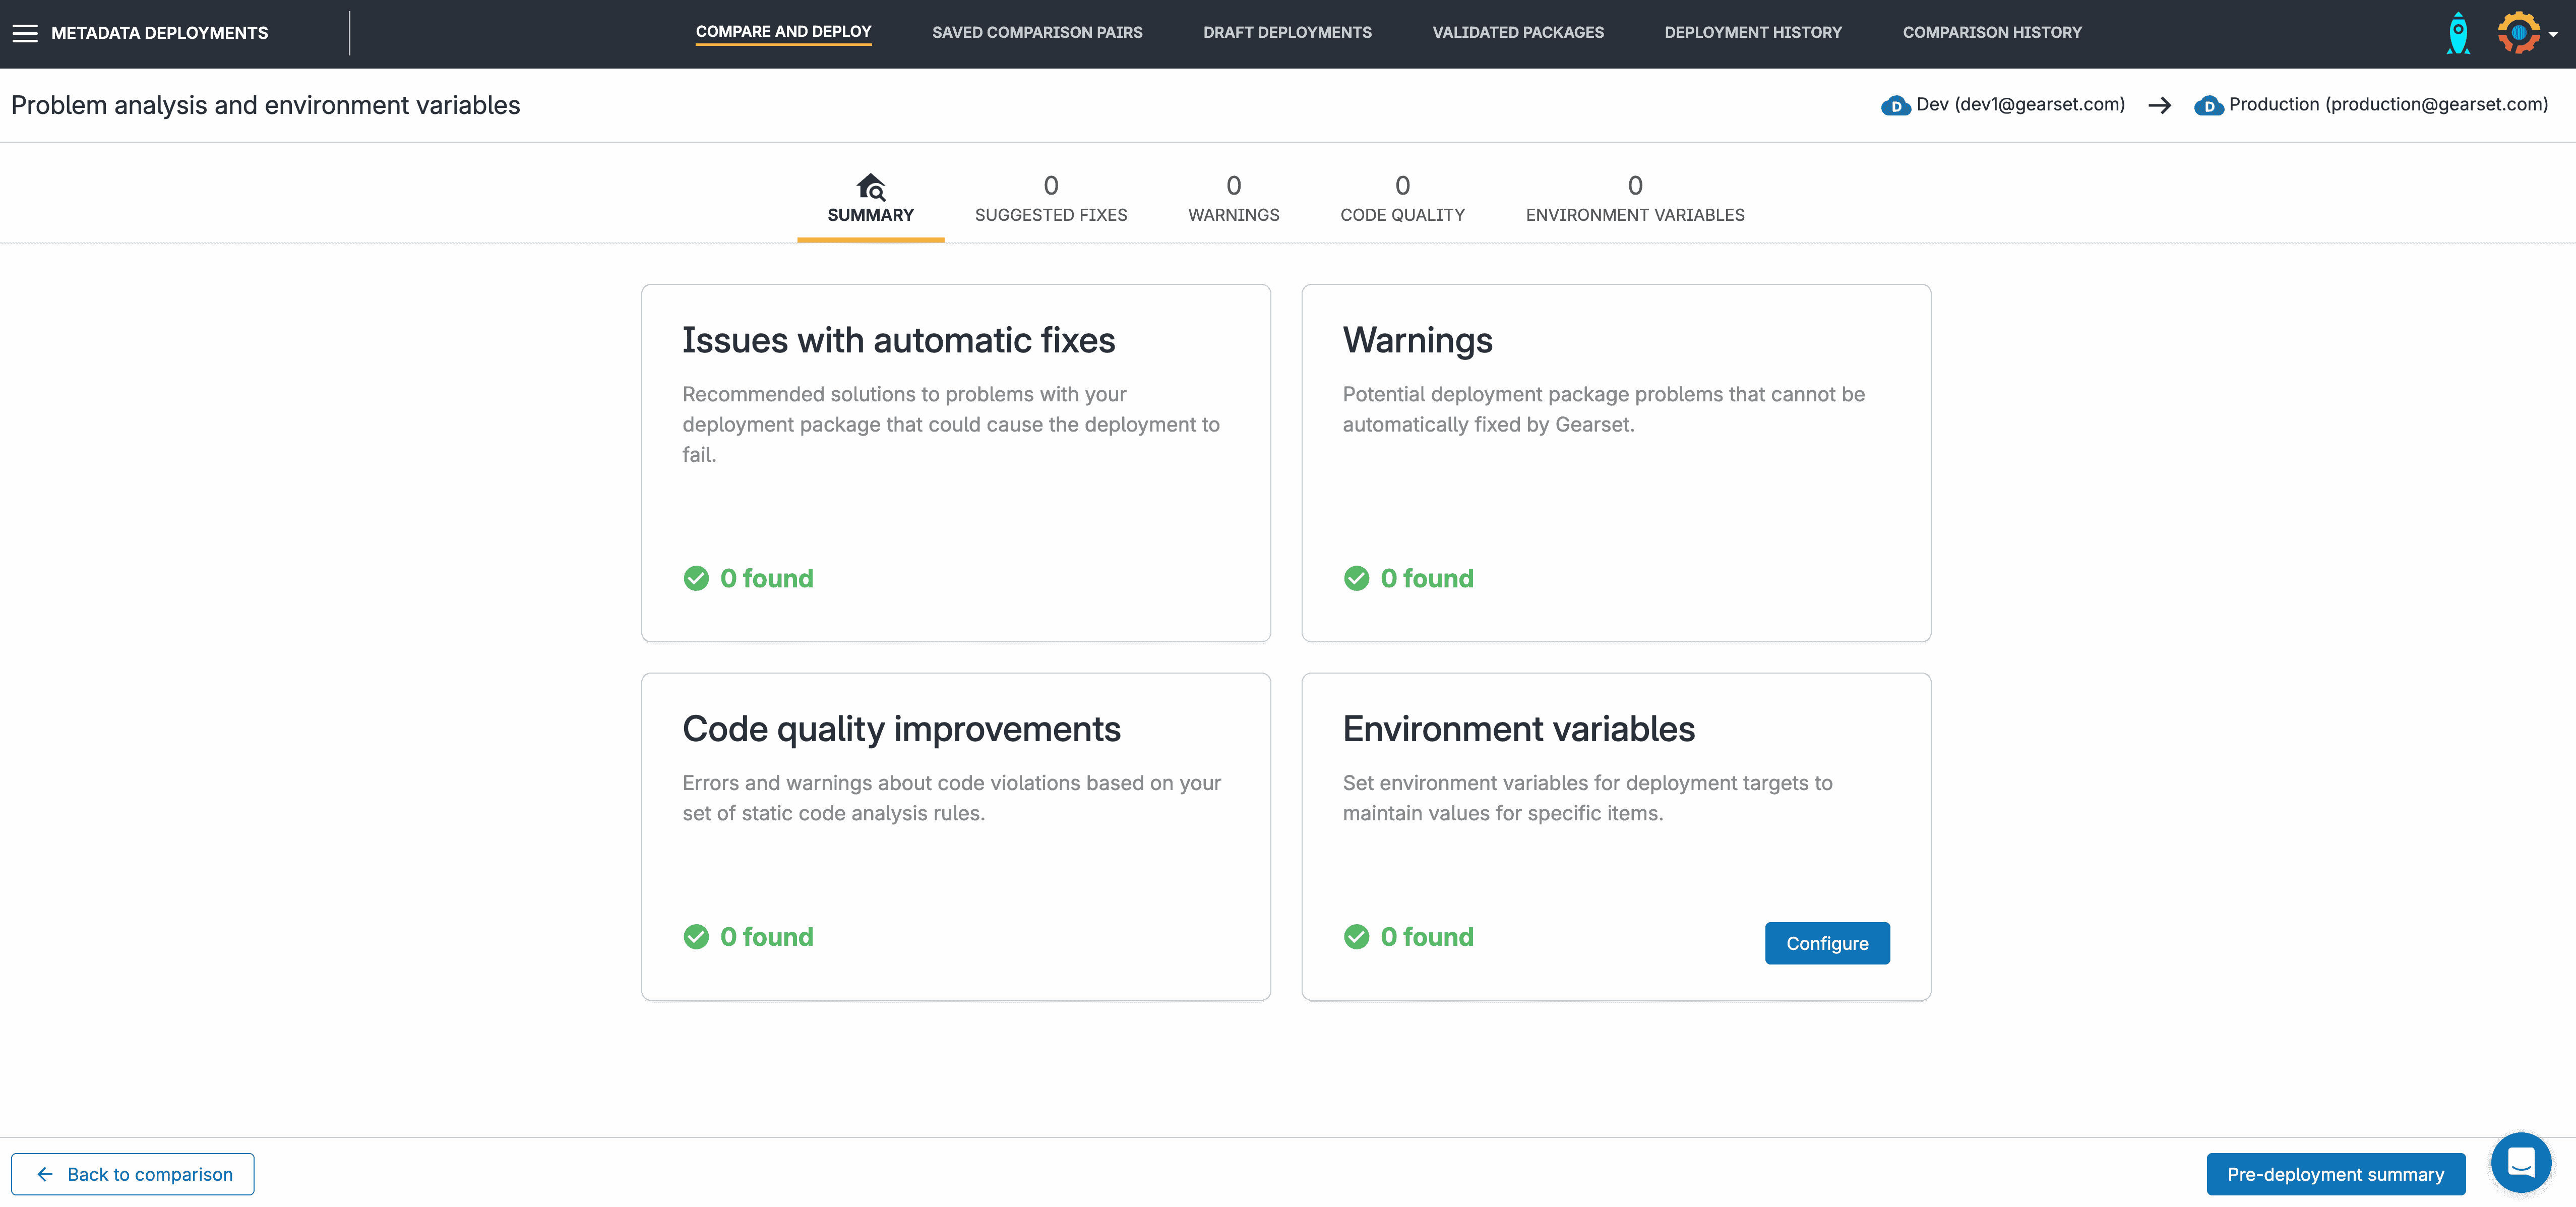
Problem analyzers
When you’re ready to deploy your package, click Next and Gearset’s problem analyzers will identify any missing dependencies or common errors that would cause your deployment to fail.
Once you’ve accepted changes from the problem analyzers, you can move forward to the pre-deployment summary and give your deployment a recognisable name and deployment notes. This will help you keep track of and audit your deployment history.
You have the choice between clicking Validate Deployment, for Gearset to check that your release will be successful, or you can release immediately by clicking Deploy Now.
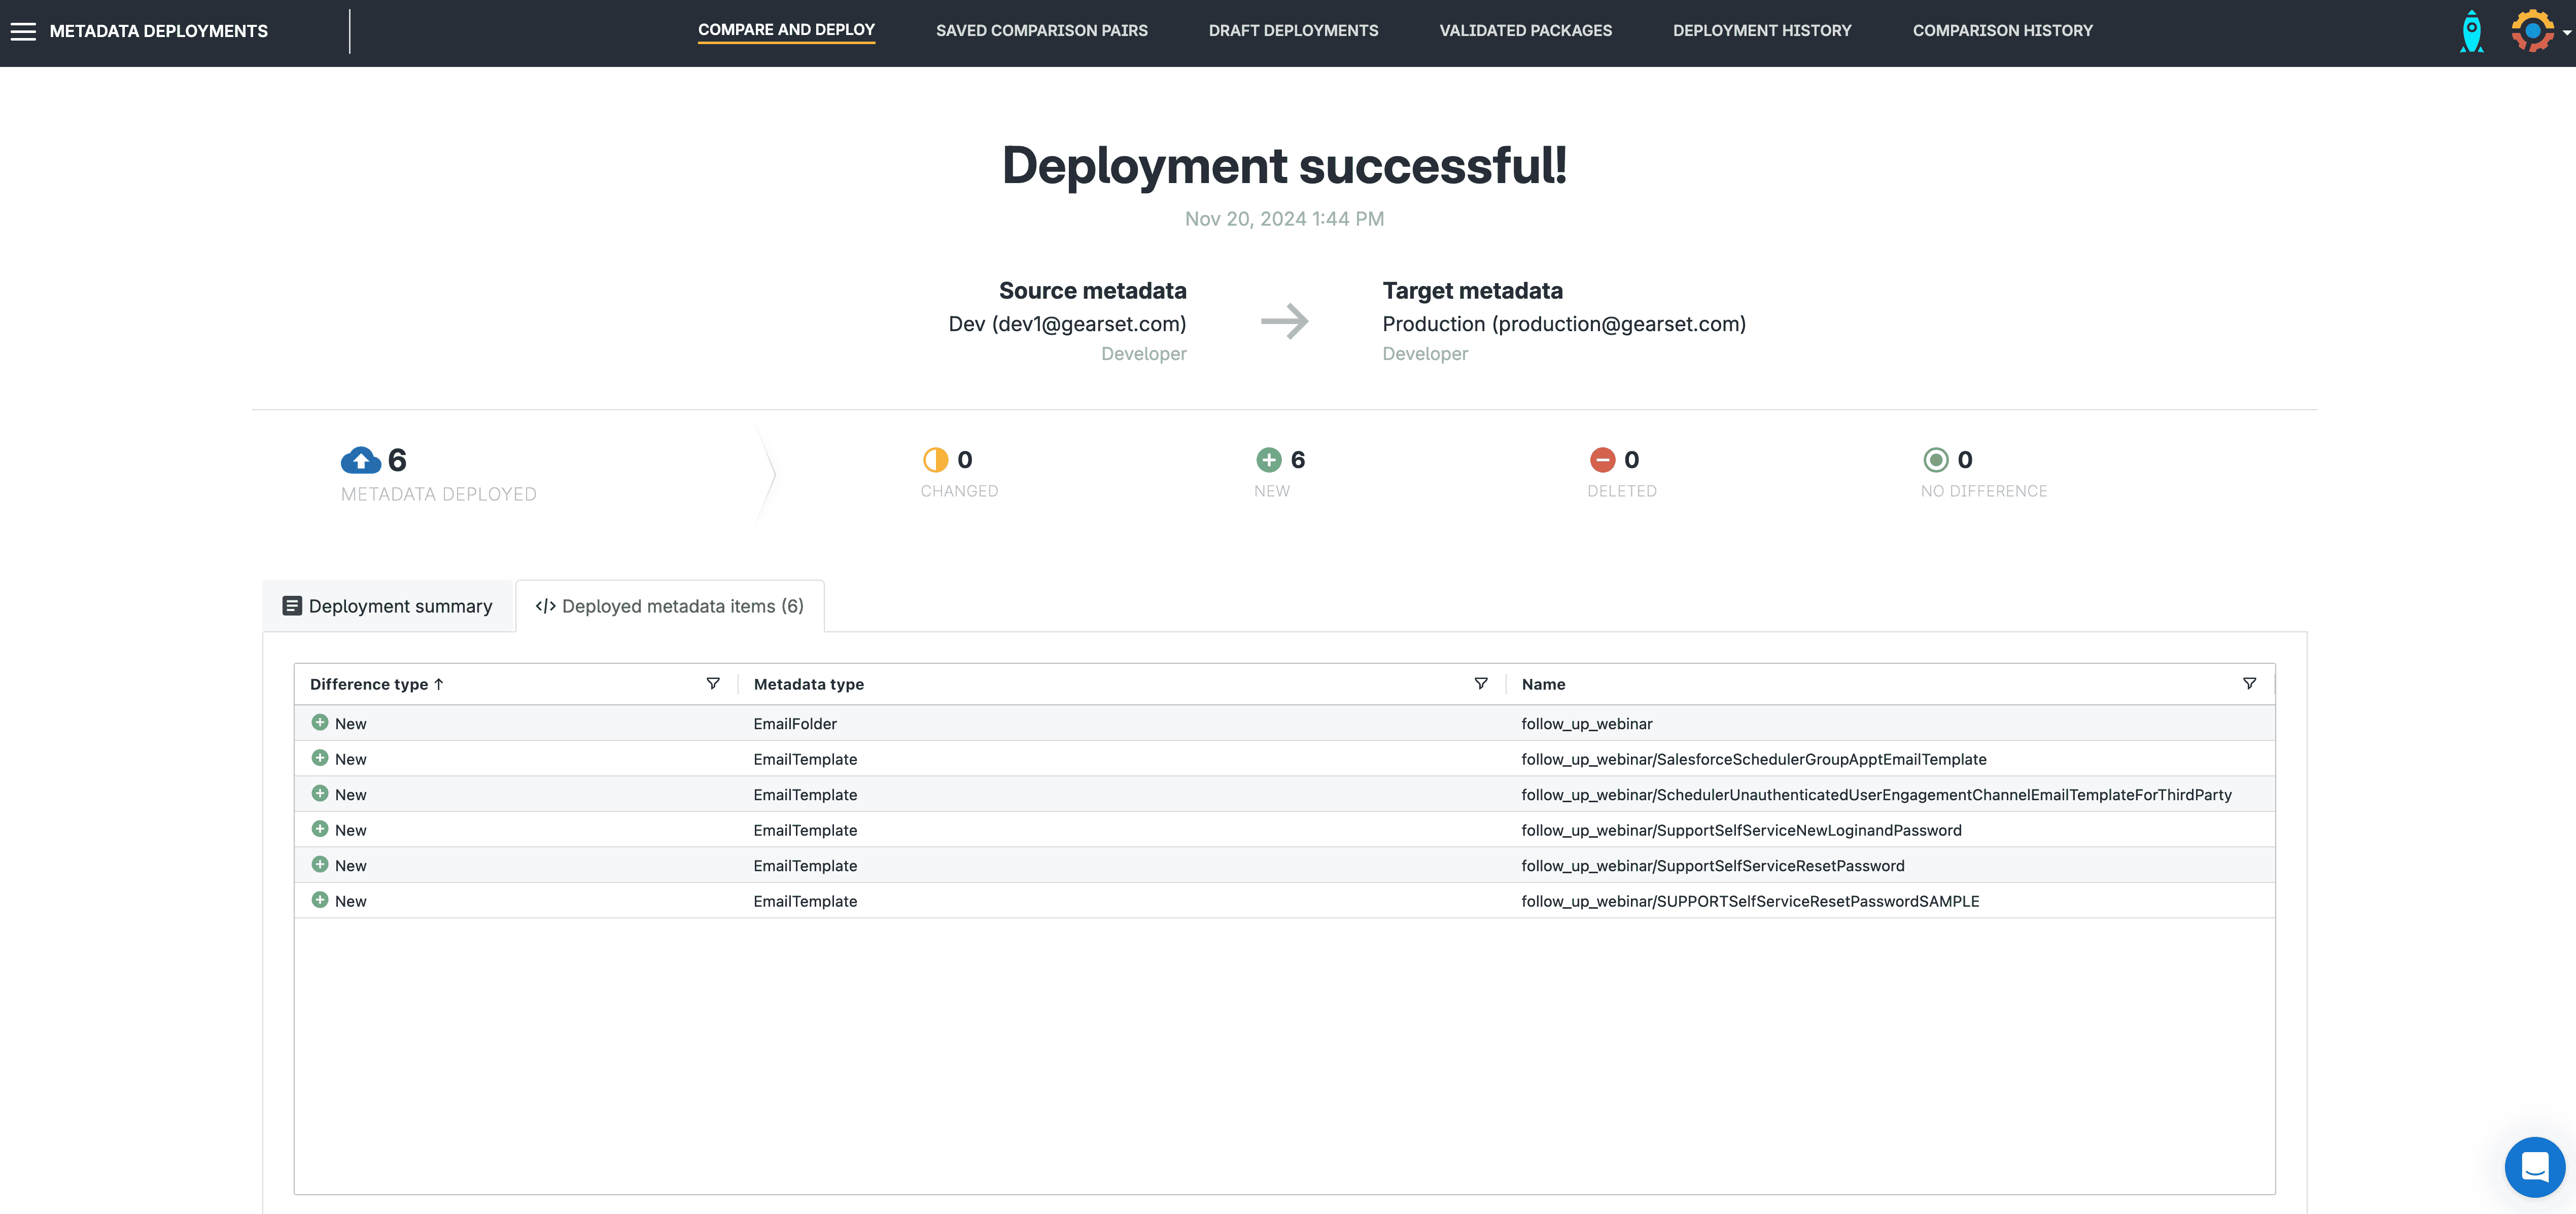
Deployment success
Once you’ve successfully deployed your email template folder, Gearset will give you a quick summary of all changes.
You can access the details of any past deployment in your Deployment history. From here, you also have the option to rollback the deployment to undo any changes released or deploy these changes to a new target. And you can hit download report at any time for details of your previous deployments and all changes made.
Deploy email template folders with ease
Deploying even the trickiest metadata types is a breeze with Gearset’s Salesforce metadata deployment solution — start your 30 day free trial today for access to all of Gearset’s features.
