
Vlocity packages are becoming increasingly popular as a way to extend Salesforce quickly with sector-specific solutions. But for many teams, deploying Vlocity means using a dedicated deployment tool and a separate workflow to Salesforce metadata deployments — not an ideal solution. It doesn’t have to be that way. With Gearset, you can deploy your Vlocity DataPacks alongside Salesforce metadata.
What is Vlocity?
The Vlocity managed package was acquired by Salesforce in February 2020 and rebranded as Salesforce Industries. The two names are still used interchangeably — for the sake of ease, I’ll use “Vlocity” in the rest of this post.
Companies choose Salesforce as their CRM because it’s easy to customize for particular business requirements. But most companies in any given sector will have broadly similar requirements, and so Vlocity offers sector-specific solutions as packages that companies can install into Salesforce. In broad strokes, these solutions meet the typical requirements companies have in particular sectors, and then Salesforce teams can adjust the fine details with further customization.
Why are Vlocity deployments different?
Just like any other changes made to Salesforce, Vlocity customizations should be developed and released as part of your DevOps workflow. That means changes need to be made in a developer environment first, tested properly, and deployed along a release pipeline to production.
But there’s a key difference between Vlocity and most other Salesforce customizations: Vlocity configuration is represented with data, not metadata. For this reason, Vlocity DataPacks can’t be deployed using Salesforce’s Metadata API or change sets.
London, UK
Agentforce World Tour London
How to deploy Vlocity using first-party deployment tools
Salesforce provides some tooling for Vlocity deployments: IDX Build Tool (usually just called Vlocity Build) and IDX Workbench.
IDX Build Tool (Vlocity Build)
For developers used to working with DX commands, the Vlocity Build Tool is a useful extension designed to handle Vlocity deployments. It allows you to migrate Salesforce Industries configuration using packExport and packDeploy commands in the CLI.
There are several steps for getting Vlocity Build set up, which you can find in the documentation for the Vlocity Build repository. It’s not always a smooth deployment process to follow. For instance, the recommended approach is to run packRetry a few times after attempting to export and deploy changes, because the order of deployment can cause failures that succeed on subsequent attempts.
IDX Workbench
For teammates more comfortable with a GUI, IDX Workbench makes deploying Vlocity DataPacks feel a bit like change sets. It’s actually better than change sets in a couple of ways: you can deploy to version control as well as org-to-org, and it’s possible to see basic comparisons of Vlocity DataPacks between environments. However, development teams report that IDX Workbench can be a bit buggy — sometimes it just hangs after you’ve selected components.
Drawbacks of the IDX deployment tools
Using Vlocity Build is a steep learning curve for low-code teammates who are often the ones making the configurations to Salesforce Industries, and it’s a key principle of DevOps that developers are best placed to deploy their work — they have all the context for the changes and how they should work.
Using the click-based IDX Workbench could solve that issue. But it adds another deployment tool to the mix, which creates more problems:
- It’s inefficient to run extra deployments for Vlocity DataPacks in addition to metadata deployments
- It’s another tool for the team to learn
- Your audit trail for deployments is split
- It’s much more complicated to integrate your Vlocity deployments into a mature DevOps process
As Salesforce’s architects point out, it’s worth exploring partner solutions built for Salesforce with full-featured support for deploying Vlocity DataPacks. This means the whole team can easily deploy Vlocity and metadata together — with one audit trail.
Gearset gives you more granular control over Vlocity deployments than Salesforce’s deployment tools. It offers a whole range of additional functionality for deployments, including the ability to schedule deployments, roll back some or all of your deployment, clone and redeploy packages, and much more. And with Gearset, you can also include Vlocity in a mature Salesforce DevOps process, building a CI/CD pipeline for release automation.
How to deploy Vlocity DataPacks using Gearset
Gearset’s Vlocity deployment solution allows you to deploy Vlocity components alongside metadata, in one process.
Let’s walk through a Vlocity deployment in Gearset. Why not follow along by starting a free trial?
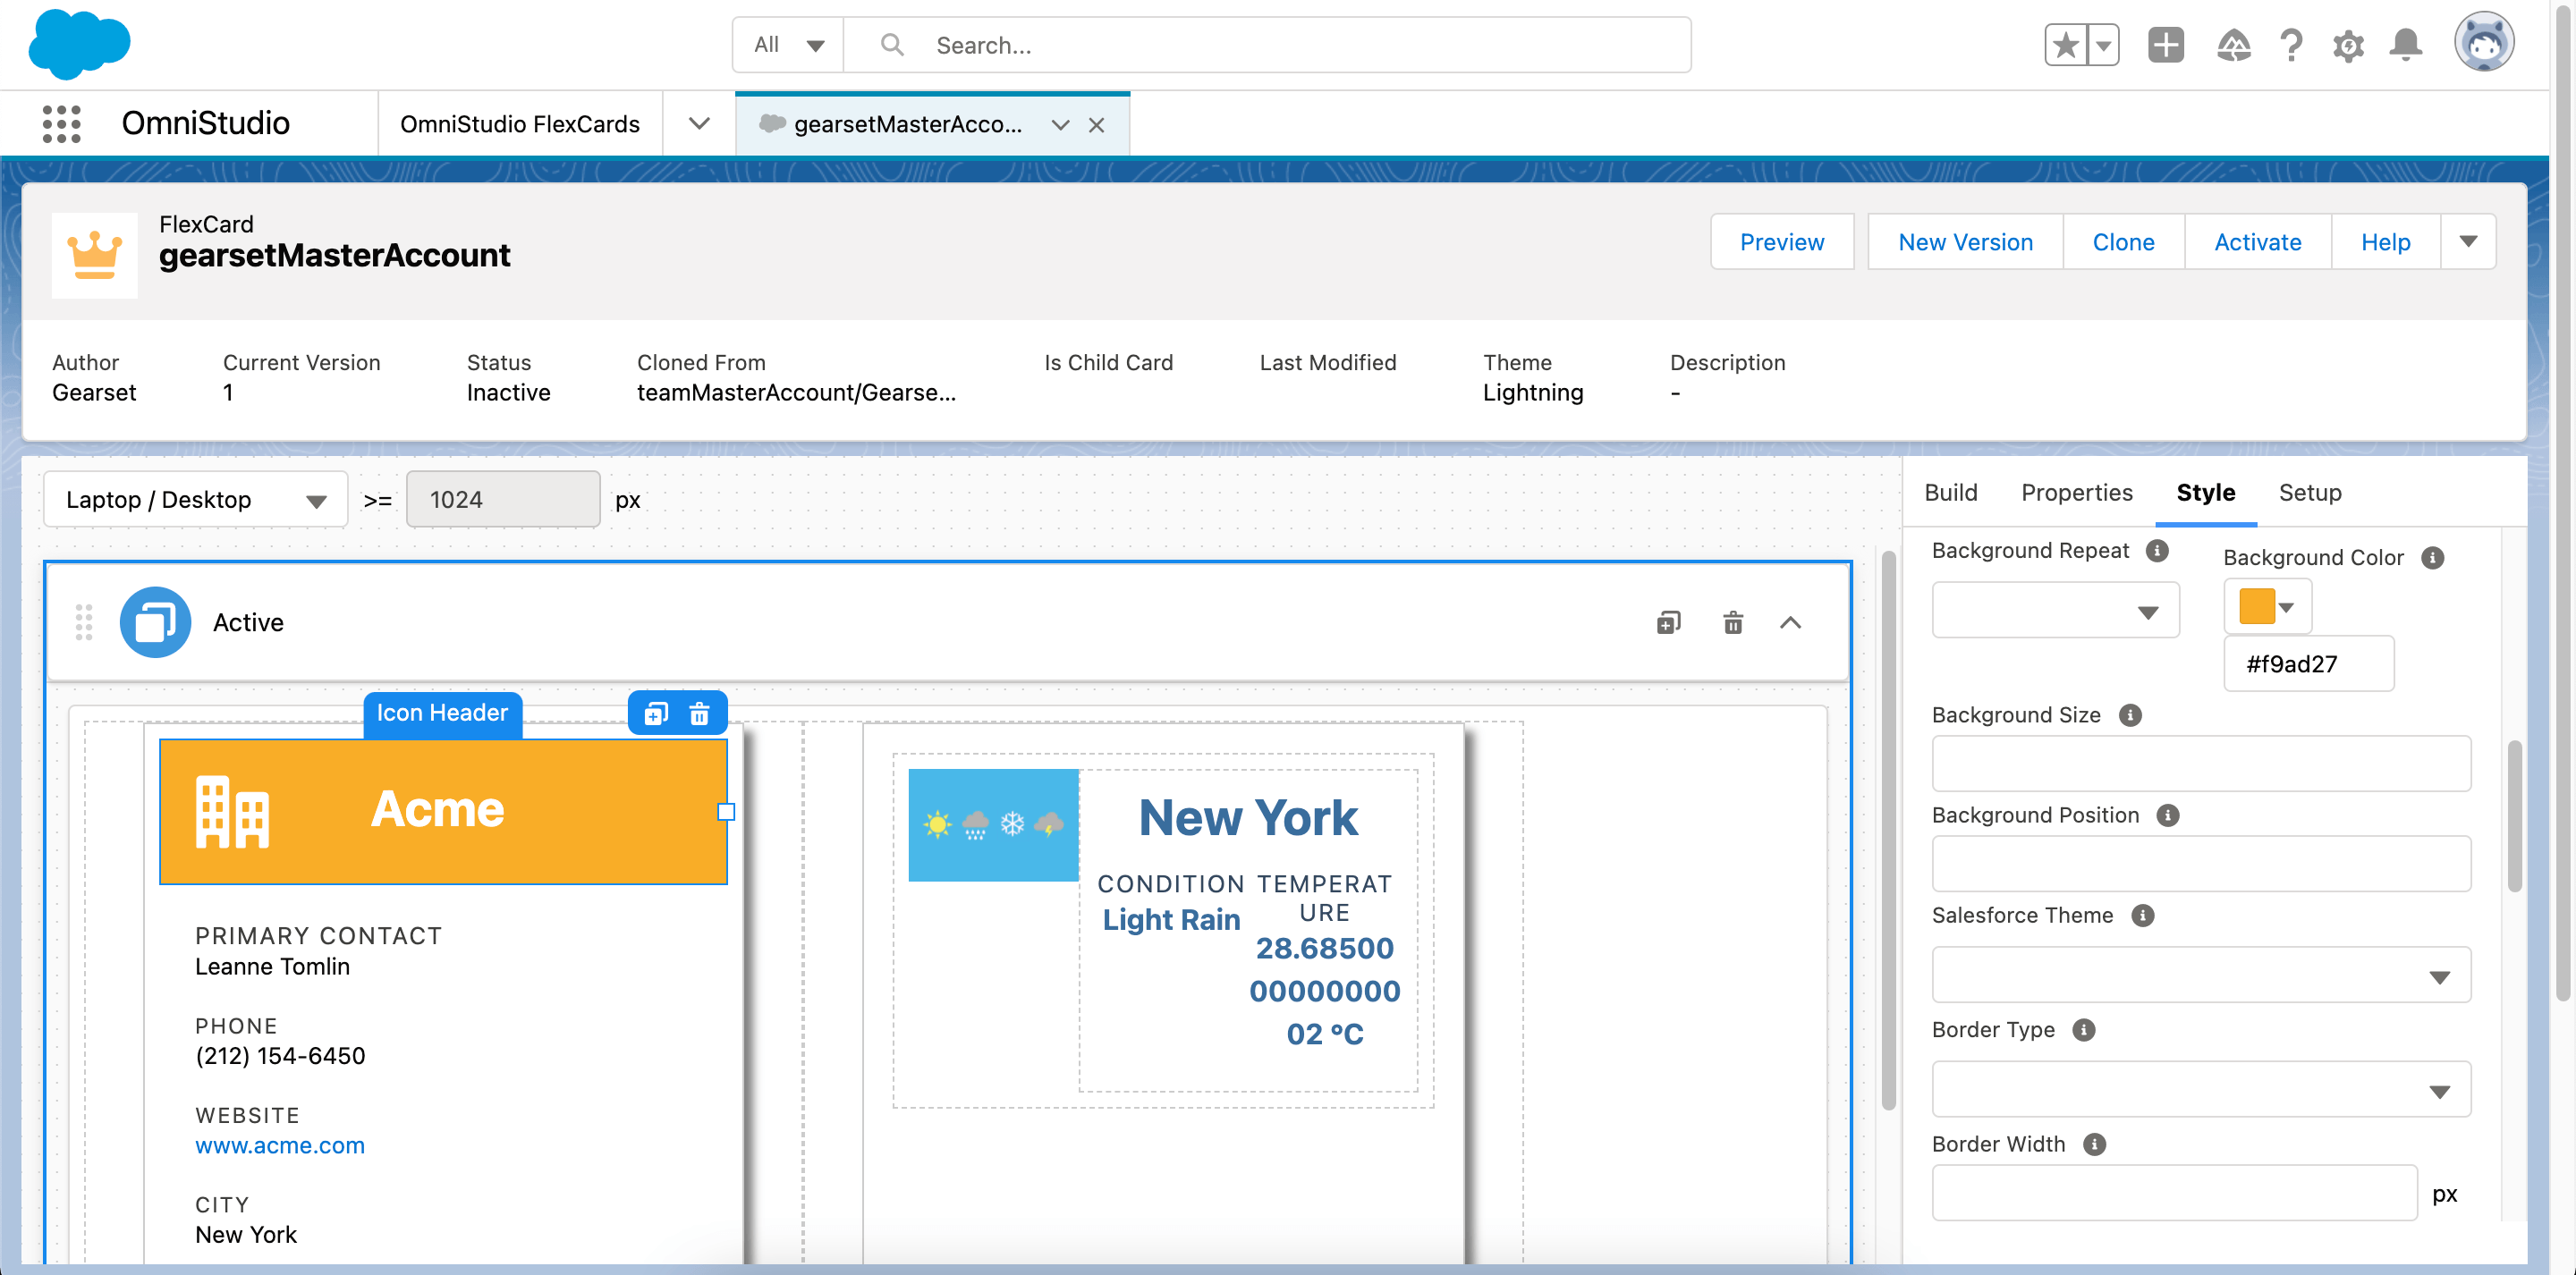
1. Create a Vlocity change in Salesforce
First, we’ll make a change to one of the FlexCards in our developer org. We open up OmniStudio from the App Launcher, go to OmniStudio FlexCards and select the FlexCard we want to edit — in this case gearsetMasterAccount. We deactivate the card and make a simple change, switching the color of the icon header from blue to orange, then reactivate the FlexCard.
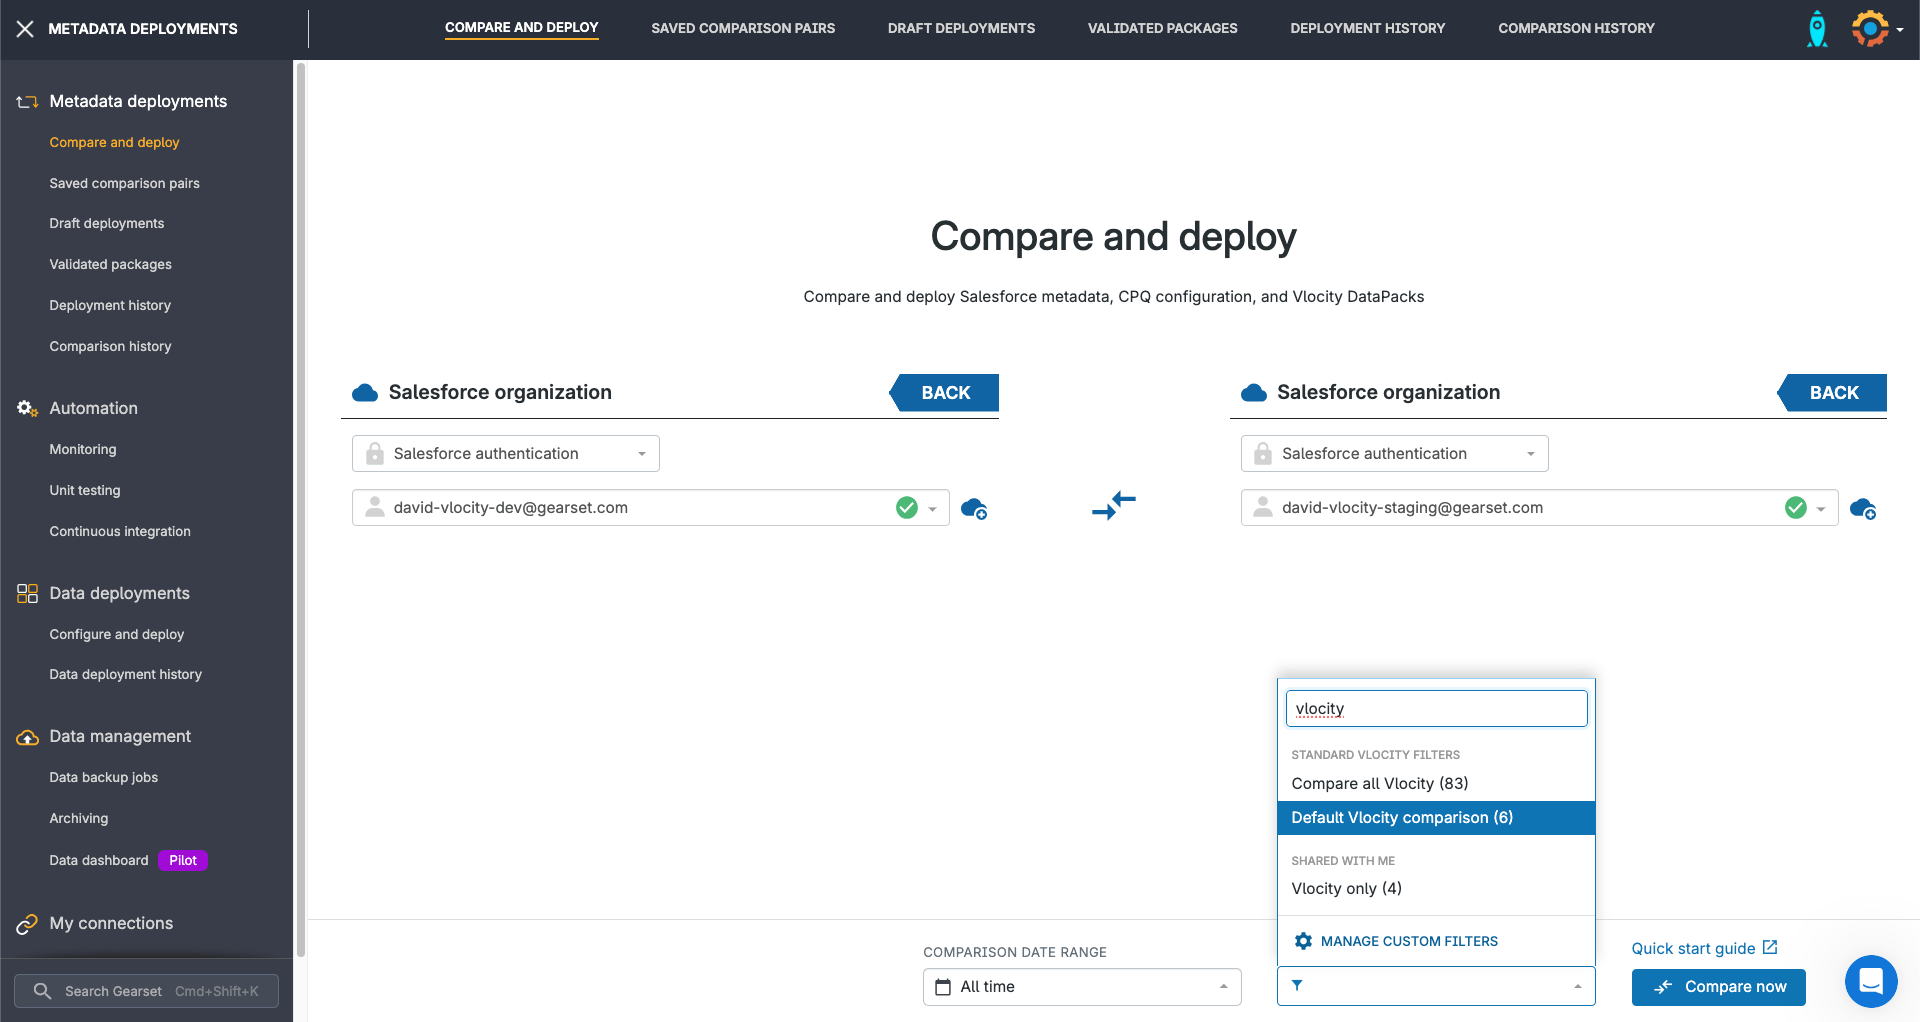
2. Compare the source and target environments
Next, we’re going to use Gearset to compare that developer org with a staging environment, and then deploy our change to the FlexCard. On the Compare and deploy page, we select our source and target orgs.
Next, we select “Default Vlocity comparison” in the filter, which determines which Vlocity items and metadata we’ll retrieve. The default Vlocity metadata filter retrieves the following Vlocity components: DataRaptor, IntegrationProcedure, OmniScript, VlocityCard, VlocityUILayout, and VlocityUITemplate. We’re ready to click Compare now.
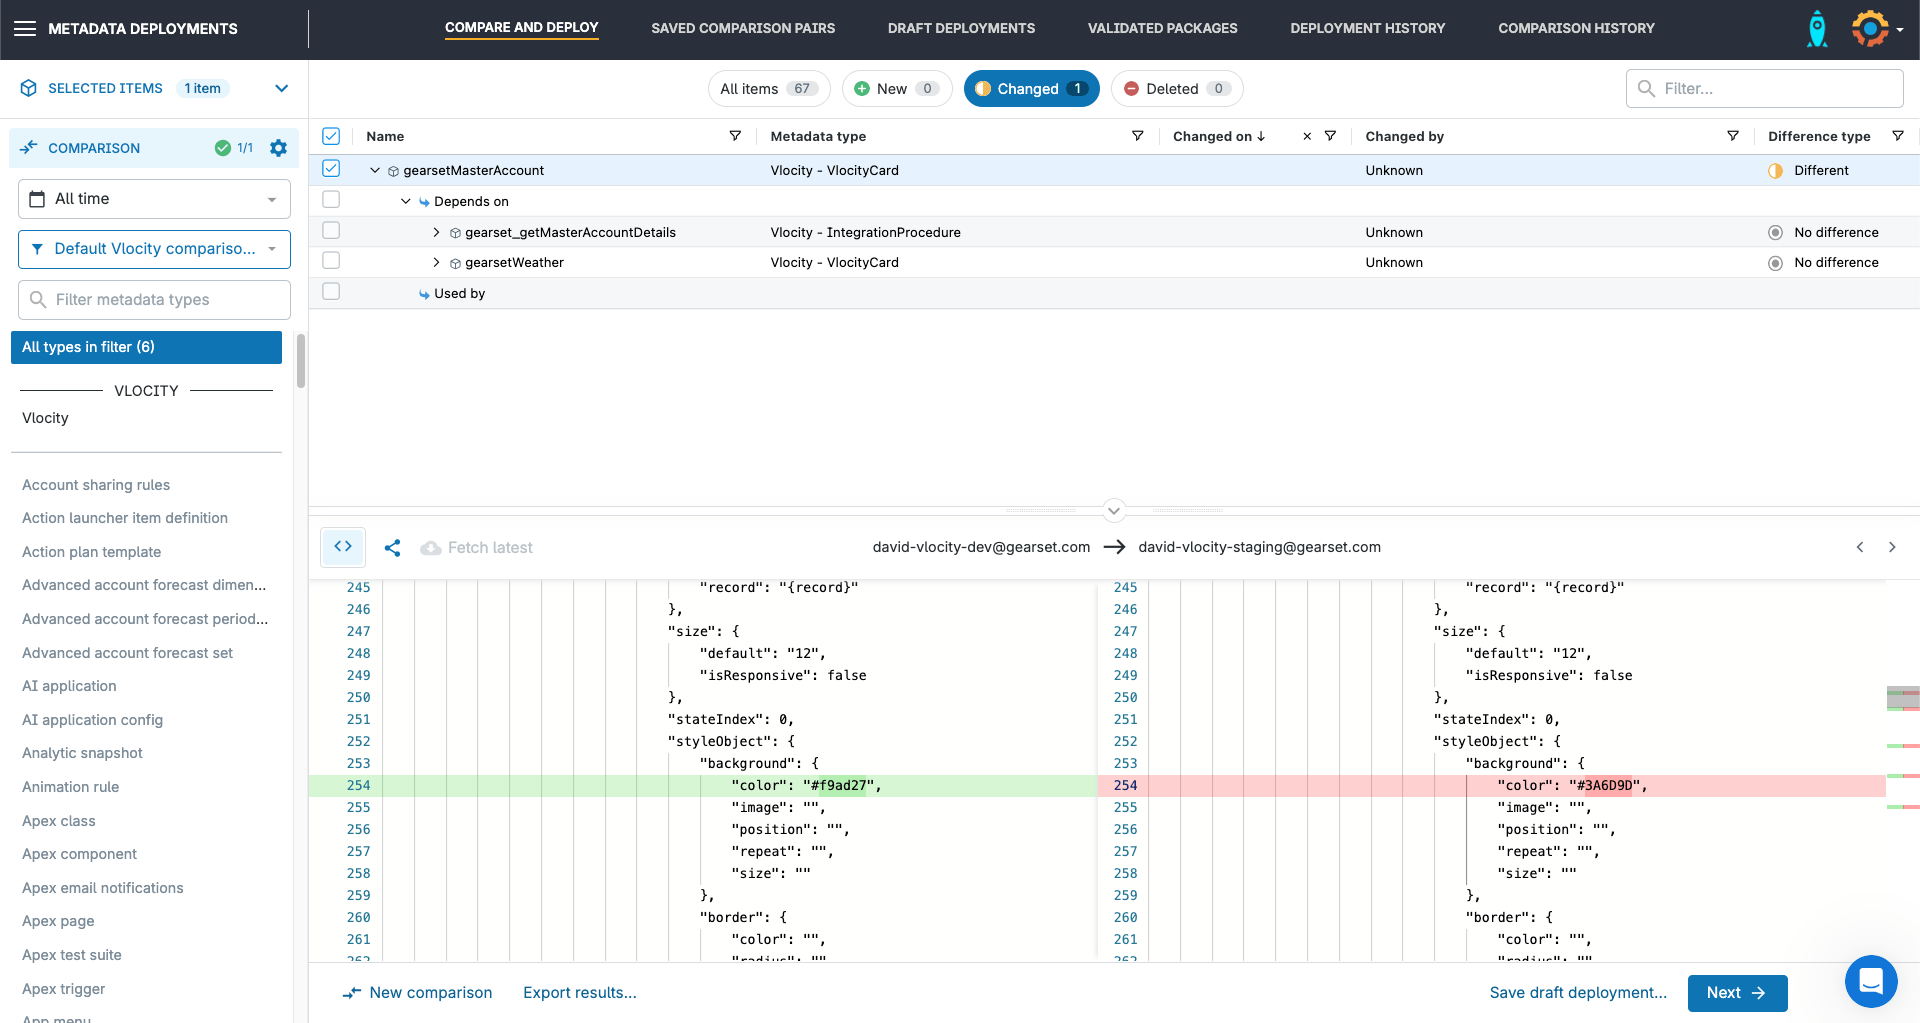
3. Select the Vlocity components to deploy
Gearset now shows us the exact differences between our source and target. We can navigate between all items, new, changed and deleted, using the tabs along the top of the comparison view. If we need to pull any metadata types into the comparison, we can grab those on-demand from the left-hand side.
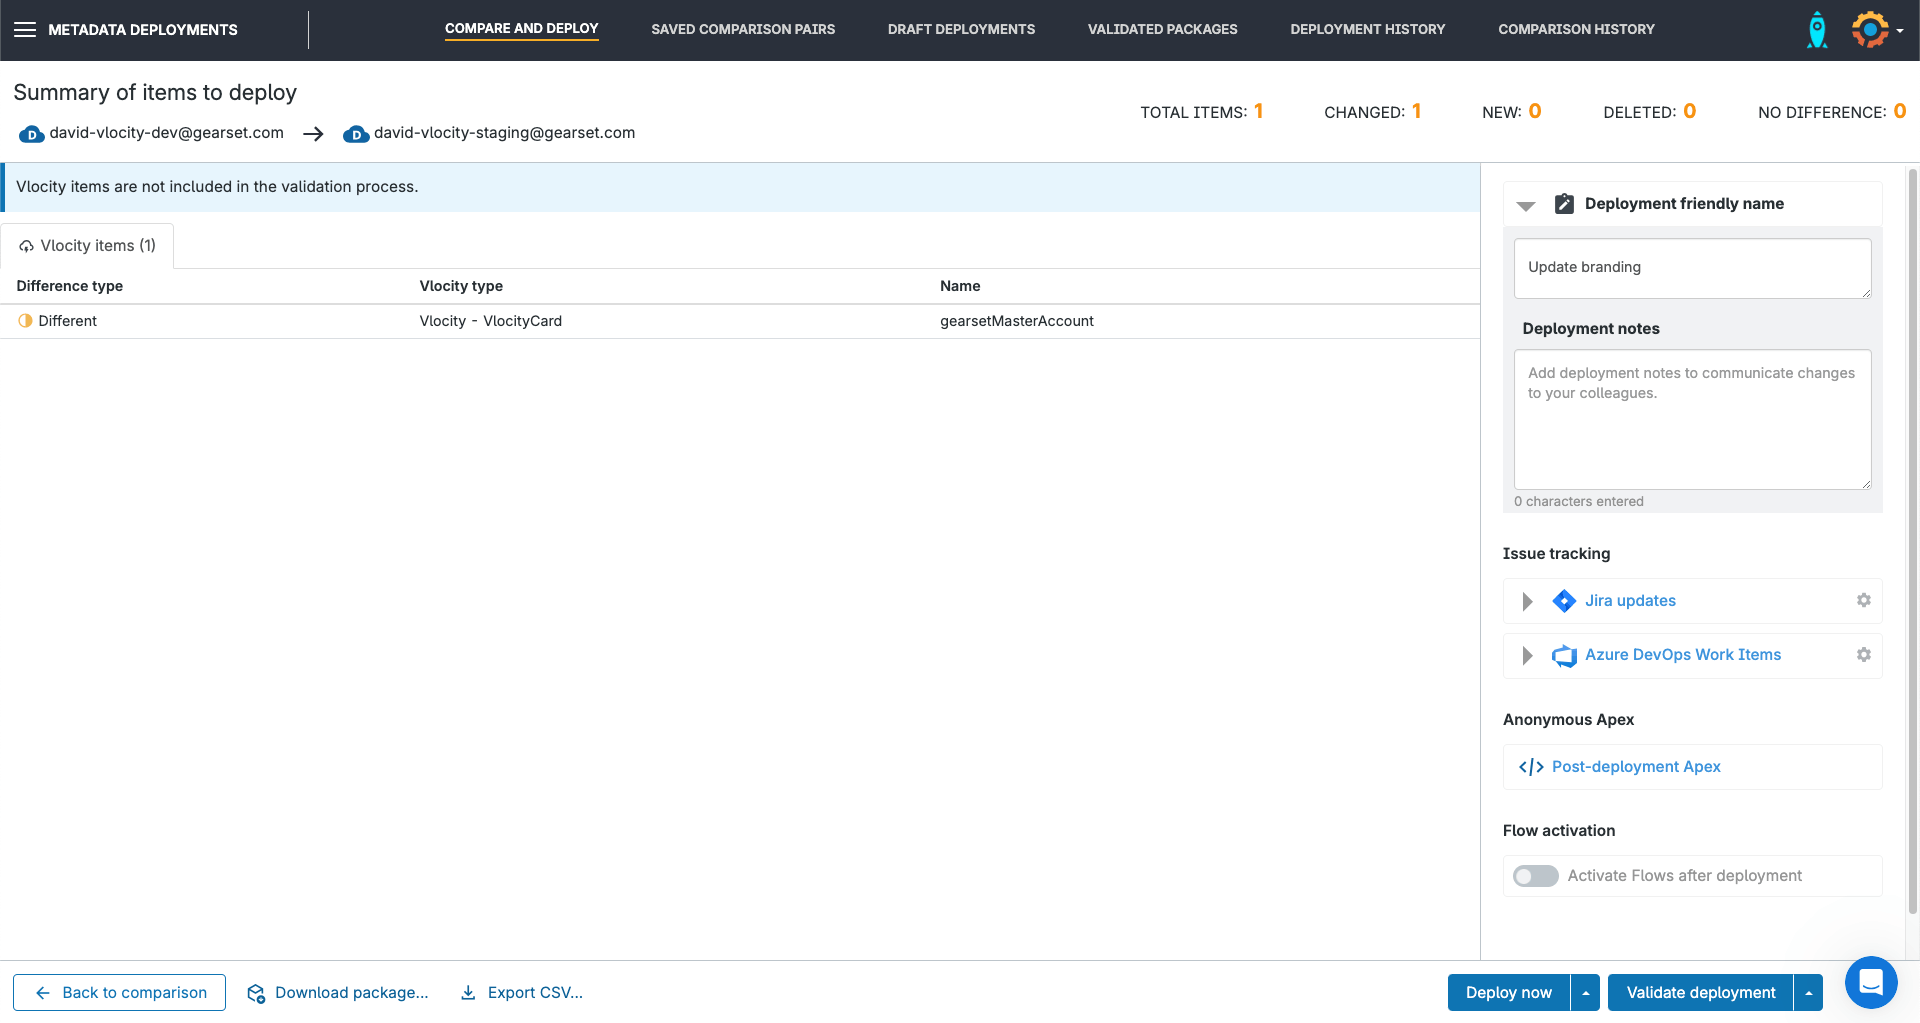
Here’s our change to the VlocityCard, so we’ll select that item to deploy.
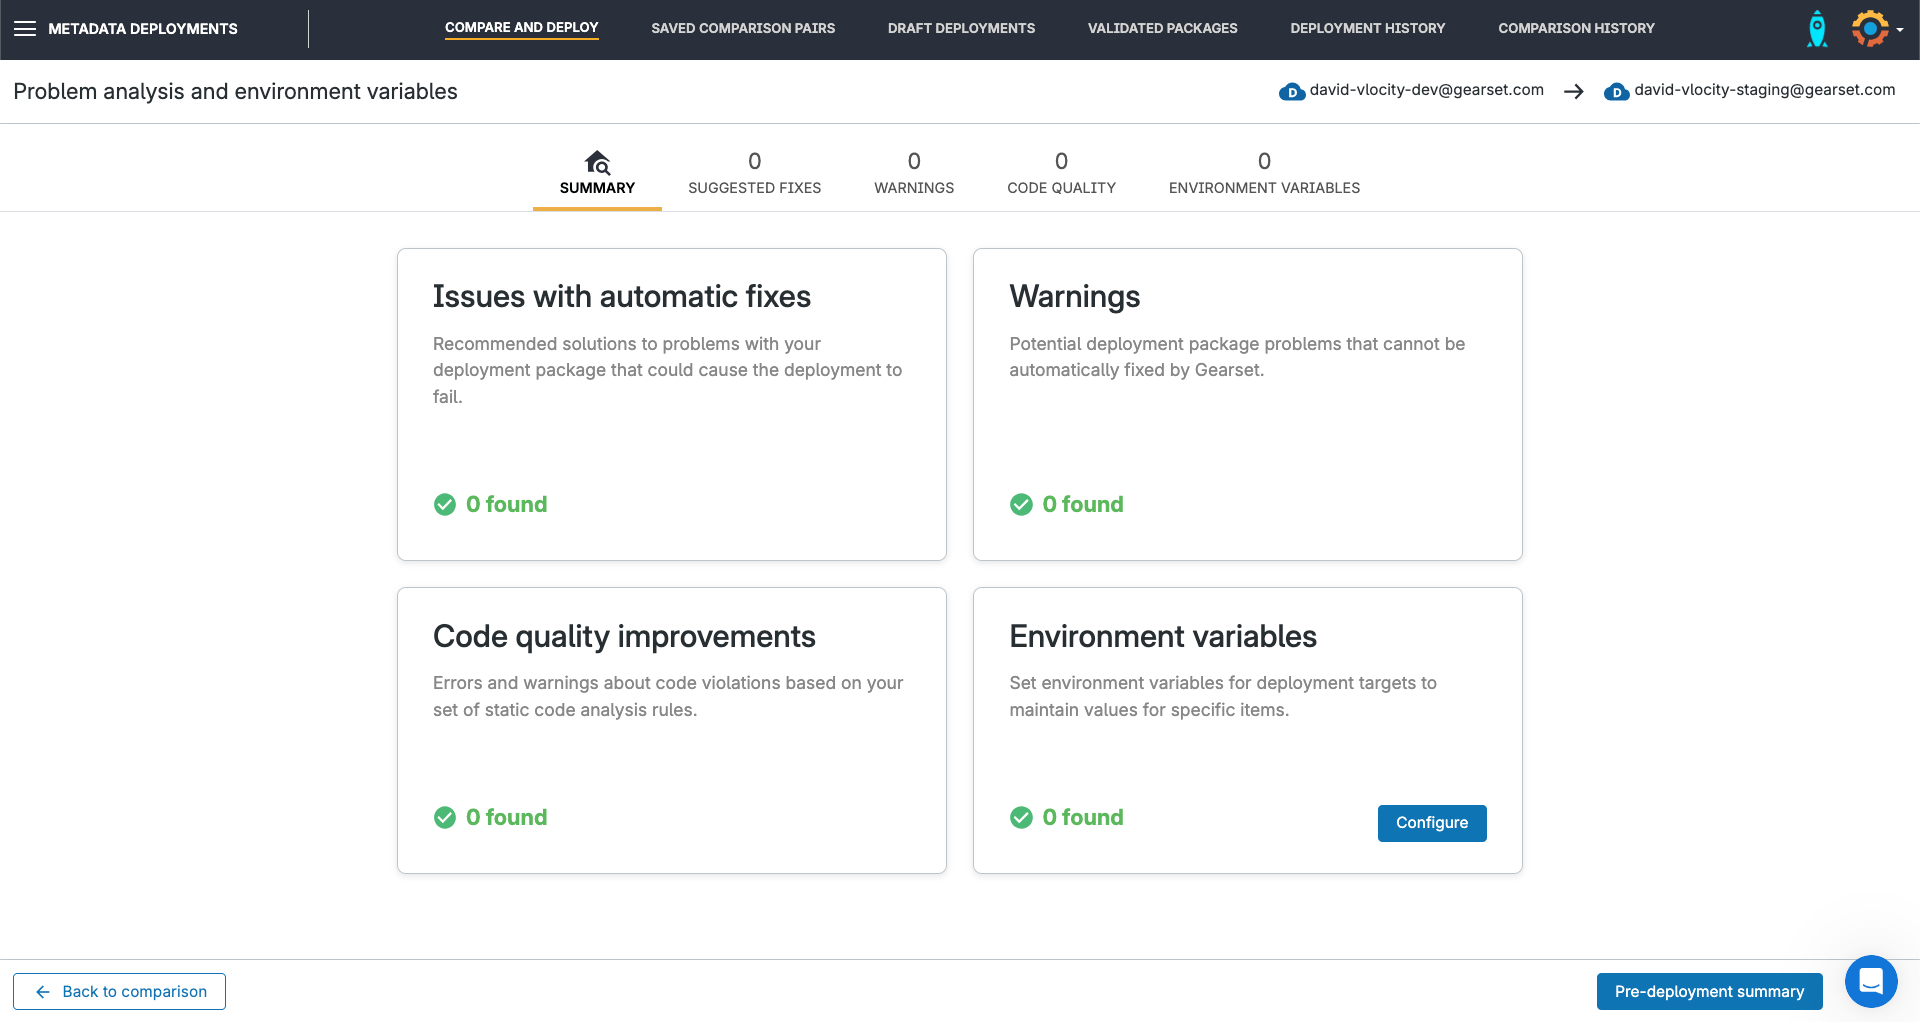
There are no warnings flagged up by Gearset’s problem analyzers for this deployment, so we can proceed straight to the deployment summary.
4. Review the package and deploy
We’ll give the deployment a friendly name so it’s clear to the team what this deployment was for. There’s the option to update tickets in our work tracking tool, such as Jira. Then we can schedule the deployment for later, or click Deploy now.
To save us needing to carry out a post-deployment step, Gearset will automatically activate Flexcards and OmniScripts after the deployment.
An automated fix for OmniScripts
If you try to deploy an OmniScript that’s embedded within another OmniScript, Gearset will detect this and recommend that you add the dependent OmniScript to the deployment package. This is because the dependent OmniScript will need to be reactivated in order to run as intended.
Deploying Vlocity and metadata together
You can easily deploy Vlocity items alongside Salesforce metadata in the same deployment. On the Deployment summary page, you’ll see separate tabs for metadata items and Vlocity items for you to review everything that’s going to be deployed.
Gearset will deploy your metadata first, then the Vlocity items. When you view your deployment history in Gearset, you may see some deployments that have the status “Partial”. This means the metadata was successfully deployed but not the Vlocity items.
Adding Vlocity items to your Salesforce DevOps process
Despite the differences between Vlocity DataPacks and regular Salesforce metadata, having a DevOps process that includes all your Salesforce configurations helps to realize the benefits of DevOps.
As well as deploying Vlocity DataPacks manually between Salesforce orgs and/or Git branches, you can also use Gearset to include Vlocity deployments in your CI/CD process. Gearset’s pipelines view lets you visualize and manage your entire release process so you can:
- Track changes and the status of environments
- Promote changes through the pipeline with a few clicks
- Back propagate changes to keep environments in sync
- Reduce and resolve merge conflicts easily
Gearset integrates with your preferred Git hosting provider, and your pipeline view will reflect all changes made — whether or not they’re made in Gearset. This means developers can still review and merge PRs in GitHub or whichever tool you’re using, and pipelines will remain the source of truth for your release process.
Any unexpected changes to Vlocity in production can also be detected with automated monitoring in Gearset.
Boost your release Vlocity with Gearset
Bring your whole team and all your work streams together with Gearset, so metadata and Vlocity deployments are combined in a mature DevOps process. If you’re not yet a Gearset user, you can start a free 30-day trial today or reach out to arrange a tailored demo.
