
Well-maintained Salesforce permissions are a compliance necessity for any organization. Field-Level Security (FLS) is a key piece of the permissions model in Salesforce that helps businesses build nuanced access levels for end users — but it’s notoriously difficult to deploy. With the upcoming migration of permissions from Profiles to Permission Sets, and the introduction of Permission Set Groups, teams are scrambling to find an easy way to deploy these metadata types and maintain compliance — all while keeping their security configurations up to date to avoid potential data breaches.
In this article, we’ll look at how Field-Level Security and Field Permissions fit into the permissions structure, how to control access, and how to deploy them in just a few clicks — so you’re ready well before the Spring ’26 release lands.
What is Field-Level Security in Salesforce?
To understand Field-Level Security (FLS) in Salesforce, we need to look at Object Level Security too. As their names suggest, Object Level and Field-Level Security specify the level of data access a Profile has to an object and field respectively. These types of permissions are layered onto each other to build a more nuanced level of access for users, providing granular control. Let’s look at how this works.
Object Level Security specifies whether a particular Profile will have Create, Read, Update, and Delete (CRUD) access for an object. For example, Account Executives in the sales team will likely need Create, Read and Update access for the Account object, so that they can see, add and change records. But someone from the internal comms team is unlikely to need to see customer account records, so they might not need access to the Account object at all.
But, access requirements are often a bit more complex than simply being able to see and edit all fields on a given object. Continuing our example above, an Account Executive will likely need to update fields like email address, contact number, etc. But it might be preferable to restrict their ability to edit billing information. Instead, editing billing-related fields, which contain sensitive information is likely something that the Accounts Payable team will need. This is where Field-Level Security (FLS) comes into play, allowing you to apply additional security controls and prevent accidental data exposure.
When a profile has at least Read access to an object, FLS settings can then be added to control Read/Edit access to specific fields, further protecting sensitive information by allowing granular control of visibility. But FLS can’t give greater field access than is specified by the Object Level Security. So if a profile is given only Read access to the Account object, the FLS could be used to make specific, sensitive fields not readable/hidden but couldn’t be used to give Edit access to fields on the Account object. With this in mind, it’s important to give the highest level of permission that a profile needs at the object level. FLS can then be used to narrow down and restrict access.
Within Salesforce, Field Accessibility allows you to see an overview of the FLS given to each profile for a specific field, it shows you the overall field-level security settings, but this isn’t a permission in itself.
Field-Level Security set to be retired
Salesforce recently announced that permissions on Profiles are set to be retired in Spring ‘26 — Profiles will still exist but permissions that used to live on Profiles will be migrated over to Permission Sets instead. With this shift to Permission Sets, Object Level Security will be replaced by Object Permissions and FLS will be replaced by Field Permissions.
FLS and Field Permissions work in the same way: by restricting the pre-specified object permissions for end users. The difference is simply where these permissions live — Profile vs Permission Set.
Migrating from Profiles to Permission Sets
To ensure continuity in your org and avoid the risk that end users will have their access unintentionally revoked, FLS needs to be replaced by Field Permissions before Spring ‘26.
Salesforce has introduced the User Access and Permissions Assistant to help users convert Profiles to Permission Sets. But people across the ecosystem are still daunted by the prospect of making the migration from FLS to Field Permissions and long-term permissions management, because of how difficult these security configurations are to deploy using native solutions like Change Sets.
Thankfully, Gearset can help make those deployments easier.
How to deploy Field-Level Security
It’s going to take time to build and test all the new Permissions Sets needed to replace permissions on Profiles. While that work is ongoing, it’s likely that you’ll still need to add or change existing FLS to control visibility of sensitive fields.
1. Choose your source and target orgs
To get started, start a free 30-day trial of Gearset and head to the Compare and deploy page to chose the source and target of your deployment. The app provides a default metadata filter for Profiles and Permission Sets.
2. Select your FLS changes
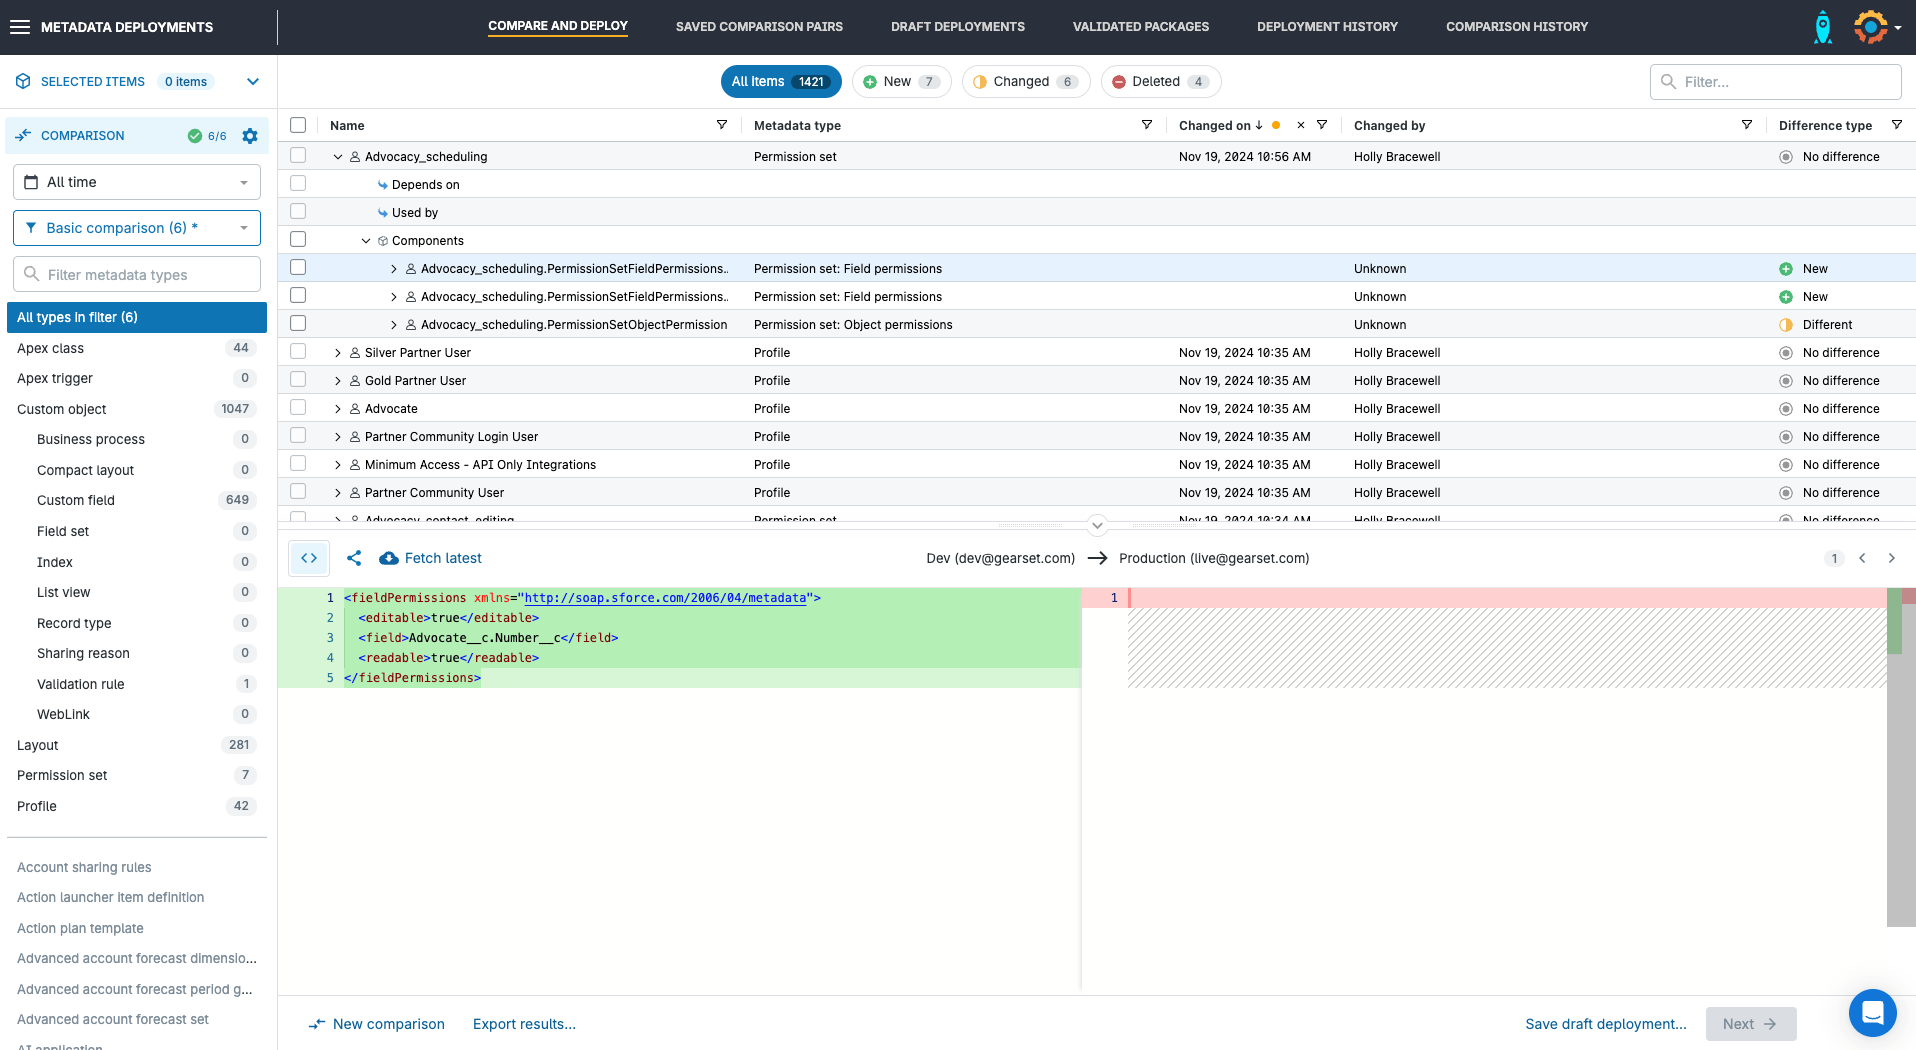
Profiles are large metadata types and scrolling through every line of an XML file to find changes is time-consuming and error-prone. Instead, Gearset will flag all changed, new, and deleted components in a side-by-side diff, so you can see even the smallest changes made to Profiles like individual FLS.
New, changed and deleted FLS will appear in a couple of places on the comparison. First, individual FLS can be found under the associated object. For example, if multiple FLS has been changed for the ‘Advocate’ Custom Object, you can expand the object in the comparison view and see all the associated profiles and permissions for that object. This includes changes as specific as a singular FLS. By selecting individual FLS from this view, I can deploy only the FLS that I’m interested in. Being able to deploy individual FLS means you can easily make small changes rather than deploying an entire Profile which might contain unfinished or untested development, or include access to sensitive data.
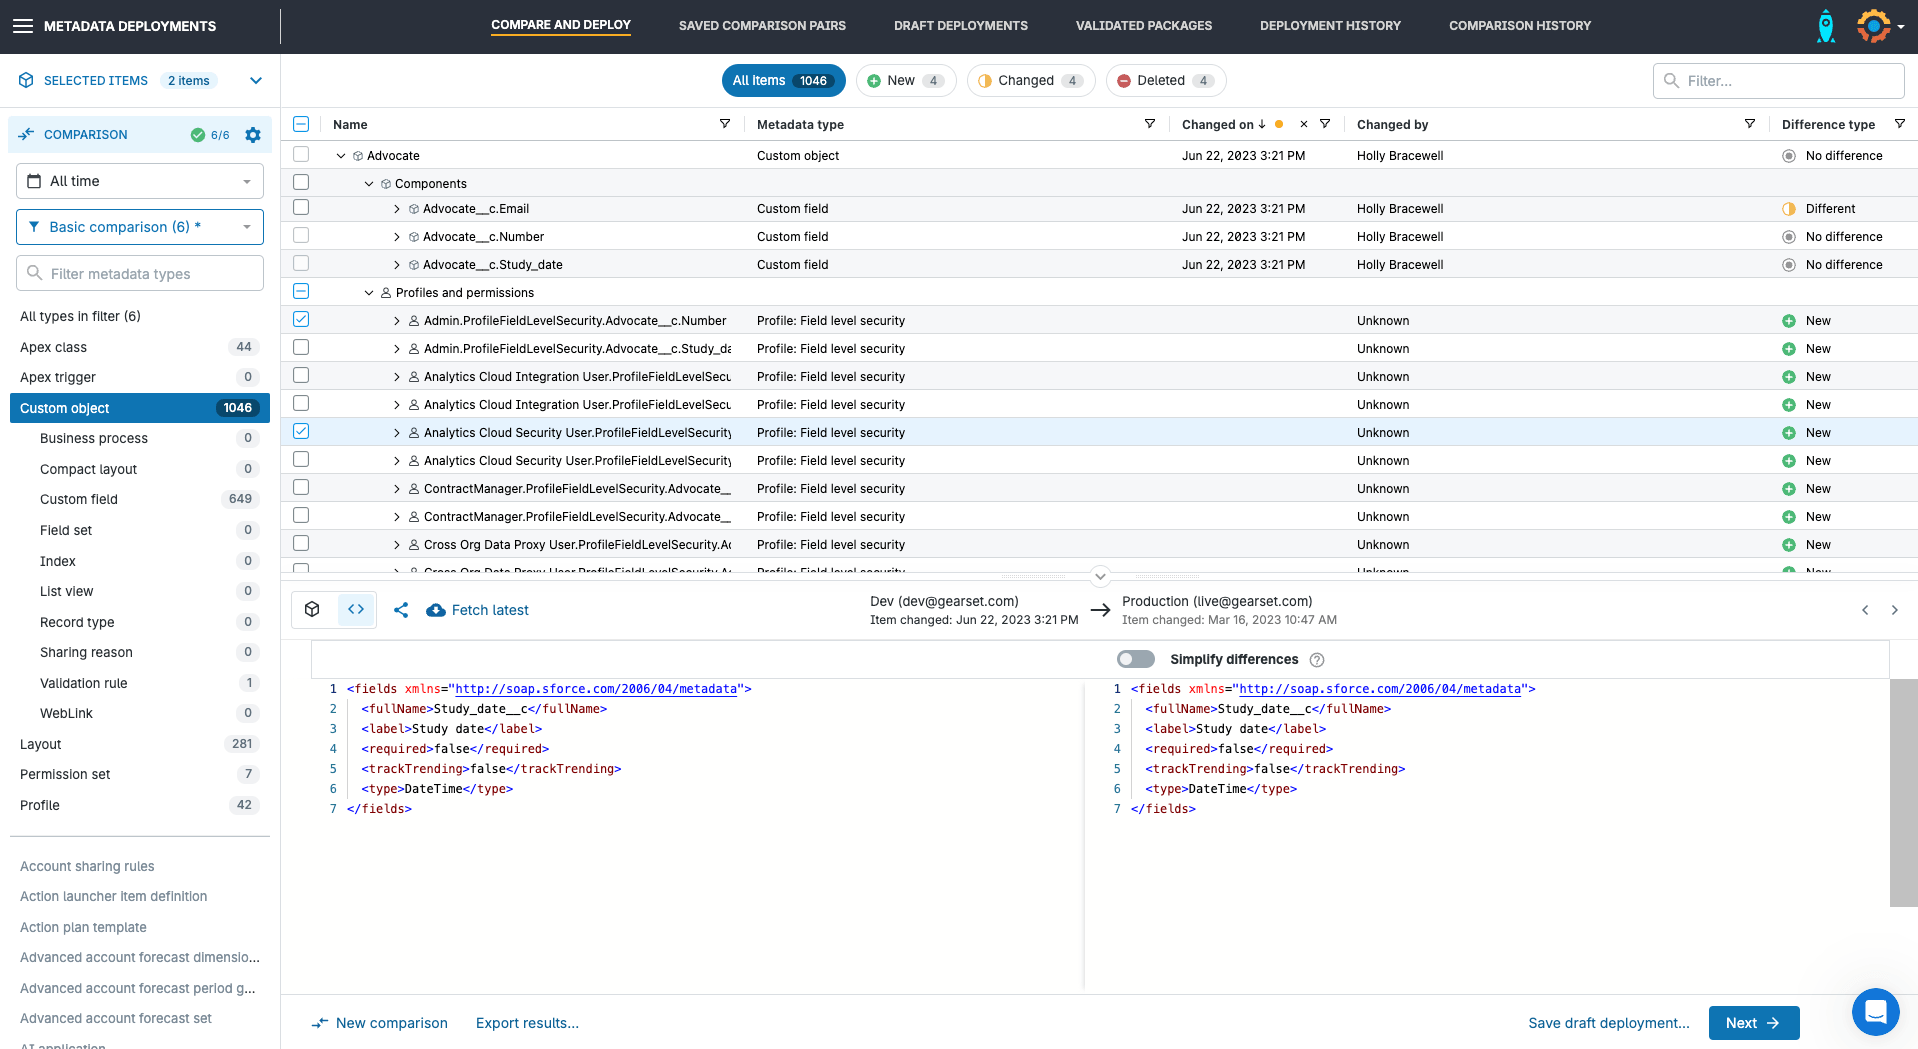
Another place you can find FLS is nested underneath the Profile in the comparison. If the Profile is new (i.e. doesn’t exist in the target) all permissions will be flagged as a single line-item that can only be deployed as a whole.
If the Profile already exists in the target org but there are permissions differences, potentially impacting data access, between the source and target, then those differences will show as individual permission changes and can be deployed independently.
Building a deployment package in Gearset is as simple as clicking the components you want to include in your deployment.
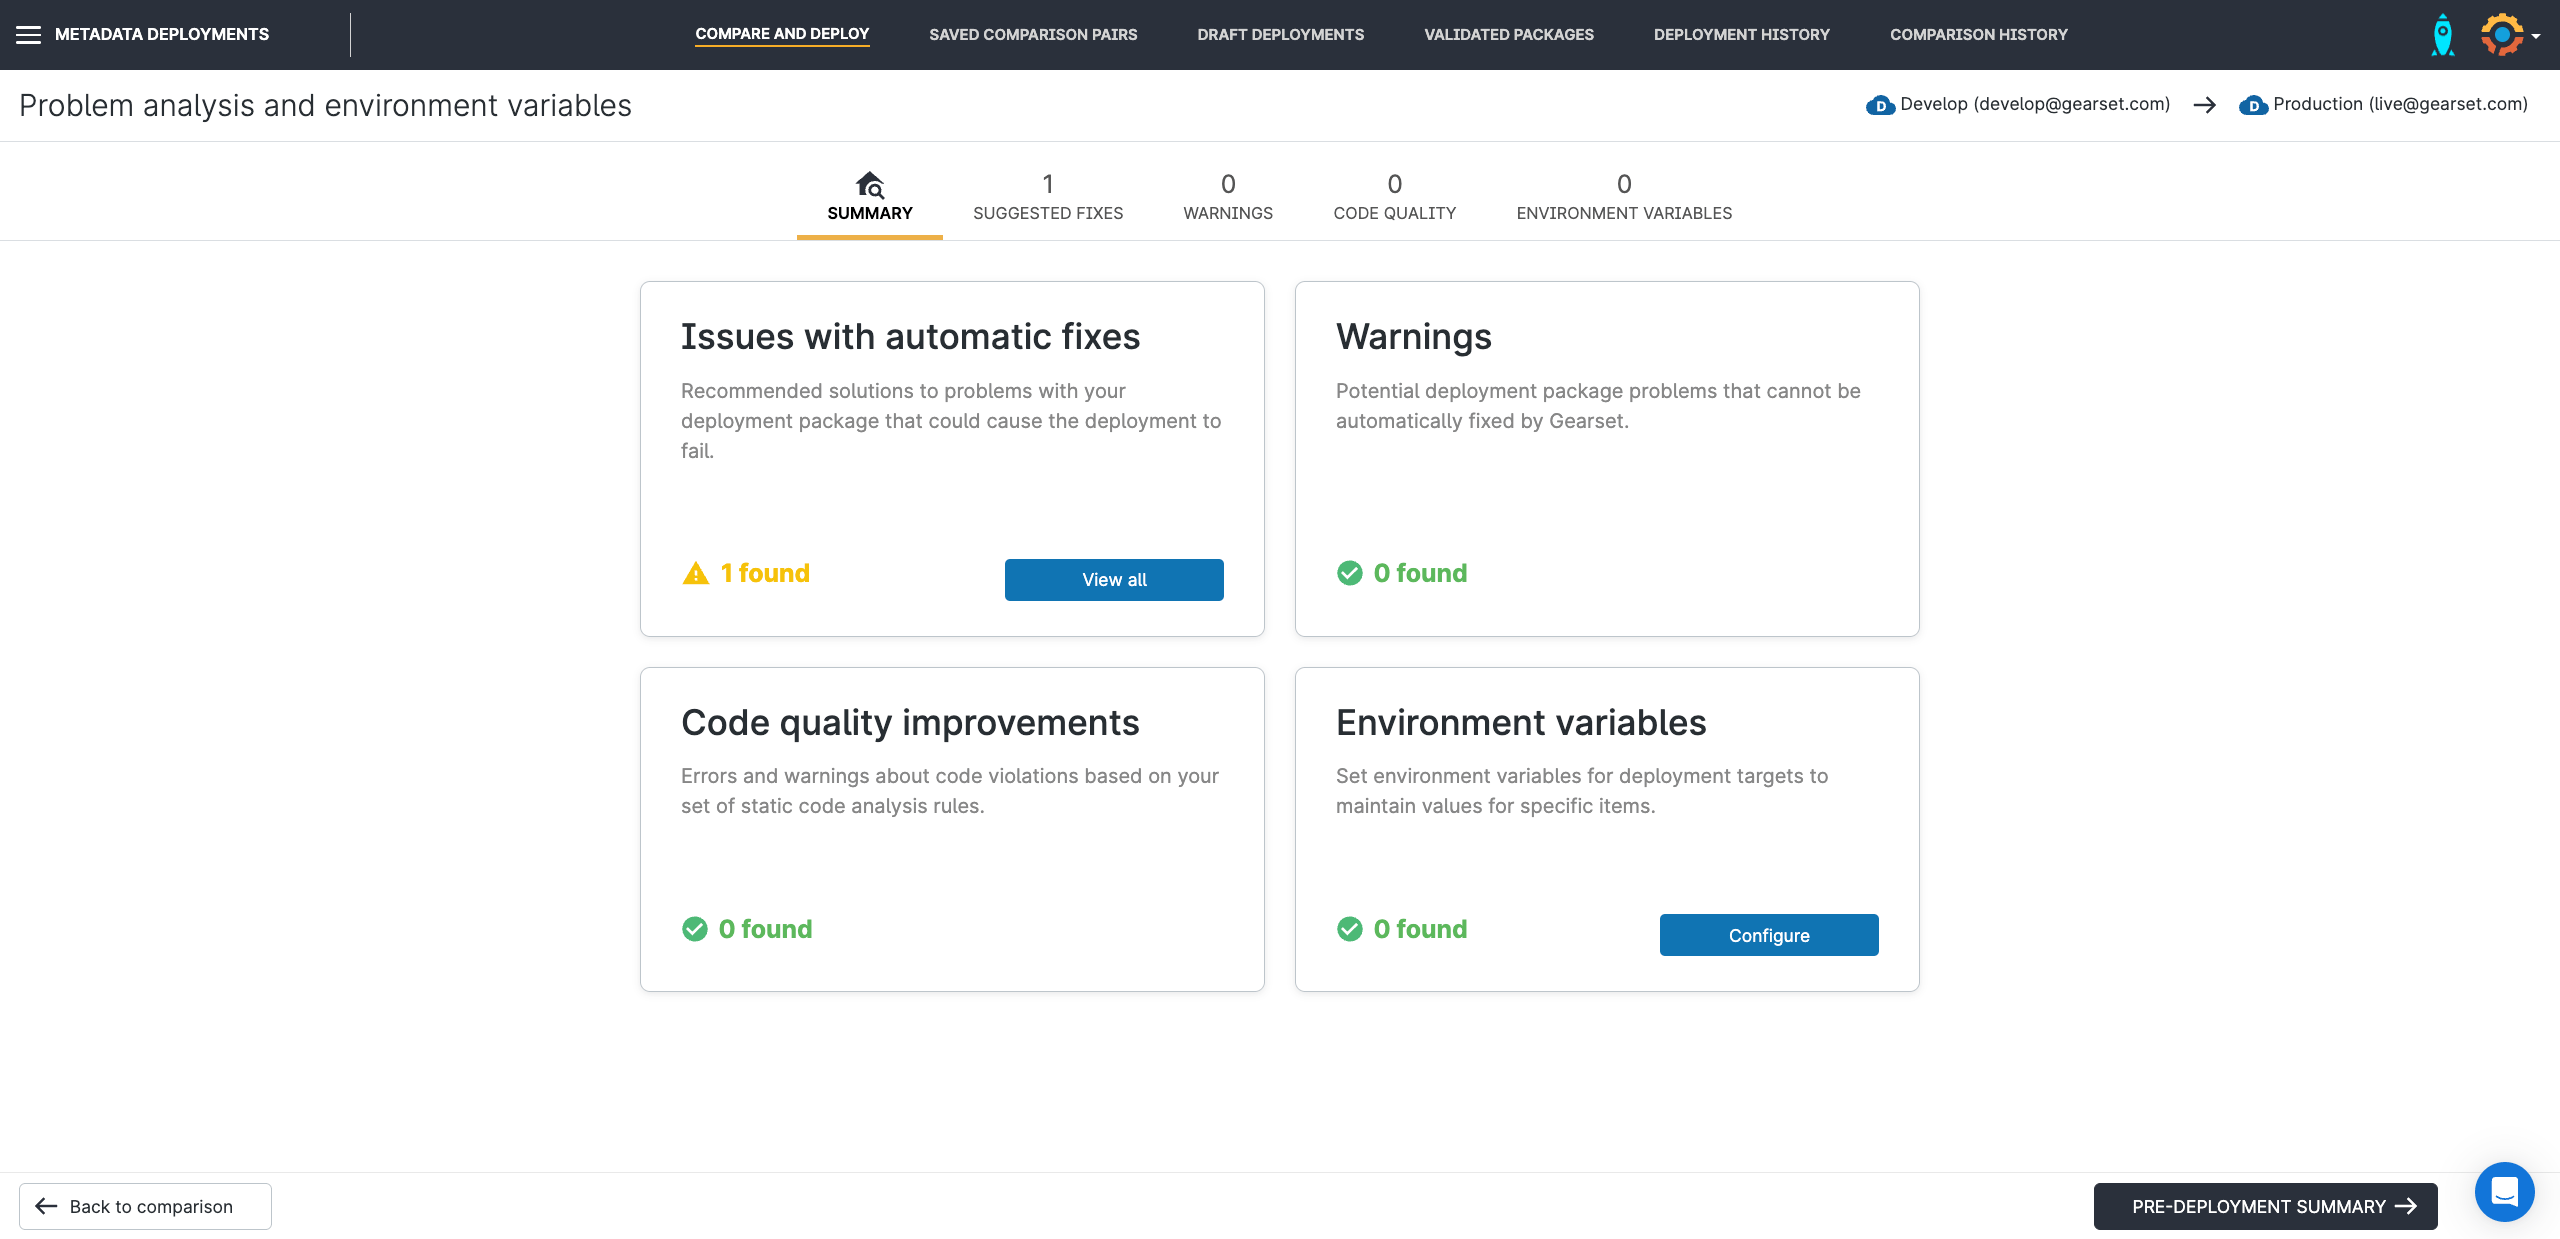
3. Run a problem analysis on your deployment package
Once you’re happy with your selection, Gearset runs problem analysis on your deployment package. This identifies any potential issues and suggests fixes, increasing the likelihood your deployment will succeed on the first run. Static code analysis is also run, to help you maintain high code quality.
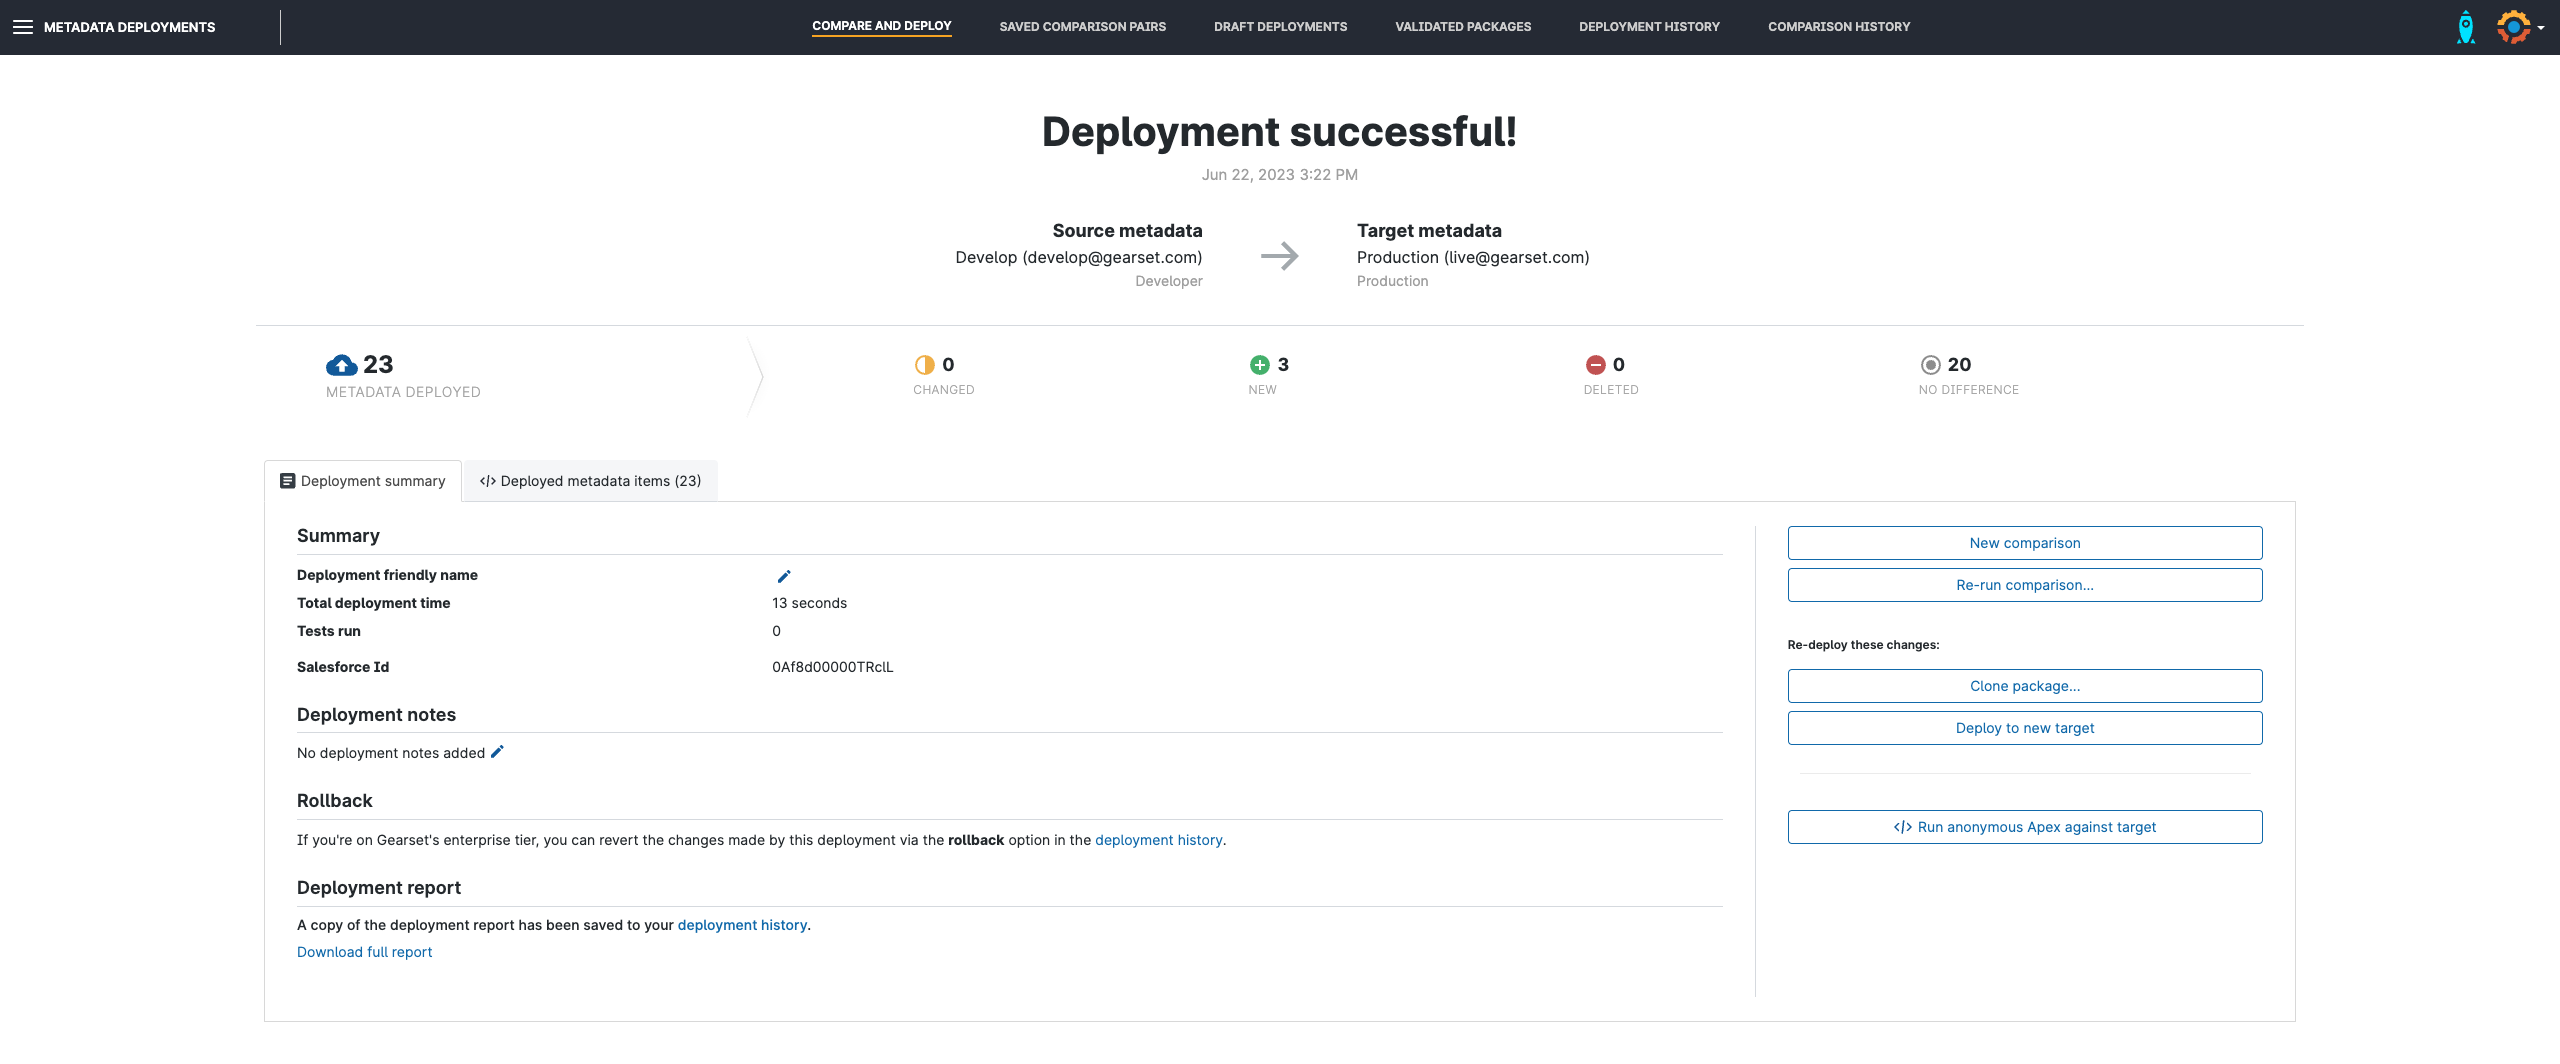
4. Deploy your FLS changes
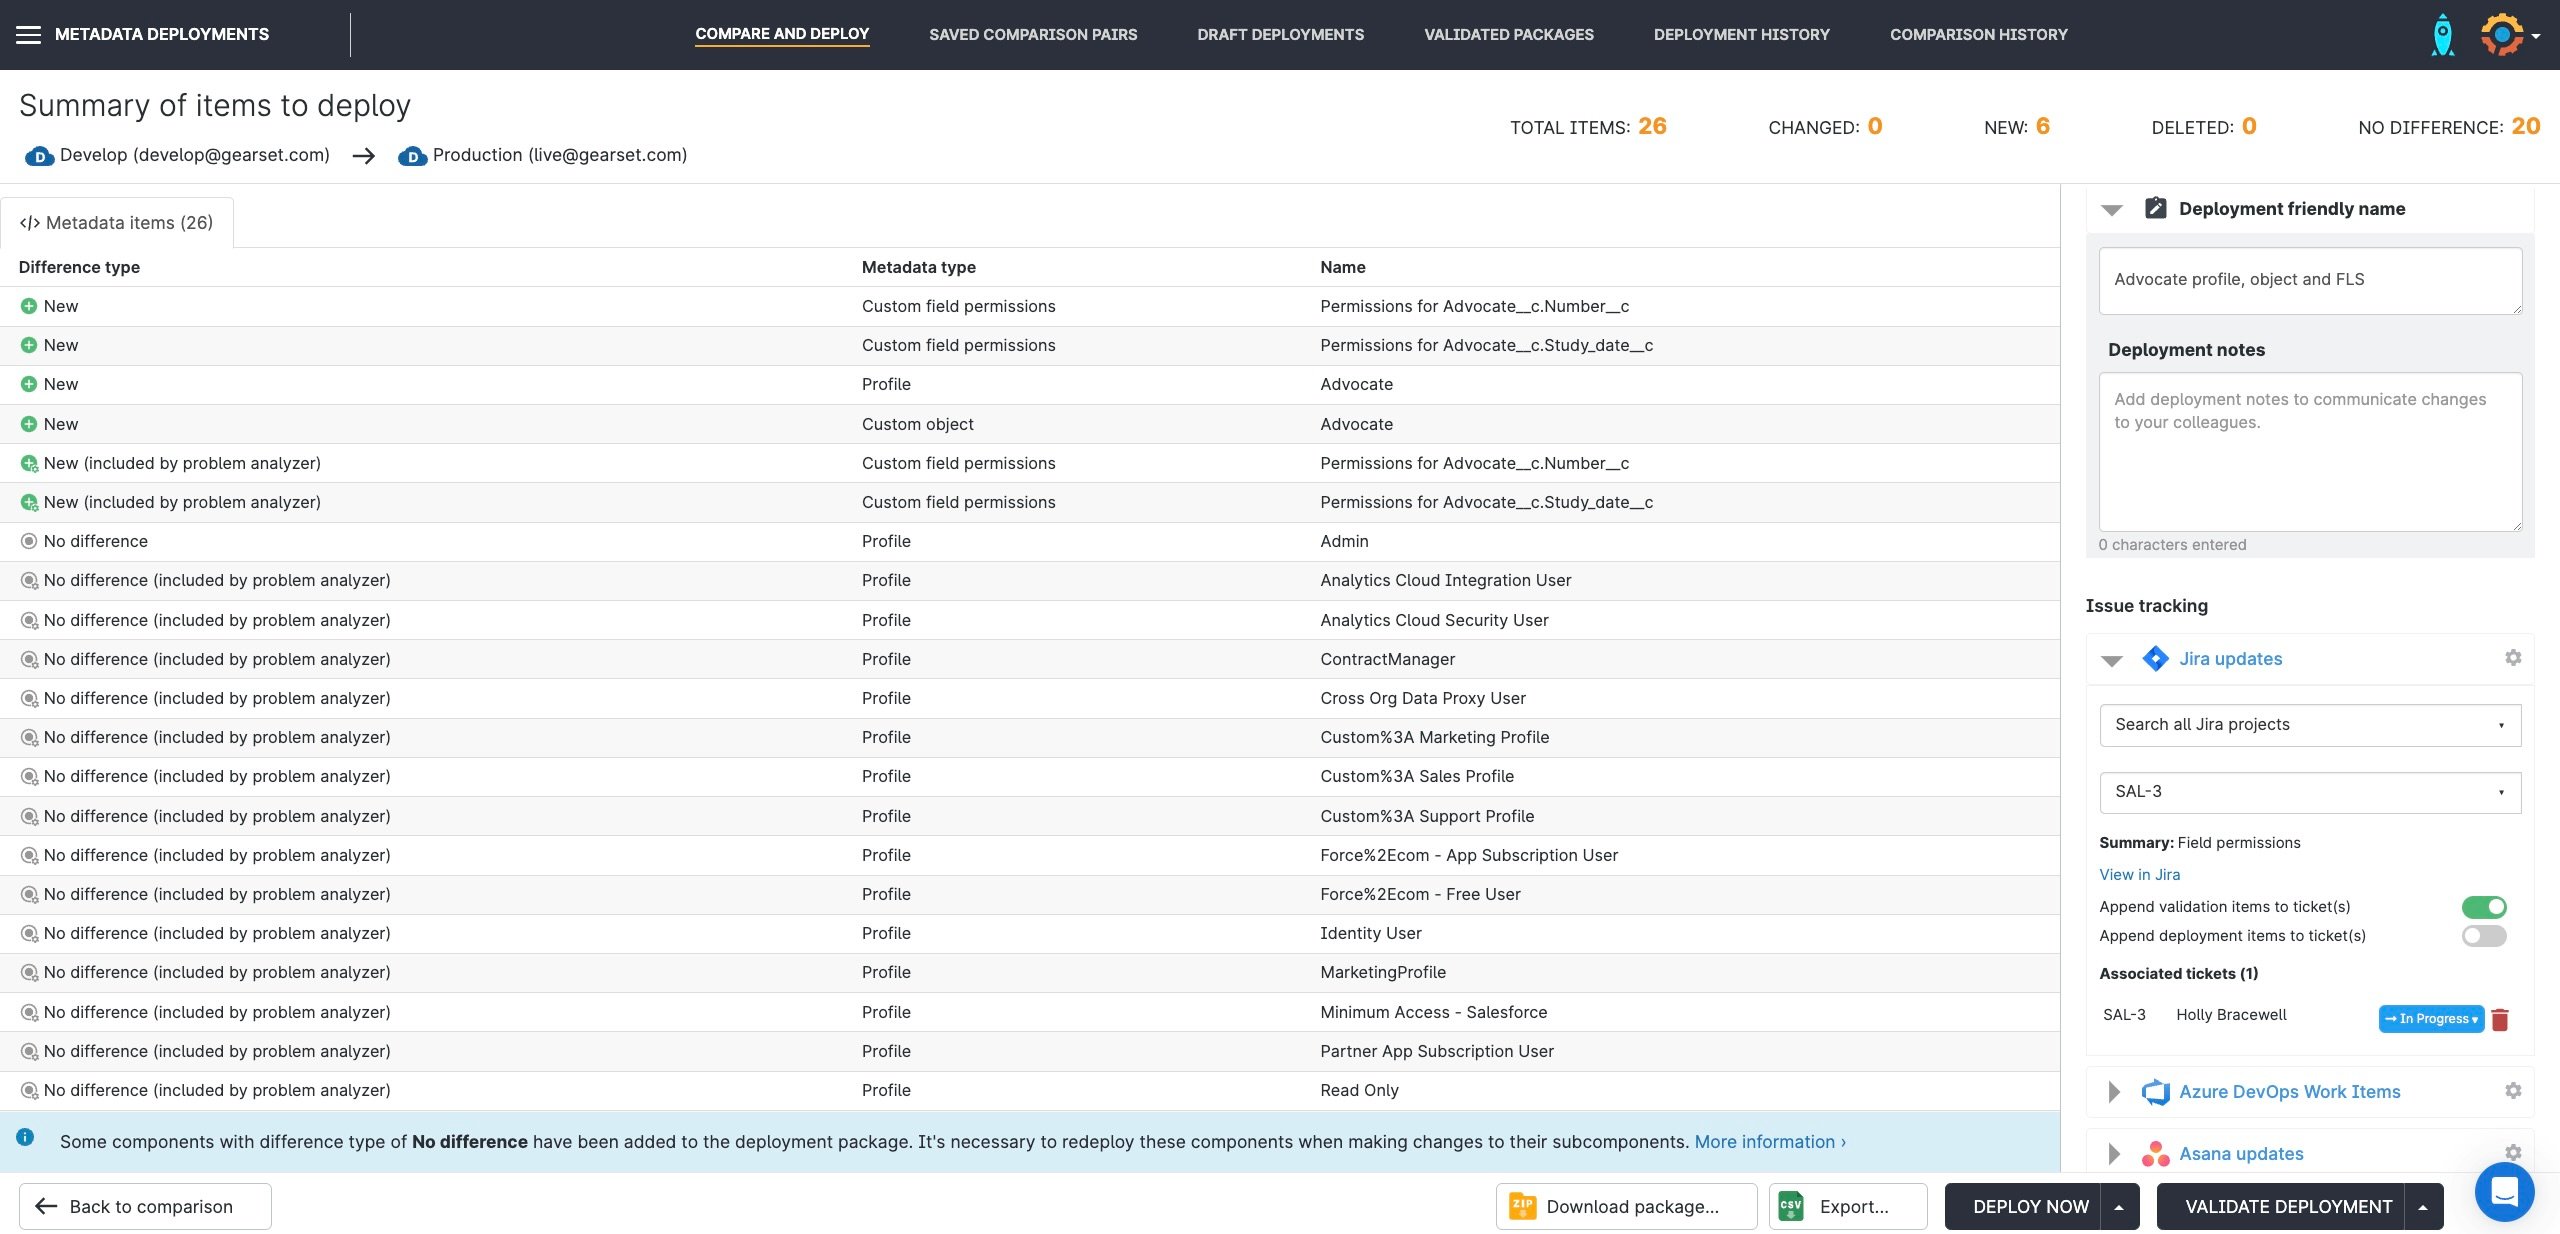
On the pre-deployment summary page, you can check the components you’re about to deploy, as well as giving the deployment a name, leaving notes, and associating Jira, Azure DevOps Work Items, and Asana tickets. When you’re ready to go, simply press Deploy Now
5. Review your deployment
Once the deployment has run, you’ll be given a summary of the deployment and can download a full PDF report at any time from the Deployment history page.
Gearset can build destructive packages just as easily, so you can delete FLS and other permissions on Profiles in just a few clicks. Once the permission has been removed from your source org, it’ll flag under the Deleted tab on your comparison page. Simply find the deletion you’re looking to make then build and deploy in the same way as above.
If you want to roll back any deployment made through Gearset, you can do so from the Deployment history page. Simply select the deployment you want to revert and Gearset will run a comparison between a snapshot of your org taken pre-deployment and your org in its current state. You can then choose whether to roll back the entire deployment or select only some components to be reverted.
How to deploy Field Permissions
When you’re ready to start deploying Field Permissions, Gearset’s deployment workflow is the same no matter what metadata type you’re deploying. Simply choose your source and target orgs (making sure the right comparison filter is applied), then begin to select the items you want to deploy.
Just like FLS, Field Permissions can be found nested under the relevant object in the comparison results. They can also be found and selected individually from within the Permission Set line-item.
Deploy Salesforce permissions with ease
Whether you’re ready to go with Field Permissions or are looking for an easy way to manage FLS while you get ready for Spring ‘26, Gearset is on hand to help. If you want to make permission management a breeze, start a free 30-day trial now with nothing to install in your orgs.
