Many teams use Digital Experiences — formerly known as Communities — to build sites, apps and portals on Salesforce’s Experience Cloud. While creating and customizing sites has never been easier, the deployment process for Digital Experiences can be difficult. Some teams even resort to building sites directly in their production org.
But help is on hand! Gearset provides an easy way to deploy your site, and is the only solution that lets you deploy individual components of your Digital Experience, such as single pages or branding updates.
In this in-depth article, we’ll explore the different metadata types you might end up working with, and the best way to deploy your Salesforce Digital Experience.
Are Salesforce Communities and Digital Experiences the same thing?
More or less — Salesforce rebranded Communities as Digital Experiences in its Spring ‘21 release. Old habits die hard, so you’ll still hear plenty of folks talking about Communities, Community Pages, Community Builder and Community Cloud. But in up-to-date terminology these are now Digital Experiences, created in Experience Builder on Experience Cloud.
You may also hear people refer to these as Lightning Sites. That’s because Experience Builder uses the Lightning framework also used for Lightning pages.
While Communities and Digital Experiences are essentially the same thing, they’re represented by two different metadata types: SiteDotCom and ExperienceBundle. Either metadata type can be used to deploy your Digital Experience site, but there are significant differences between them, and ExperienceBundle is definitely better.
Stop flying blind: How Truckstop brought clarity to a complex org
Why is ExperienceBundle better than SiteDotCom?
Problems with SiteDotCom
The SiteDotCom metadata type was originally the only way to deploy Communities. It represents your Digital Experience as a single .site file containing a blob (binary large object), and this poses a few challenges:
- The
.sitefile can’t be read by humans. - If multiple people each make their own changes to the Digital Experience, there’s no way to merge those changes together using SiteDotCom.
- SiteDotCom metadata can’t be broken up for deployments of individual components, e.g. of a single page. You have to deploy the whole Digital Experience every time you make a change.
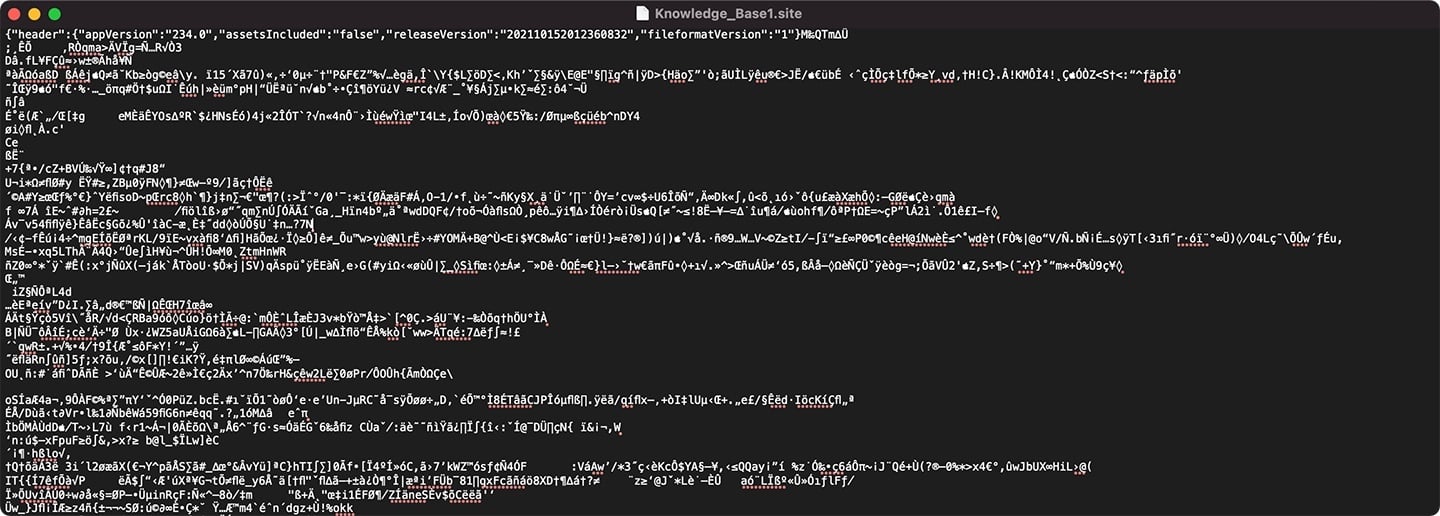
In short, SiteDotCom makes development and deployments a headache because the blob isn’t exactly user-friendly. This is what it looks like when I try to open the .site file that represents one of my Experience Cloud sites.

What’s more, Salesforce generates a different binary blob each time you fetch your SiteDotCom metadata from Salesforce. This means any comparison of the metadata in your source and target orgs won’t help you identify specific changes, because the whole file will look different. This doesn’t stop you deploying the right changes, but the lack of visibility is frustrating — and it can be avoided by switching to Experience Bundles.
The advantages of Experience Bundles
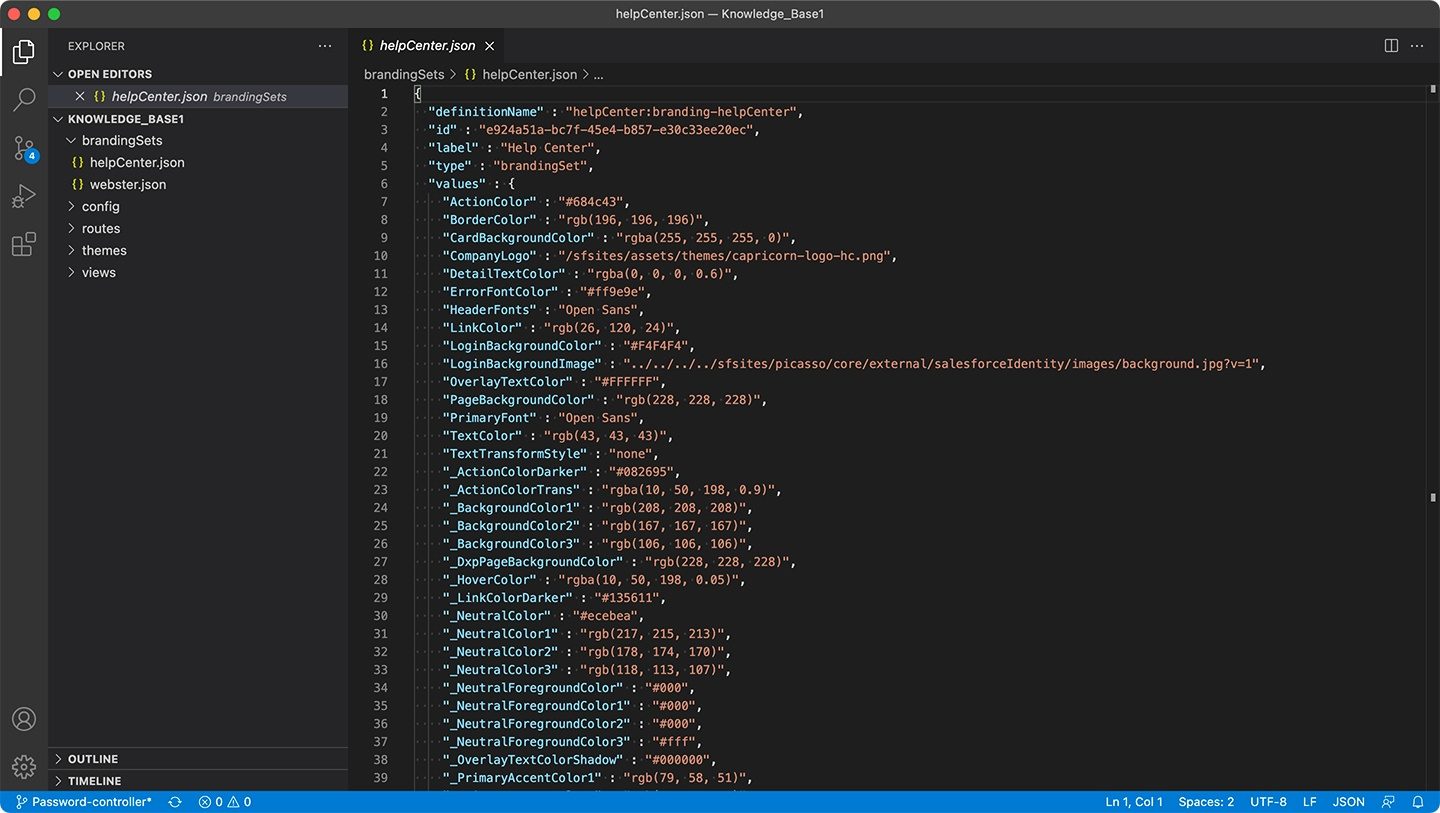
Salesforce released the ExperienceBundle metadata type in 2019, to provide a better alternative to SiteDotCom. Rather than one .site file, ExperienceBundle gives you a set of .json files within a sensible folder structure. These files are in plain text, which makes your Digital Experience metadata human-readable. And if you’re using version control, having several separate files makes it less likely that developers will update the same file and trigger a merge conflict. Here’s that same Experience Cloud site, now represented with human-readable .json files in a sensible folder structure.

By switching to ExperienceBundles and using Gearset for your metadata deployments, you’ll be able to deploy individual changes to your Digital Experiences — something that’s not possible with SiteDotCom or other deployment solutions.
Gearset is the only DevOps platform that compares the metadata in your source and target before each deployment, and this opens the door to clever handling of tricky metadata types such as Profiles and Permission sets. In the case of ExperienceBundles, Gearset breaks down the metadata so you can select individual components you want to deploy, then recomposes your selections as bundles that can be deployed over the Metadata API.
The value of precision deployments
It’s super useful to be able to deploy individual changes to your Digital Experience — there are so many elements to Digital Experiences that it’s a pain to deploy the entire site for each change. Consider how much customization is possible using Experience Builder, which gives you fine-grained control over every aspect of the site.
All of these Digital Experience customizations are described in your metadata, and if you’ve switched to using the ExperienceBundle metadata type, you’ll have an ExperienceBundle folder with the following subfolders, each containing multiple .json files of various types:
| ExperienceBundle folder | Files |
|---|---|
| brandingSets | branding_set_name.json |
| config | site_name.json, languages.json, loginAppPage.json |
| routes | page_name.json |
| themes | theme_name.json |
| variations | experienceVariation_name.json |
| views | view_name.json |
Imagine you’ve made changes to just one page of your Experience Cloud site, or you’ve been working in VSCode on particular .json files in your ExperienceBundle folder. The quickest and best way to test or release your work is to deploy only what you’ve changed to the relevant environment in your pipeline. Deploying the entire site or the entire folder structure is unnecessary.
Only deploying the files you’ve changed also helps to avoid accidentally overwriting changes made by your teammates, whether you’re deploying to version control or straight to a Salesforce org. Salesforce DevOps works best when you’re promoting small but logical slices of work along your deployment pipeline, shipping small and often to your end users.
How to transition from SiteDotCom to Experience Bundles
Switching to use ExperienceBundle instead of SiteDotCom is pretty straightforward. You just need to enable ExperienceBundle for deployments via the Metadata API — a step covered in the walkthrough below.
Bear in mind that SiteDotCom metadata can still be retrieved even after you’ve made the transition to ExperienceBundle. You should leave out the SiteDotCom blob from your ExperienceBundle deployment package. As well as being redundant, it can also cause an otherwise-fine deployment to fail with the following error message: You seem to be missing site. Add the file to your bundle and try again.
How to deploy Digital Experiences
Deploying a Salesforce Community or Experience Cloud site can be a complex process, but with the right preparation, you can ensure a smooth and successful deployment. In this section, we’ll cover the essential steps to prepare for deployment using the Metadata API.
So how do you manage the deployment process for a Digital Experience or Salesforce Communities site from a sandbox org through to production? If your Digital Experience doesn’t already exist in your target environment, you can deploy the whole site in a few steps using Gearset. If your site already exists in the target org, and you just want to deploy specific changes, you can head straight to step four.
If you want to follow this walkthrough yourself, start your free 30 day trial to see Gearset in action for yourself.
1. Enable Digital Experiences in your orgs
Before you can deploy any Digital Experiences between your orgs, you’ll need to enable Digital Experiences in both the source and the target environments. If you forget the target org, your deployment will fail with the error message: Not available for deploy for this organization.
Here’s how to enable Digital Experience in your orgs for deployment via the Metadata API:
- Go to Digital Experiences > Settings in your org setup.
- Check the Enable Digital Experiences box.
- Choose an available domain name and hit Save.
- Also in Settings, scroll down to the Experience Management Settings section and check the box next to Enable ExperienceBundle Metadata API.

Make sure your target org isn’t on an older Salesforce version than the source — that will cause an Experience Cloud deployment to fail with the error: Sorry, your target org is running on an earlier version of Salesforce and can’t accept the current file. Please wait for your target org to be updated and try again.
You can’t retrieve and deploy ExperienceBundle across different versions of the API. By default, Gearset uses the highest common API version for your deployment, so this issue will be resolved automatically. But note that a number of Experience Cloud features are only supported in more recent API versions.
2. Deploy your Apex
When you create a Community in Salesforce, a variety of supporting Apex pages, components and Apex classes are automatically generated by Salesforce to provide the basic scaffolding for your site. This scaffolding includes code and pages to handle user registration, login, password resetting, and so on. If you forget these in your deployment, you’re likely to receive an error along the lines of In field: indexPage - no ApexPage named CommunitiesLanding found. In Gearset, the default metadata comparison filter includes all things Apex.
3. Deploy your site
To deploy the site itself, make sure you select the relevant metadata types in Gearset’s metadata filter:
- Experience bundle
- Network (Community)
- Custom site
- Permission sets (if changed)
If you don’t include these metadata types, you can expect to get error messages such as: In field: Network - no Network named Gearset found; In field: Site - no CustomSite named Gearset found. Select all the relevant items from the comparison and proceed to deploy.
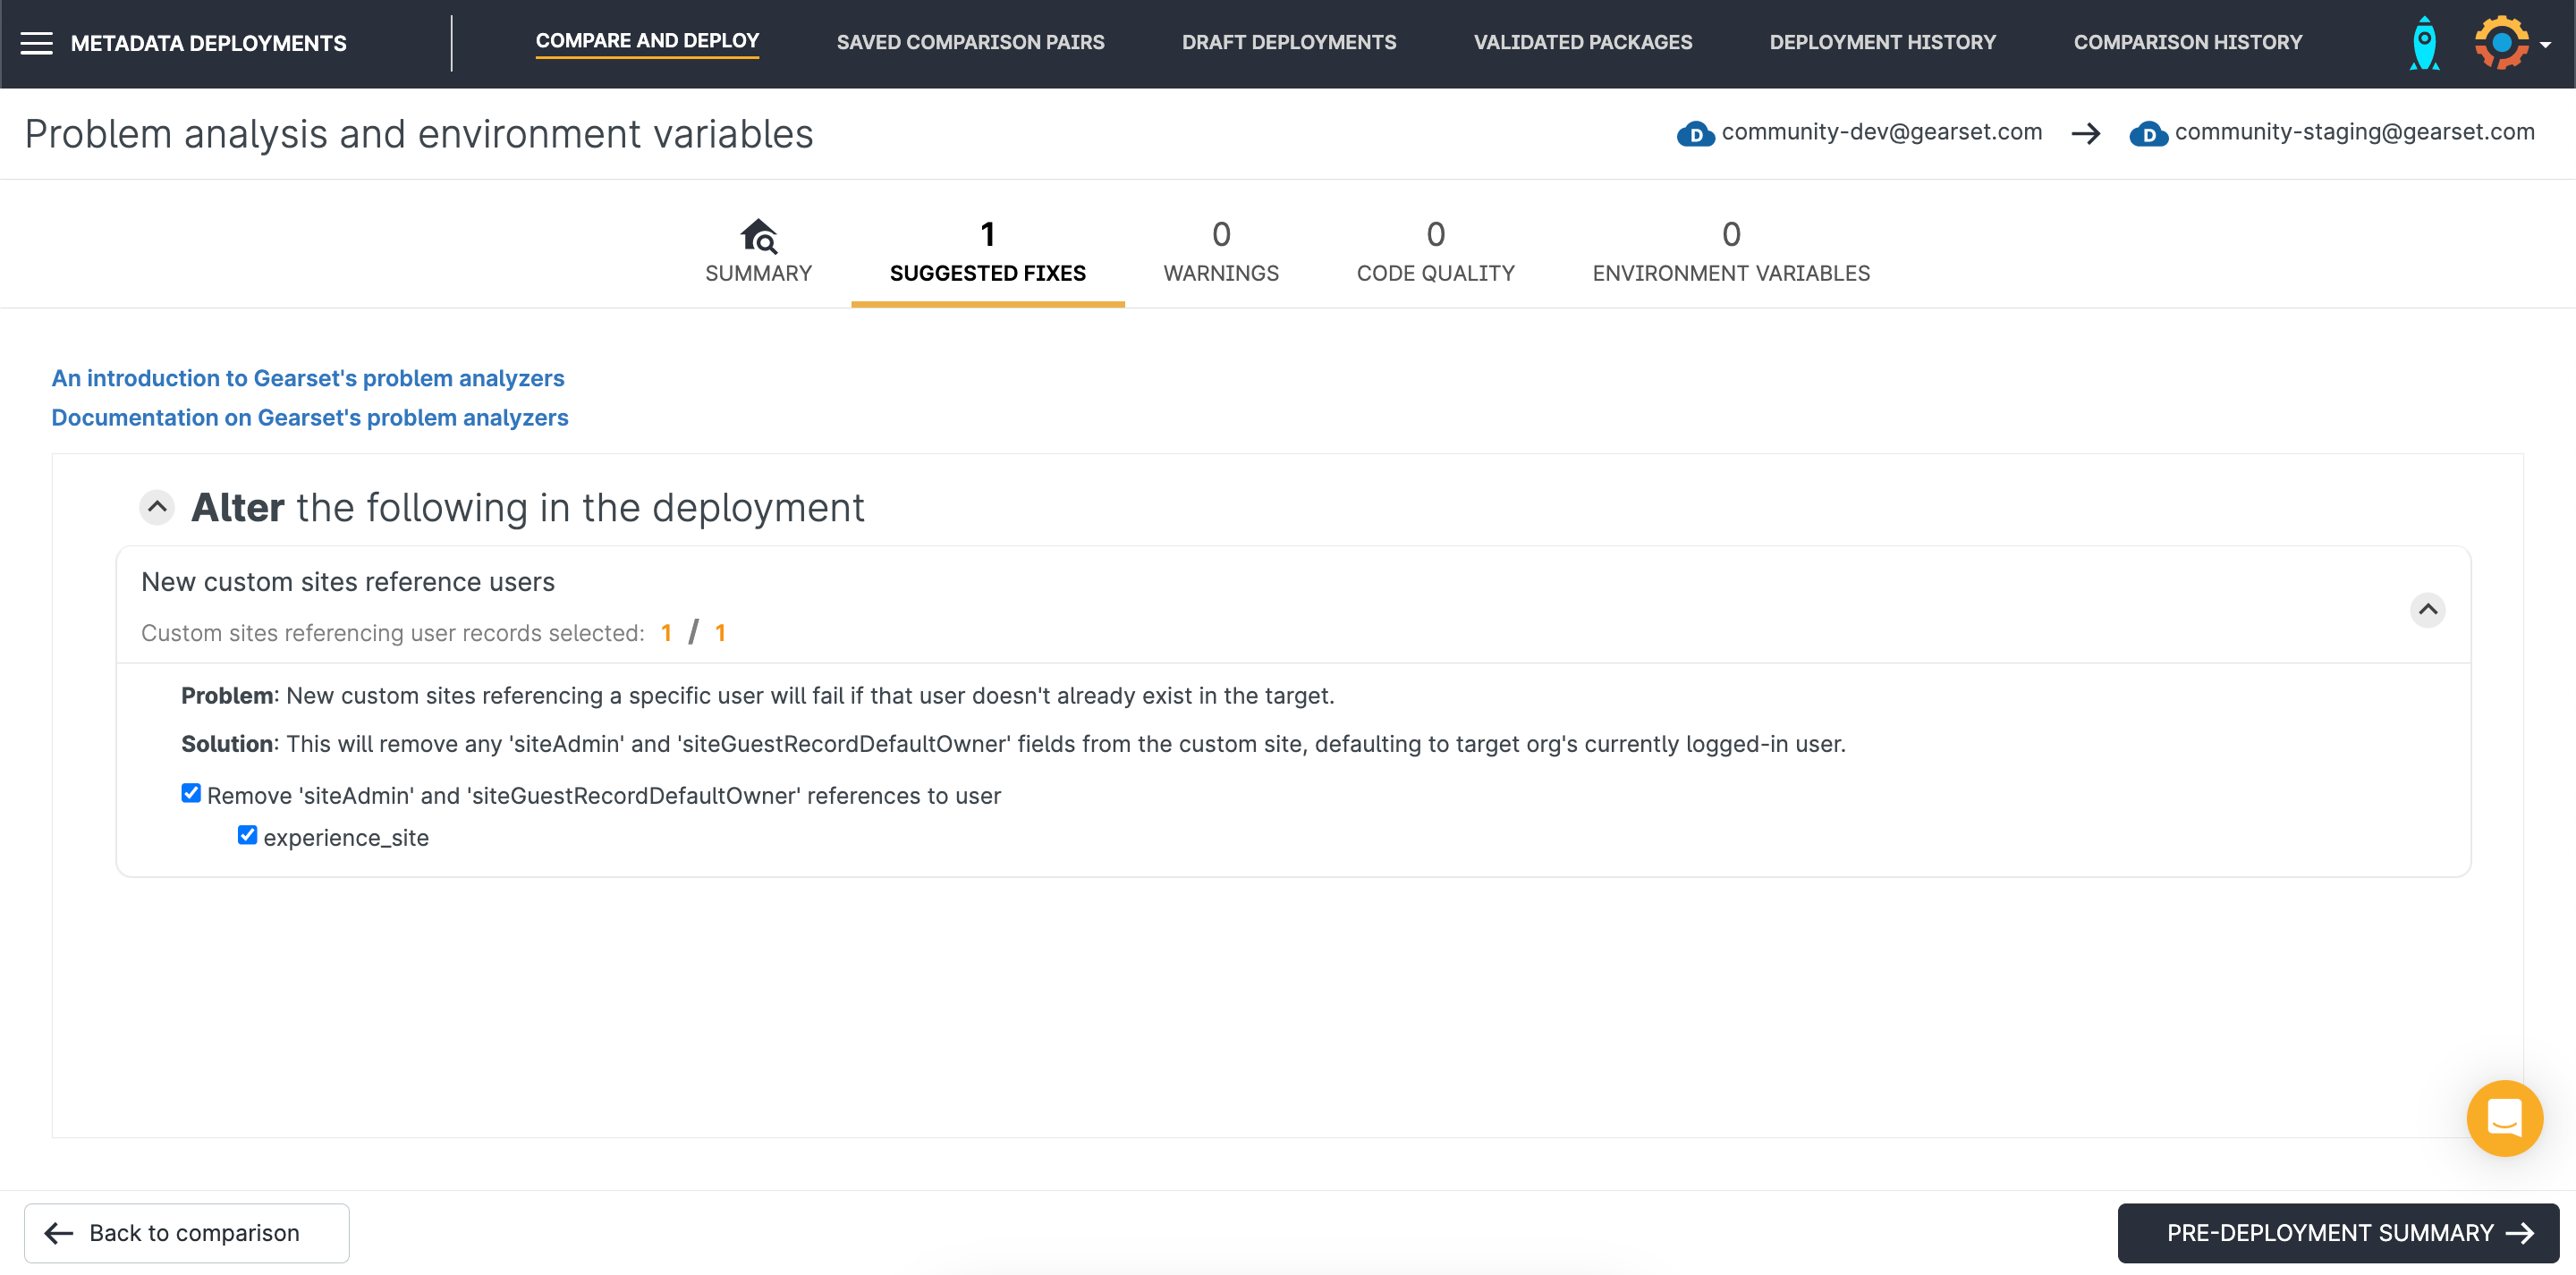
One common error message when deploying a Digital Experience is In field: siteAdmin - no User named claudia@gearset.com found. This occurs when the user specified as siteAdmin in the source doesn’t exist in the target. Gearset has a problem analyzer to solve this issue for you. If the site exists in the target org, Gearset uses the existing siteAdmin value from the target. If the site doesn’t yet exist in the target, the user who connected the target org to Gearset is added as the siteAdmin. All you need to do is review and accept the suggested fix before deploying.

4. Deploy changes to an existing Community (Digital Experience)
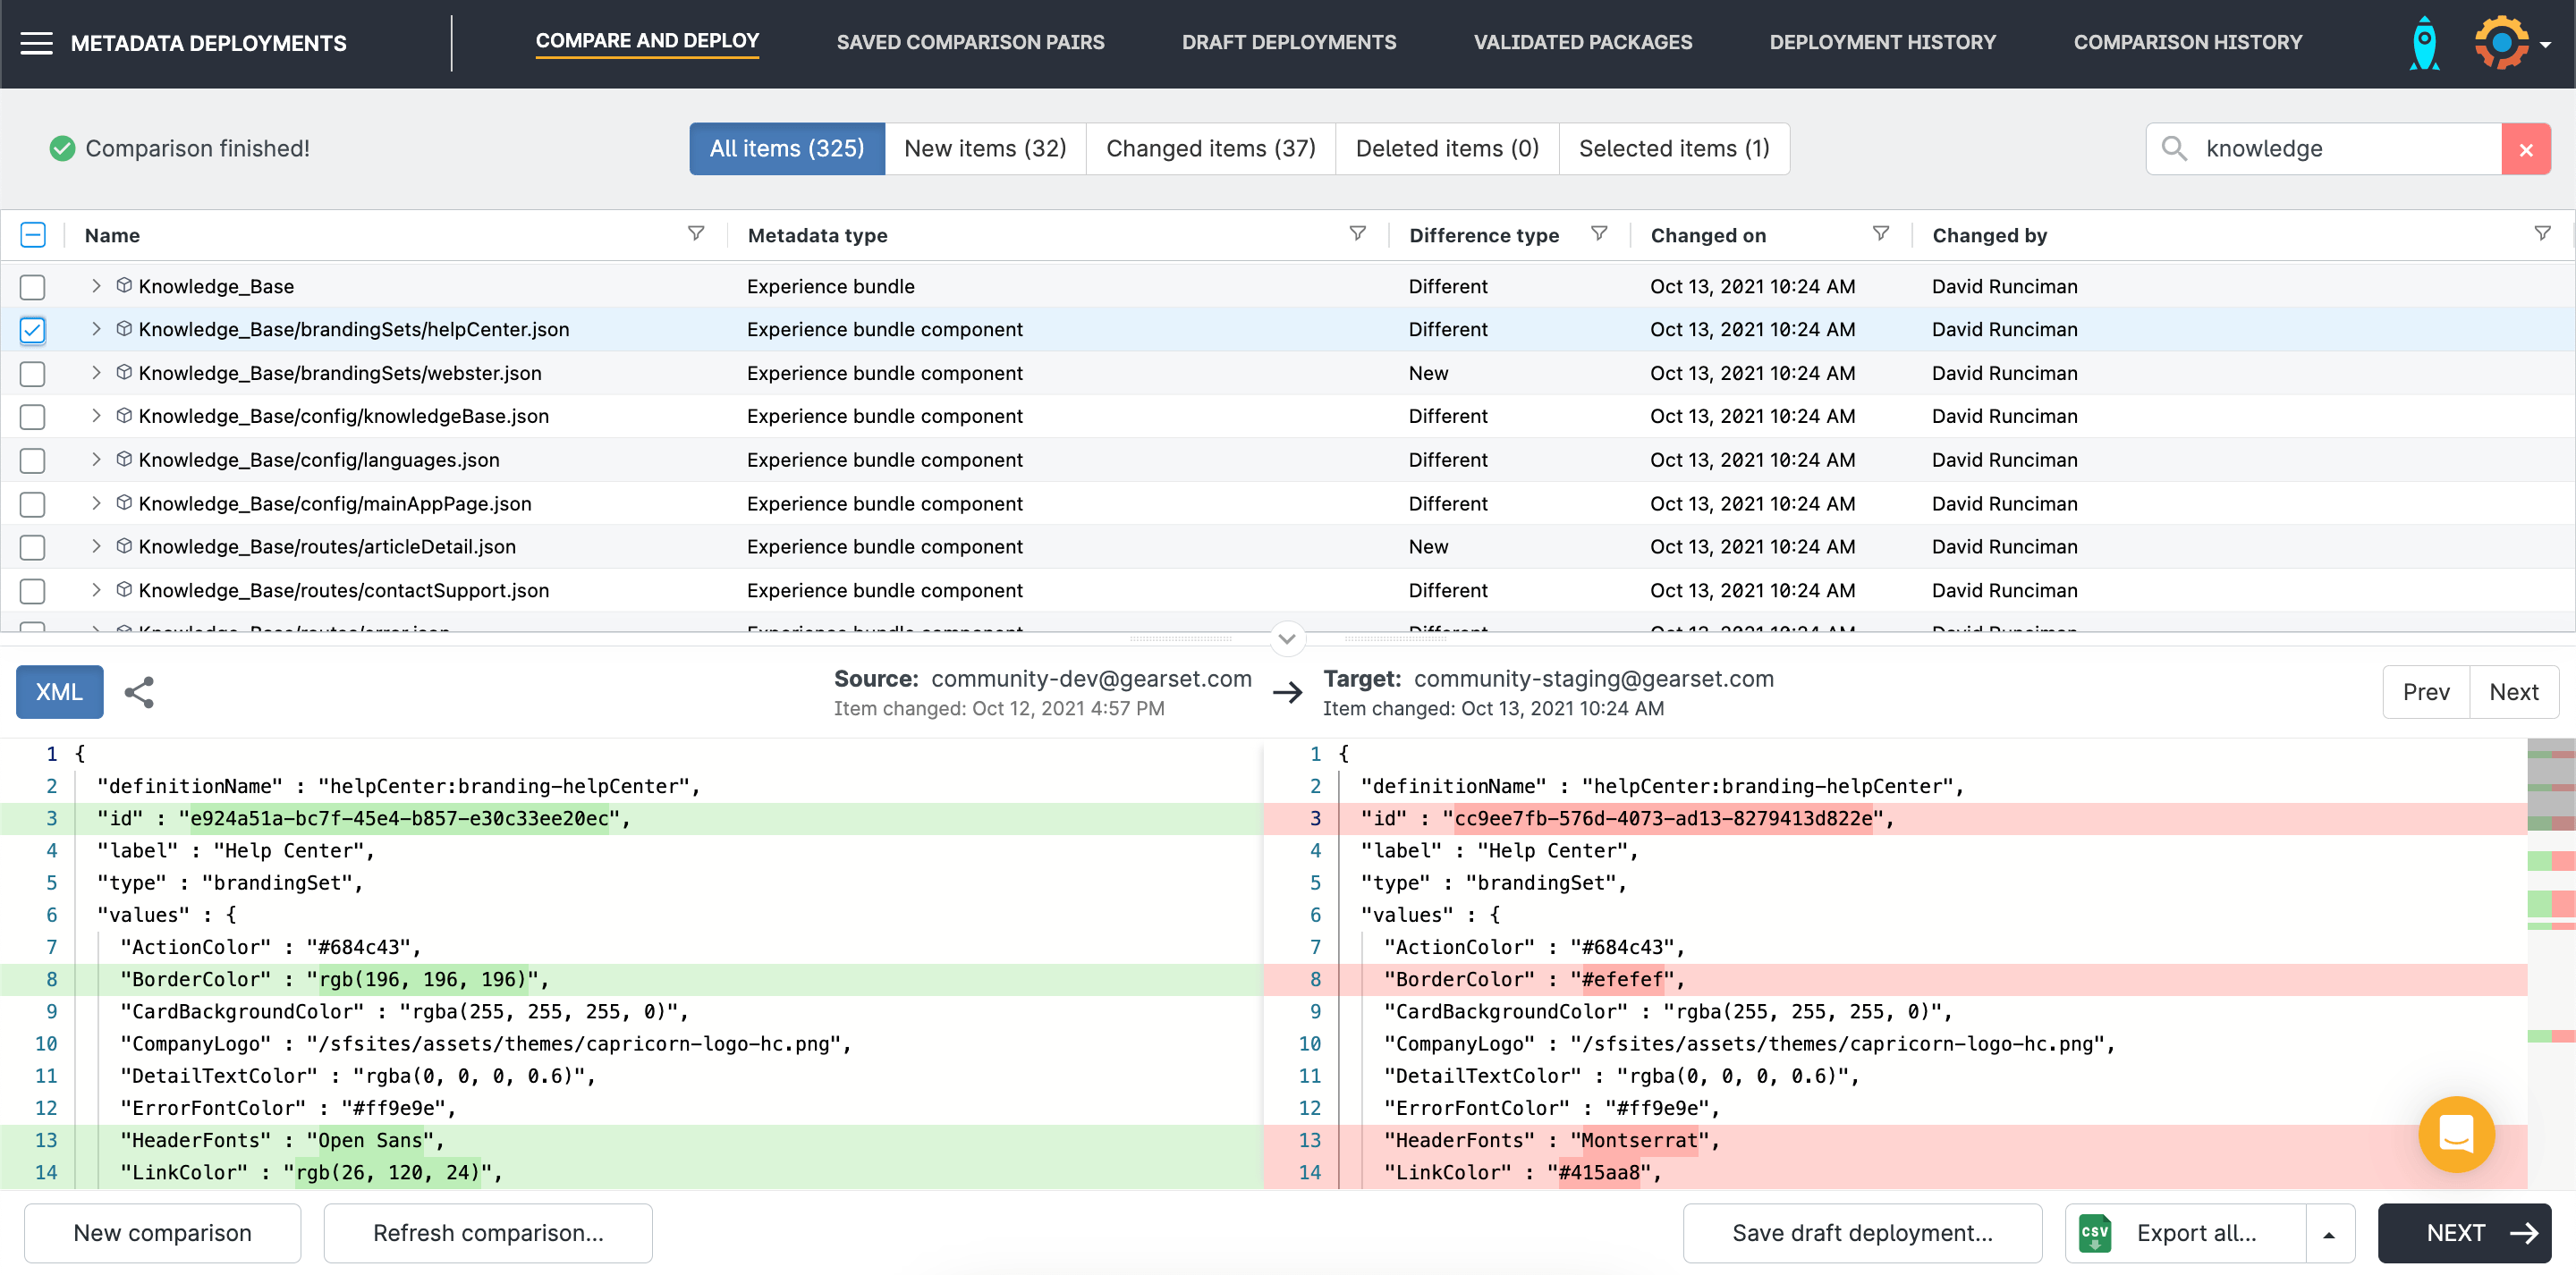
Once your Experience Cloud site is in the target environment, you can deploy any further changes that you make in the source environment as part of the deployment process. When you compare your orgs using Gearset, you’ll see the entire ExperienceBundle on one line, such as the Knowledge_Base bundle in the example shown below. But Gearset also breaks down your ExperienceBundle into its constituent components, which are all of the individual .json files containing your metadata.
You can view individual .json files, see the exact differences between source and target, and select which files you’d like to include in your deployment package, rather than deploying everything. In this example, we’ve selected the file that determines the branding of our site’s help center — you can see that changes have been made to the colors and font.

If you’re wondering how to deploy Community pages as you create them, without needing to deploy your whole site, you’re not alone. Gearset allows you to deploy specific components of your Digital Experience. What end users see as a page on the site is represented in your ExperienceBundle metadata as a .json file in the ‘views’ folder. In the comparison grid, look for the Experience bundle component that has the relevant name: {Digital_Experience_Name}/views/{pageName}.json. In this example, we’ve selected the .json file that represents a homepage variation of our site for anyone based in Chicago.

For other individual changes, you’ll need to include the relevant metadata types in your comparison and deployment. If you’re wanting to deploy the navigational sections of your site, select the Managed topics (Community) metadata type. If you have images, you’ll need to include the Content asset type. Gearset has a ‘Default Experience Cloud’ metadata filter, which includes 15 types you’re likely to end up deploying.
5. Publish your site
You’ll need to publish the site in your target org to get your changes live. From Setup, search “All Sites”, find your site and click Builder to open up Experience Builder. It’s always a good idea to preview your changes first, then hit Publish when you’re ready.
Try deploying your Digital Experiences!
If deploying Digital Experiences (or Communities — if that’s how you still think of them!) is something you wish was easier, learn more with this free video guide from one of our Salesforce experts.
And for smoother deployments, try using Gearset. No other Salesforce metadata deployment solution has the capability to deploy such fine-grained changes to your sites, so it’s well worth seeing if it makes all the difference to your development and release process.
Start your free trial today and let us know how you get on! Gearset catches missing dependencies and offers full or partial rollback, plus many more essentials for ensuring your deployment success on Salesforce.


